How to create a simple reminder
- 29 Feb 2024
- 4 Minutes to read
- Print
- DarkLight
- PDF
How to create a simple reminder
- Updated on 29 Feb 2024
- 4 Minutes to read
- Print
- DarkLight
- PDF
Article Summary
Share feedback
Thanks for sharing your feedback!
All plan types with varying limitations | |
Permissions |
|
Platform(s) | Web/Browser, Mac app, and Windows app |
Why create an automated reminder in Airtable?
There are numerous situations where setting a reminder can be helpful. This article walks through how to set one up using automations.
For the examples used in this article, we are using our Project Tracker template found here in our template gallery.
This article showcases the "When a record matches conditions" trigger, and one of our Google Workspace actions that "Send an Email" via a connected Gmail account.
Creating a simple reminder automation
Step 1: Create a date field
The first step is to use a date field - we'll create a new one by clicking the + icon to the right of the existing fields. We'll then select the date field type and name the field “ Reminder”.
With every date field, you have the option to use just a date or to optionally use a specific time. For this example, we'll toggle on the option to include a time field.

Step 2: Add a formula field
The next step is to add a short formula that will compare the current time (localized to your device) with the date and time entered in the reminder field. Add a new formula field, name the field Trigger Reminder, and copy and paste the formula below into the formula field.
IF(
     AND(
          {Reminder},
          NOW() >= {Reminder}
     ),
     "Trigger Reminder"
)
This formula checks to see if there is a date/time entered in the reminder field. If there is a date in that reminder field then it will check whether the current date/time is equal to or past NOW(). If the "Reminder" date field is now or past now, then it will display the string" Trigger Reminder" in the formula field for that record. The automation that we'll configure in the next step uses the formula to trigger the reminder.
Note
The process in this article is a workaround involving the use of the NOW() formula function, and has some limitations. Generally, NOW() updates approximately every five to ten minutes when a base is open (although this timing may vary slightly). If the base is closed, it will update approximately every hour when the base has time-dependent automation triggers or actions. If native automation delays would be a helpful feature for you we'd love to hear more about your interest!
Step 3: Add an automation
To create our reminder we'll need to add both a trigger and an action to an automation. The trigger will fire based on the formula field created in the last step, and the action will allow us to send the reminder to a variety of sources (email, Slack, etc).
To start creating an automation, from the open base of your choice click on Automations in the upper left corner of your screen to open the automation configuration window. Click the + Create automation option to begin the setup process. If you would like, you can rename the automation right away to make it easier to understand what it does.
Step 4: Add a trigger
Select the trigger called When a record matches conditions. Next, select the table you're using (the “Tasks” table in our example), then add a condition for when the {Trigger Reminder} formula field you created contains the text: Trigger Reminder.
 Lastly, you'll want to run a test to make sure your trigger is set up correctly. You will need to have at least one record in your table match the trigger condition (the Trigger Reminder field has the text Trigger Reminder) for your test to run successfully.
Step 5: Add an action
In this example, we're going to configure an email reminder using Gmail. Start by clicking the "Add action" button below your trigger, and selecting the "Send email" option under Gmail. After connecting your Google account you can then configure all of the email fields and any details you want to include for the reminder.
In the example below, the task name, its related project, and the assignee is included in the reminder. This record information can be added by clicking the plus symbol to the right of the field you're filling, and selecting the appropriate data from the record.

Once you've added all of the information you want to include in the reminder, run a test to make sure everything is configured correctly. You should receive an email like the example below within a few seconds.

Step 6: Test the automation and turn it on
Once you've successfully tested your automation make sure to turn it on - and then your reminder automation setup is complete!
FAQs
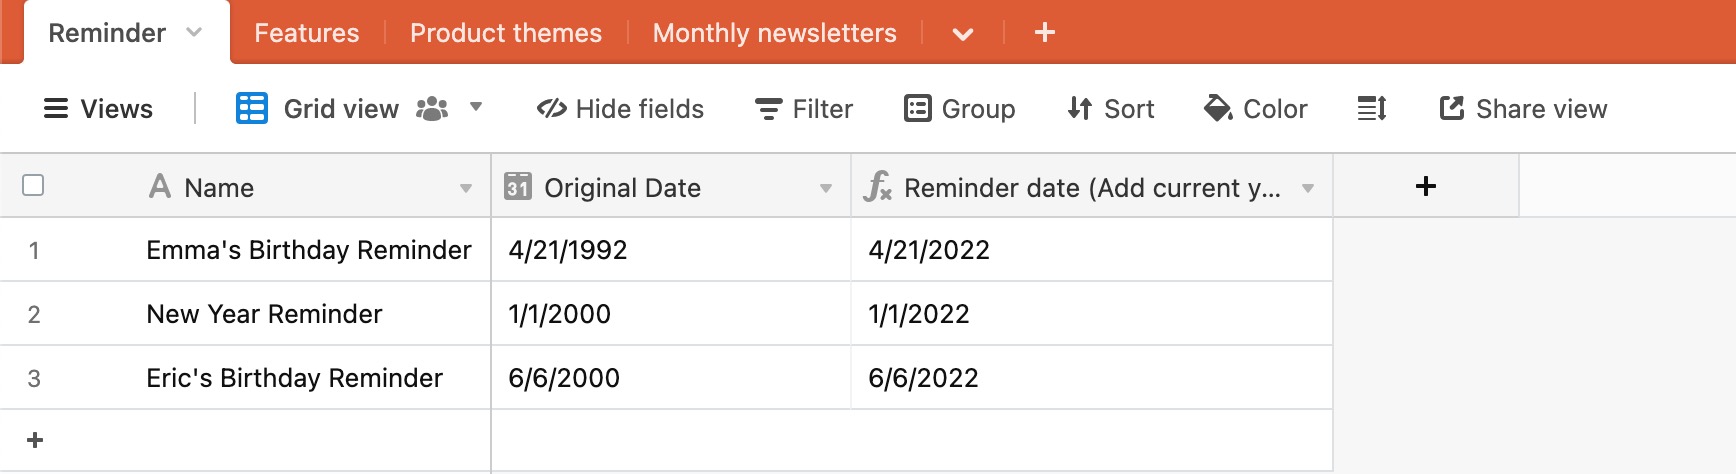
Does this reminder workflow work for recurring dates in the past such as birthdays or anniversaries?
No, it does not. As a workaround, you could try adding a formula field to your base that would append the current year to the end of a date field. So, we would want to configure a formula that references the "Original Date" field and then adjusts that date to the current year instead. Here's one example of what that formula could look like:
DATETIME_PARSE(
 CONCATENATE(
  DATETIME_FORMAT({Original Date}, 'MM/DD/'),
   DATETIME_FORMAT(
     TODAY(),"YYYY"
                                      )
                              ),
        "MM/DD/YYYY"
    )
Comparing this to the example used above, instead of the {reminder} field, we would use the {Reminder date (Add current year)} field. In your base, remember that you will likely name your fields differently than in this example. Therefore, you'll want to create a customized formula that matches the names of the fields you are referencing.
Was this article helpful?