List view overview
- 05 Mar 2024
- 8 Minutes to read
- Print
- DarkLight
- PDF
List view overview
- Updated on 05 Mar 2024
- 8 Minutes to read
- Print
- DarkLight
- PDF
Article Summary
Share feedback
Thanks for sharing your feedback!
Plan availability | All plan types |
Permissions |
|
Platform(s) | Web/Browser, Mac app, and Windows app |
Related reading | Linked records - Linked records are used to inform the hierarchical relationships of the varying levels that you will decide on for your list view. |
Airtable terminology |
|
Overview of the list view
Learn about the ways the List view can help you and your team create, edit, and manage hierarchical data within Airtable. In the article below, we'll walk you through the steps to build out a basic list view and also point out some of the considerations when creating and interacting with this view type.
The list view type makes it easy to create, edit, and manage hierarchical data — whether it's projects and tasks, campaigns and deliverables, or a product roadmap and features — all within Airtable. This helps to reduce time spent building in Airtable and improve efficiency. Ultimately, you'll use linked record relationships to combine data from multiple tables into a single List view type. This feature works well for:
Product teams that would like to break projects down into features, features down into tasks, and take bulk actions on sets of tasks (like adding them to a particular sprint) all in one place.
Marketing teams that would like to create intuitive performance rollups of deliverables to campaigns to initiatives, allowing them to view the cascading impact.
Setting up a new List view
First, you'll want to navigate to the table that will represent the lowest level in the hierarchy of the view you are creating. There is a maximum of 3 levels that can be set.
The next step is to add a new List view from the sidebar on the left. Click the List option.
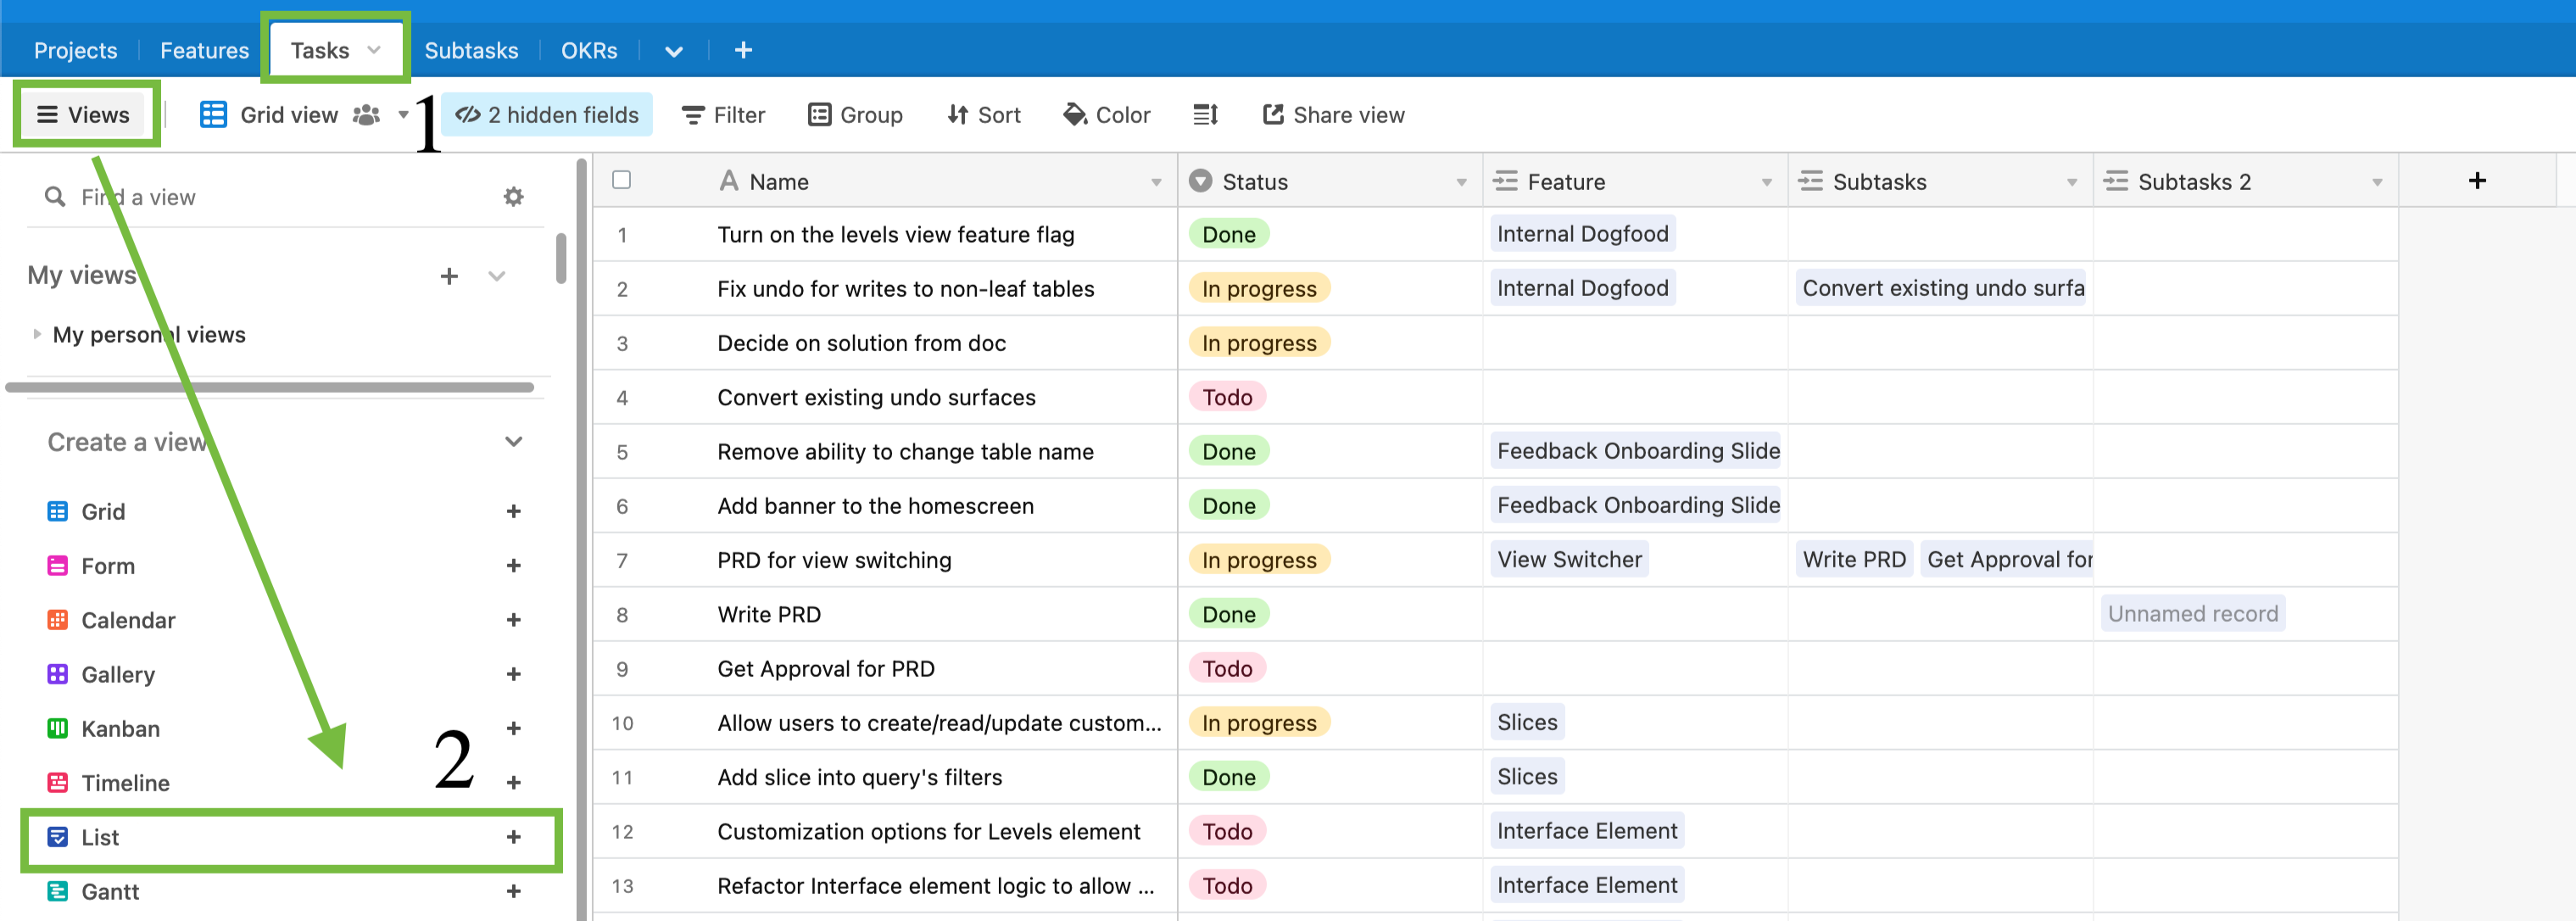
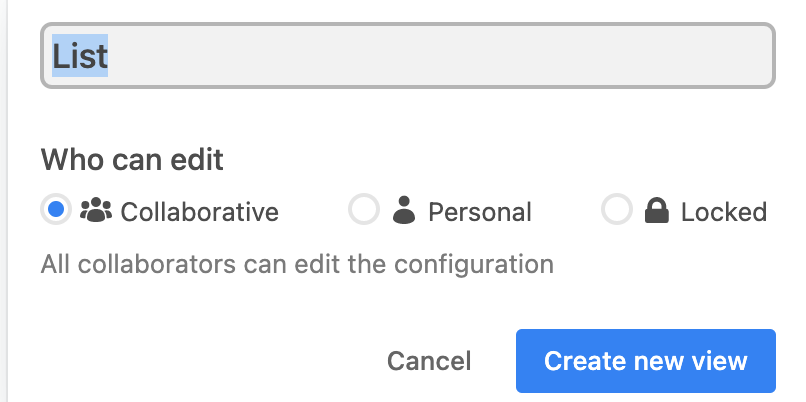
Next, set the name and edit access of the view, and then click Create new view.
Then, click Set levels or Try now.
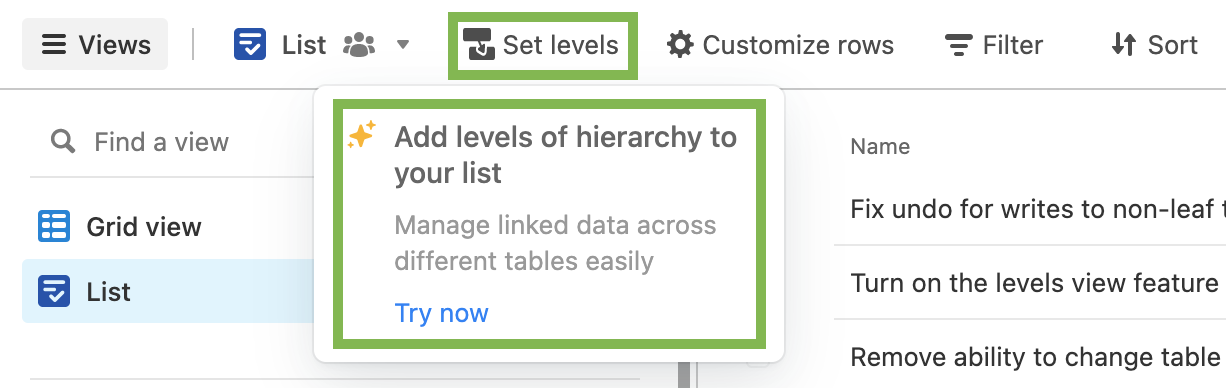
This will open up a configuration window that will help guide you through the initial creation of the new view. Click Get started and then set which table to display at each level by clicking +Add level above. You can also create a new table if the table doesn't already exist from the Select table dropdown. If you do choose to create a new table, you'll likely want to customize it before proceeding ahead. When you are finished setting the table hierarchy click Next.
Note
Level 1 will default to the table you are building the view in. If you'd rather have another table's data represent level 1, then exit the configuration window and create the new List view in that table instead.
Next, you'll set which linked record field will link each of the tables together. A few notes on behavior here:
If a table that you selected in the previous step contains no linked record fields that are connected to the list below it, then a new linked record field will be created when the view is created.
If a table contains at least one linked record field, then we will choose a linked record field by default.
For tables that contain multiple linked record fields, if that default linked record field isn't correct, then you'll want to choose the appropriate field for your use case.
For the first level, there is an additional option to Enable nested records. These nested records are related to other records with a self-linking linked record field. This option is great to include when you want to break down records in Level 1 into smaller nested records.
Once you are finished creating the linked record field relationships click Next.
In the final setup window, you'll choose which fields to display from each of the tables that you've connected. It's a good idea to only include the most necessary fields for the audience that will be interacting with the view. Once you are finished configuring which fields to show click Done. In most cases, you'll want to further configure the view which is covered in the next section.


Adjusting a previously configured List view
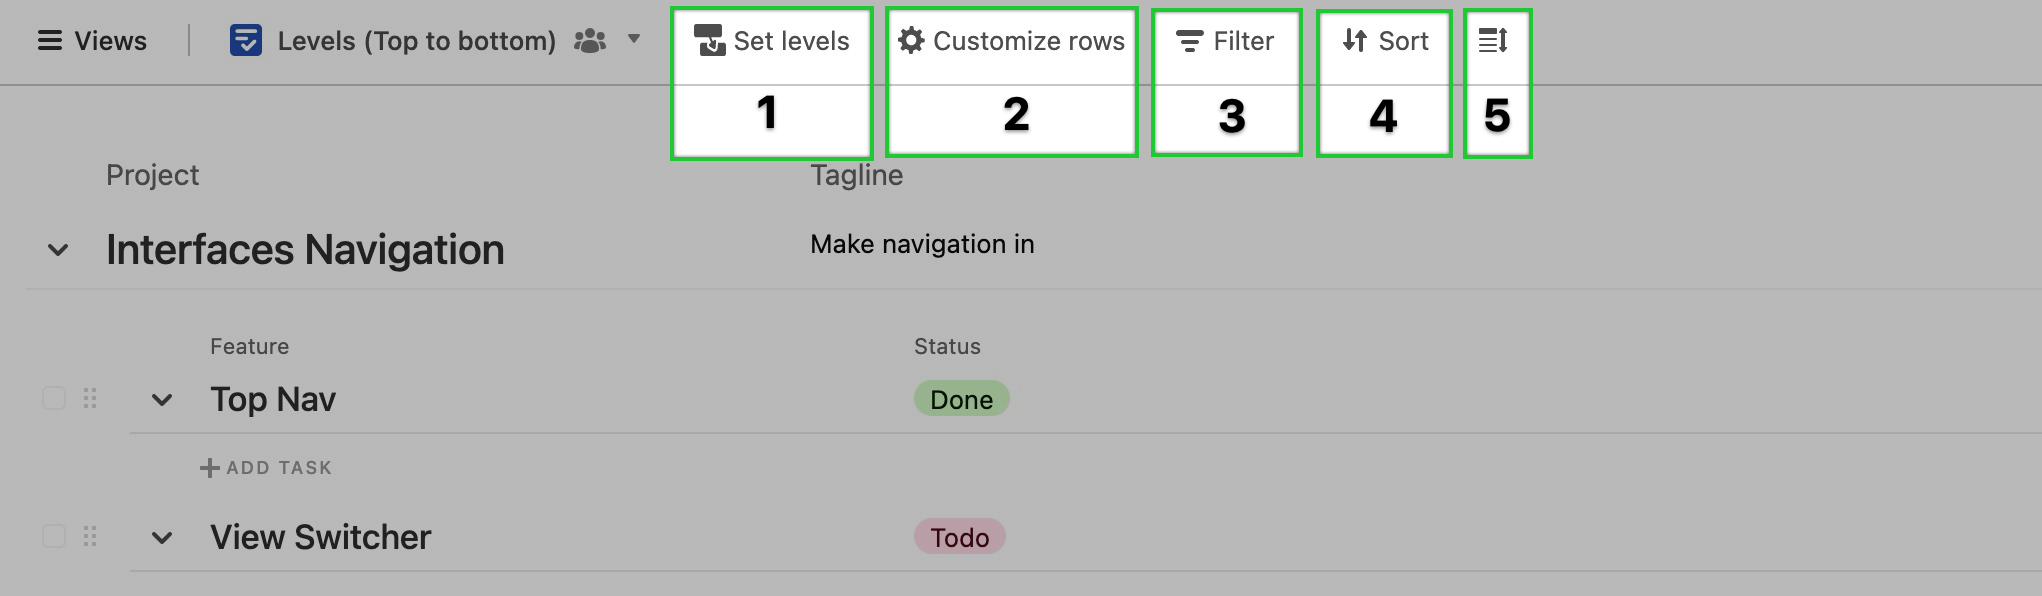
Additional view options include:
Set Levels - If the initial setup of the view didn't turn out in the hierarchical order you expected, then you can adjust that order or choose another table to use here. You'll also be able to toggle on/off the option to Enable nested records below Level 1.
Customize rows - This option allows you to set section visibility, configure a prefix for each item in the list, and adjust the visible fields for each level. Prefixes are essentially a checkbox field that provides an easy way for you and other colleagues to know when an item has been completed.
Filter - Here you can choose to filter out certain records. Since this view includes records from different tables across your base, filters can be applied for each of the levels (tables) connected to your view. It's important to note that when you click on the Filtered option only the filters associated with the level chosen will appear. You'll want to click through each level to see which filters may have previously been applied.
Sort - Similar to the filtering option above, sorting behavior can be configured for each level. The same considerations apply here.
Row height - This option allows you to adjust the row height of each level. In list views that include long text fields or image attachments, changing the row height will give users more screen real estate for context.
Rename what records are called for each level - To rename what each record in a List view is called (i.e. "Task" vs. "Record") use the customized terminology feature.

Interacting with a List view
Now that you have a List view created, there are a few ways to interact with the view. Keep in mind that the ability to perform the actions listed below will depend upon each user's permissions.
Create new records
There are a few different ways to add records in the List view:
New records can be added to levels 2 and 3 using the + actions below the last record in each level (shown below as +Add task and +Add feature on the left side).
To add new records for any level use the blue and white plus button in the bottom right corner of the view.
Finally, pressing Enter at the end of the first column's text field will make a new record (similar to shift+enter in other views, but here, you can just press Enter).

Move/Link records
Moving records around in a List view will affect the linked record field that connects the levels together. In the GIF below, you'll see that a blue highlight will show up when the record can be moved to a new level location. Level 1 records can be moved to link over to different level 2 records. If nested records are enabled, then level 1 records can also be moved to link with another level 1 record. Level 2 records can be moved to link over to different level 3 records. Notice below that moving the record will replace the former link with the new location's link.
.gif)
Edit records
If a user has owner, creator, or editor permissions, then they will be able to click into a field and edit it. Users can also expand records, to edit them. Keep in mind that custom field editing permissions may prevent edits from being made.
Expand records
When hovering over a record, whenever the finger-pointing icon appears click to expand that record.
Delete records
To delete one or many records check the box located next to each record and then right-click to bring up the option to delete the record or delete all selected records if you have checked multiple records.
Additionally, you can right-click a record to bring up a menu of additional options allowing you to duplicate, expand, collapse, copy the record URL, or delete. 
FAQs
What is a list view and what makes it unique from other view types?
The list view type makes it easy to create, edit, and manage hierarchical data — whether it's projects and tasks, campaigns and deliverables, or a product roadmap and features — all within Airtable. List View is built for creating and managing simple or complex projects, whether a user is looking to manage a single product roadmap or marketing campaign, build company-wide OKRs, or even manage the episode production of a TV show’s season.
Projects typically have a number of tasks, and with List View, you can easily organize those tasks based on importance, urgency, deadline, status, or another category. This is the only view where you can see multiple fields across different tables at once.
When should I use a grid view versus a list view?
In a base, it can be helpful to use a list view when you want to look at fields across multiple tables. This is more powerful than using a grid view that groups records based on a linked record field because you can actually bring in fields from multiple tables. There are some feature differences between list and grid view types. If your needs require one of the following, you should continue to use a grid view type:
"Group by" support
Grouped summary bar understandings
Shared view in the base
Consider using interfaces for this instead
How can I show or hide empty parent rows?
You’ll be able to toggle between showing or hiding empty parents. Showing all of the sections can be really useful for planning when you may want to see Features that don’t have any Tasks, so you can create some. Hiding sections can be more useful when you’re no longer planning or not currently working on those Features at the moment. 
How can I add a prefix field?
When this option is selected:

You can see a checkbox field prefixed to the first field of your lowest-level table (and your nested records, if that’s enabled). This checkbox field’s name will not be visible and will be indented alongside nested records.
Was this article helpful?