- 08 Jan 2024
- 4 Minutes to read
- Print
- DarkLight
- PDF
Using the web clipper browser extension
- Updated on 08 Jan 2024
- 4 Minutes to read
- Print
- DarkLight
- PDF
This article covers how to use the web clipper extension to gather information from a web page and use it to create records in Airtable. Note that this extension also requires opening and using Airtable in the Google Chrome browser.
Web clipper walkthroughs
Install the web clipper browser extension
The Airtable web clipper browser extension lets you select a clip action to create a new record in an Airtable base, using content from whatever web page you’re currently looking at. It appears as an Airtable logo button to the right of your address bar.
To get started, open Chrome and go to the Airtable Chrome extension, then click the blue Add to Chrome button to install the Airtable web clipper browser extension. Please note that at this time, web clipper is only available for Google Chrome.
Create a new clip action
To create a new clip action, go to the base into which you’d like to add new clipped records and add a new web clipper extension. To do that, click on the button that says "extensions", then "Install an extension", and then search for web clipper from our extension marketplace.
Once you add the web clipper extension and install the browser extension you'll be given the option to "Add a clip action.”
After giving your new clip action a name and picking a table to add records to, you can click the Add to extension button to add your newly created clip action to your browser extension, or click Skip for now to jump to customizing your clip action.
Customize a clip action
Customizing your clip action lets you choose what kind of content goes into different fields when you create a new record with the browser extension.
You can either set a default value for a field (which will prefill the new record with information from the web page) or select None for the default value. If you don’t select a default value for a field, you can fill in that field with your own content (like freeform text or a screenshot of the web page) before creating the new record.
Once you’ve set up all the fields you’d like, click the Add to extension button (if you didn’t already do so in the previous screen). You’re ready to start clipping!
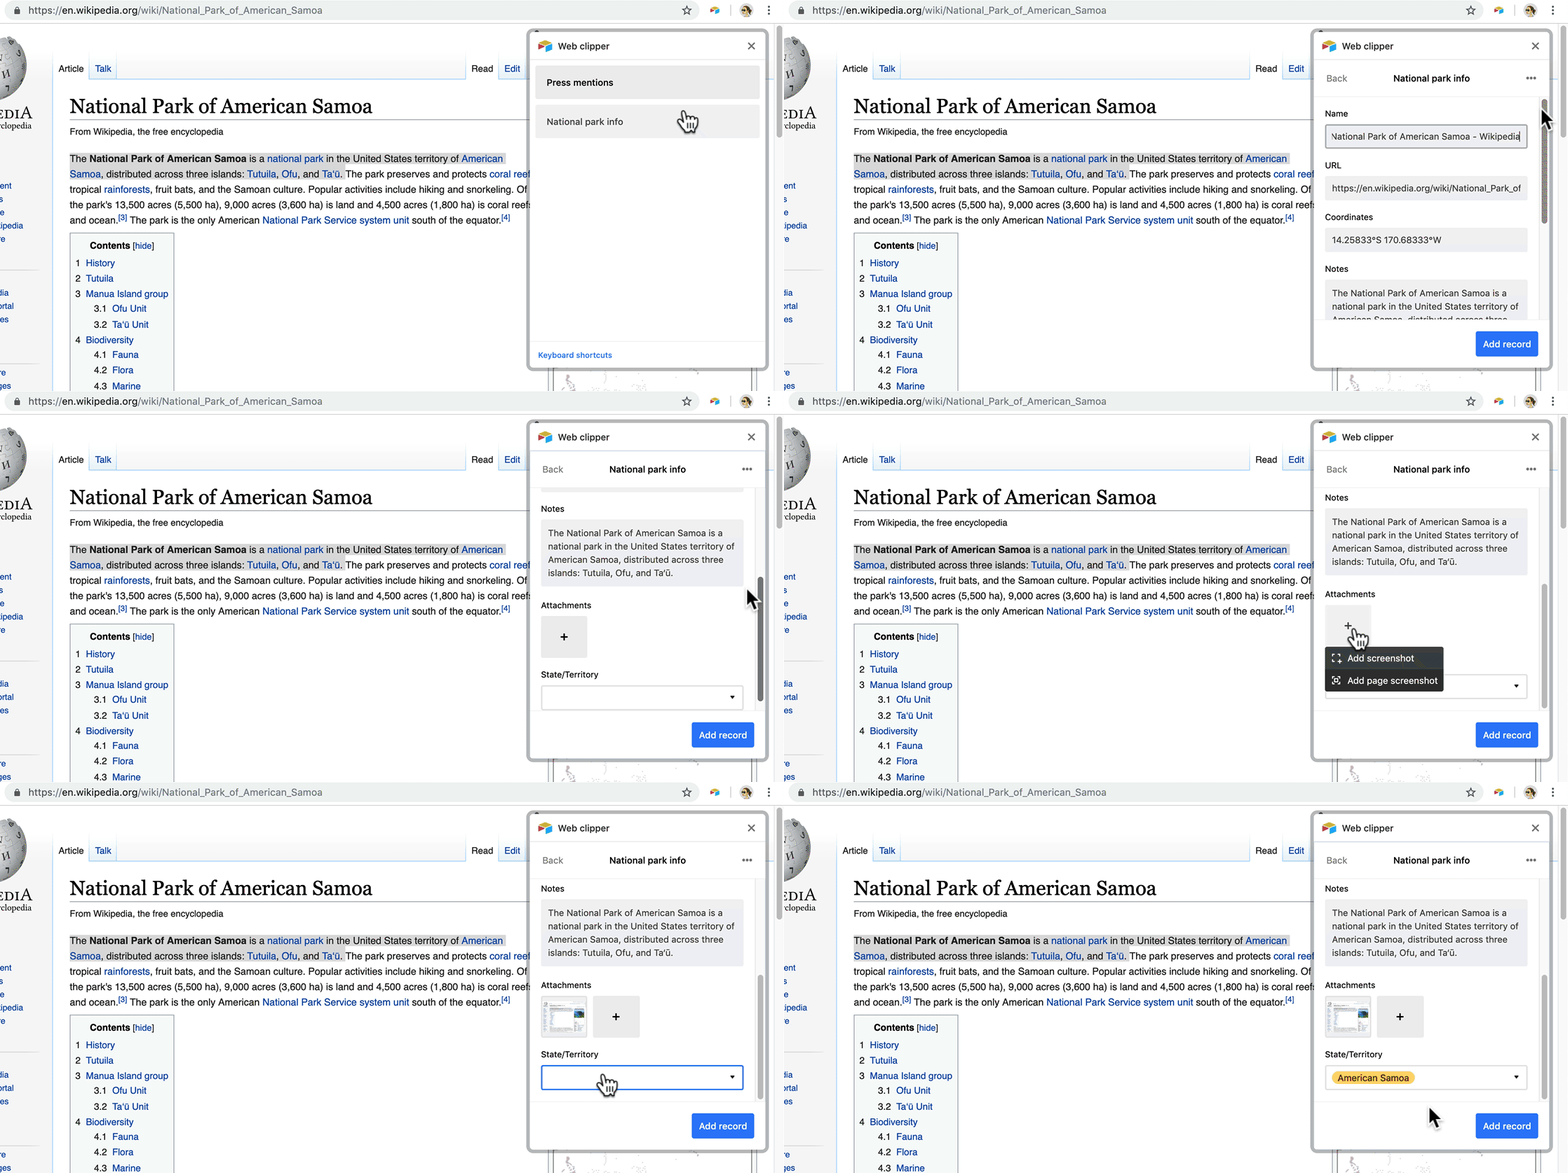
Web clipper in action (Example)
While browsing a web page, click on your web clipper browser extension button to bring up the list of clip actions you’ve added, then choose one.
This will give you a chance to look over your content before making a new Airtable record.
Depending on how you customized your clip actions, some fields might be prefilled with the default values of the web page (like the page title or URL) while others might be blank. You can even create default values from CSS selectors. If you’d like, you can edit any of the prefilled values. For any fields in the clip action that don’t have designated default values, you can fill in relevant content.

When you’re done, just click the Add record button. You can see the new record you created by clicking the Show in Airtable button or keep browsing.
Adding a clip action created by another collaborator
If one of your collaborators has already set up a clip action in a base for which you have edit access, you can add that clip action to your own browser extension. All you have to do is go to the web clipper extension associated with that clip action and click the Add to extension button. You and your collaborators can use this to share all your clipped content in the same table.
Any changes made to a clip action configuration in a web clipper extension will automatically be reflected in the browser extension for every collaborator who’s added that clip action, keeping your whole team up-to-date with any changes.
Removing clip actions
To remove a previously added clip action from your browser extension, open the browser extension, select a clip action you’d like to remove, open the menu button (the three dots in the upper right-hand corner), and select Remove clip action.
You can remove a clip action from your browser by choosing the Remove clip action from the clip action menu.
Importing and exporting clip actions
When you open up the extension to create a new clip action recipe, you’ll now see the option to import or export the recipe.
The import and export options are at the bottom of the clip action extension configuration.
This will allow you to export a JSON file that reflects your clip action’s “recipe” (i.e. the fields and the CSS selector, if used) or import somebody else’s recipe.
When you import a recipe, you’ll be asked to map each field from the recipe to a field in your table. Make sure that you have the correct field types (e.g. if the original recipe maps a particular value to an attachment field, you’ll need to have an attachment field in your table). Once you’ve mapped the fields, you can load the clip action into the browser extension and you’re ready to go!
The fields that are left to choose will be available in the dropdown while fields not supported or those already mapped will be disabled.

