Data sets and verifying data in Airtable
- 05 Apr 2024
- 21 Minutes to read
- Print
- DarkLight
- PDF
Data sets and verifying data in Airtable
- Updated on 05 Apr 2024
- 21 Minutes to read
- Print
- DarkLight
- PDF
Article Summary
Share feedback
Thanks for sharing your feedback!
Plan availability | Enterprise Scale and Business plan access only |
Permissions |
|
Platform(s) | Web/Browser, Mac app, and Windows app |
Related reading | |
Airtable terminology | Data set(s) - Specific data that has been shared to an organization’s library, where other people in the organization can find and access it. A data set may additionally be marked as verified by an admin, although this is not a requirement for a data set to be included in the library. Verified data set(s) - Specific data that has been approved by admins within an organization and shared for use by other people in that organization. Verified data is shared to a data library, where other members of the organization can find and access it. Data library - Available to an entire organization, the data library represents the collection of data sets that have been published for that organization. People in an organization who want to use a data set must navigate to the data library when adding a new table to a base. Data set owner - A data set owner is manually designated as a point of contact for a data set that’s been published to an organization’s data library. Although data set owners don’t have any additional access or permissions in-product, it is required to designate a data set owner before a data set can be published. |
Why use data sets in Airtable?
By leveraging our existing Airtable sync feature, creators or admins in your organization can configure shareable data sets that will appear in a library alongside other data sets. Admins can verify individual data sets that your organization can trust as a single source of truth. Users with creator permissions can sync that verified data into bases across their organization's Airtable ecosystem. There are different permission settings and configuration options worth taking a deeper dive into which are covered in the article below.
Often, especially in organizations with many departments and teams, there is an issue of content sprawl. Briefly, content sprawl is what happens when multiple versions of similar data are being used across an organization. This means that data becomes hard to trust, difficult to find, and tedious or inefficient to keep updated. Here are a few examples of how content sprawl might occur in your organization:
Product roadmaps
Marketing campaigns
Company-wide KPIs and OKRs
Org chart / Human resources directory
By utilizing data sets in Airtable, your organization can reduce content sprawl empowering admins to verify the data sets that meet your organization's standards. By doing so, each verified data set effectively becomes a single source of truth for the entire organization. What that means is that your organization's data can only be updated from a single base location, but can be synced and viewed from multiple base locations throughout your organization's Airtable ecosystem.
Publishing a data set
The following steps can be performed by admins with creator permissions or users with creator permissions — depending on admin panel settings — in the base view where the data is stored. Publishing data sets allows them to be seen by other members of your organization and verified by admins if they so choose.
Step 1: Determine the data set that you want to publish
First, navigate to the base, then the table, and lastly, the view that you would like to add to your organization's data library.
Step 2: Find the publishing option
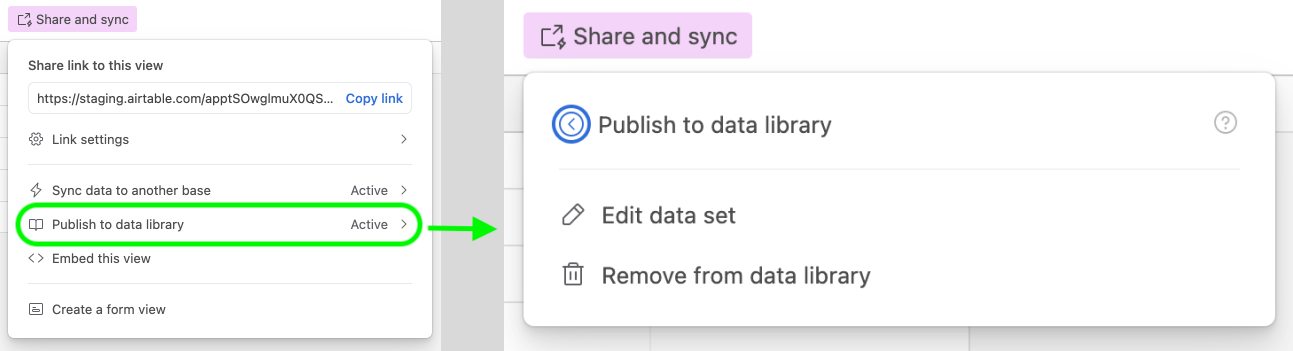
Click Share and sync option and then click the Publish to data library option.
Note
For a more in-depth walkthrough of the view share menu consult this article.
Step 3: Name and describe the data set
First, give the verified dataset a name.
Next, give the data set a description. We highly recommend describing the data in as much detail as is necessary to help creators across your organization understand exactly what the verified data source contains.
Step 4: Choose an "owner" for the data set
By default, the user currently publishing the data set (you) will be assigned as the data set's "owner." However, you can also assign ownership to another user with creator permissions in the base where the data set is being sourced from.
Note
If you see a greyed-out name of a user you would like to be the owner then it likely means they do not have the appropriate permissions in the base. Consult this article for information on how to add a new base collaborator or change their permissions.
Step 5: Choose who can see this data set
By default, any user with base creator permissions will be able to see and add the data set from your organization's data library. However, by toggling on this option, you can choose particular user groups to share the data set with. This is particularly helpful when there is sensitive data or data only relevant to certain groups that you would like to hide from the larger organization.
Step 6: Lock or unlock the data set's source view
Here you can choose whether to lock the view. By default, this option is toggled on. Remember, that records can still be modified in other views in the table where the data is being stored. The main reason for this feature is to prevent accidental changes to the configuration of the view being used as the source of the data set.
Step 7: Publish the data set
On the right portion of the setup screen, you'll see a general preview of how the data set will appear in the data library to other users. Once you have determined that the data set configuration is complete click Publish. After publishing, the data set will appear in your organization member's data library and can be verified by an admin.
Using a data set
The following steps can be performed by any users from your organization who have Creator permissions in the base where they want to sync that data set. It's important to note that certain data sets may not be visible to every user depending upon the settings outlined in Step 5 of the section above.
Step 1: Determine where you want to add the data set
Navigate to the base where you would like to add the data set. Remember that this will essentially create a synced table in the base that cannot be edited. However, the data can be viewed and enriched with additional fields in the table that is created.
Step 2: Navigate to the data library
First, click the + Add or import option to create a new table. You'll find this option next to the furthest right table in the base that is open. Clicking this will open a dropdown menu where you will see a section titled "Add from data library." In this section, you'll see 3 suggested data sets that are popular in your organization as well as the option to view x more data sets >. Clicking that option will open the data library.
Step 3: Preview and determine a data set to use
If you clicked to view more data sets, then a popup will appear with more choices from your organization's data library.
Verified data sets that have specifically been marked as trustworthy by your organization's admins will show a Verified badge next to the name of the data set.
Clicking on any data set will open a preview of the data set containing:
An interactable embedded preview of the data set
A description of the data set
The number of records and fields in the data set
The number of other bases currently syncing to this data set
The owner of the data set
When the data set was last updated
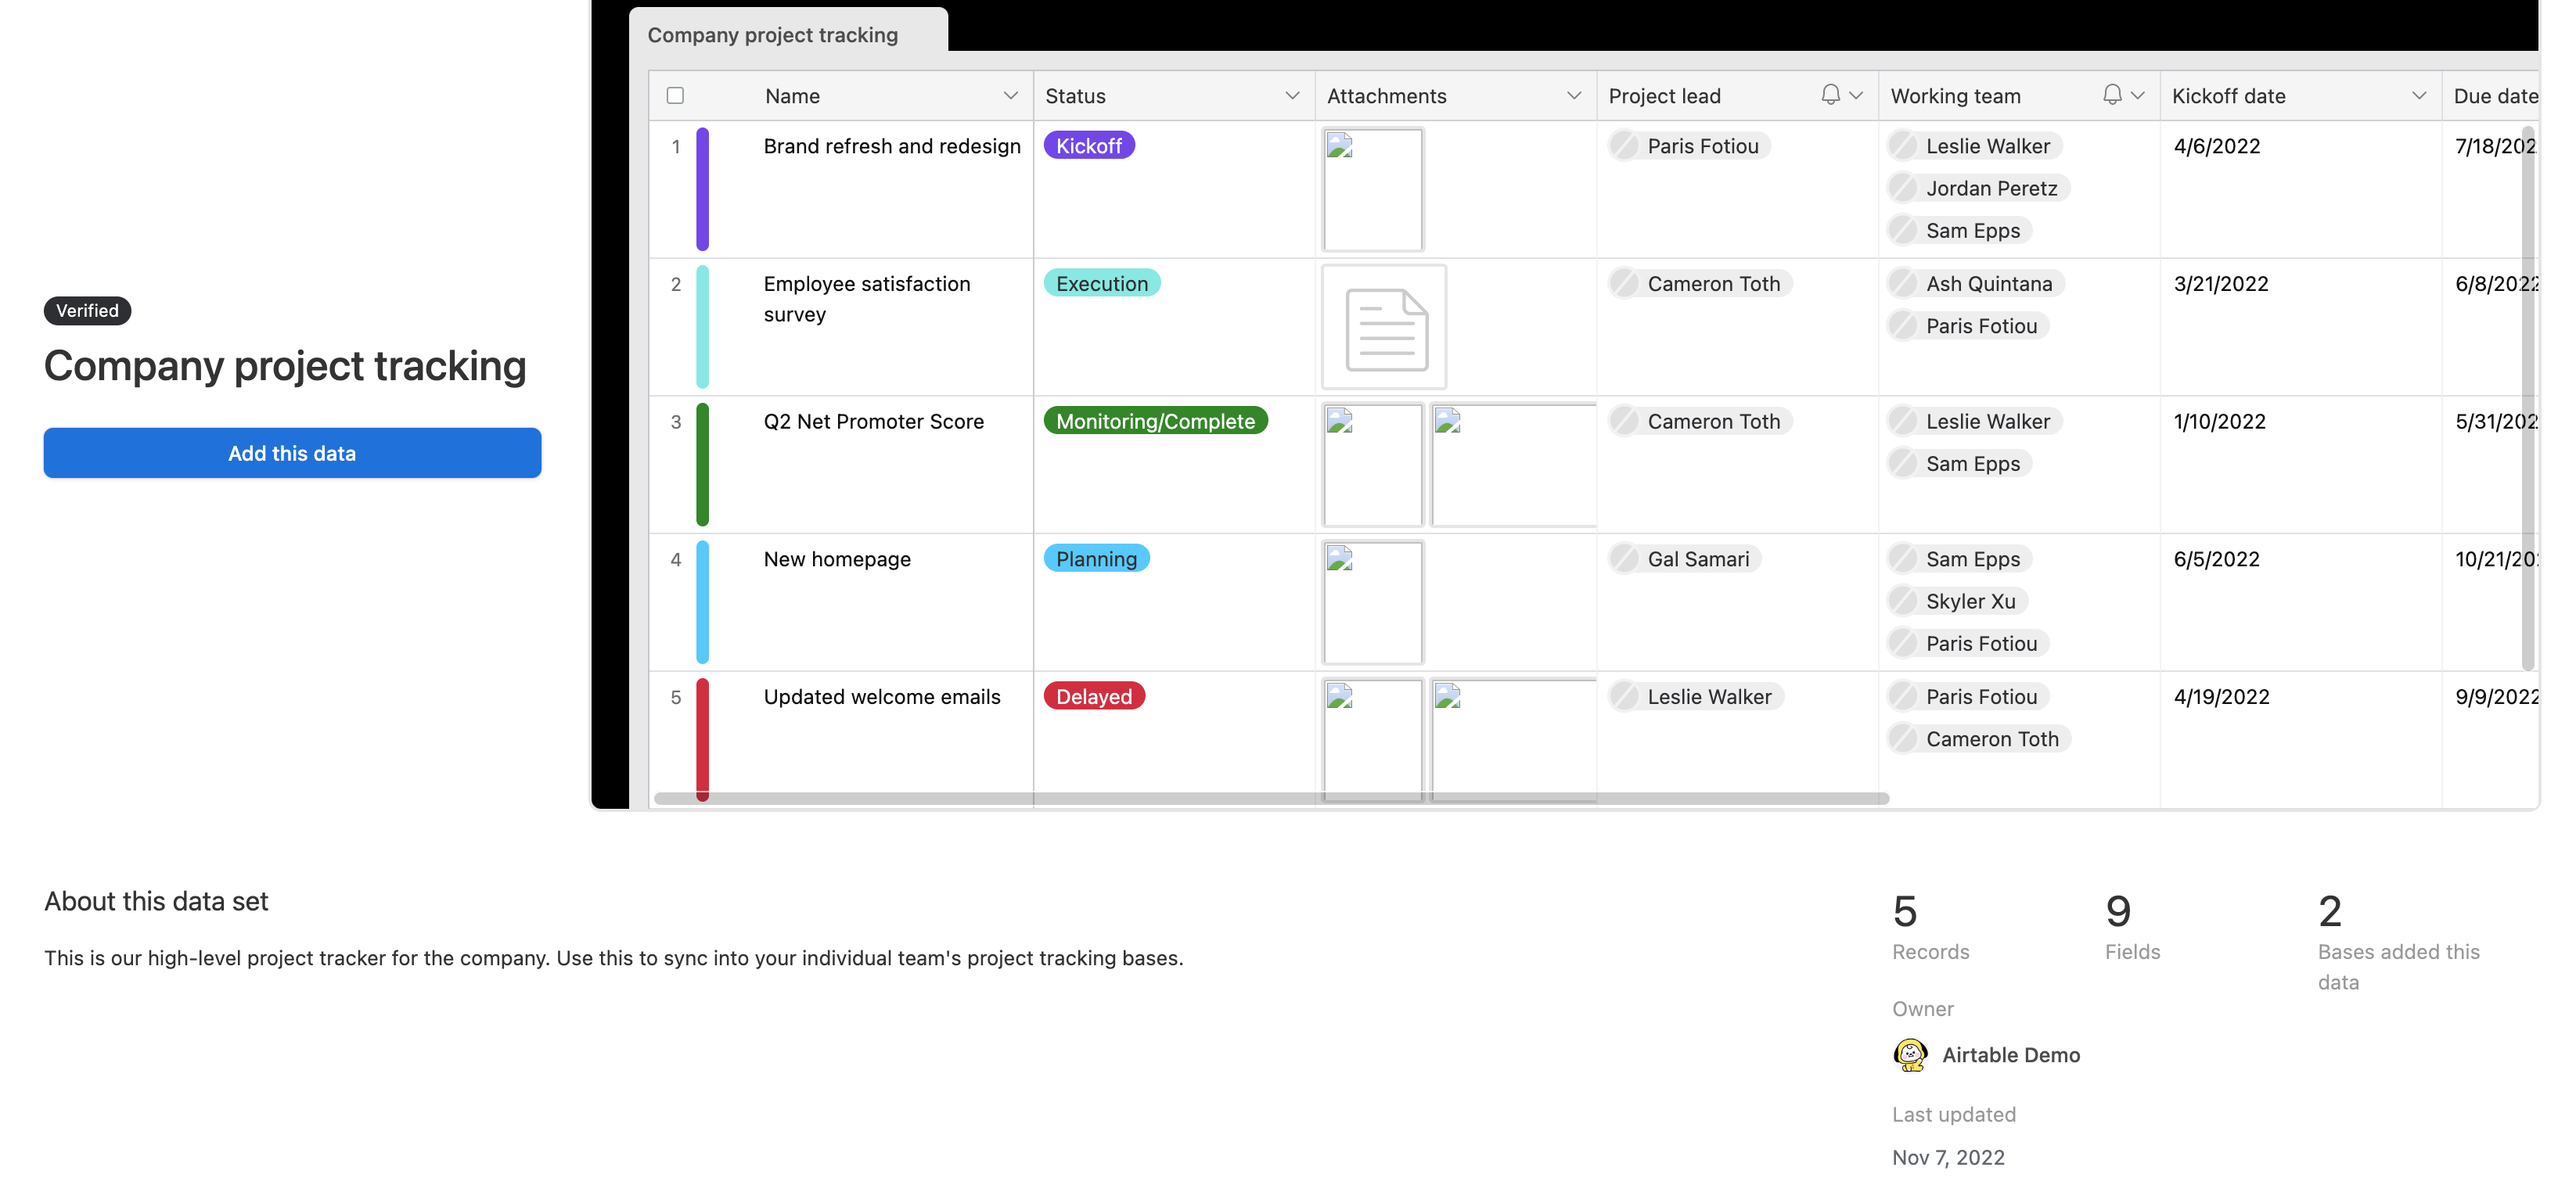
Step 4: Add the data to your base
When you have confirmed that this is the correct data set to use, click Add this data. Depending on the size of the source, it may take a few moments for the source data to sync over. You'll see a new synced table appear in the base when it is finished processing.
Data sets in the Admin Panel
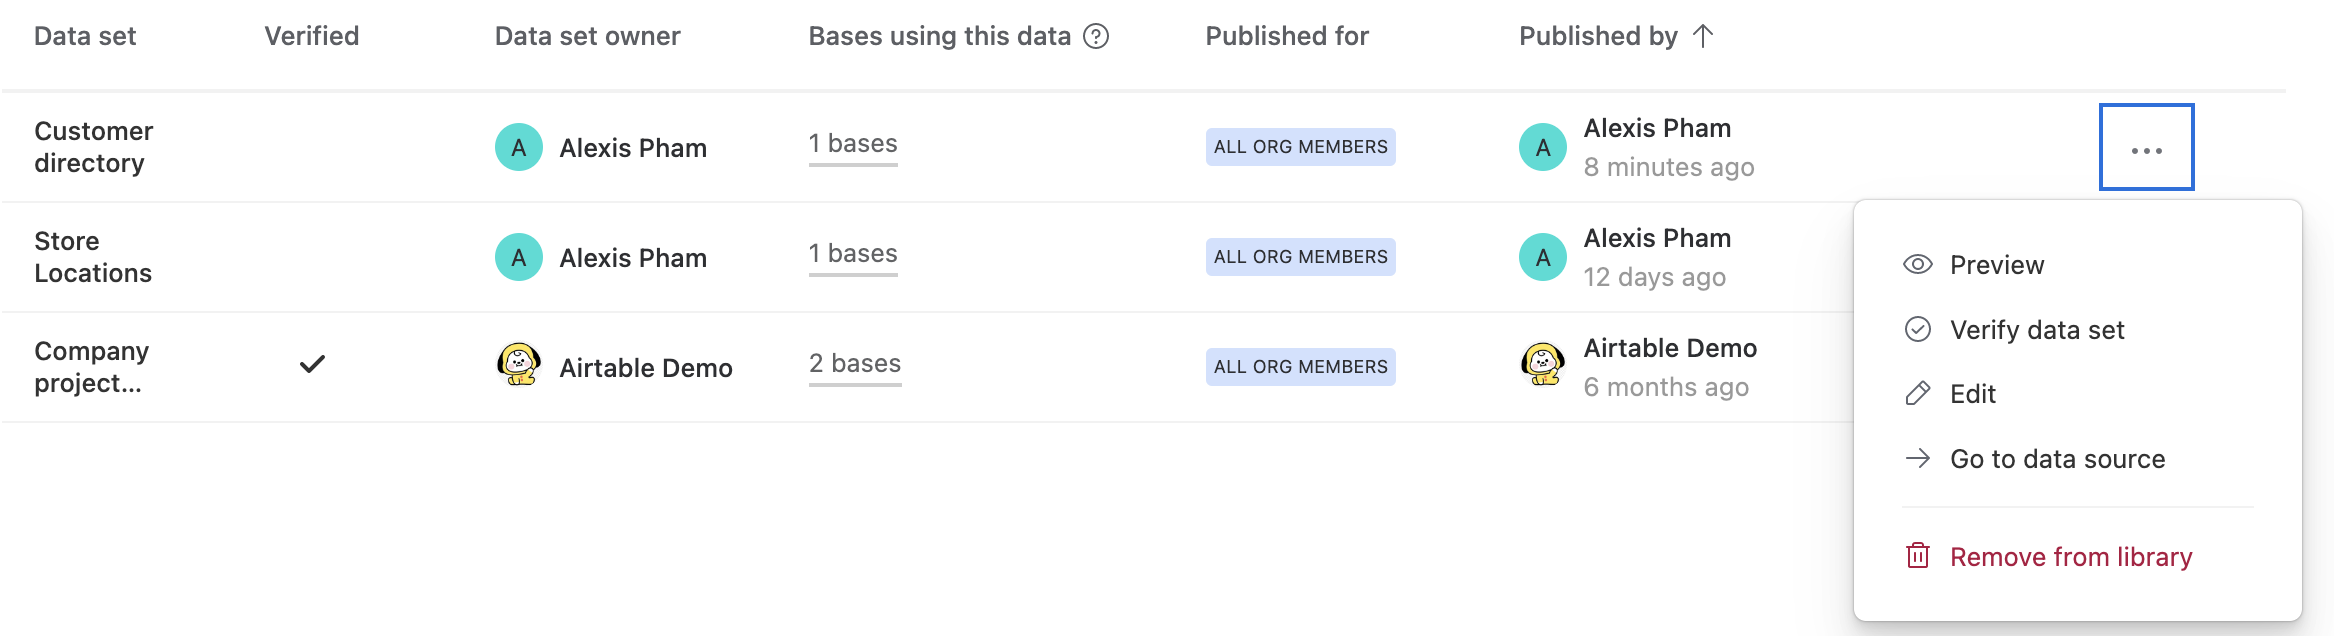
Within Admin Panel, admins can access the Data sets page for their organization's instance from the left side menu. On this page, admins are able to see a list of data sets across their organization. Admins will find vital information about each data set and be able to perform various actions such as editing, verifying, and previewing data sets, and more. Additionally, there is a toggle to only allow admins to add data sets to your organization's data library.
Learn more about each part of this admin panel page by clicking here:
You'll find the Data sets page on the left side of the Admin Panel.

Total # of published data sets - This number represents the total number of published data sets across an organization.
Toggle for restricting data set publishing - By default, this option is toggled off, which means that users with creator/owner permissions in a base can publish data sets. When toggled on, only admins will be able to publish data sets in bases where they have creator/owner permissions.
Active/Inactive - Here, admins can click between a list of active or inactive data sets. Inactive data sets represent data sets that are not currently added to any other bases across the organization utilizing the data sets feature. You can find more information about reactivating a data set below.
Find a data set - Search for a data set by its given name in the data library.
Data sets filter - Filter the list of data sets to show All datasets, Published only (data sets that are not currently verified), or Published and verified data sets.
CSV - Download a CSV file containing the information listed above.
Name - The name of the data set.
Verified - A check mark indicates that the data has been verified. The process of verifying data is covered below.
Data set owner - The user who is currently assigned as the "owner" of the data set.
Bases using this data- The total number of bases that have included this data set as a table.
Published for - The audience(s) that have access to see this data set in the data library. Either All org members or a list of specific user groups chosen in step 5 of the publishing flow outlined above.
Published by - The user who originally published the data set. This user might be different than the "owner" of the data set.
... (Additional options) - Here, admins will find more options that allow them to:
Preview - Preview the data set as if you were looking at it in the data library. Good for gaining context about what is contained within the data set.
Verify data set - Mark the data as verified so that users across the organization know they can trust the data set. On previously verified data sets this option will appear as No longer verify data set, which essentially allows admins to "unverify" the data set. Note that "unverifying" a data set will not cause previously added data sets to be removed from connected bases.
Edit - Edit the name, description, data set owner, and/or user group access of the data set.
Go to data source - This option links to the original base view of the data published in the data library.
Remove from library - Remove this data set from your organization's data library.

Understanding data sets as they relate to Enterprise Hub
For more information about the Enterprise Hub feature in general, please consult this support article.
Enterprise Hub expected behavior with data sets:
By default, all members of the org can publish a data set. However, admin can control this by the admin setting toggle:
Allow only admins to publish data setswithin the Data sets panel.Only admins can verify a data set to mark it as a verified data set.
A data set is published from a view. The organizational unit that owns this view (org unit ← workspace ← base ← table ← view) “owns” the data set.
Data set ownership:
Owner of data set is nominal (i.e. to facilitate communication)
On nomination, we require the user to be a collaborator of the base the data set belongs to, but we don’t enforce it afterwards.
Admin Management
Super admins can manage all datasets owned by any organizational unit within the hub organization.
Org unit admins can manage all datasets owned by the organizational unit that they are an admin of.
Published data set audience scopes
Once published, a data set is only visible to the members of the audience user groups selected
If you are a super admin, then you can publish to the entire Enterprise Hub.
If you are a member of an org, then you can publish to:
An entire org unit the base belongs to.
Or to multiple groups with the following options:
Groups owned by the current data set’s org unit
Groups owned by the current data set’s org unit’s ancestors. Note that we do not include data set’s org unit’s descendants.
“Claim list” of itself and ancestral units
Ultimately, this means that, no one, even super admins, can choose sibling/children org units as an audience. This was by design in order to not expose descendant organizational unit’s member information to ancestral members.
Enterprise Hub and sync restriction dependencies:
Syncing a published data set is affected by the syncability of the underlying shared view. Thus, impacted by the org level sync restrictions controlled by the admin in Admin panel. Learn more about synced view restrictions in this support article.
To sync from a dataset, in addition to the user being part of the published audience scope, the org level sync setting should allow syncing of data across the two bases by being set to “Unrestricted.”
For example, even if the published scope for the dataset is Enterprise Hub, if the admin sync setting of the org unit the dataset resides in, is “Restricted to org”, the data set can only be synced to bases that belong to the same org unit.
In order for the data set to be synced to bases external to the org unit (even if it’s in the same hub), the sync setting needs to be unrestricted.
Here’s a helpful table to break down the expected behavior of this setting:
Admin sync setting | Expected behavior |
|---|---|
Off |
|
Restricted to org unit |
|
Unrestricted |
|
Verifying or removing verification of a data set
You'll need to have admin permissions to be able to perform the steps listed below.
Step 1: Navigate to the Admin Panel
After logging into Airtable on the browser of your choice, visit this link to open your organization's admin panel.
Step 2: Find the Data sets page
After opening the Admin Panel, click the Data sets option on the left sidebar.
Step 3: Find the data set you would like to verify
From here you can search for a specific data set by name or scroll through the list of data sets to find it. To filter the list to only show data sets that are not currently verified, set the filter next to the search bar to Published only.
Step 4: Verify the data set
On the right side of the data set you are viewing click the three-dot ... icon to open a menu of additional options. Next, click the option to Verify data set. The screen will refresh after a moment and you should see a check appear in the Verified column next to the data set you just verified.
Note
If you chose to filter the data sets page to show Published only, then the data set will no longer appear in view because it has been filtered out since it is now verified.
Step 5: Removing a data set's verification
Removing the verification badge from a data set follows similar steps to what is listed in the steps above. The main difference is that the option to Verify data set will now instead appear as No longer verify data set. Additionally, you may want to filter the Data sets page to only show data sets that are currently verified by choosing the Published and verified option in the filter dropdown menu.
Making inactive data sets active
Certain actions will deactivate a data set. These include:
Turning off sync for the share
The share link is disabled
Setting a password for the share
Turning on two-way sync for the share
Enabling email domain restrictions for the share
We've included messaging in-product to help prevent changes like these from being made, but issues may still arise over time.
You'll need to have Admin permissions to be able to perform the steps listed below.
Note
Assuming your organization hasn't disabled creators from publishing data sets if you are a user with creator permissions in the base where the settings are causing an issue, then you can skip to the second part of step 4 below to resolve the issue(s) and reactivate the data set.
Step 1: Navigate to the Admin Panel
After logging into Airtable on the browser of your choice, visit this link to open your organization's admin panel.
Step 2: Find the Data sets page
After opening the Admin Panel, click the Data sets option on the left sidebar.
Step 3: Click the inactive option
Below the toggle to Allow only admins to publish data sets you'll see the option to show Inactive data sets. Click this and move on to the next step.
Step 4: Find the data set you would like to reactivate
From here you can search for a specific data set by name or scroll through the list of data sets to find it. You'll see an option, Make active, that when clicked on will take you to the base where the issue is occurring. As a reminder, we list those potential issues at the top of this section.
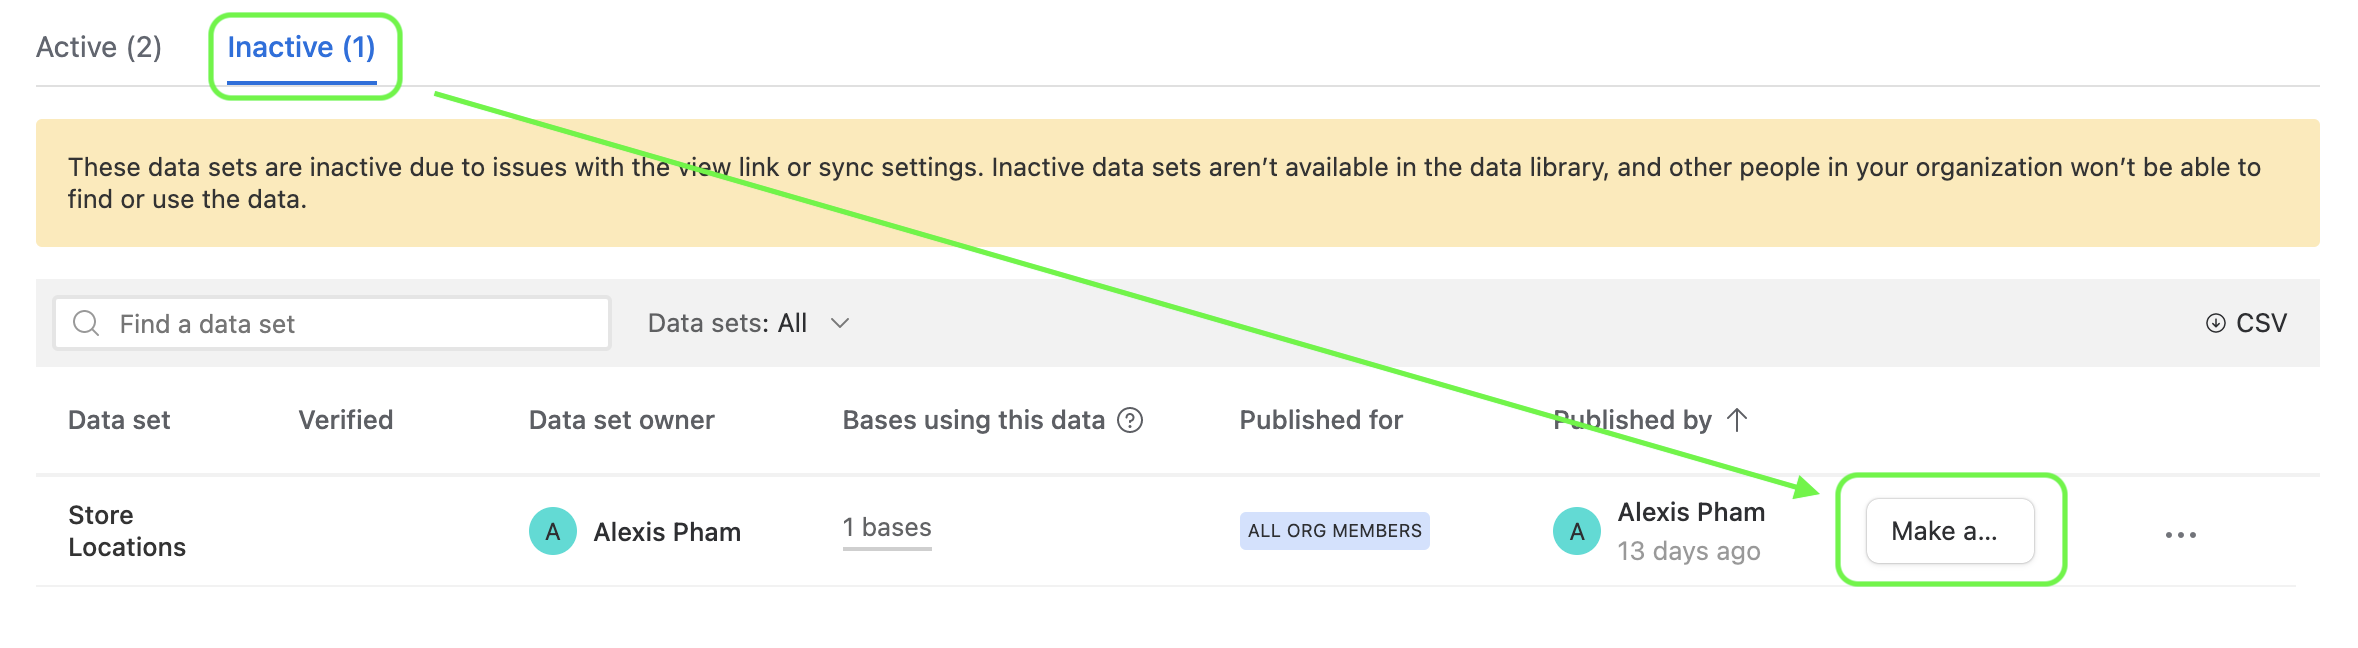
Note
Sometimes, when a browser window is below a certain size, the Make active button may appear truncated, as shown in the image above.
Once in the base, you'll see one or more warning messages explaining what will need to be resolved to reactivate the data set.

Step 5: Fix the issue that caused the inactivity
Any issues will need to be resolved before the data set can be reactivated. Using the example from the last step, let's say that a password was accidentally enabled for the data set. To resolve this, you'll need to:
Click the blue back arrow that is highlighted.
This will return you to the main Share and sync settings menu.
From here, click Link settings.
Then toggle off the Access is password-protected option.
This will open a confirmation pop-up. Click Remove password.
Step 6: Reactivate the data set
Now that you've resolved the issue or issues that caused the data set to become inactive you can either click back to the Link settings or click the Share and sync button to open the view share settings menu again. From here:
Click the Publish to data library option.
This will open the next window. Confirm that All issues have been resolved.
Finally, click Make active to reactivate the data set.

Note
In the Admin Panel, you'll need to refresh the Data sets page in order to see the reactivated data set appear back in the list of Active data sets.
Data set dependencies
Users must be full organization members to see their organization’s data set library
Being an Organization member means that user has been claimed by a single enterprise account. More about Organizations can be found in this support article.
Users who are not a member of the organization will not see Data set as an option in the data library while adding a new synced table, even if that base is enterprise owned.
Example: Personal accounts won’t see data sets in the data library. They will see existing synced tables though.
Reordering data sets in the data library
Data sets are ordered in the data library as:
Verified data sets first, then unverified data sets.
Within those two larger grouping orders, data sets will then appear in the order of most recently published to least recently published.
As a workaround to bump a data set to the top of the view order, an admin can:
Remove the data set from the data library.
Then, publish that data set again.
Lastly, verify the data set again.

Grouping records may not work as expected
In data set previews, the view's group settings will appear the same as they do in the source of the original data set.
However, when a data set is added to another base those group settings may not be respected.
In these cases, you may need to "rebuild" the group settings that were used in the original data set. If the data set owner is not you, then we recommend you contact them so that they can help to consult you on how you might recreate those settings.
FAQs
How many datasets can be published and verified per organization?
We have not included any limits at this time.
Who can publish and verify data sets?
By default, data sets can be published by any Organization member with creator permissions or higher. Admins can choose to allow only admins to publish data sets in the Admin Panel.
Only the organization's admin(s) can verify a data set.
Who can see published and verified data sets?
Users must be Organization members (i.e. claimed by a single Organization, read more here) to have access to an Organization’s data library. If a user is not an organization member or an admin, they will not see the library while adding a new synced table in a base, even if that base is owned by the Organization.
By default, a data set is published to the entire Organization but publishers can restrict the visibility of a data set to specific user groups in the publishing flow and when editing a published dataset in the library.
Admins can see the list of data sets in the Admin Panel “Data sets” tab and take various actions to manage them (e.g. search, filter, verify, stop verifying, change metadata)
Note
Regarding admins on multiple organizations: Non-member admins can only see published data sets in the Admin Panel and they cannot access the data library from within a base.
How should I manage verified data? Who should be responsible for this?
Data verification can be performed by Airtable admins.
Managing and choosing which data sets should be marked as verified is highly dependent upon your organization's individual needs.
It’s important for at least one admin to take the lead on this program – they should be responsible for verifying existing datasets and ensuring that they stay up to date.
It’s also important that admins feel comfortable with the quality of this data w/o feeling like they have an unreasonable upkeep responsibility. That’s the reason the ability to establish an owner on a data set exists.
What settings are required to publish a data set?
Users must enable a link and ensure that the following are disabled:
Two-way sync
Password protected
Email domain access at the view level (org-wide domain sharing restrictions are fine)
If a user has published a data set and then enables one of these settings, the published data set will move into an inactive state and a user or admin must reconfigure sync settings to reactivate it.
Where are data sets stored? Is this something “new” that needs to be maintained?
Data sets are stored in the original bases they are published from. You can view all published datasets in the admin panel, including the bases that they have been synced to.
Can a user publish a synced view that is already in use in other bases?
Yes! This is the recommended approach for data sets that are already used broadly. Publishing to the data library will work retroactively:
Publishing a synced view already in use to the data library doesn’t change anything for bases already using it
It immediately gives admins more visibility into their data ecosystem as these bases will be listed as using the published dataset in the Admin Panel.
If I edit which user groups a data set is published for, will the bases already using this data set be affected?
No, existing syncs will not be affected. The feature to publish a dataset to specific groups is only about setting the visibility of the data set in the library, so if a user is already using that sync, it doesn't change anything for them.
Is there a best practice recommendation for managing data sets that power published data sets/verified data?
Airtable recommends that the owner of a data set is clearly defined within your organization.
How does a published data set or a verified data set handle a “chained sync?”
We will only track a source and all bases syncing to that source. This means that syncs of syncs (aka a chained sync) will not show up in the admin panel.
When I make changes to the data of a published dataset or edit the view configuration, do changes sync automatically to bases that use it?
Yes. Published datasets update automatically, just like regular syncs.
What’s the order of data sets presented in the data library?
The verified data sets come first, followed by published data sets. Within each of those groups, we show data sets published in descending order.
Do records added to a base from the data library count toward the base’s record limit?
Yes, because this is how Airtable sync works.
Was this article helpful?