- Getting started with Airtable
- Introduction to Airtable basics
- Contacting Airtable Support Updated
- Airtable home screen
- Glossary of Airtable terminology
- Airtable technical requirements
- Feature differences between Airtable on desktop and mobile
- Airtable keyboard shortcuts
- Using Markdown in Airtable
- Adding descriptions in Airtable
- Finding Airtable IDs
- Airtable Automations
- Automations Overview
- Automation feature walkthroughs
- Integrated automation walkthroughs
- Airtable automation walkthroughs
- Linking existing records using automations
- Conditional groups of automation actions
- Repeating groups of Airtable automation actions
- Creating recurring records using automations
- How to delay Airtable automation runs
- Prevent automations from triggering by mistake
- Use automations to timestamp status updates
- Automation Triggers
- Airtable Triggers
- Airtable automation trigger: When record matches conditions
- Airtable automation trigger: When a form is submitted
- Airtable automation trigger: When record created
- Airtable automation trigger: When record updated
- Airtable automation trigger: When record enters view
- Airtable automation trigger: At scheduled time
- Airtable automation trigger: When webhook received
- Airtable automation trigger: When a button is clicked
- Airtable automation trigger: When email received Updated
- Integrated Triggers
- Airtable Triggers
- Automation Actions
- Airtable Actions
- Airtable automation action: Send email Updated
- Airtable automation action: Create record
- Airtable automation action: Update record
- Airtable automation action: Find records
- Airtable automation action: Sort list
- Airtable automation action: Run a script Updated
- Airtable automation action: Generate with AI
- Integrated Actions
- Airtable automation actions: Slack
- Airtable automation actions: Google Workspace
- Airtable automation action: Send MS Teams message
- Airtable automation actions: Outlook
- Airtable automation actions: Jira Cloud
- Airtable automation actions: Jira Server / Data Center
- Airtable automation actions: Salesforce
- Airtable automation action: Create post in Facebook Pages
- Airtable automation actions: GitHub Issues
- Airtable automation action: Hootsuite post
- Airtable automation action: Send Twilio SMS
- Airtable Actions
- Airtable Bases
- Using Airtable Cobuilder
- Airtable bases overview
- Creating and managing Airtable bases
- Structuring bases in Airtable
- Moving bases between workspaces in Airtable
- Creating and managing tables in Airtable
- Creating Airtable base share links
- Importing third-party data into Airtable
- Using insights in Airtable
- Troubleshooting Airtable base performance
- Airtable Betas
- Collaborating in Airtable
- Airtable Enterprise Support
- General Enterprise information
- External badging in Airtable
- Using app library and components in Airtable Updated
- Ask an Expert beta overview
- European data residency at Airtable
- Airtable user groups overview
- Airtable Enterprise API
- Creating and managing data retention policies in Airtable
- eDiscovery APIs in Airtable
- Airtable and data loss prevention
- Accessing Enterprise audit logs in Airtable
- Set up Jira Server / Data Center to connect with Airtable
- Admin panel pages
- Airtable admin panel overview
- Users - Airtable enterprise admin panel
- Airtable admin panel user details
- Groups - Airtable admin panel
- Workspaces - Airtable Enterprise Admin Panel
- Bases - Airtable admin panel
- Interfaces - Airtable admin panel
- Data sets - Airtable admin panel
- Managed apps - Airtable admin panel
- Components - Airtable admin panel
- Reports - Airtable admin panel
- Settings - Airtable admin panel Updated
- Managing Enterprise organizations
- Managing Enterprise admins in admin panel
- Using Organizations
- Organization branding for apps in Airtable
- Enterprise Hub in Airtable
- Enterprise Hub: Org unit assignment with user groups Updated
- Deactivating, removing access, and reactivating users in the admin panel
- Managing user access to workspaces and bases
- Airtable Enterprise Key Management Updated
- Custom terms of use New
- Enterprise SSO
- General Enterprise information
- Airtable Extensions
- Airtable Fields
- Fields Overview
- Attachment
- Date-based fields
- Formula
- Getting Started with Formulas
- Formula Foundations
- The essentials of Airtable formulas
- Formula writing tips for beginners
- Troubleshooting formulas
- Basic calculations
- Conditional statements
- Logical arguments
- Working with dates
- Displaying DATETIME_FORMAT using the date field in Airtable
- Working with date functions in Airtable
- Calculating the difference between dates in Airtable
- Supported DATETIME_DIFF unit specifiers in Airtable
- Supported DATETIME_FORMAT format specifiers in Airtable
- Using the DATETIME_PARSE() formula in Airtable
- Working with timezones
- Record functions
- Text functions
- Numeric functions
- Common Solutions: Beginner
- Common Solutions: Intermediate
- Common Solutions: Advanced
- Long Text Field
- Linked Record Field
- Linking records in Airtable
- Limiting linked record selection to a view in Airtable
- Dynamic filtering in linked record fields
- Linking to one, many, or a subset of Airtable records
- Converting existing fields to Airtable linked records
- Reordering record links in Airtable
- Understanding linked record relationships in Airtable
- Number-Based Fields
- Other Fields
- Rollup, lookup, and count fields
- Select and user fields
- Integrating with Airtable
- API
- Getting started with Airtable's Web API
- Creating personal access tokens
- Airtable Webhooks API Overview
- Service accounts overview
- Airtable Web API - Using filterByFormula or sort parameters
- Airtable API Deprecation Guidelines
- Airtable API: Common troubleshooting
- Managing API call limits in Airtable
- URL length limitations for web API requests
- Integration services
- Third-party integrations via OAuth overview
- Troubleshooting disconnected OAuth integrations in Airtable
- Options for integrating with Airtable
- Third-party integrations - Common troubleshooting
- Low-code integrations - Common troubleshooting
- Integrating Airtable with external calendar applications
- Visualizing records from Airtable in Tableau
- Visualizing Airtable records in Microsoft Power BI & Power Query
- Integrating HubSpot with Airtable
- Using Zapier to integrate Airtable with other services
- Using Zapier's Multi-Step Zaps to find and update records
- Using IFTTT to integrate Airtable with other services
- Integrating with AWS Lambda & DynamoDB
- Developer tools
- API
- Airtable Interface Designer
- Interface Designer overview articles
- Interface layouts
- Interface elements
- Adding and removing elements in interfaces
- Adding layouts to interfaces
- Formatting elements in interfaces
- Interface element: Button
- Interface element: Calendar
- Interface element: Chart
- Interface element: Filter
- Interface element: Gallery
- Interface element: Grid
- Interface element: Kanban
- Interface element: Number
- Interface element: Record picker
- Interface element: Text
- Interface element: Timeline
- Learning and Resources
- Managing Airtable
- Airtable Policy
- Airtable Records
- Airtable Sync
- Airtable Views
- Airtable Workspaces
- Print
- Share
- DarkLight
- PDF
Comparing numeric values using IF in Airtable
- Updated on 07 Dec 2023
- 2 Minutes to read
- Print
- Share
- DarkLight
- PDF
This article covers how to compare numeric values using the IF function in Airtable to streamline your team's and organization's work.
Introduction
All plan types | |
Platform(s) | Web/Browser, Mac app, and Windows app |
Related reading |
The IF function returns one of two values depending on whether a logical argument is true or not. This article will cover how to compare numeric values (numbers) against a logical argument using an IF statement.
IF statements (or conditional statements) are written in the following format:
IF([logical argument], [value1], [value2])
This function means "If [logical argument is true], then return [value1]. Otherwise, return [value2]." The logical argument can be either text or a value, e.g. {Pet's Name}='Rufus' or {Test Score}>75.
Comparing values in Airtable
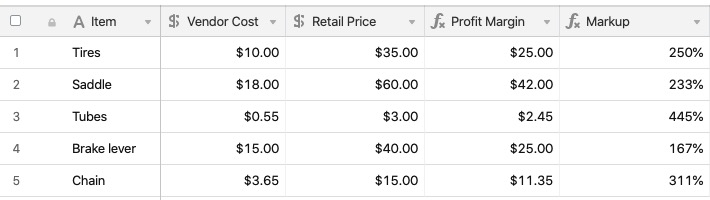
As an example, a purchasing manager for a bicycle shop needs to track the revenue generated by each item in stock. She needs to keep track of her purchase costs, retail price, profit margin, and markup percentage.
Profit margin can be calculated with this formula: {Retail Price} - {Vendor Cost}
While markup can be calculated with: ({Retail Price} - {Vendor Cost}) / {Vendor Cost}
![360055331934ScreenShot2020-01-16at21850PM.jpg](http://cdn.airtable.document360.io/d0ee2ee4-3f78-47c7-b388-85e40be9fb89/Images/Documentation/360055331934ScreenShot2020-01-16at21850PM.jpg)
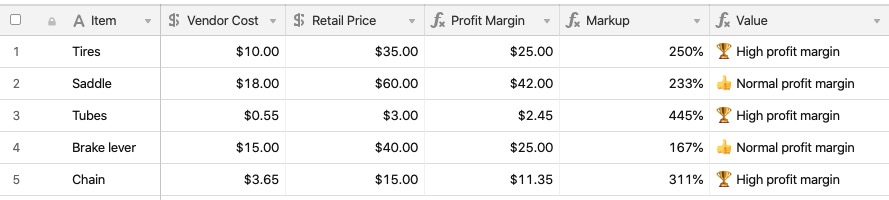
To easily filter her table by how profitable each item can be, another formula can be added to identify the items with the highest profits margins (over 200%). Note in the formula below that when referencing a percentage field in a formula, you'll need to multiply the field values by 100 in order to maintain the properly formatted percent value.
IF(
({Markup}*100) >= 250,
"🏆 High profit margin",
"👍 Normal profit margin"
)
![Screen Shot 2020-01-16 at 2.20.06 PM](http://cdn.airtable.document360.io/d0ee2ee4-3f78-47c7-b388-85e40be9fb89/Images/Documentation/Screen%20Shot%202020-01-16%20at%202.20.06%20PM.jpg)
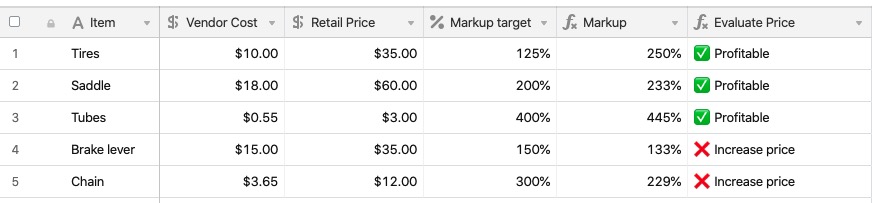
The purchasing manager has some basic information just using these formulas, but to stay profitable she also wants to ensure that every item they sell is above a minimum markup percentage depending on the item.
Using the formula below, she can output a message based off of the Markup target listed for each item.
IF({Markup} > {Markup target},"✅ Profitable","❌ Increase price")
![Screen Shot 2020-01-16 at 1.47.17 PM (1)](http://cdn.airtable.document360.io/d0ee2ee4-3f78-47c7-b388-85e40be9fb89/Images/Documentation/Screen%20Shot%202020-01-16%20at%201.47.17%20PM%20%281%29.jpg)
Advanced work with percentages in Airtable
While considering a storewide sale of 25% off, the purchasing manager needs to ensure that each item will remain profitable when discounted by the sale. She can use this formula in order to determine which items would be priced too low given the sale.
IF(
(Markup - {Sale Discount})*100>({Markup target}*100),
"✅ Okay for storewide sale",
"❌ Priced below profit margin"
)
![Screen Shot 2020-01-16 at 1.50.52 PM](http://cdn.airtable.document360.io/d0ee2ee4-3f78-47c7-b388-85e40be9fb89/Images/Documentation/Screen%20Shot%202020-01-16%20at%201.50.52%20PM.jpg)
The result of the formula is helpful, but could provide even more information to our purchasing manager to help inform the decision for the weekend sale. By adjusting the formula, you can add in logic to display how much the sale amount will need to be lowered in order for that item to remain profitable. Note that the formula below uses another new function - ROUND() - to round the displayed percentage to one decimal point.
IF(
(Markup - {Sale Discount})*100>({Markup target}*100),
"✅ Okay for storewide sale",
"❌ Decrease sale discount by at least "
&
ROUND(({Markup target}*100 - (({Markup}-{Sale Discount})*100)),1)
&
"%"
)
![360056198133ScreenShot2020-01-16at15541PM.jpg](http://cdn.airtable.document360.io/d0ee2ee4-3f78-47c7-b388-85e40be9fb89/Images/Documentation/360056198133ScreenShot2020-01-16at15541PM.jpg)
With this information provided by the IF statement, the purchasing manager can adjust the sale discount to make sure both her customers - and her profits - are happy.