Contents x
- Getting started with Airtable
- Introduction to Airtable basics
- Contacting Airtable Support
- Airtable home screen
- Glossary of Airtable terminology
- Airtable technical requirements
- Feature differences between Airtable on desktop and mobile Updated
- Airtable keyboard shortcuts
- Using Markdown in Airtable
- Adding descriptions in Airtable
- Finding Airtable IDs
- Airtable Automations
- Automations Overview
- Automation feature walkthroughs
- Integrated automation walkthroughs
- Airtable automation walkthroughs
- Linking existing records using automations
- Conditional groups of automation actions
- Repeating groups of Airtable automation actions
- Creating recurring records using automations
- How to delay Airtable automation runs
- Prevent automations from triggering by mistake
- Use automations to timestamp status updates
- Automation Triggers
- Airtable Triggers
- Airtable automation trigger: When record matches conditions
- Airtable automation trigger: When a form is submitted
- Airtable automation trigger: When record created
- Airtable automation trigger: When record updated
- Airtable automation trigger: When record enters view
- Airtable automation trigger: At scheduled time
- Airtable automation trigger: When webhook received
- Airtable automation trigger: When a button is clicked
- Airtable automation trigger: When email received Updated
- Integrated Triggers
- Airtable Triggers
- Automation Actions
- Airtable Actions
- Integrated Actions
- Airtable automation actions: Slack
- Airtable automation actions: Google Workspace
- Airtable automation action: Send MS Teams message
- Airtable automation actions: Outlook
- Airtable automation actions: Jira Cloud
- Airtable automation actions: Jira Server / Data Center
- Airtable automation actions: Salesforce
- Airtable automation action: Create post in Facebook Pages
- Airtable automation actions: GitHub Issues
- Airtable automation action: Hootsuite post
- Airtable automation action: Send Twilio SMS
- Airtable Bases
- Using Airtable Cobuilder
- Airtable bases overview
- Creating and managing Airtable bases
- Structuring bases in Airtable
- Moving bases between workspaces in Airtable
- Creating and managing tables in Airtable
- Creating Airtable base share links
- Importing third-party data into Airtable
- Using insights in Airtable
- Troubleshooting Airtable base performance
- Airtable Betas
- Collaborating in Airtable
- Airtable Enterprise Support
- General Enterprise information
- External badging in Airtable
- Using app library and components in Airtable Updated
- Ask an Expert beta overview
- European data residency at Airtable
- Airtable user groups overview
- Airtable Enterprise API
- Creating and managing data retention policies in Airtable
- eDiscovery APIs in Airtable
- Airtable and data loss prevention
- Accessing Enterprise audit logs in Airtable
- Set up Jira Server / Data Center to connect with Airtable
- Admin panel pages
- Airtable admin panel overview
- Users - Airtable enterprise admin panel
- Airtable admin panel user details
- Groups - Airtable admin panel
- Workspaces - Airtable Enterprise Admin Panel
- Bases - Airtable admin panel
- Interfaces - Airtable admin panel
- Data sets - Airtable admin panel
- Managed apps - Airtable admin panel
- Components - Airtable admin panel
- Reports - Airtable admin panel
- Settings - Airtable admin panel Updated
- Managing Enterprise organizations
- Managing Enterprise admins in admin panel
- Using Organizations
- Organization branding for apps in Airtable
- Enterprise Hub in Airtable
- Enterprise Hub: Org unit assignment with user groups Updated
- Deactivating, removing access, and reactivating users in the admin panel
- Managing user access to workspaces and bases
- Airtable Enterprise Key Management Updated
- Custom terms of use Updated
- Enterprise SSO
- General Enterprise information
- Airtable Extensions
- Airtable Fields
- Fields Overview
- Attachment
- Date-based fields
- Formula
- Getting Started with Formulas
- Formula Foundations
- The essentials of Airtable formulas
- Formula writing tips for beginners
- Troubleshooting formulas
- Basic calculations
- Conditional statements
- Logical arguments
- Working with dates
- Displaying DATETIME_FORMAT using the date field in Airtable
- Working with date functions in Airtable
- Calculating the difference between dates in Airtable
- Supported DATETIME_DIFF unit specifiers in Airtable
- Supported DATETIME_FORMAT format specifiers in Airtable
- Using the DATETIME_PARSE() formula in Airtable
- Working with timezones
- Record functions
- Text functions
- Numeric functions
- Common Solutions: Beginner
- Common Solutions: Intermediate
- Common Solutions: Advanced
- Long Text Field
- Linked Record Field
- Linking records in Airtable Updated
- Limiting linked record selection to a view in Airtable Updated
- Dynamic filtering in linked record fields
- Linking to one, many, or a subset of Airtable records
- Converting existing fields to Airtable linked records
- Reordering record links in Airtable
- Understanding linked record relationships in Airtable
- Number-Based Fields
- Other Fields
- Rollup, lookup, and count fields
- Select and user fields
- Integrating with Airtable
- API
- Getting started with Airtable's Web API
- Creating personal access tokens
- Airtable Webhooks API Overview
- Service accounts overview
- Airtable Web API - Using filterByFormula or sort parameters
- Airtable API Deprecation Guidelines
- Airtable API: Common troubleshooting
- Managing API call limits in Airtable
- URL length limitations for web API requests
- Integration services
- Third-party integrations via OAuth overview
- Troubleshooting disconnected OAuth integrations in Airtable
- Options for integrating with Airtable
- Third-party integrations - Common troubleshooting
- Low-code integrations - Common troubleshooting
- Integrating Airtable with external calendar applications
- Visualizing records from Airtable in Tableau
- Visualizing Airtable records in Microsoft Power BI & Power Query
- Integrating HubSpot with Airtable
- Using Zapier to integrate Airtable with other services
- Using Zapier's Multi-Step Zaps to find and update records
- Using IFTTT to integrate Airtable with other services
- Integrating with AWS Lambda & DynamoDB
- Developer tools
- API
- Airtable Interface Designer
- Interface Designer overview articles
- Interface layouts
- Interface elements
- Adding and removing elements in interfaces
- Adding layouts to interfaces
- Formatting elements in interfaces
- Interface element: Button
- Interface element: Calendar
- Interface element: Chart
- Interface element: Filter
- Interface element: Gallery
- Interface element: Grid
- Interface element: Kanban
- Interface element: Number
- Interface element: Record picker
- Interface element: Text
- Interface element: Timeline
- Learning and Resources
- Managing Airtable
- Airtable Policy
- Airtable Records
- Airtable Sync
- Airtable Views
- Airtable Workspaces
- Print
- Share
- DarkLight
- PDF
Contents
Data sets - Airtable admin panel
- Updated on 26 Sep 2024
- 3 Minutes to read
- Print
- Share
- DarkLight
- PDF
Article summary
Did you find this summary helpful?
Thank you for your feedback
Business and Enterprise Scale only | |
Platform(s) | Web/Browser, Mac app, and Windows app |
Related reading | |
Airtable terminology | Admin panel - A centralized set of tools to help admins manage their organization’s Enterprise account. It's a designated surface that includes ways for admins to view and manage users, groups, reports, bases, and more |
Data sets can be published from shared views to the data library, where other people in your organization can find and use the data. Admins can indicate that they’ve approved a data set by marking it as verified. Learn more here.
Using the data sets page in the admin panel
On this page, admins are able to see a list of data sets across their organization. Admins will find vital information about each data set and be able to perform various actions such as editing, verifying, and previewing data sets, and more. Additionally, for there is a toggle to only allow admins to add data sets to your organization's data library.
Accessing the data sets page
Open your admin panel.
Click Managed apps.
Navigating the data sets page
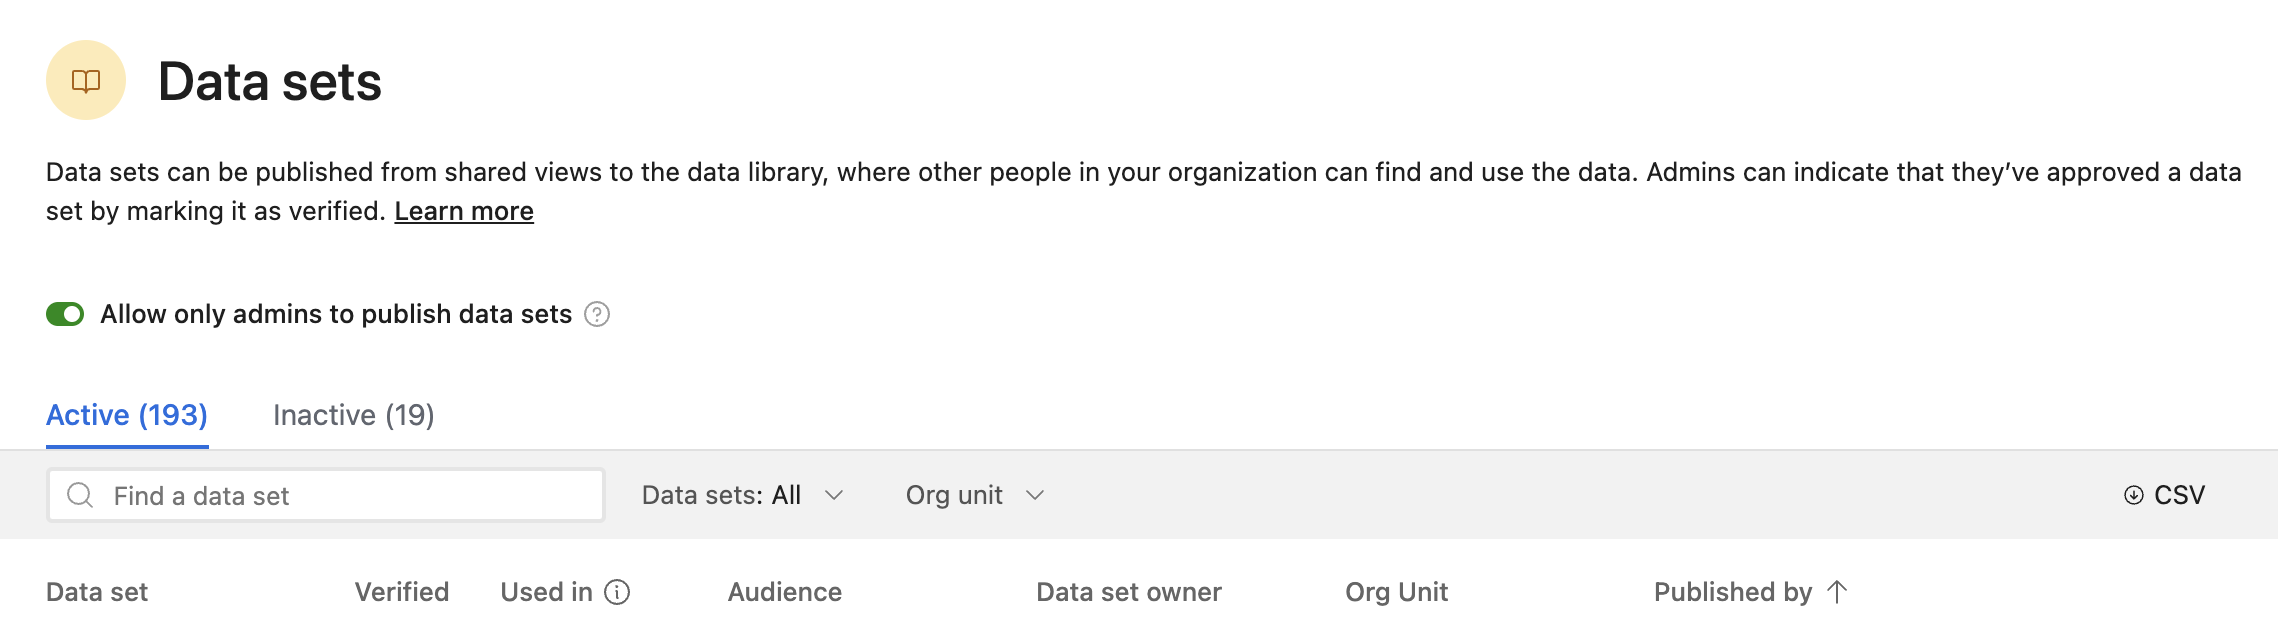
First up, there are a couple options to consider using:
Allow only admins to publish data sets - By default, this option is toggled off, which means that users with creator/owner permissions in a base can publish data sets. When toggled on, only admins will be able to publish data sets in bases where they have creator/owner permissions.
Active/Inactive - Here, admins can click between a list of active or inactive data sets. Inactive data sets represent data sets that are not currently added to any other bases across the organization utilizing the data sets feature. You can find more information about reactivating a data set here.
Next up there are some searching/browsing, filtering, and CSV download options:
Find a data set - Search for a data set by its given name in the data library.
Data sets filter - Filter the list of data sets to show All datasets, Published only (data sets that are not currently verified), or Published and verified data sets.
Org unit - (Enterprise Hub only) This option allows super admins to filter the data sets that are associated with one or more org units.
CSV - Download a CSV file containing the information listed above.
Finally, you’ll see the column headers for the various information related to the data sets shown. You can click these column headers to sort the list of data sets in ascending or descending order based on the column value you click:
Name - The name of the data set.
Verified - A check mark indicates that the data has been verified. The process of verifying data is covered here.
Used in - You’ll find a link to view the bases that are currently using (connected to) the corresponding data set.
Audience - The audience(s) that have access to see this data set in the data library. Either All org members or a list of specific user groups chosen in step 5 of the publishing flow outlined here.
Data set owner - The user who is currently assigned as the "owner" of the data set.
Org unit - (Enterprise Hub only) See the org unit that this data set belongs to.
Published by - The user who originally published the data set. This user might be different than the "owner" of the data set.
... (Additional options) - Here, admins will find more options that allow them to:
Preview - Preview the data set as if you were looking at it in the data library. Good for gaining context about what is contained within the data set.
Verify data set - Mark the data as verified so that users across the organization know they can trust the data set. On previously verified data sets this option will appear as No longer verify data set, which essentially allows admins to "unverify" the data set. Note that "unverifying" a data set will not cause previously added data sets to be removed from connected bases.
Edit - Edit the name, description, data set owner, and/or user group access of the data set.
Go to data source - This option links to the original base view of the data published in the data library.
Remove from library - Remove this data set from your organization's data library.
Was this article helpful?
Thank you for your feedback! Our team will get back to you
How can we improve this article?
Your feedback
Comment
Comment (Optional)
Character limit : 500
Please enter your comment
Email (Optional)
Email
Please enter a valid email
