Contents x
- Getting started with Airtable
- Introduction to Airtable basics
- Contacting Airtable Support
- Airtable home screen
- Glossary of Airtable terminology
- Airtable technical requirements
- Feature differences between Airtable on desktop and mobile Updated
- Airtable keyboard shortcuts
- Using Markdown in Airtable
- Adding descriptions in Airtable
- Finding Airtable IDs
- Airtable Automations
- Automations Overview
- Automation feature walkthroughs
- Integrated automation walkthroughs
- Airtable automation walkthroughs
- Linking existing records using automations
- Conditional groups of automation actions
- Repeating groups of Airtable automation actions
- Creating recurring records using automations
- How to delay Airtable automation runs
- Prevent automations from triggering by mistake
- Use automations to timestamp status updates
- Automation Triggers
- Airtable Triggers
- Airtable automation trigger: When record matches conditions
- Airtable automation trigger: When a form is submitted
- Airtable automation trigger: When record created
- Airtable automation trigger: When record updated
- Airtable automation trigger: When record enters view
- Airtable automation trigger: At scheduled time
- Airtable automation trigger: When webhook received
- Airtable automation trigger: When a button is clicked
- Airtable automation trigger: When email received Updated
- Integrated Triggers
- Airtable Triggers
- Automation Actions
- Airtable Actions
- Integrated Actions
- Airtable automation actions: Slack
- Airtable automation actions: Google Workspace
- Airtable automation action: Send MS Teams message
- Airtable automation actions: Outlook
- Airtable automation actions: Jira Cloud
- Airtable automation actions: Jira Server / Data Center
- Airtable automation actions: Salesforce
- Airtable automation action: Create post in Facebook Pages
- Airtable automation actions: GitHub Issues
- Airtable automation action: Hootsuite post
- Airtable automation action: Send Twilio SMS
- Airtable Bases
- Using Airtable Cobuilder
- Airtable bases overview
- Creating and managing Airtable bases
- Structuring bases in Airtable
- Moving bases between workspaces in Airtable
- Creating and managing tables in Airtable
- Creating Airtable base share links
- Importing third-party data into Airtable
- Using insights in Airtable
- Troubleshooting Airtable base performance
- Airtable Betas
- Collaborating in Airtable
- Airtable Enterprise Support
- General Enterprise information
- External badging in Airtable
- Using app library and components in Airtable Updated
- Ask an Expert beta overview
- European data residency at Airtable
- Airtable user groups overview
- Airtable Enterprise API
- Creating and managing data retention policies in Airtable
- eDiscovery APIs in Airtable
- Airtable and data loss prevention
- Accessing Enterprise audit logs in Airtable
- Set up Jira Server / Data Center to connect with Airtable
- Admin panel pages
- Airtable admin panel overview
- Users - Airtable enterprise admin panel
- Airtable admin panel user details
- Groups - Airtable admin panel
- Workspaces - Airtable Enterprise Admin Panel
- Bases - Airtable admin panel
- Interfaces - Airtable admin panel
- Data sets - Airtable admin panel
- Managed apps - Airtable admin panel
- Components - Airtable admin panel
- Reports - Airtable admin panel
- Settings - Airtable admin panel Updated
- Managing Enterprise organizations
- Managing Enterprise admins in admin panel
- Using Organizations
- Organization branding for apps in Airtable
- Enterprise Hub in Airtable
- Enterprise Hub: Org unit assignment with user groups Updated
- Deactivating, removing access, and reactivating users in the admin panel
- Managing user access to workspaces and bases
- Airtable Enterprise Key Management Updated
- Custom terms of use Updated
- Enterprise SSO
- General Enterprise information
- Airtable Extensions
- Airtable Fields
- Fields Overview
- Attachment
- Date-based fields
- Formula
- Getting Started with Formulas
- Formula Foundations
- The essentials of Airtable formulas
- Formula writing tips for beginners
- Troubleshooting formulas
- Basic calculations
- Conditional statements
- Logical arguments
- Working with dates
- Displaying DATETIME_FORMAT using the date field in Airtable
- Working with date functions in Airtable
- Calculating the difference between dates in Airtable
- Supported DATETIME_DIFF unit specifiers in Airtable
- Supported DATETIME_FORMAT format specifiers in Airtable
- Using the DATETIME_PARSE() formula in Airtable
- Working with timezones
- Record functions
- Text functions
- Numeric functions
- Common Solutions: Beginner
- Common Solutions: Intermediate
- Common Solutions: Advanced
- Long Text Field
- Linked Record Field
- Linking records in Airtable Updated
- Limiting linked record selection to a view in Airtable Updated
- Dynamic filtering in linked record fields
- Linking to one, many, or a subset of Airtable records
- Converting existing fields to Airtable linked records
- Reordering record links in Airtable
- Understanding linked record relationships in Airtable
- Number-Based Fields
- Other Fields
- Rollup, lookup, and count fields
- Select and user fields
- Integrating with Airtable
- API
- Getting started with Airtable's Web API
- Creating personal access tokens
- Airtable Webhooks API Overview
- Service accounts overview
- Airtable Web API - Using filterByFormula or sort parameters
- Airtable API Deprecation Guidelines
- Airtable API: Common troubleshooting
- Managing API call limits in Airtable
- URL length limitations for web API requests
- Integration services
- Third-party integrations via OAuth overview
- Troubleshooting disconnected OAuth integrations in Airtable
- Options for integrating with Airtable
- Third-party integrations - Common troubleshooting
- Low-code integrations - Common troubleshooting
- Integrating Airtable with external calendar applications
- Visualizing records from Airtable in Tableau
- Visualizing Airtable records in Microsoft Power BI & Power Query
- Integrating HubSpot with Airtable
- Using Zapier to integrate Airtable with other services
- Using Zapier's Multi-Step Zaps to find and update records
- Using IFTTT to integrate Airtable with other services
- Integrating with AWS Lambda & DynamoDB
- Developer tools
- API
- Airtable Interface Designer
- Interface Designer overview articles
- Interface layouts
- Interface elements
- Adding and removing elements in interfaces
- Adding layouts to interfaces
- Formatting elements in interfaces
- Interface element: Button
- Interface element: Calendar
- Interface element: Chart
- Interface element: Filter
- Interface element: Gallery
- Interface element: Grid
- Interface element: Kanban
- Interface element: Number
- Interface element: Record picker
- Interface element: Text
- Interface element: Timeline
- Learning and Resources
- Managing Airtable
- Airtable Policy
- Airtable Records
- Airtable Sync
- Airtable Views
- Airtable Workspaces
- Print
- Share
- DarkLight
- PDF
Contents
How to delay Airtable automation runs
- Updated on 21 Dec 2023
- 4 Minutes to read
- Print
- Share
- DarkLight
- PDF
Article summary
Did you find this summary helpful?
Thank you for your feedback
Learn how to set a time delay for an automation to use before running. This delay will occur between updating your base and running the automation.
It's worth noting that there are multiple ways to accomplish a similar result.
You might also consider utilizing conditional automation action groups for more complex workflows.
Also, note that Airtable offers the "At a scheduled time" trigger for handling situations where you'd like an automation to fire on a specific time/date.
Introduction
Plan availability | All plan types |
Permissions | Owners/Creators - These permissions are needed in order to be able to perform the steps outlined in this article. |
Platform(s) | Web/Browser, Mac app, and Windows app |
Understanding automation run delays
In this article, we'll apply this workflow to an example scenario where a marketing team is using Airtable to track record assets (images, copy, and more). When the required assets are ready they want to change the status to Review and notify the team with an automated message in Slack. They need the option to delay sending the Slack message if preferred.
Here's a summary of the workflow we'll create for this hypothetical marketing team:
Create a date field (with time toggled on) to use for delaying the automation
Create a formula field to track the current date/time against the date/time entered in the date field
Configure a filtered view to only show records that have all assets and the "Review" status
Setup the automation action to fire only when the current date/time matches the date field date/time
Note
The process in this article is a workaround involving the use of the
NOW()formula function which has some limitations. Generally,NOW()updates approximately every five to ten minutes when a base is open (although this timing may vary slightly). If the base is closed, it will update approximately every hour when the base has time-dependent automation triggers or actions. If native automation delays would be a helpful feature for you we'd love to hear more about your interest!
Setting up an automation to run after a delay
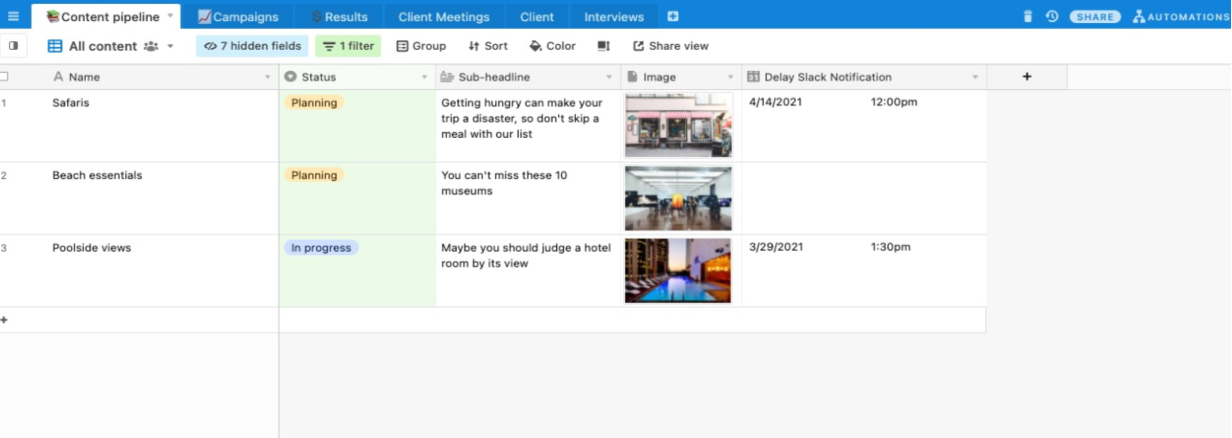
Step 1: Create a date field
Add a new date field and name it Delay Slack Notification. Notice that some of the records shown below have a date and time filled out, while some don't.
Step 2: Create a formula field
We'll use a formula to check if the current date and time is the same as the date and time entered in the date field. The formula used below follows this logic:
If the Delay Slack Notification field is empty then display a message that says, "Send Notification".
If the Delay Slack Notification field has something entered and the current date/time matches it, display a message that says, "Send Notification".
If the Delay Slack Notification field has something entered and the current date/time doesn't match, display a message that says, "Delay Notification.”
IF(
    OR(
        AND(
            {Status} = "Review",
            {Delay Slack Notification},
            NOW()>={Delay Slack Notification}
        ),
        AND(
            {Status} = "Review",
            {Delay Slack Notification} = BLANK()
        )
    ),
"Send Notification",
"Delay Notification"
)
Plain text
Step 3: Configure a filtered view
Next, you'll need to set up a new filtered view that will be used to display only records that have all of the desired assets present. The filtering criteria we set up for our conditions are:
Sub-headline is not empty AND
Link is not empty AND
Header image is not empty AND
Status is "Review"
Records will enter this view whenever each of those fields is filled and someone has changed the status to "Review.”
Note
The Content Tracker template doesn't include the Review status by default. If you're using that template to build this same automation you'll need to add that status manually.
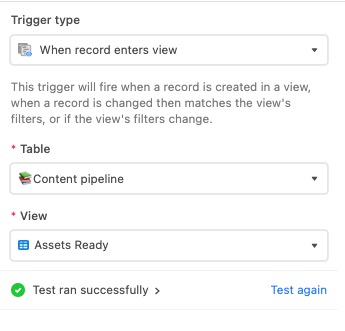
Step 4: Choose an automation trigger
The next step is to setup an automation using the When a record enters a view trigger. Select the appropriate table and the Assets Ready view we just created.
Note
We strongly recommend pairing the "When record enters view" trigger with a locked view. By using a locked view, or ensuring a locked field is involved, you can decrease the likeliness of accidentally changing a view's filtering (therefore avoiding accidental automation runs for unintended records that enter that view).
Step 5: Add an automation action
Next, add the Send a Slack message action and select the channel where you want to send the message. You can then format your message to include any information about the record. In the example below a link to open the record is included to make it easy to review the record.
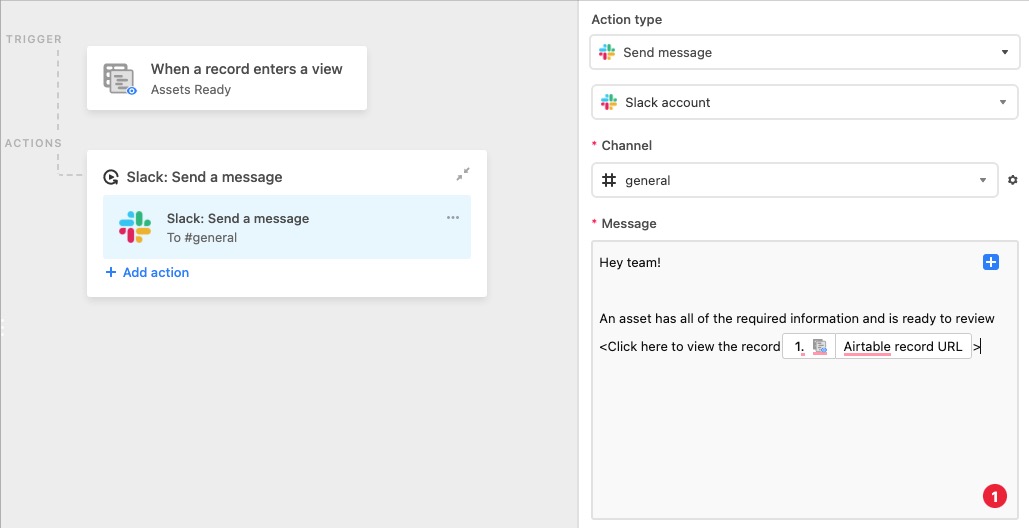 Once you've configured the message details make sure to run a test to check that everything is formatted correctly.

Understanding expected automation output behavior
Now that everything has been configured, the automation action will run in these scenarios when a record enters the Assets Ready view:
If a record has a "Ready" status and has a delayed date and time entered, the Slack message will wait to send until that date and time is reached.
If a record has a "Ready" status and no delayed date and time is entered, the Slack message will send immediately.
Was this article helpful?
Thank you for your feedback! Our team will get back to you
How can we improve this article?
Your feedback
Comment
Comment (Optional)
Character limit : 500
Please enter your comment
Email (Optional)
Email
Please enter a valid email
