- Cómo empezar a usar Airtable
- Introducción a los aspectos básicos de Airtable
- Cómo comunicarse con el equipo de soporte de Airtable
- Pantalla de inicio de Airtable
- Glosario de terminología de Airtable
- Airtable technical requirements
- Diferencias entre las funciones de Airtable para escritorio y para móvil
- Atajos de teclado de Airtable
- Cómo usar Markdown en Airtable
- Adding descriptions in Airtable
- Finding Airtable IDs
- Automatizaciones de Airtable
- Descripción general de automatizaciones
- Guías de automatizaciones
- Guías de automatizaciones integradas
- Guías de automatizaciones en Airtable
- Linking existing records using automations
- Conditional groups of automation actions
- Repeating groups of Airtable automation actions
- Creating recurring records using automations
- How to delay Airtable automation runs
- Prevent automations from triggering by mistake
- Use automations to timestamp status updates
- Desencadenantes de automatizaciones
- Desencadenantes de Airtable
- Airtable automation trigger: When record matches conditions
- Airtable automation trigger: When a form is submitted
- Airtable automation trigger: When record created
- Desencadenante de automatización de Airtable: cuando se actualiza un registro
- Airtable automation trigger: When record enters view
- Desencadenante de automatización de Airtable: a una hora programada
- Airtable automation trigger: When webhook received
- Airtable automation trigger: When a button is clicked
- Airtable automation trigger: When email received
- Desencadenantes integrados
- Desencadenantes de Airtable
- Acciones de automatización
- Acciones en Airtable
- Acción de automatización de Airtable: enviar correo electrónico
- Airtable automation action: Create record
- Airtable automation action: Update record
- Airtable automation action: Find records
- Airtable automation action: Sort list
- Acción de automatización de Airtable: ejecutar un script
- Airtable automation action: Generate with AI
- Acciones integradas
- Airtable automation actions: Slack
- Airtable automation actions: Google Workspace
- Airtable automation action: Send MS Teams message
- Airtable automation actions: Outlook
- Airtable automation actions: Jira Cloud
- Airtable automation actions: Jira Server / Data Center
- Airtable automation actions: Salesforce
- Airtable automation action: Create post in Facebook Pages
- Airtable automation actions: GitHub Issues
- Airtable automation action: Hootsuite post
- Airtable automation action: Send Twilio SMS
- Acciones en Airtable
- Bases de Airtable
- Using Airtable Cobuilder
- Descripción general de las bases de Airtable
- Creating and duplicating bases in Airtable
- Structuring your Airtable bases effectively
- Moving Airtable bases between workspaces
- Tables in Airtable
- Crear enlaces para compartir bases de Airtable
- Importing third-party data into Airtable
- Uso de las perspectivas
- Troubleshooting Airtable base performance
- Versiones beta de Airtable
- Colaboración en Airtable
- Asistencia de Airtable Enterprise
- Información general
- External badging in Airtable
- Creating and using Airtable components
- Ask an Expert beta overview
- Data residency at Airtable
- Descripción general de los grupos de usuarios en Airtable
- API de Enterprise de Airtable
- Creating and managing data retention policies in Airtable
- eDiscovery APIs in Airtable
- Airtable and data loss prevention
- Acceder a los registros de auditoría de Enterprise en Airtable
- Configuración de Jira Server/Data Center para conectarse con Airtable
- Panel de Administración de Enterprise
- Descripción general del panel de administración de Enterprise
- Usuarios: panel de administración de Enterprise en Airtable
- Detalles del usuario en el panel de administración de Airtable
- Grupos: panel de administración de Airtable
- Espacios de trabajos: panel de administración de Enterprise de Airtable
- Bases: panel de administración de Enterprise en Airtable
- Interfaces: Panel de administración de Enterprise en Airtable
- Data sets - Airtable admin panel
- Managed apps - Airtable admin panel
- Components - Airtable admin panel
- Informes: panel de administración de Enterprise en Airtable
- Airtable admin panel settings
- Guía práctica de Enterprise
- Gestionar a los admins de Enterprise en el panel de administración
- Uso de organizaciones
- Organizational branding for apps in Airtable
- Enterprise Hub in Airtable
- Enterprise Hub : Org unit assignment with user groups
- Desactivar, retirar el acceso y reactivar usuarios desde el panel de administración
- Gestionar el acceso de usuario a espacios de trabajo y bases
- Airtable Enterprise Key Management
- Custom terms of use
- SSO en Enterprise
- Información general
- Extensiones de Airtable
- Descripción general de las extensiones
- Extensiones por Airtable
- Extensiones integradas
- Campos de Airtable
- Descripción general de los campos
- Archivo adjunto
- Campos basados en fecha
- Fórmula
- Empezar a usar fórmulas
- Fundamentos de fórmulas
- Soluciones frecuentes: principiante
- Soluciones habituales: intermedias
- Soluciones habituales: avanzado
- Campo de texto largo
- Campos de registros vinculados
- Campos con números
- Otros campos
- Campos de compilación, búsqueda y recuento
- Campos de selección y colaborador
- Integración con Airtable
- API
- Getting started with Airtable's Web API
- Crear tokens de acceso personal
- Airtable Webhooks API Overview
- Service accounts overview
- API web de Airtable: usar filterByFormula o parámetros para ordenar
- Airtable API Deprecation Guidelines
- Airtable API: Common troubleshooting
- Managing API call limits in Airtable
- Enforcement of URL length limit for Web API requests
- Servicios de integración
- Third-party integrations via OAuth overview
- Troubleshooting disconnected OAuth integrations in Airtable
- Options for integrating with Airtable
- Third-party integrations - Common troubleshooting
- Low-code integrations - Common troubleshooting
- Integrating Airtable with external calendar applications
- Visualizing records from Airtable in Tableau
- Visualizing Airtable records in Microsoft Power BI & Power Query
- Integrating HubSpot with Airtable
- Using Zapier to integrate Airtable with other services
- Using Zapier's Multi-Step Zaps to find and update records
- Using IFTTT to integrate Airtable with other services
- Integrating with AWS Lambda & DynamoDB
- Herramientas para desarrolladores
- API
- Diseñador de Interfaces de Airtable
- Descripción general
- Diseños de página
- Elementos
- Adding and removing elements in interfaces
- Adding layouts to interfaces
- Formatting elements in interfaces
- Interface element: Button
- Interface element: Calendar
- Interface element: Chart
- Interface element: Filter
- Interface element: Gallery
- Interface element: Grid
- Interface element: Kanban
- Interface element: Number
- Interface element: Record picker
- Interface element: Text
- Interface element: Timeline
- Aprendizaje y recursos
- Gestión de Airtable
- Política de Airtable
- Registros de Airtable
- Sincronización de Airtable
- Vistas de Airtable
- Espacios de trabajo de Airtable
- Impresión
- Compartir
- OscuroLigero
- PDF
Airtable Sync: Converting to a synced table
- Actualizado en 04 Mar 2024
- 5 Minutos para leer
- Impresión
- Compartir
- OscuroLigero
- PDF
Plan availability | All paid plan types |
Permissions | Owners/Creators - In order to create or update synced tables, you'll need to have creator permissions in the base where you are setting up the sync. |
Platform(s) | Web/Browser, Mac app, and Windows app |
Related reading |
|
When is adding synced data to a table a good choice?
This article will walk you through the basic setup steps, considerations, and reasoning related to converting an existing table in a base to become a table synced to a view that is sync-enabled from another base.
While building an app on Airtable, you may realize that you want to tap into data that already exists in your organization. However, if you’ve already invested time and energy into constructing your app, it can be painful to imagine rebuilding linked records, interfaces, and automations around a new dataset that’s been synced into a new table. This is when you’ll want to utilize the option to import data from a synced table into your app. In many cases, your organization may already be using our verified data feature, but even if you aren’t, there may be value in importing synced data into an existing table. Below, we will walk you through the steps necessary to complete this process, including mapping the fields between the source and the target table you are converting.
Converting an existing table to become a synced table
Navigate to the base containing the table that you want to convert.
Click the dropdown next to the name of the table and then hover over the Import data option.
There are two options:
Users on any plan type can choose a specific Airtable base containing a view that has sync enabled.
Enterprise Scale users can then choose to convert the table to be synced via your organization’s Data library (click the Add from data library option).
Once you have selected how you want to sync in the data, you’ll be shown a prompt that will remind you that this will change the base structure permanently. If you are unsure of whether or not you want to make this change, we recommend employing any of the following options first:
Manually take a snapshot of the base to be able to restore the base in its current form
Duplicate the table you want to convert to see how the changes will affect it. You can do this by clicking the dropdown next to the name of the table and then clicking the Duplicate table option.
Take a moment to consider the potential impacts of making this change in your base before proceeding, then click Continue.
Depending upon which method you chose in step 3 there are two options:
If you choose to sync from an Airtable base, you’ll be shown the same setup screen when creating any other sync. Here you can choose to setup the sync by choosing a specific base, then table, then view to sync or by pasting in a share link that has syncing enabled. Click Next once you’ve selected a view or pasted in the share link URL.
If you choose the Add from data library option, then you will replace existing data with a data set by choosing from the data sets available to you and then clicking Add this data.
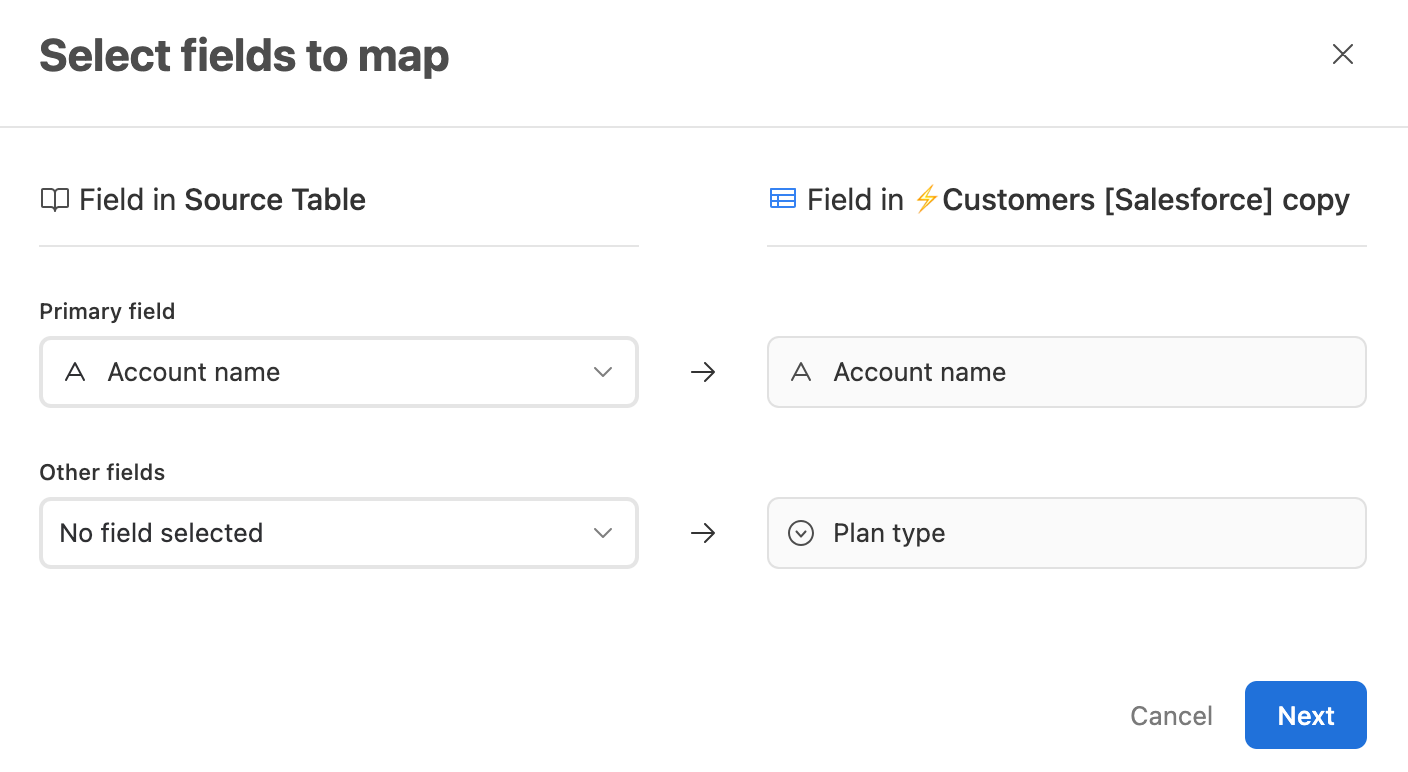
You’ll now be shown a window where you will map fields from the source view to the target table in the base you currently have open. You’ll need to choose a primary field to map to this table and also help to match certain fields in the source view to appropriate fields in the target table. Often, field names and field types will differ. For more information on the limitations associated with this step of the setup process, click here to read more. Sometimes, you might even choose not to map a specific field. In these cases, you choose to keep the No field selected option. Once you have chosen how to map the fields from the source to the target click Next.
Next, you will be brought to a screen where you can choose to import new fields into the table. Essentially, these are any fields that have not already been mapped to the target table in the previous step. Any fields you import will be created as additional synced columns in the target table. You may choose to import one, many, all, or none of the fields presented in this window. Click Next when you have decided which fields to import.
Lastly, this will take you to the Review changes screen. Here you can read a brief description of how it is that the table you are choosing to convert as a synced table will change. Remember, if you have any doubts about whether or not this is a change you want to make you can still click Cancel to exit the sync setup process. Otherwise, click Finish import to allow the sync to occur.
Note
Remember that it may take a few moments for the sync to complete depending upon the size of the table that you are converting to a synced table.
Limitations and dependencies
During the conversion process, existing records in the table will be removed and replaced by the records present in the source view. Note that once the conversion process has been completed as highlighted in the walkthrough above, this cannot be undone. Please keep that in mind before initiating the conversion.
Because the sync is created with two-way sync turned off, synced data added during this process is uneditable. As a result, forms and automations that edit one or more fields in the target table will break and need to be rebuilt to work again. If you use two-way sync, you must re-enable two-way sync on the target table via the Sync Configuration menu post-setup.
If a target single or multi-select column is mapped, the select options available in a single or multi-select column will be changed to match those in the source table. This means that if a target select option was used in view filters or as sorting criteria, it would be removed.
In some cases, features like filters and interfaces may also need to be reconfigured to look and work as intended if those features currently utilize fields or views in their layout.
Source fields can only be mapped to compatible target fields. For example, a number field in the source table can map to a text field in the target table, but a text field in the target source cannot map to a number field in the target.
FAQs
Can I add or "merge in" synced data with the existing data in the table?
No. We only support converting the table to store/show data from the source you choose.