Contenido x
- Cómo empezar a usar Airtable
- Introducción a los aspectos básicos de Airtable
- Cómo comunicarse con el equipo de soporte de Airtable
- Pantalla de inicio de Airtable
- Glosario de terminología de Airtable
- Airtable technical requirements
- Diferencias entre las funciones de Airtable para escritorio y para móvil
- Atajos de teclado de Airtable
- Cómo usar Markdown en Airtable
- Adding descriptions in Airtable
- Finding Airtable IDs
- Automatizaciones de Airtable
- Descripción general de automatizaciones
- Guías de automatizaciones
- Guías de automatizaciones integradas
- Guías de automatizaciones en Airtable
- Linking existing records using automations
- Conditional groups of automation actions
- Repeating groups of Airtable automation actions
- Creating recurring records using automations
- How to delay Airtable automation runs
- Prevent automations from triggering by mistake
- Use automations to timestamp status updates
- Desencadenantes de automatizaciones
- Desencadenantes de Airtable
- Airtable automation trigger: When record matches conditions
- Airtable automation trigger: When a form is submitted
- Airtable automation trigger: When record created
- Desencadenante de automatización de Airtable: cuando se actualiza un registro
- Airtable automation trigger: When record enters view
- Desencadenante de automatización de Airtable: a una hora programada
- Airtable automation trigger: When webhook received
- Airtable automation trigger: When a button is clicked
- Airtable automation trigger: When email received
- Desencadenantes integrados
- Desencadenantes de Airtable
- Acciones de automatización
- Acciones en Airtable
- Acción de automatización de Airtable: enviar correo electrónico
- Airtable automation action: Create record
- Airtable automation action: Update record
- Airtable automation action: Find records
- Airtable automation action: Sort list
- Acción de automatización de Airtable: ejecutar un script
- Airtable automation action: Generate with AI
- Acciones integradas
- Airtable automation actions: Slack
- Airtable automation actions: Google Workspace
- Airtable automation action: Send MS Teams message
- Airtable automation actions: Outlook
- Airtable automation actions: Jira Cloud
- Airtable automation actions: Jira Server / Data Center
- Airtable automation actions: Salesforce
- Airtable automation action: Create post in Facebook Pages
- Airtable automation actions: GitHub Issues
- Airtable automation action: Hootsuite post
- Airtable automation action: Send Twilio SMS
- Acciones en Airtable
- Bases de Airtable
- Using Airtable Cobuilder
- Descripción general de las bases de Airtable
- Creating and duplicating bases in Airtable
- Structuring your Airtable bases effectively
- Moving Airtable bases between workspaces
- Tables in Airtable
- Crear enlaces para compartir bases de Airtable
- Importing third-party data into Airtable
- Uso de las perspectivas
- Troubleshooting Airtable base performance
- Versiones beta de Airtable
- Colaboración en Airtable
- Asistencia de Airtable Enterprise
- Información general
- External badging in Airtable
- Creating and using Airtable components
- Ask an Expert beta overview
- Data residency at Airtable
- Descripción general de los grupos de usuarios en Airtable
- API de Enterprise de Airtable
- Creating and managing data retention policies in Airtable
- eDiscovery APIs in Airtable
- Airtable and data loss prevention
- Acceder a los registros de auditoría de Enterprise en Airtable
- Configuración de Jira Server/Data Center para conectarse con Airtable
- Panel de Administración de Enterprise
- Descripción general del panel de administración de Enterprise
- Usuarios: panel de administración de Enterprise en Airtable
- Detalles del usuario en el panel de administración de Airtable
- Grupos: panel de administración de Airtable
- Espacios de trabajos: panel de administración de Enterprise de Airtable
- Bases: panel de administración de Enterprise en Airtable
- Interfaces: Panel de administración de Enterprise en Airtable
- Data sets - Airtable admin panel
- Managed apps - Airtable admin panel
- Components - Airtable admin panel
- Informes: panel de administración de Enterprise en Airtable
- Airtable admin panel settings
- Guía práctica de Enterprise
- Gestionar a los admins de Enterprise en el panel de administración
- Uso de organizaciones
- Organizational branding for apps in Airtable
- Enterprise Hub in Airtable
- Enterprise Hub : Org unit assignment with user groups
- Desactivar, retirar el acceso y reactivar usuarios desde el panel de administración
- Gestionar el acceso de usuario a espacios de trabajo y bases
- Airtable Enterprise Key Management
- Custom terms of use
- SSO en Enterprise
- Información general
- Extensiones de Airtable
- Descripción general de las extensiones
- Extensiones por Airtable
- Extensiones integradas
- Campos de Airtable
- Descripción general de los campos
- Archivo adjunto
- Campos basados en fecha
- Fórmula
- Empezar a usar fórmulas
- Fundamentos de fórmulas
- Soluciones frecuentes: principiante
- Soluciones habituales: intermedias
- Soluciones habituales: avanzado
- Campo de texto largo
- Campos de registros vinculados
- Campos con números
- Otros campos
- Campos de compilación, búsqueda y recuento
- Campos de selección y colaborador
- Integración con Airtable
- API
- Getting started with Airtable's Web API
- Crear tokens de acceso personal
- Airtable Webhooks API Overview
- Service accounts overview
- API web de Airtable: usar filterByFormula o parámetros para ordenar
- Airtable API Deprecation Guidelines
- Airtable API: Common troubleshooting
- Managing API call limits in Airtable
- Enforcement of URL length limit for Web API requests
- Servicios de integración
- Third-party integrations via OAuth overview
- Troubleshooting disconnected OAuth integrations in Airtable
- Options for integrating with Airtable
- Third-party integrations - Common troubleshooting
- Low-code integrations - Common troubleshooting
- Integrating Airtable with external calendar applications
- Visualizing records from Airtable in Tableau
- Visualizing Airtable records in Microsoft Power BI & Power Query
- Integrating HubSpot with Airtable
- Using Zapier to integrate Airtable with other services
- Using Zapier's Multi-Step Zaps to find and update records
- Using IFTTT to integrate Airtable with other services
- Integrating with AWS Lambda & DynamoDB
- Herramientas para desarrolladores
- API
- Diseñador de Interfaces de Airtable
- Descripción general
- Diseños de página
- Elementos
- Adding and removing elements in interfaces
- Adding layouts to interfaces
- Formatting elements in interfaces
- Interface element: Button
- Interface element: Calendar
- Interface element: Chart
- Interface element: Filter
- Interface element: Gallery
- Interface element: Grid
- Interface element: Kanban
- Interface element: Number
- Interface element: Record picker
- Interface element: Text
- Interface element: Timeline
- Aprendizaje y recursos
- Gestión de Airtable
- Política de Airtable
- Registros de Airtable
- Sincronización de Airtable
- Vistas de Airtable
- Espacios de trabajo de Airtable
- Impresión
- Compartir
- OscuroLigero
- PDF
Contenido
Airtable Sync integration: Tableau Online
- Actualizado en 15 Jul 2024
- 6 Minutos para leer
- Impresión
- Compartir
- OscuroLigero
- PDF
The content is currently unavailable in Spanish. You are viewing the default English version.
Resumen del artículo
¿Te ha resultado útil este resumen?
Gracias por sus comentarios
Note
Tableau recently changed the name of their cloud-based product from Tableau Online to Tableau Cloud. While we adjust for this in-product, you might see Tableau Online still in use.
Plan availability | Business and Enterprise Scale access only |
Permissions | Owners/Creators - In order to create or update synced tables, you'll need to have creator permissions in the base where you are setting up the sync. |
Platform(s) | Web/Browser, Mac app, and Windows app |
Related reading |
|
Learn how to use the Airtable Sync integration feature to bring information from an external application into Airtable as a new table in your base. Sync integrations are always a one way sync from the external application into an Airtable base, so changes made in Airtable cannot be synced back to the external application that you are syncing with.
Tableau builds tools to measure, parse, and share data and visually compelling analytics. Follow along below to learn the ins and outs of syncing data from a Tableau Cloud worksheet to Airtable.
Setting up a Tableau to Airtable sync
Note
This sync integration is built for Tableau Cloud users. Data held in Tableau Server is out of scope for this feature.
Step 1: Add a new synced table
From a new or existing base, find the + Add or import button next to the table furthest to the right. If you have 4 or more tables in your base, then this button will simply appear as a “+” plus sign. Next, click the More… option. Then, you’ll see a list of other available syncs to choose from. Finally, click the Tableau Online option.

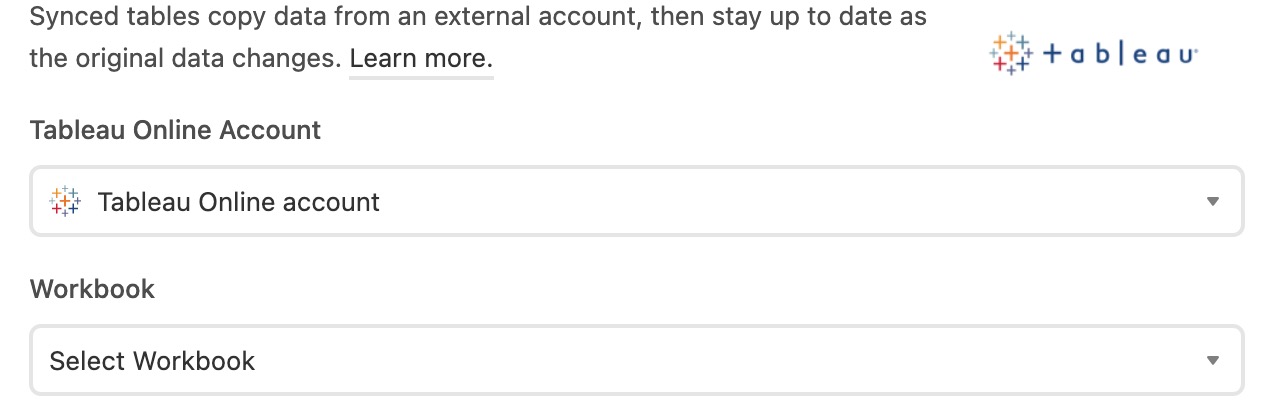
Step 2: Select a Tableau account
After clicking to add the Tableau sync you’ll be prompted to select or connect a Tableau Online Account. If this is the first time you are setting up a sync with Tableau, then you’ll need to connect with a new account.

This will bring up a new window where you will enter your Tableau credentials. This includes the Host Name, Site Name, Personal Access Token Name, and Personal Access Token Secret. Links are provided throughout the setup window for further instruction. Additionally, we recommend that you create a new Personal Access Token just for this Airtable connection.

Jump down to the section below for more information on Security and Authentication.
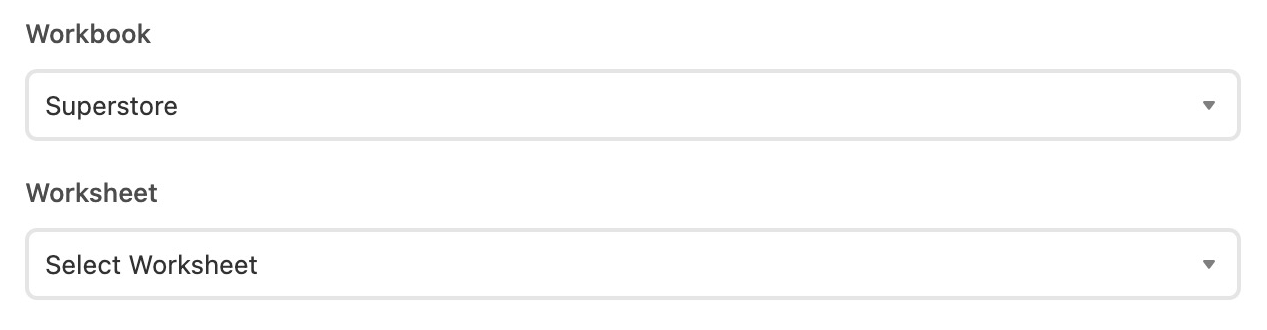
Step 3: Select Workbook and Worksheet
After connecting your Tableau account you’ll see a drop-down asking you to select a Workbook.
From the Workbook selected, you’ll then select a Worksheet to sync to Airtable. If you end up remembering a certain Worksheet is in another Workbook, then you can open up the Workbook drop-down and select an other one.
Click the Next button to move on to field configuration.
Note
Depending upon the size of the worksheet, it may take some time for the next step to appear in Airtable. At the moment, Airtable can sync over a maximum of 10,000 records from a worksheet per sync.
Step 4: Field configuration
Next up, you’ll need to configure the fields that will be synced over to Airtable. This involves choosing a primary field, customizing which fields will be shown, as well as picking field types for each column (field).

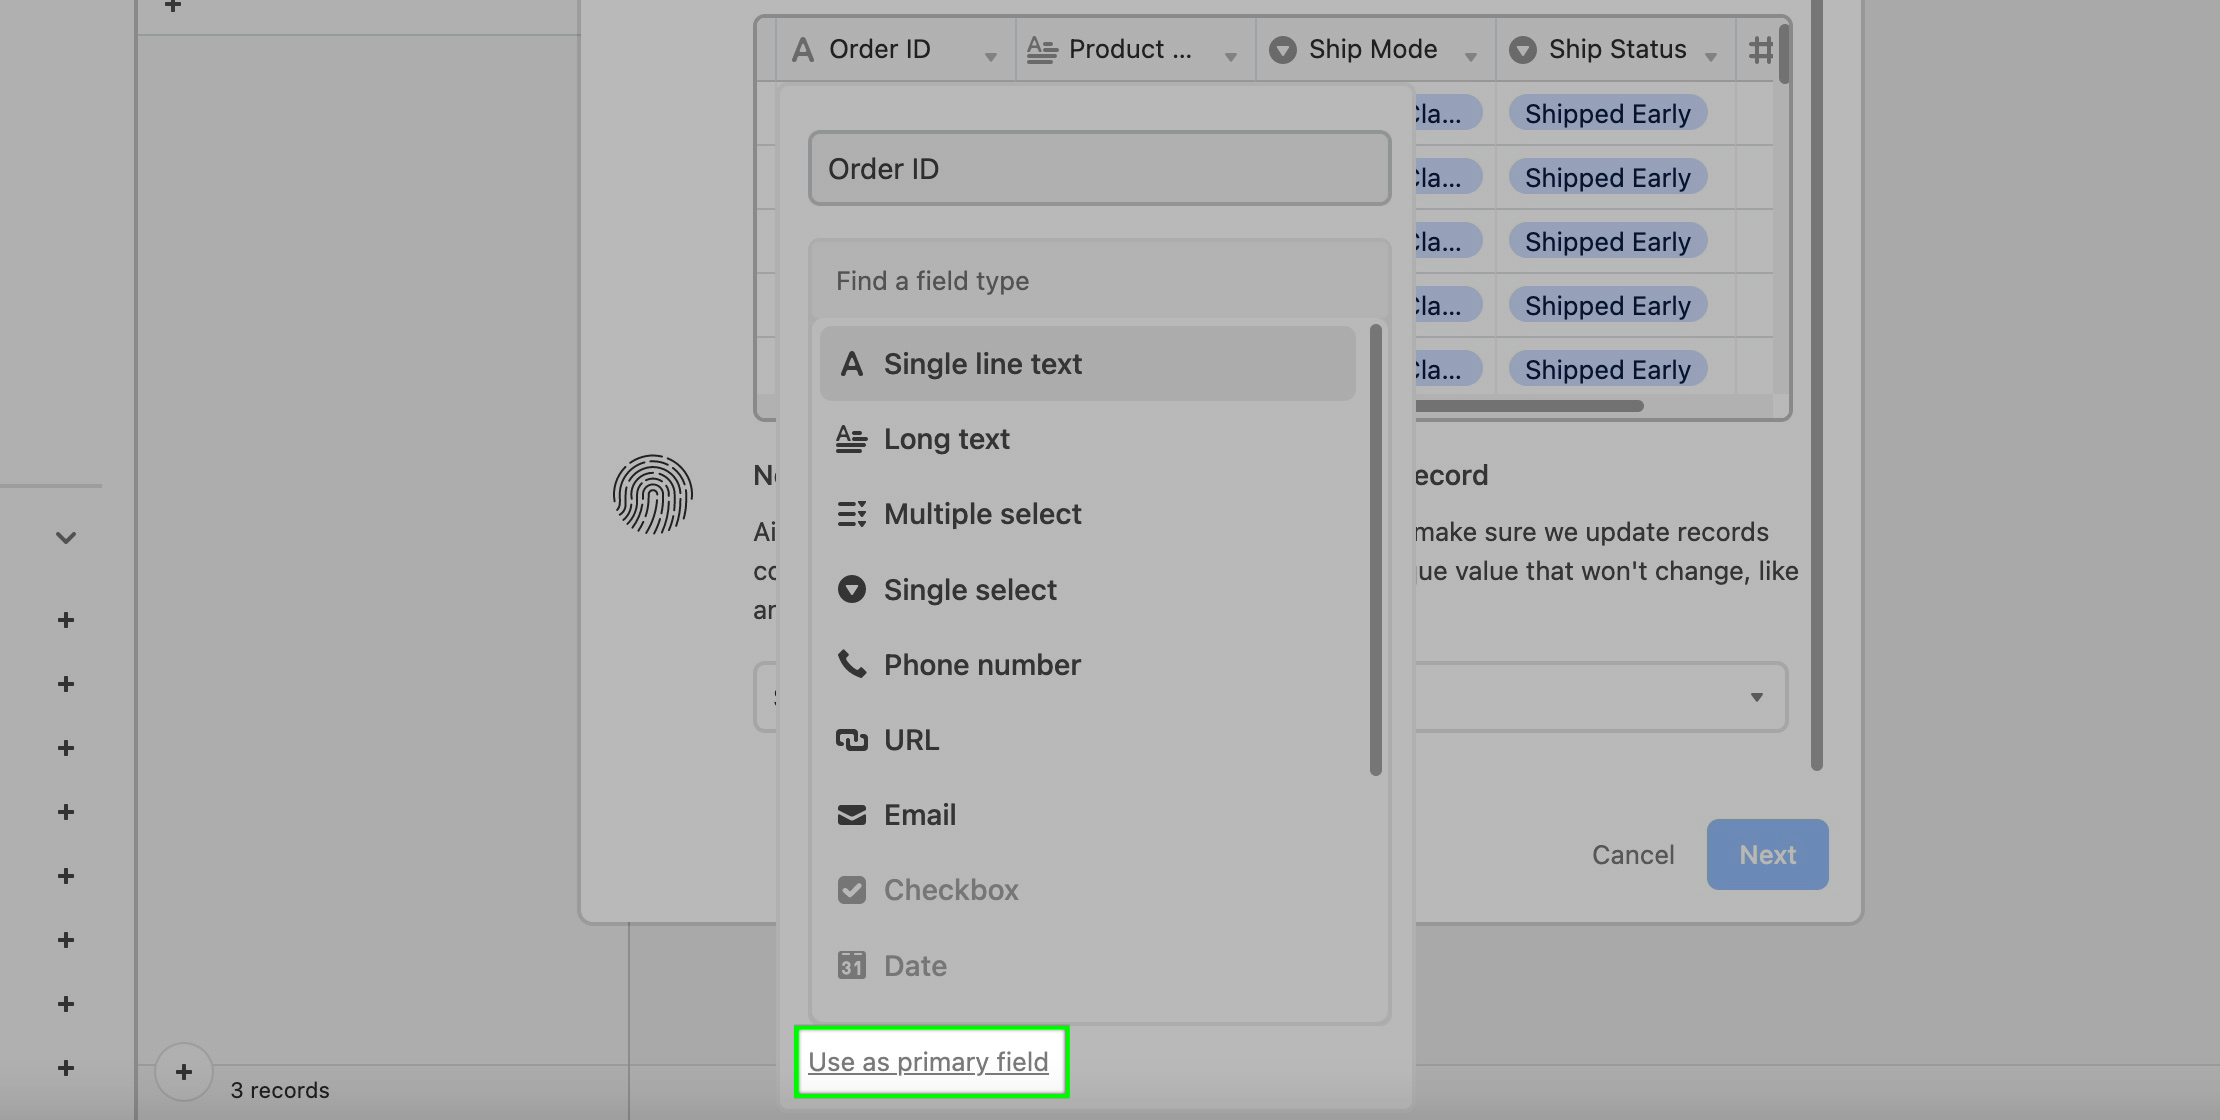
We do our best to identify good field types for each field coming from Tableau, however, sometimes you’ll want to adjust things so they make sense in your Airtable base. For this example, we first want to change the “Order ID” field to be a single line text field. This serves two purposes. First, it is likely a better field type for this row of data. Second, it allows us to set this as the pr imary field.

Now, we want to set this Order ID field to be the primary field in Airtable since it uniquely identifies each row (record) of data. Upon clicking the drop-down next to the Order ID field name we’ll click the Use as pri mary field option.
Next, you need to choose a field that uniquely identifies each record. This may sound redundant since you just set the primary field in Airtable, but it isn’t. Setting the primary field in Airtable allows you to uniquely identify it in Airtable, whereas choosing it here helps us to accurately perform the sync when comparing the current state of your sync in Airtable to the information being held in Tableau. Since the “Order ID” field is a good identifier, we will use that field in this step.

Note that there may be times when a certain field is not a good unique identifier. In these cases, we will warn you that some non-unique records will be lost unless another field can be used.

Step 5: Configure sync settings
Before creating your synced table, there are Settings options that allow you to choose how often you want to sync, and how to handle records deleted or hidden in the Tableau source:
The frequency of syncing. Right now, the options are manual syncing and automatic syncing which happens about every hour.
Whether or not deleted records in the Worksheet in Tableau should be removed from the Airtable table. By default, deleted rows will be removed.

Step 6: Create a synced table
Once you’ve selected your desired sync settings, click the Create table button. Depending on how large the data set being synced in from Tableau is, it may take a few moments for the synced table to be created.

Security and Authentication
This sync integration utilizes Tableau’s PAT (Personal Access Tokens) functionality to connect the two services together. The link above provides a more detailed breakdown of how Tableau has designed their PATs to work and is the best document to refer to for authentication and security questions.
Note
Airtable uses HTTPS to ensure secure and encrypted transfer of information.
FAQs
What limitations exist for this sync?
We will only sync with the first 10,000 records from your Tableau Worksheet. If your Worksheet has more than 10,000 rows, you can use a filter to bring it under 10,000 rows then duplicate the Worksheet and adjust the filter to exclude the rows from Worksheet 1 and include the remaining rows in the duplicated Worksheet 2. You'll need to set up a multi-source sync or a separate synced table in Airtable for each additional Worksheet.
Example: Assume you have a Tableau worksheet containing office supply orders over a two-year period and the total record count is 18,000. If you wanted to bring all 18,000 records into Airtable you could filter the Worksheet using the date field to just include records for the first year, dropping the total record count below the 10,000 record limit. You could then duplicate the worksheet and change the date filter to just include records from the second year. You now have two worksheets that represent all the data you want, both of which are under 10,000 records and can individually be synced into the same Airtable destination table using multi-source sync.
¿Te ha sido útil este artículo?
¡Gracias por sus comentarios! Nuestro equipo se pondrá en contacto con usted
¿Cómo podemos mejorar este artículo?
Sus comentarios
Comentario
Comentario (Opcional)
Límite de caracteres : 500
Por favor, introduzca su comentario
Correo electrónico (Opcional)
Correo electrónico
Introduce un correo electrónico válido
