Record coloring in Airtable
- 19 Nov 2024
- 5 Minutos para leer
- Impresión
- OscuroLigero
- PDF
Record coloring in Airtable
- Actualizado en 19 Nov 2024
- 5 Minutos para leer
- Impresión
- OscuroLigero
- PDF
The content is currently unavailable in Spanish. You are viewing the default English version.
Resumen del artículo
¿Te ha resultado útil este resumen?
Gracias por sus comentarios
Introduction
Paid plans only | |
Owners/Creators and Collaborators with editor permissions | |
Platform(s) | Web/Browser, Mac app, Windows app, and some functionality on mobile devices |
Airtable terminology | Record - A record is an individual item in a table. Records are the basic unit of data that are pulled into various views and interfaces. |
Record coloring in Airtable overview
Record coloring allows users to quickly discern meaningful distinctions between records, without having to dig into the details. Record coloring is useful for things like:
Coloring tasks that are overdue and not marked as complete in a bright red color.
Coloring tasks that have a due date within the next three days and are not marked as complete in a yellow color.
Coloring completed tasks with a neutral gray, making other records stand out in comparison.
Adding record coloring in views
Record coloring can be applied at the view level in bases, meaning that each different view can have its own unique record coloring configuration. View share links include any record coloring settings as well.
Record coloring can be applied to:
Grid views - Record colors appear as color flags on the left side of the primary field.
Calendar views - Record colors are applied to the whole card.
Kanban views and gallery views - In Kanban and gallery views, record colors show up as lines of color on the left side of the card.
Timeline views - Record colors are applied to whole events.
List views - Record colors appear as color flags on the left side of records in the first level of the list view.
Gantt views - Record colors are applied to whole events.
There are three ways to apply record coloring:
Select fields:
Click the paint bucket icon Color option in the view bar.
Then choose the Select field option.
The first select field in the view will be automatically applied. If you have more than one single select field, you can choose which field to use as the color reference by selecting the desired single select field from the dropdown menu.
A color legend will be visible for reference. Changing the color of an option from the color menu will also change the color in the connected select field.
Conditions:
Click the paint bucket icon Color option in the view bar.
Then choose the Conditions option. When you first open the conditions menu, it will have one color and one "undefined" condition (essentially, a condition you haven't set yet).
The menu for creating conditions and condition groups for coloring is the same as the interface for creating conditions for filtering records. To set an individual condition, you'll need to select a field, an operator, and a comparison value (or values).
To add another condition for the same color, click on the + Add condition or + Add condition group button. A collection of two or more conditions (or conditional groups) will be connected via a conjunction ("and" or "or"). By taking advantage of creating and using condition groups, you can create views with deeply customized record coloring.
Clicking on the color swatch for a set of conditions will bring up a color picker. From this color picker, you can specify the color for a set of conditions.
To add a new color and the associated set of conditions for that color, click the + Add color option at the bottom of the dialog. Alternatively, you can duplicate a color and all its conditions by clicking the duplicate button (double square icon) next to a color. This makes it easier to quickly create lots of conditions that are similar to one another.
You can also specify a default color by clicking the + Set default color option. Any records not meeting the specified conditions for any of the other colors will get the default color.
Additional considerations:
Color conditions will automatically collapse to save space as you add more colors and conditions, but you can expand a color to view or edit its conditions by clicking on it.
A record can only have one color —so in the case of a record that matches multiple conditions, the record will receive the color of the first condition it matches, starting from the top of the conditions list. You can rearrange the colors and their associated conditions by clicking and dragging on a color's drag handle. This will change the priority of the different colors—colors closer to the top of the list of colors will get higher priority than those closer to the bottom of the list.
Date fields:
NOTE
Record coloring by date fields is only available for calendar views with multiple date fields.
Record coloring by date fields is a special option for record coloring that is only available when you've plotted multiple date fields and/or date ranges on a single view. Record coloring by date field lets you color the record cards in your calendar view based on the date field or date range used to create the card. This is particularly helpful if you want to be able to quickly distinguish which cards came from which date fields or ranges—for example, if you're tracking multiple types of deadlines on a single calendar.
To color your records using date fields, first make sure that you've plotted more than one date field on your calendar.
Next, click the paint bucket icon Color option in the view bar.
Then choose the Date fields option.
You can then select a color to represent each of the date fields or ranges you've plotted on the calendar.
Record coloring in interfaces
Setting record coloring in interfaces:
Record coloring settings in interfaces are found in the Appearance section of the configuration menu on the right side of the interface editor. Click the cogwheel icon next to the “Color by” heading to add or adjust color settings. In general, the same steps provided above related to record coloring in views apply to record coloring in interfaces.
Removing conditions or colors
To remove a color condition:
Click the paint bucket icon Color option in the view bar.
Click the trash icon to the left of the color that you want to delete. This will delete that color and all of its conditions.
Alternatively, click the trash icon to the right of an individual condition. If this is the only condition, then it will also delete the color. Otherwise, if there are more conditions, the color will remain and those conditions will now determine when that color is shown for records.
To remove select field coloring:
Click the paint bucket icon Color option in the view bar.
Click the X next to the “Coloring records the same as” text.
To remove date field coloring:
Click the paint bucket icon Color option in the view bar.
Click the X next to the “Events are colored based on the date fields they use” text.
FAQs
Is record coloring available on the Free plan?
No. Record coloring is only available on paid plans (Team, Business, and Enterprise Scale).
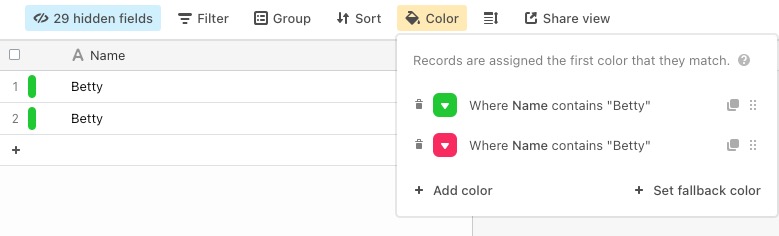
What happens if a record matches two color configurations?
The color configuration that was created first will be applied to the record. For example, in the image below, two color conditions are the same, therefore the first color condition (green) will be applied to any matching records.
Is it possible to color Airtable fields like records?
While you can color Airtable records, coloring individual fields is not possible.
¿Te ha sido útil este artículo?