Plan Availability | All plan types |
Permissions |
|
Platform(s) | Web/Browser, Mac app, and Windows app (with some additional limited support on mobile) |
Note
Consider using AI to help you build out a formula. You can either click Generate formula from a formula field’s editor or ask Omni to help you. Note that AI must be turned on for you to utilize these features.
Using curly brackets to reference field names
When referencing a field, it's a best practice to surround the field name with curly brackets (e.g. {Due Date} ). However, there are a few aspects of referencing fields that you'll need to know when writing Airtable formulas.
For fields with only a single word or character (e.g. no spaces in the field name), you don't have to add curly brackets around the field name. See the animation below showing a reference to the date field without brackets.
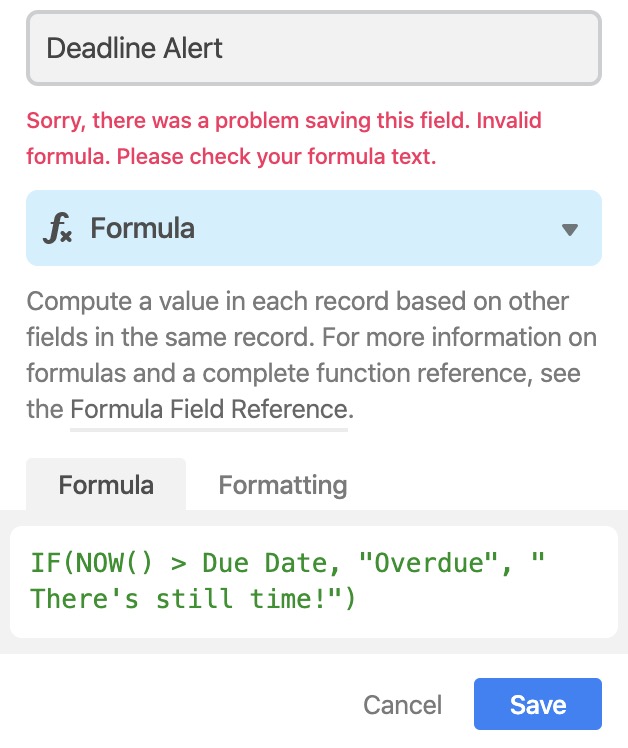
IF(NOW() > Date, "Overdue", " There's still time!")

If you have an existing formula (like the one used above), and then change a field name, Airtable will automatically update your formula to reflect the new field name. In the example below, after changing the Date field to be named Due Date, the formula field both updates the name and adds curly brackets around {Due Date}.
IF(NOW() > {Due Date}, "Overdue", " There's still time!")

For this new field name, curly brackets are required for use in any formula because it has a space in the name. If you try to reference a field name without using curly brackets, you'll see this error appear in your formula field.
Parentheses placement in Airtable formulas
Parentheses are used in Airtable to separate out statements and conditions (e.g. (5+5) * 10 ), as well as containers for formula function (e.g. CONCATENATE({Field 1}, {Field 2}) ). No matter how you use parentheses, there must always be an opening and closing parentheses.
It's important when writing a formula that wherever parentheses are used, they're placed in the right spot. With simple formulas, using a growth rate calculation below as an example, it's apparent where the parenthesis need to be placed:
({Present} - {Past}) / {Past}
As you build more complex formulas - especially with various functions and nested statements - take extra care that all of the parentheses both open and close whatever function or statement they're supposed to contain.
Building complex formulas in Airtable
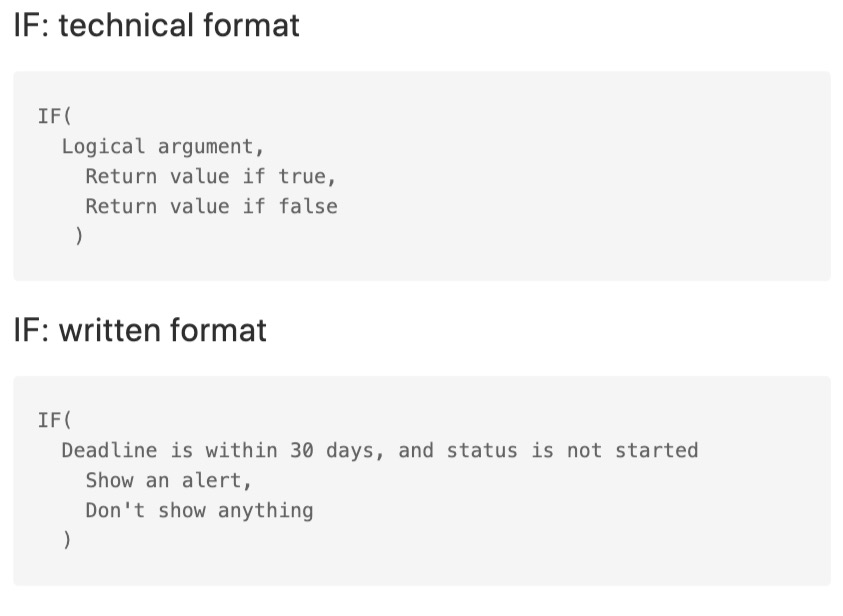
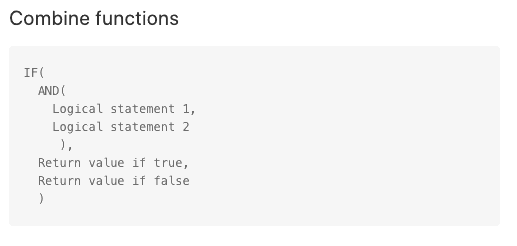
Whether you're just starting out with Airtable formulas, or you're writing out a 60 line nested IF statement, being able to understand the logic and flow of formulas can be challenging! A helpful practice to keep yourself in check when building a formula is to first write out what you want to accomplish in plain language.
Using an IF statement as an example, you may want to accomplish the following: "If the deadline is within 30 days from now, and the status is not started, then show an alert, otherwise show nothing." Write this out, and then split out the various aspects of that sentence into it's related formula components.
The entire formula needs to be structured using an IF() function, even though it will have other functions within it. You'll first need to know the technical format (see our formula field reference), and then you can:
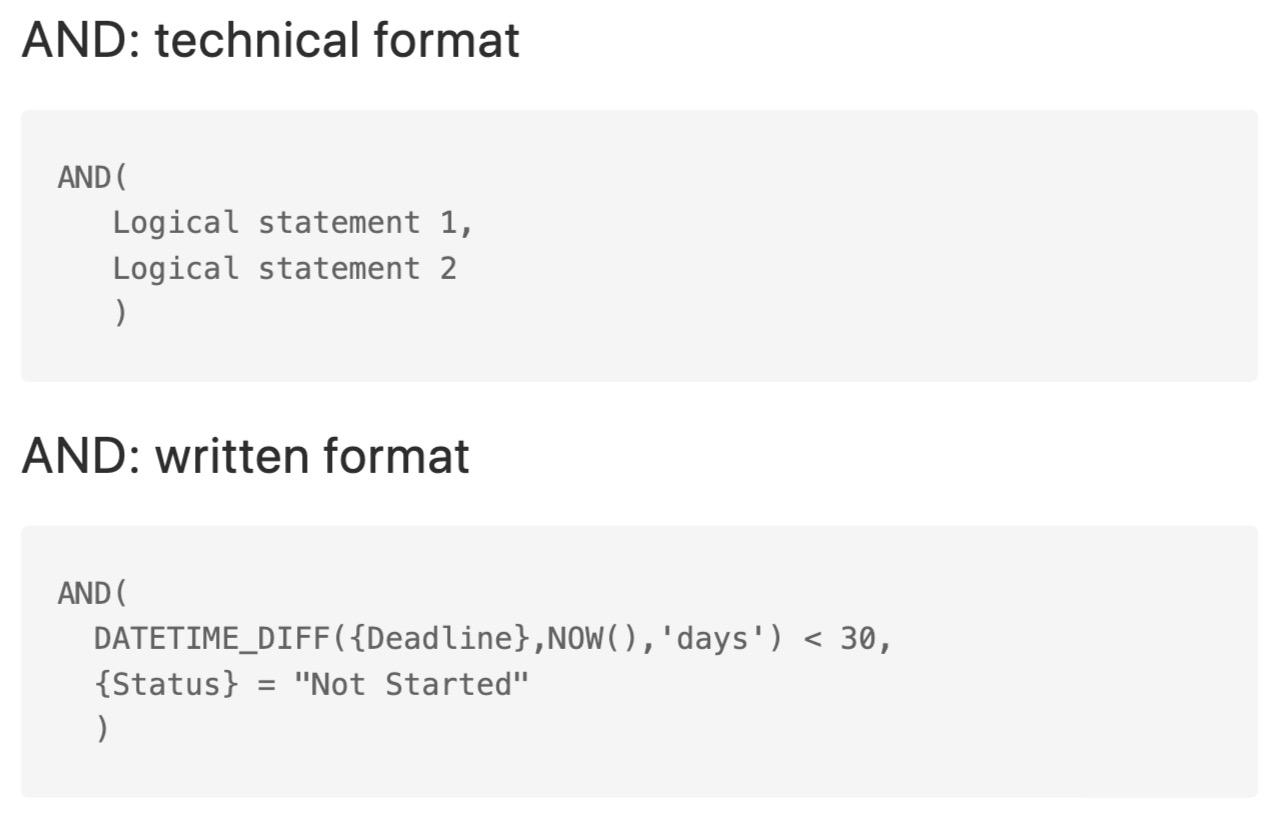
The second component needs the AND() function; the alert should only be if the deadline is within 30 days from now AND the status is not started.
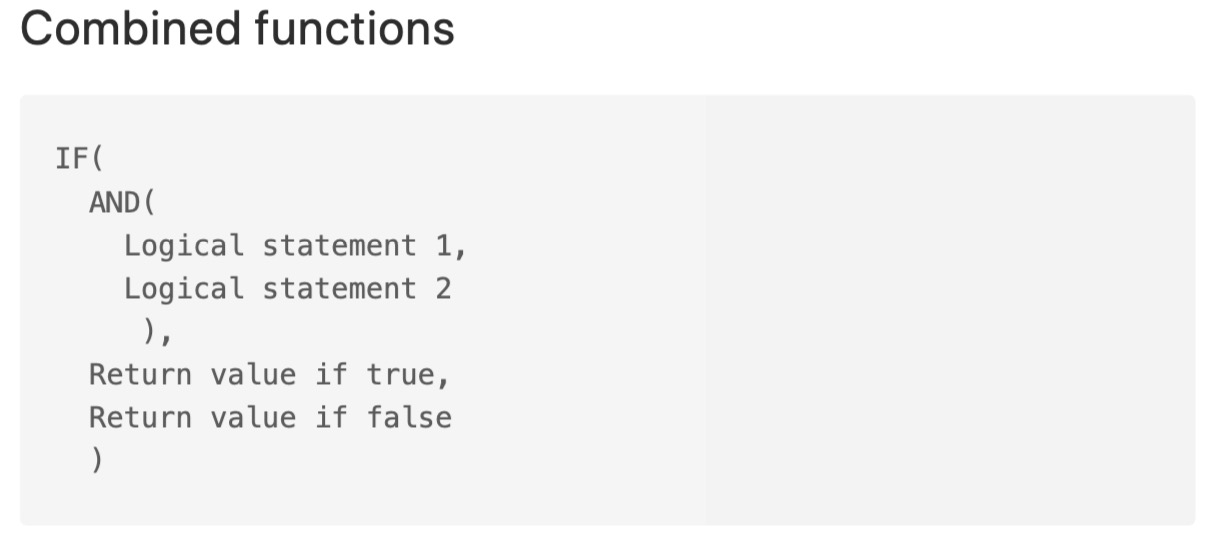
 Now that both components are written, combine the technical formats together.
 Lastly, now that all of the placeholder functions are there, substitute them with the actual formulas written before.
Building readable formulas in Airtable
When writing complex formulas, it's vital to be able to see how each of the various functions you may use relate to one another (this is especially helpful when revising a formula that you may have wrote weeks or months before).
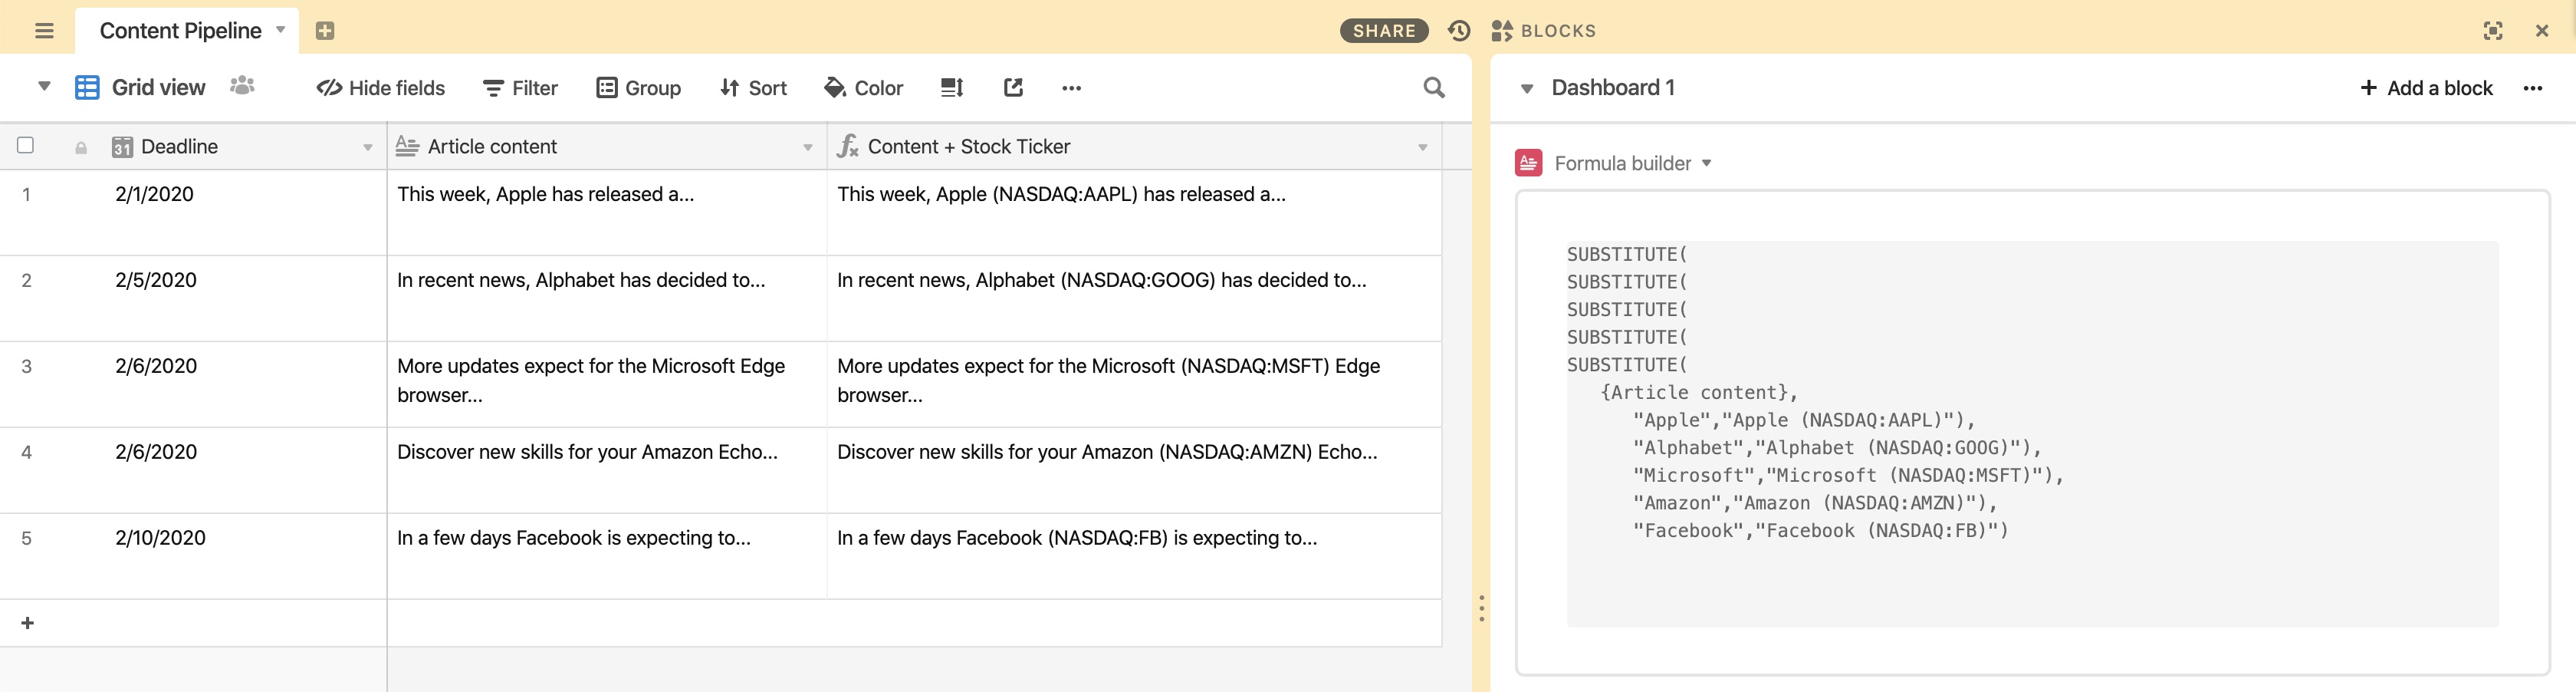
As an example, let's say you're a content writer for a website, and are drafting that content in Airtable. You need to easily add in the stock ticker for a specific list of companies whenever their name is referenced in an article. You can start with a simple formula that'd be easy to write out on a line or two.
SUBSTITUTE({Article content},"Apple","Apple (NASDAQ:AAPL)")

While this is easy to write and visually see on a line, if you decide to add in more companies and stock tickers, writing a formula with several functions all in a line can be difficult.
SUBSTITUTE(SUBSTITUTE(SUBSTITUTE(SUBSTITUTE(SUBSTITUTE({Article content},"Apple","Apple (NASDAQ:AAPL)"),"Alphabet","Alphabet (NASDAQ:GOOG)"),"Microsoft","Microsoft (NASDAQ:MSFT)"),"Amazon","Amazon (NASDAQ:AMZN)"),"Facebook","Facebook (NASDAQ:FB)")
While that formula will work perfectly, it's much easier to write it out like this instead:
SUBSTITUTE(
SUBSTITUTE(
SUBSTITUTE(
SUBSTITUTE(
SUBSTITUTE(
{Article content},
"Apple","Apple (NASDAQ:AAPL)"),
"Alphabet","Alphabet (NASDAQ:GOOG)"),
"Microsoft","Microsoft (NASDAQ:MSFT)"),
"Amazon","Amazon (NASDAQ:AMZN)"),
"Facebook","Facebook (NASDAQ:FB)")
Notice that different functions are nested, or indented, under one another for readability. Structuring a formula this way gives a clear picture of the various functions used and how they relate to one another.
Building formulas alongside your base
When you're building longer and more complex formulas, it's often helpful to see your formula alongside of your base as you build out the different components. To help with this, you can use a Description extension, or even a free text editor program in a separate window next to your base.
Using the same formula above as an example, you can see how the process of writing the formula alongside of your base can be helpful as you reference field names and add in nested arguments.
Using a larger text editor like this can be helpful as you can add line breaks and tabs to your formula (which cannot be input at this time directly within a formula field).
Applying emojis using IF statements
This section covers how to incorporate emojis into text strings using IF statements in formula fields.
To access the emoji keyboard on a Mac: Press Ctrl + CMD + spacebar.
To access the emoji keyboard on a Windows-based computer: Press the Windows logo key + “. “ (period key).
In this example, you want a "Status" field that automatically marks tasks when they are “Overdue”. You also have a "Due Date" field with dates and a checkbox field titled "Completed."
IF({Completed?} = 1, "Done",IF(IS_BEFORE({Due Date}, TODAY()), "🚨 Overdue","🔜 In-progress"))