How to create email digests with automations
- 29 Feb 2024
- 4 Minutes to read
- Print
- DarkLight
- PDF
How to create email digests with automations
- Updated on 29 Feb 2024
- 4 Minutes to read
- Print
- DarkLight
- PDF
Article summary
Did you find this summary helpful?
Thank you for your feedback
All plan types with different automations usage limits | |
Owners/Creators - Can create or edit automations in Airtable | |
Platform(s) | Web/Browser, Mac app, and Windows app |
Understanding the email digest use case
When building an Automation, you may choose a trigger that will start the automation run. The At a scheduled time trigger allows you to trigger (or run) an automation at a pre-designated date and time. This functionality allows you to create a "digest" type of automation to regularly send a set of record information at a set time. This article covers how to set up that trigger and add an action step afterward.
Setting up an automation to send email digests
Step 1: Choose a trigger
To start, click on Automations in the upper left corner of your base. Then, click “Create an automation” to begin the setup process.
Then select the “At a scheduled time” trigger.
If you choose the “On days of the week” option you can select a time of time and which days of the week you want to trigger the automation. In the example below, the automation is set up to trigger at 9:00am during a standard work week.
You'll see the configuration in your local timezone (according to the settings of the device you are using). The trigger will fire at the same time for collaborators in other various timezones.
Step 2: Add the automation actions
Once the trigger is configured and tested you can add an automation action. To create the email digest, two actions will be configured:
“Find records”
“Send email”
Add a "find records" action
We’ll first an action to look for any records to include in the digest email.
Start by clicking the + Add advanced logic or action button under the trigger step, and then select the “Find records” action.
In this case, these would include records where the due date is equal to today’s date. Note that the conditions are set where the {Due Date} field is “today”.
Once this is configured, make sure to test the action.
Add a "send an email" action
The “Send an email” action will be used to automatically generate a formatted email to a list of people.
Start by clicking the + Add advanced logic or action button under the previous action step, and then select the “Send an email” action.
You can then customize the email you plan to send. In the example below, we’ll include a short note in the body of the email, and then render a list of records and fields that were found in the trigger step. The “Send an email” action is covered in-depth in this support article. You can also view guides for all other available options here.
Insert records as a list - In the body of the email, one option you can use is to insert the records found in the “Find records” action as a list. You can even choose which fields to include in the list!
To add a record list, start by clicking on the plus sign in the “Message” section.
Then, choose the option that says “Records” (from the Find records action), and then select “Records” again.
Lastly, choose “Insert records as list”. From here you can toggle any of the fields you’d like to include in the list of records. Watch the gif below for an example of these steps.
Here’s an example of how this list of records would be rendered in an email:
After you’ve customized the rest of the email options, run a test to make sure everything is set up correctly.
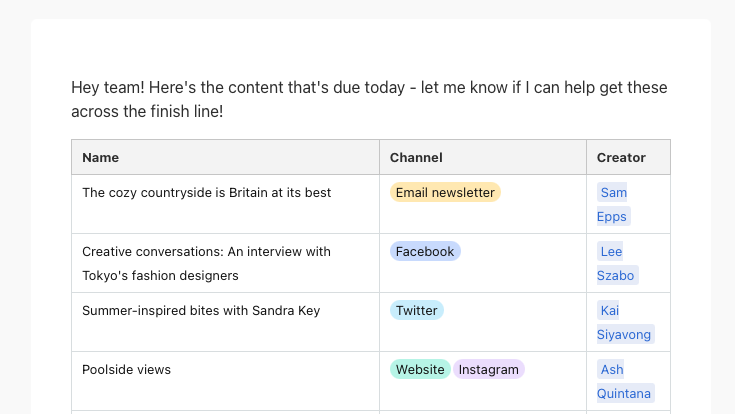
Insert records as a grid - Instead of inserting records as a list, you can also insert them as a grid. To do so, follow the same steps as above, but instead select the "insert as grid" option. Here’s an example of how this grid of records would be rendered in an email:
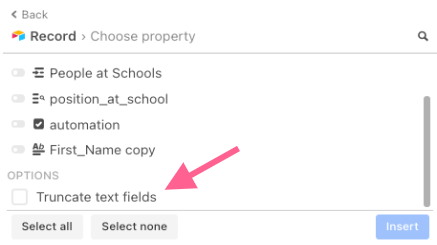
All characters in text fields will be included in your grid by default, but you can choose to truncate text fields by checking the box next to the option when setting up the grid.
After you’ve customized the rest of the email options, run a test to make sure everything is set up correctly.


Note
Records in the HTML grid found conditionally will be ordered by Record ID based upon ASCII formatting (numbers -> capital letters -> lowercase letters). If you'd like to customize the order your records are returned in, check out this article to learn more about finding records based on a view, and then rendering those view-ordered records and fields in a grid.
FAQs
Where can I use the "insert records as list" feature?
This feature is currently only available to be used within an email body. You can use this with Airtable’s native Send email action, as well as the Send email action for Outlook and Gmail.
Is there a way to order the HTML grid or list?
If you'd like to customize the order your records and fields are returned, check out this article to learn more about finding records based on a view, and then rendering those view-ordered records in a grid.
Was this article helpful?