Plan availability | All paid plans with varying limitations. |
Permissions |
|
Platform(s) | Web/Browser, Mac app, Windows app |
Learn how to use the Airtable Sync integration feature to bring information from an external application into Airtable as a new table in your base. Sync integrations are always a one way sync from the external application into an Airtable base, so changes made in Airtable cannot be synced back to the external application that you are syncing with.
This article covers how to sync with an external Outlook Calendar to bring detailed information from events in an Outlook Calendar into Airtable.
Setting up Outlook Calendar to sync with Airtable
Navigate to a base where you want to sync data into Airtable.
Add a new synced table by clicking the + Add or import button.
Scroll down to the bottom of the list and click the XX more sources… option.
Browse or search for “Outlook” and then click Microsoft Outlook Calendar.
Click Select account and select an existing Outlook account, if you’ve already connected to Outlook, or connect a new Outlook Calendar account if this is the first time you've set this sync up.
For more info on authentication and authorization consult this support article section.
Next, select a Calendar.
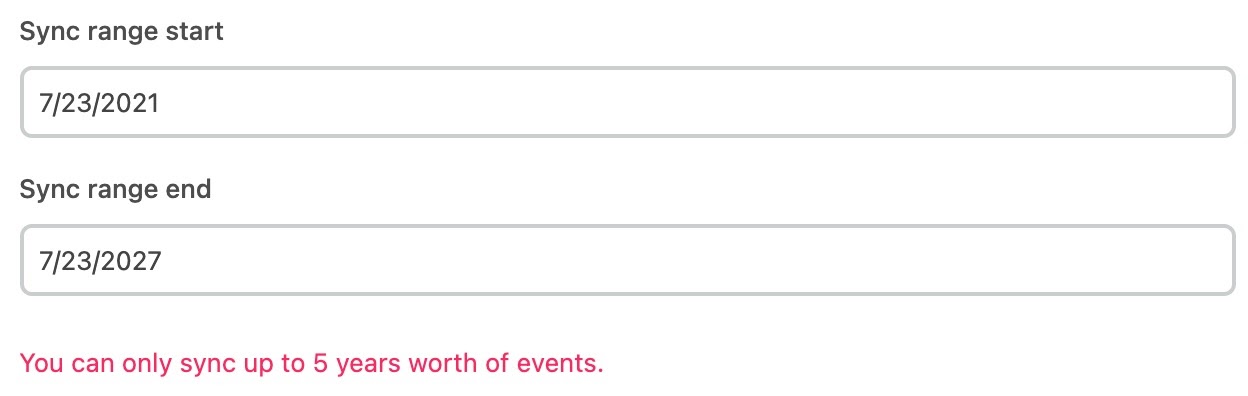
After choosing your preferred Calendar, you will need to select a start and end date range.
Note
Due to limitations within Microsoft’s API, the maximum date range that you set cannot be longer than 5 years. You will see an error message after clicking “Next” if you attempt to set a date range longer than 5 years.
After clicking next, you’ll be presented with two sync options; you can sync:
All fields from the Outlook Calendar source, including any fields added by Outlook in the future.
Specific fields from the Outlook Calendar source.
If you choose to sync specific fields you’ll be shown a menu where you can toggle each individual field that you want to sync from your Outlook Calendar. 14 fixed fields will sync from Outlook Calendar if the “All fields in the source view and fields added in the future” option is chosen: Title, Start, End, All Day, Creator, Importance, Location, Description, Attendees, Created, Updated, Event Link, Meeting Link, and Event ID.
Click the “Advanced” dropdown to choose a specific field to use as the primary field. By default, we use the “Title” field from Outlook Calendar as the primary field.
Click Next after you have chosen how you want the fields to be synced to Airtable. Before creating your synced table, there are Settings options that allow you to choose how often you want to sync, and how to handle records deleted or hidden in the Outlook Calendar source:
The frequency of syncing. Right now, the options are manual syncing and automatic syncing which happens about every hour.
Whether or not deleted records from Outlook Calendar should be removed from the Airtable table. By default, deleted calendar events will be deleted in Airtable.
Once you’ve selected your desired sync settings, click the Create table button. Depending on how large the data set being synced in from Outlook Calendar is, it may take a few moments for the synced table to be created.
Security and OAuth scopes
Authentication
We request the minimum read/write scopes necessary to make the Airtable Sync integration work. The OAuth consent screen will look like this:
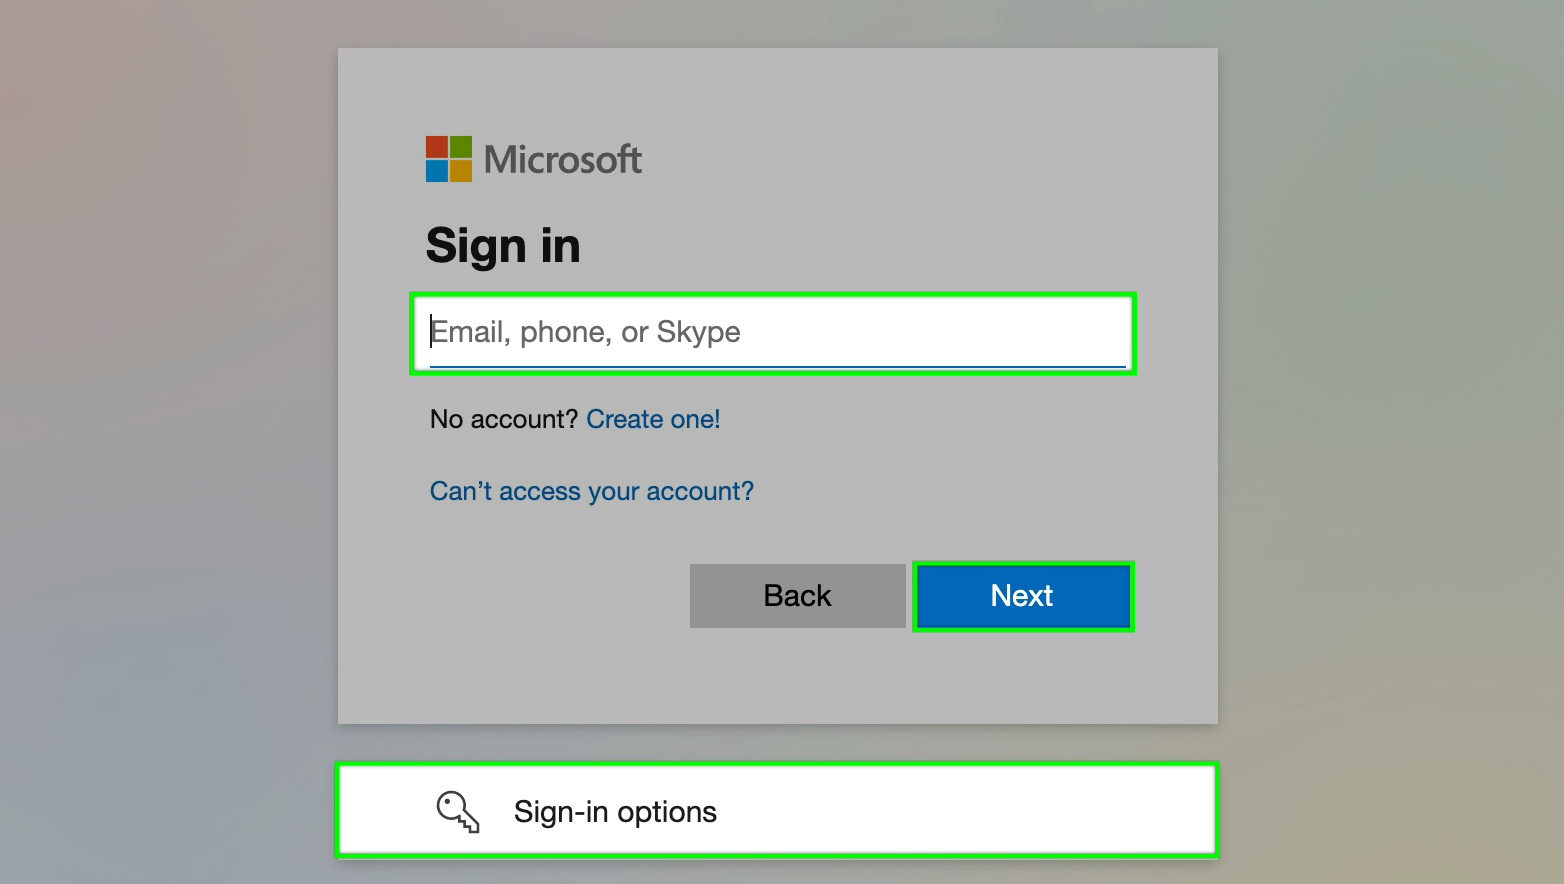
The access approval screen will appear next. Clicking "Yes" means that you will allow us to access the necessary scopes to allow the automation to work.

Outlook scopes
Scope name | Scope purpose |
| For refresh token |
| For user metadata |
| For sign-in |
| For reading/writing emails 1 |
| For sending mail 1 |
| For reading/writing calendar events 2 |
| For reading mailbox settings related to calendar events 2 |
| For requesting when connecting accounts |
1 Only for Outlook Email automations
2 Only for Outlook Calendar automations
We use delegated permissions for all of our Outlook integrations and tokens are transmitted between Airtable and Microsoft’s servers securely via HTTPS. On Airtable’s side, the tokens are stored in databases that are encrypted at rest.
For more information on Outlook scopes, check out Microsoft's documentation here.
FAQs
Can you sync multiple Outlook calendars?
Depending on your Outlook calendar and Airtable sync settings, this may be possible utilizing our multi-source sync feature. However, multi-source syncing is only available on Business and Enterprise Scale plans and the results will be more experimental than expected.
The best practice would be to create merged calendars in Outlook and sync that single calendar with Airtable instead.
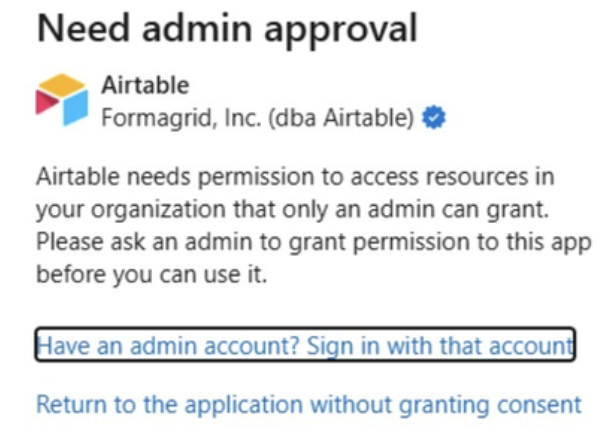
My Outlook Calendar sync integration is needing additional admin approval, who should I contact?
This is likely needed because the sync integration you have with Outlook Calendar must be approved by a Microsoft global admin from your organization’s IT department. More on Microsoft 365 administrator roles is available from their support documentation here.
I have access to calendars in Microsoft Outlook, but they are not showing up in Airtable. Why?
Due to how Airtable connects to the Microsoft Calendar API, the integration does not display all calendars associated with the connected account, including calendars the account has admin permission to write to. Only calendars that have been manually added to the “People's Calendar” view in Outlook are available in Airtable.
Why does Outlook Calendar prompt me for admin approval (Microsoft error 90095) when Outlook Mail and Teams connect fine?
This happens because Outlook Calendar requests additional Microsoft Graph scopes that the consent for Mail or Teams doesn't cover — specifically Calendars.ReadWrite, MailboxSettings.Read, and Calendars.ReadWrite.Shared (the last is requested when connecting an account). Microsoft admin consent is granted per scope, so even though Mail and Teams use the same Airtable Enterprise Application, tenant consent previously granted for those features does not automatically extend to the calendar scopes. The result is Microsoft's 90095 – "Admin consent is required for the permissions requested by this application."
To resolve it, a Microsoft Entra global admin needs to grant admin consent that explicitly includes the Calendar scopes above — re-running the admin consent flow for the Airtable application (App ID e4df1407-746c-45a8-899b-dbbadccb1cc9) with the calendar permissions present, rather than relying on the earlier Mail/Teams consent. Once that consent covers the calendar scopes, users can connect Outlook Calendar without the prompt.
Why can some users connect Outlook Calendar while others get the approval prompt?
When a tenant requires admin approval for new scopes, the prompt appears per user until organization-wide admin consent covers those exact scopes. Users who connected and individually consented before the policy or scope set changed may continue working, while others are blocked — producing inconsistent results across the same tenant. Granting tenant-wide admin consent that includes the calendar scopes (Calendars.ReadWrite, Calendars.ReadWrite.Shared, MailboxSettings.Read) resolves it for everyone. This prompt is generated and enforced by Microsoft Entra based on your tenant's consent policy, not by Airtable; Airtable uses delegated permissions and can't change or bypass it.