- Cómo empezar a usar Airtable
- Introducción a los aspectos básicos de Airtable
- Cómo comunicarse con el equipo de soporte de Airtable
- Pantalla de inicio de Airtable
- Glosario de terminología de Airtable
- Airtable technical requirements
- Diferencias entre las funciones de Airtable para escritorio y para móvil
- Atajos de teclado de Airtable
- Cómo usar Markdown en Airtable
- Adding descriptions in Airtable
- Finding Airtable IDs
- Automatizaciones de Airtable
- Descripción general de automatizaciones
- Guías de automatizaciones
- Guías de automatizaciones integradas
- Guías de automatizaciones en Airtable
- Linking existing records using automations
- Conditional groups of automation actions
- Repeating groups of Airtable automation actions
- Creating recurring records using automations
- How to delay Airtable automation runs
- Prevent automations from triggering by mistake
- Use automations to timestamp status updates
- Desencadenantes de automatizaciones
- Desencadenantes de Airtable
- Airtable automation trigger: When record matches conditions
- Airtable automation trigger: When a form is submitted
- Airtable automation trigger: When record created
- Desencadenante de automatización de Airtable: cuando se actualiza un registro
- Airtable automation trigger: When record enters view
- Desencadenante de automatización de Airtable: a una hora programada
- Airtable automation trigger: When webhook received
- Airtable automation trigger: When a button is clicked
- Airtable automation trigger: When email received
- Desencadenantes integrados
- Desencadenantes de Airtable
- Acciones de automatización
- Acciones en Airtable
- Acción de automatización de Airtable: enviar correo electrónico
- Airtable automation action: Create record
- Airtable automation action: Update record
- Airtable automation action: Find records
- Airtable automation action: Sort list
- Acción de automatización de Airtable: ejecutar un script
- Airtable automation action: Generate with AI
- Acciones integradas
- Airtable automation actions: Slack
- Airtable automation actions: Google Workspace
- Airtable automation action: Send MS Teams message
- Airtable automation actions: Outlook
- Airtable automation actions: Jira Cloud
- Airtable automation actions: Jira Server / Data Center
- Airtable automation actions: Salesforce
- Airtable automation action: Create post in Facebook Pages
- Airtable automation actions: GitHub Issues
- Airtable automation action: Hootsuite post
- Airtable automation action: Send Twilio SMS
- Acciones en Airtable
- Bases de Airtable
- Using Airtable Cobuilder
- Descripción general de las bases de Airtable
- Creating and duplicating bases in Airtable
- Structuring your Airtable bases effectively
- Moving Airtable bases between workspaces
- Tables in Airtable
- Crear enlaces para compartir bases de Airtable
- Importing third-party data into Airtable
- Uso de las perspectivas
- Troubleshooting Airtable base performance
- Versiones beta de Airtable
- Colaboración en Airtable
- Asistencia de Airtable Enterprise
- Información general
- External badging in Airtable
- Creating and using Airtable components
- Ask an Expert beta overview
- Data residency at Airtable
- Descripción general de los grupos de usuarios en Airtable
- API de Enterprise de Airtable
- Creating and managing data retention policies in Airtable
- eDiscovery APIs in Airtable
- Airtable and data loss prevention
- Acceder a los registros de auditoría de Enterprise en Airtable
- Configuración de Jira Server/Data Center para conectarse con Airtable
- Panel de Administración de Enterprise
- Descripción general del panel de administración de Enterprise
- Usuarios: panel de administración de Enterprise en Airtable
- Detalles del usuario en el panel de administración de Airtable
- Grupos: panel de administración de Airtable
- Espacios de trabajos: panel de administración de Enterprise de Airtable
- Bases: panel de administración de Enterprise en Airtable
- Interfaces: Panel de administración de Enterprise en Airtable
- Data sets - Airtable admin panel
- Managed apps - Airtable admin panel
- Components - Airtable admin panel
- Informes: panel de administración de Enterprise en Airtable
- Airtable admin panel settings
- Guía práctica de Enterprise
- Gestionar a los admins de Enterprise en el panel de administración
- Uso de organizaciones
- Organizational branding for apps in Airtable
- Enterprise Hub in Airtable
- Enterprise Hub : Org unit assignment with user groups
- Desactivar, retirar el acceso y reactivar usuarios desde el panel de administración
- Gestionar el acceso de usuario a espacios de trabajo y bases
- Airtable Enterprise Key Management
- Custom terms of use
- SSO en Enterprise
- Información general
- Extensiones de Airtable
- Descripción general de las extensiones
- Extensiones por Airtable
- Extensiones integradas
- Campos de Airtable
- Descripción general de los campos
- Archivo adjunto
- Campos basados en fecha
- Fórmula
- Empezar a usar fórmulas
- Fundamentos de fórmulas
- Soluciones frecuentes: principiante
- Soluciones habituales: intermedias
- Soluciones habituales: avanzado
- Campo de texto largo
- Campos de registros vinculados
- Campos con números
- Otros campos
- Campos de compilación, búsqueda y recuento
- Campos de selección y colaborador
- Integración con Airtable
- API
- Getting started with Airtable's Web API
- Crear tokens de acceso personal
- Airtable Webhooks API Overview
- Service accounts overview
- API web de Airtable: usar filterByFormula o parámetros para ordenar
- Airtable API Deprecation Guidelines
- Airtable API: Common troubleshooting
- Managing API call limits in Airtable
- Enforcement of URL length limit for Web API requests
- Servicios de integración
- Third-party integrations via OAuth overview
- Troubleshooting disconnected OAuth integrations in Airtable
- Options for integrating with Airtable
- Third-party integrations - Common troubleshooting
- Low-code integrations - Common troubleshooting
- Integrating Airtable with external calendar applications
- Visualizing records from Airtable in Tableau
- Visualizing Airtable records in Microsoft Power BI & Power Query
- Integrating HubSpot with Airtable
- Using Zapier to integrate Airtable with other services
- Using Zapier's Multi-Step Zaps to find and update records
- Using IFTTT to integrate Airtable with other services
- Integrating with AWS Lambda & DynamoDB
- Herramientas para desarrolladores
- API
- Diseñador de Interfaces de Airtable
- Descripción general
- Diseños de página
- Elementos
- Adding and removing elements in interfaces
- Adding layouts to interfaces
- Formatting elements in interfaces
- Interface element: Button
- Interface element: Calendar
- Interface element: Chart
- Interface element: Filter
- Interface element: Gallery
- Interface element: Grid
- Interface element: Kanban
- Interface element: Number
- Interface element: Record picker
- Interface element: Text
- Interface element: Timeline
- Aprendizaje y recursos
- Gestión de Airtable
- Política de Airtable
- Registros de Airtable
- Sincronización de Airtable
- Vistas de Airtable
- Espacios de trabajo de Airtable
- 04 Dec 2023
- 4 Minutos para leer
- Impresión
- Compartir
- OscuroLigero
- PDF
Building custom Airtable form URL fillers using ENCODE_URL_COMPONENT
- Actualizado en 04 Dec 2023
- 4 Minutos para leer
- Impresión
- Compartir
- OscuroLigero
- PDF
The ENCODE_URL_COMPONENT
formula function in Airtable translates strings of text and characters into language that can be read in your browser's address field. Because URLs can only read special characters (e.g. %20 instead of a space), you have to encode any normal components in order for them to be used in a web address.
Introduction
All plan types | |
Platform(s) | Web/Browser, Mac app, and Windows app |
Related reading |
NOTE
A common Airtable scenario where this is helpful is pre-filling form URLs. This is a tutorial on how to setup a base to automatically generate unique pre-filled form URLs using ENCODE_URL_COMPONENT
.
Configuring bases
Let's say that you're on a recruiting team for a growing business, and need to hire for a few key roles. You can use an Airtable form to collect information from job applicants, but you have a few prospects in mind that you'd love to hire. Sending a prefilled form their way can save them some time filling out the form and create a positive first experience for your company.
Starting with the grid, you'll want to create a few key fields to track information. We'll track the Role / Title of the position you want to hire for, as well as the names of prospective hires. On the form, the applicant will have a space to write out why they're the best fit for the role.
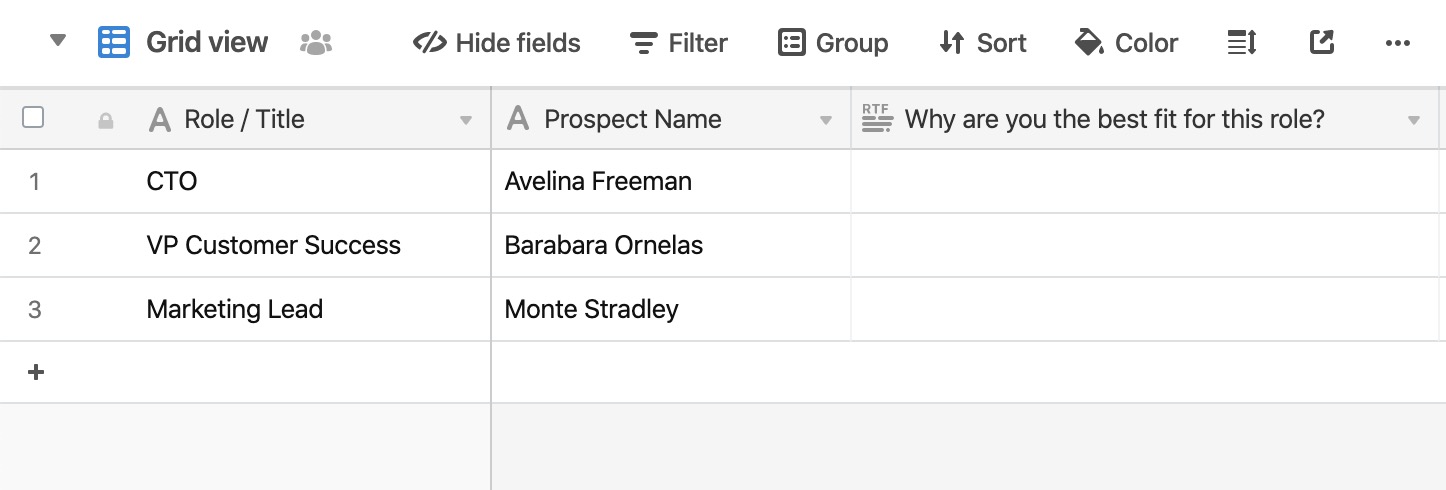
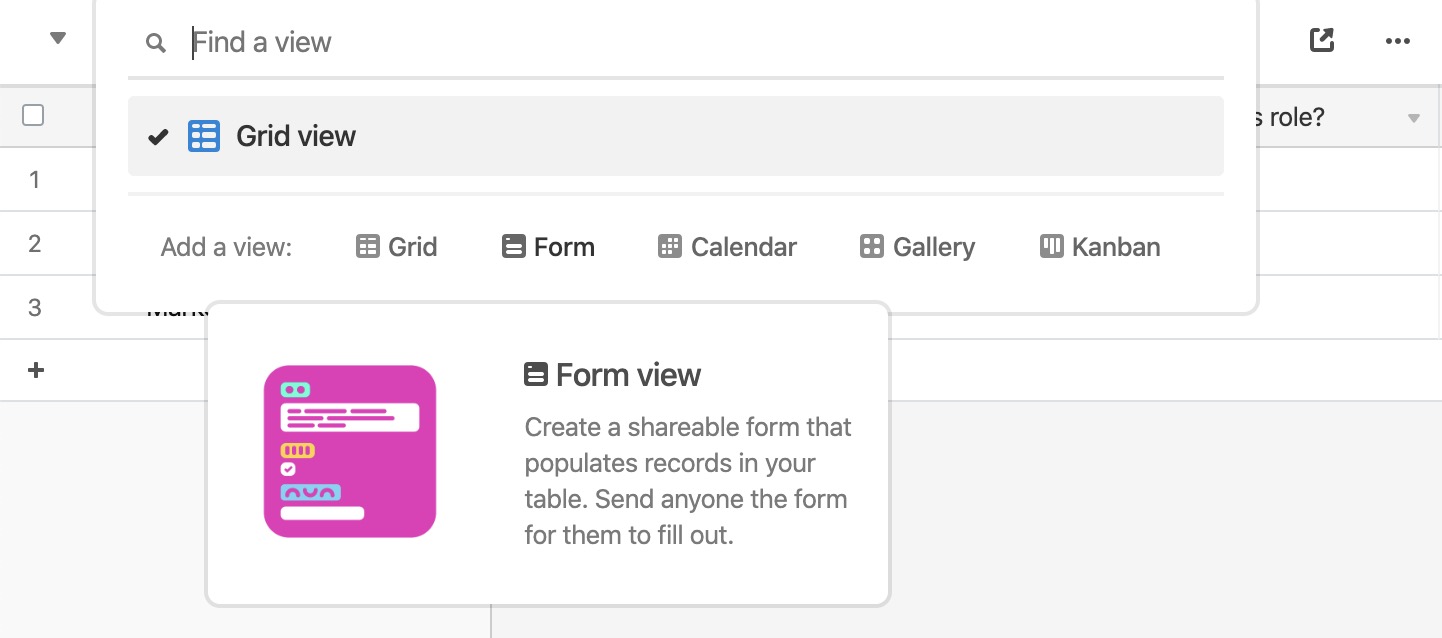
Once the fields are created, add a form view to the table.
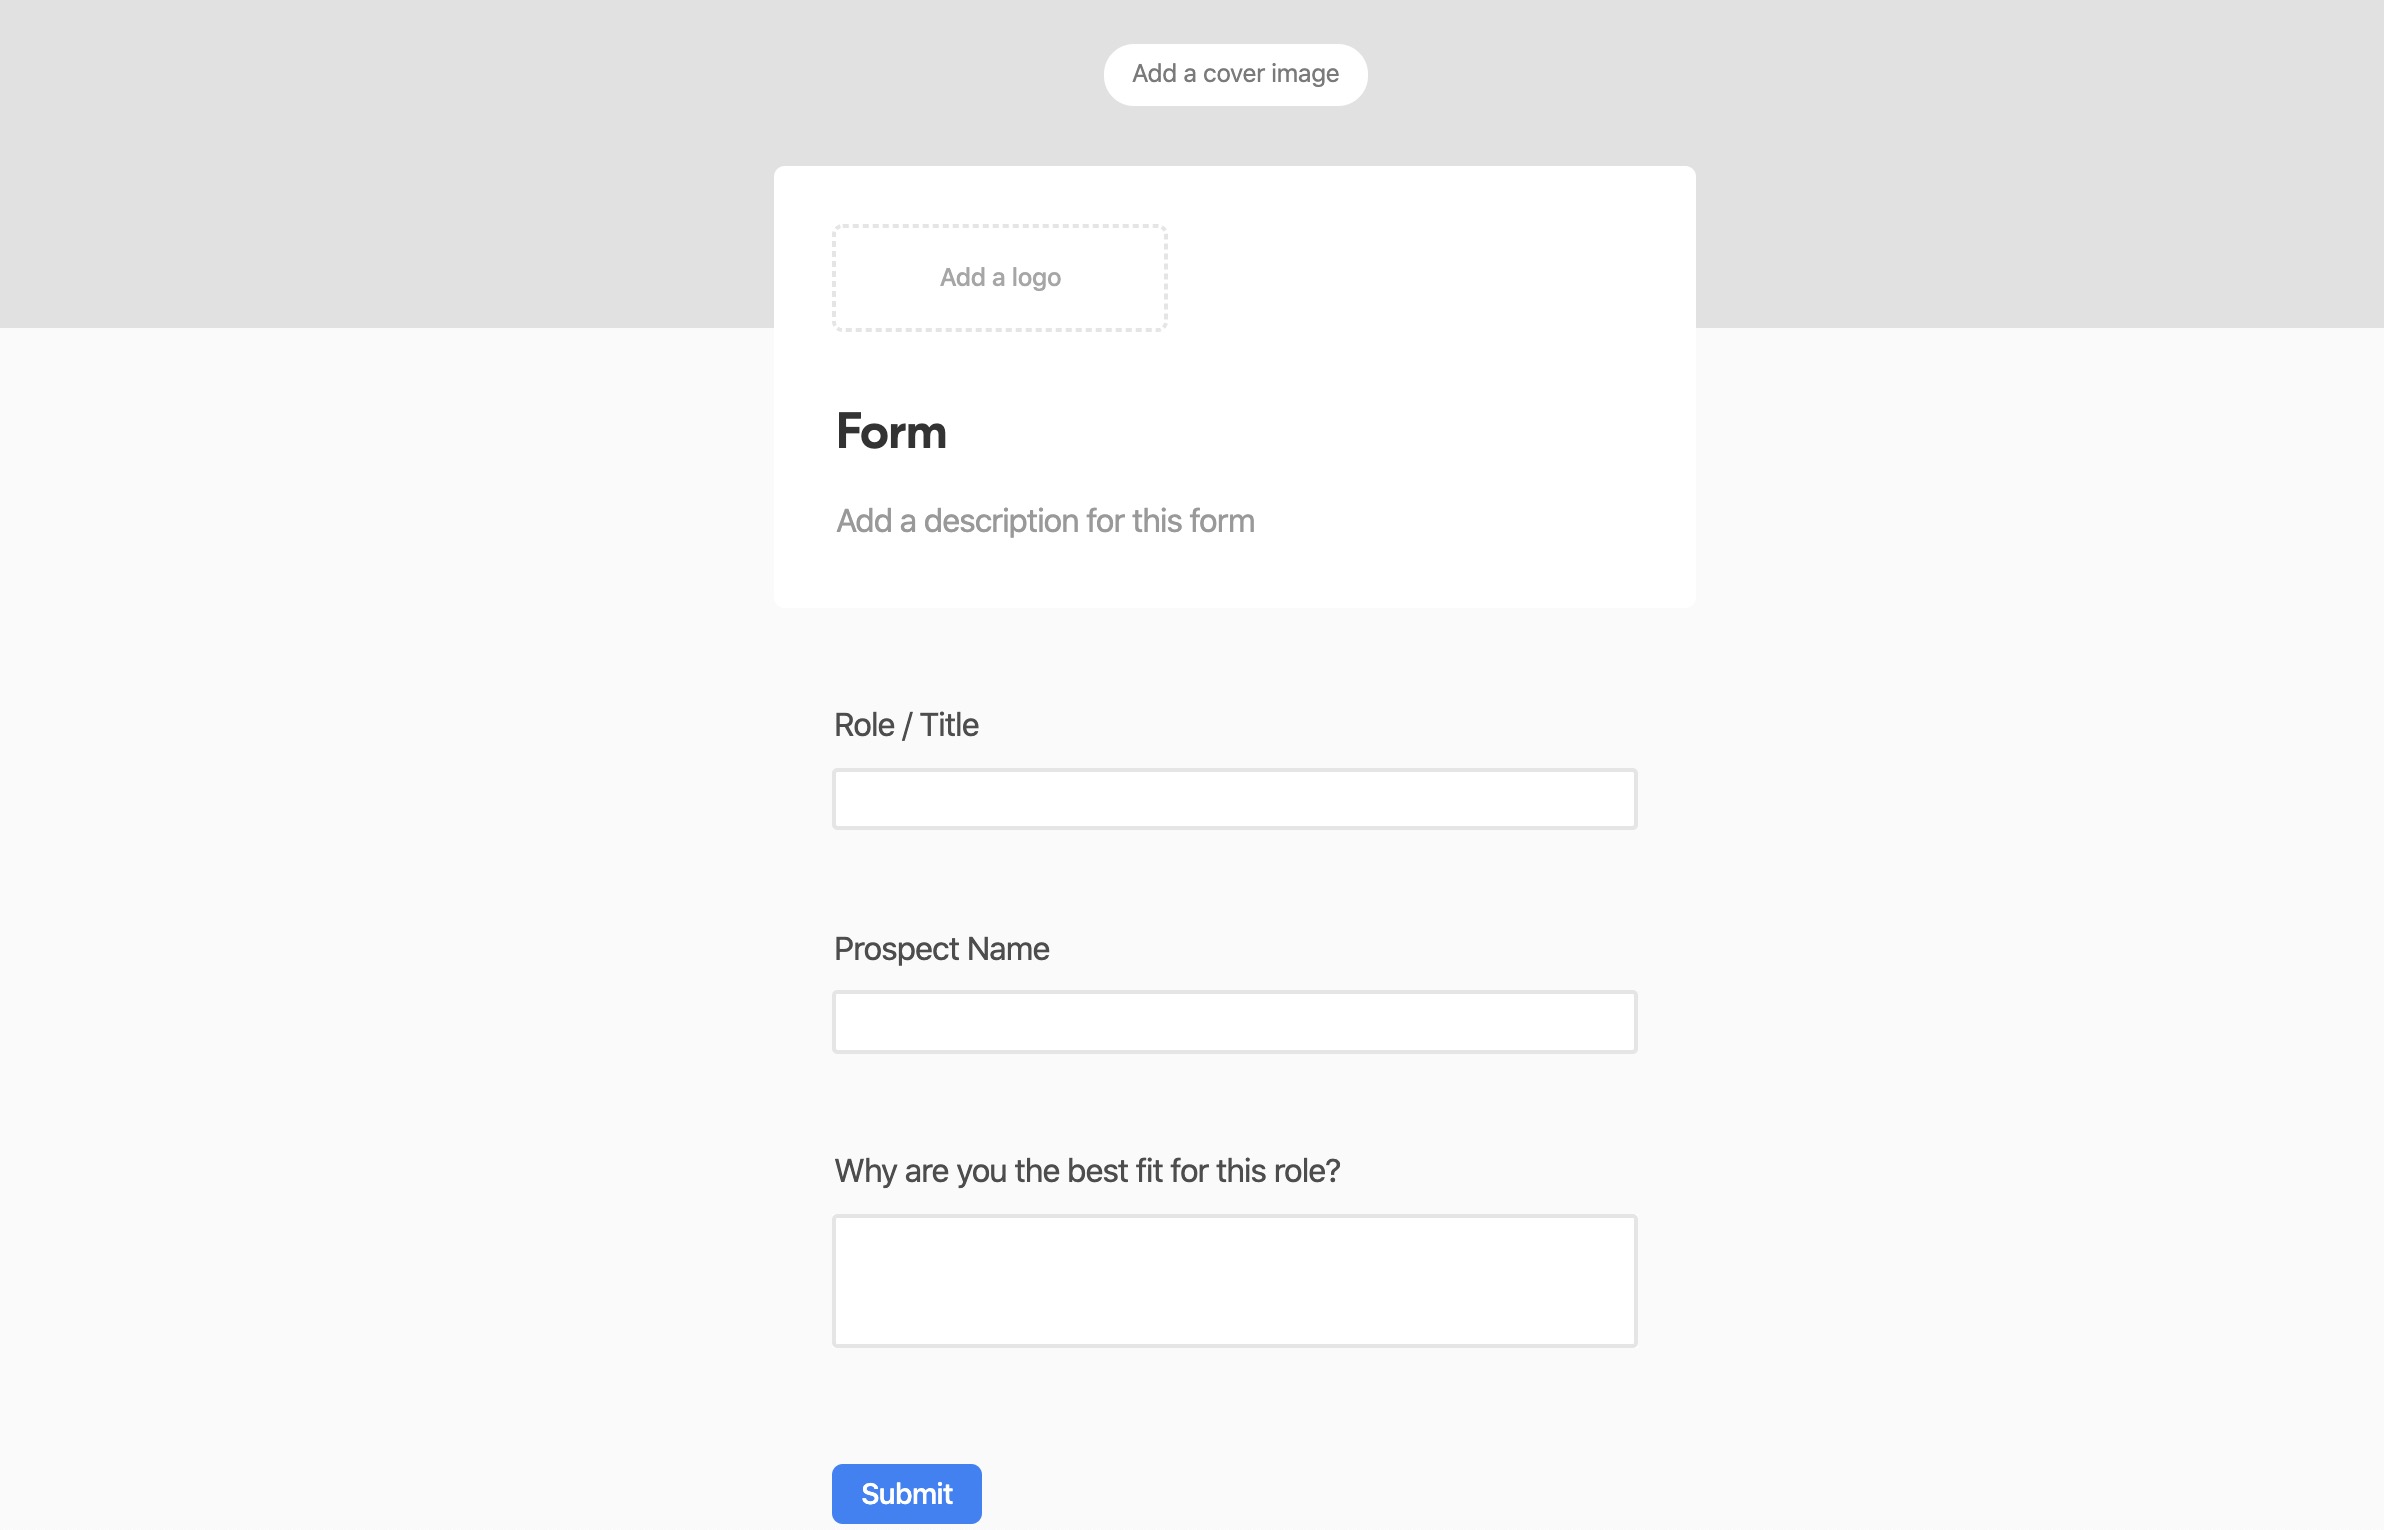
The same fields created in the grid view are now available as form fields.
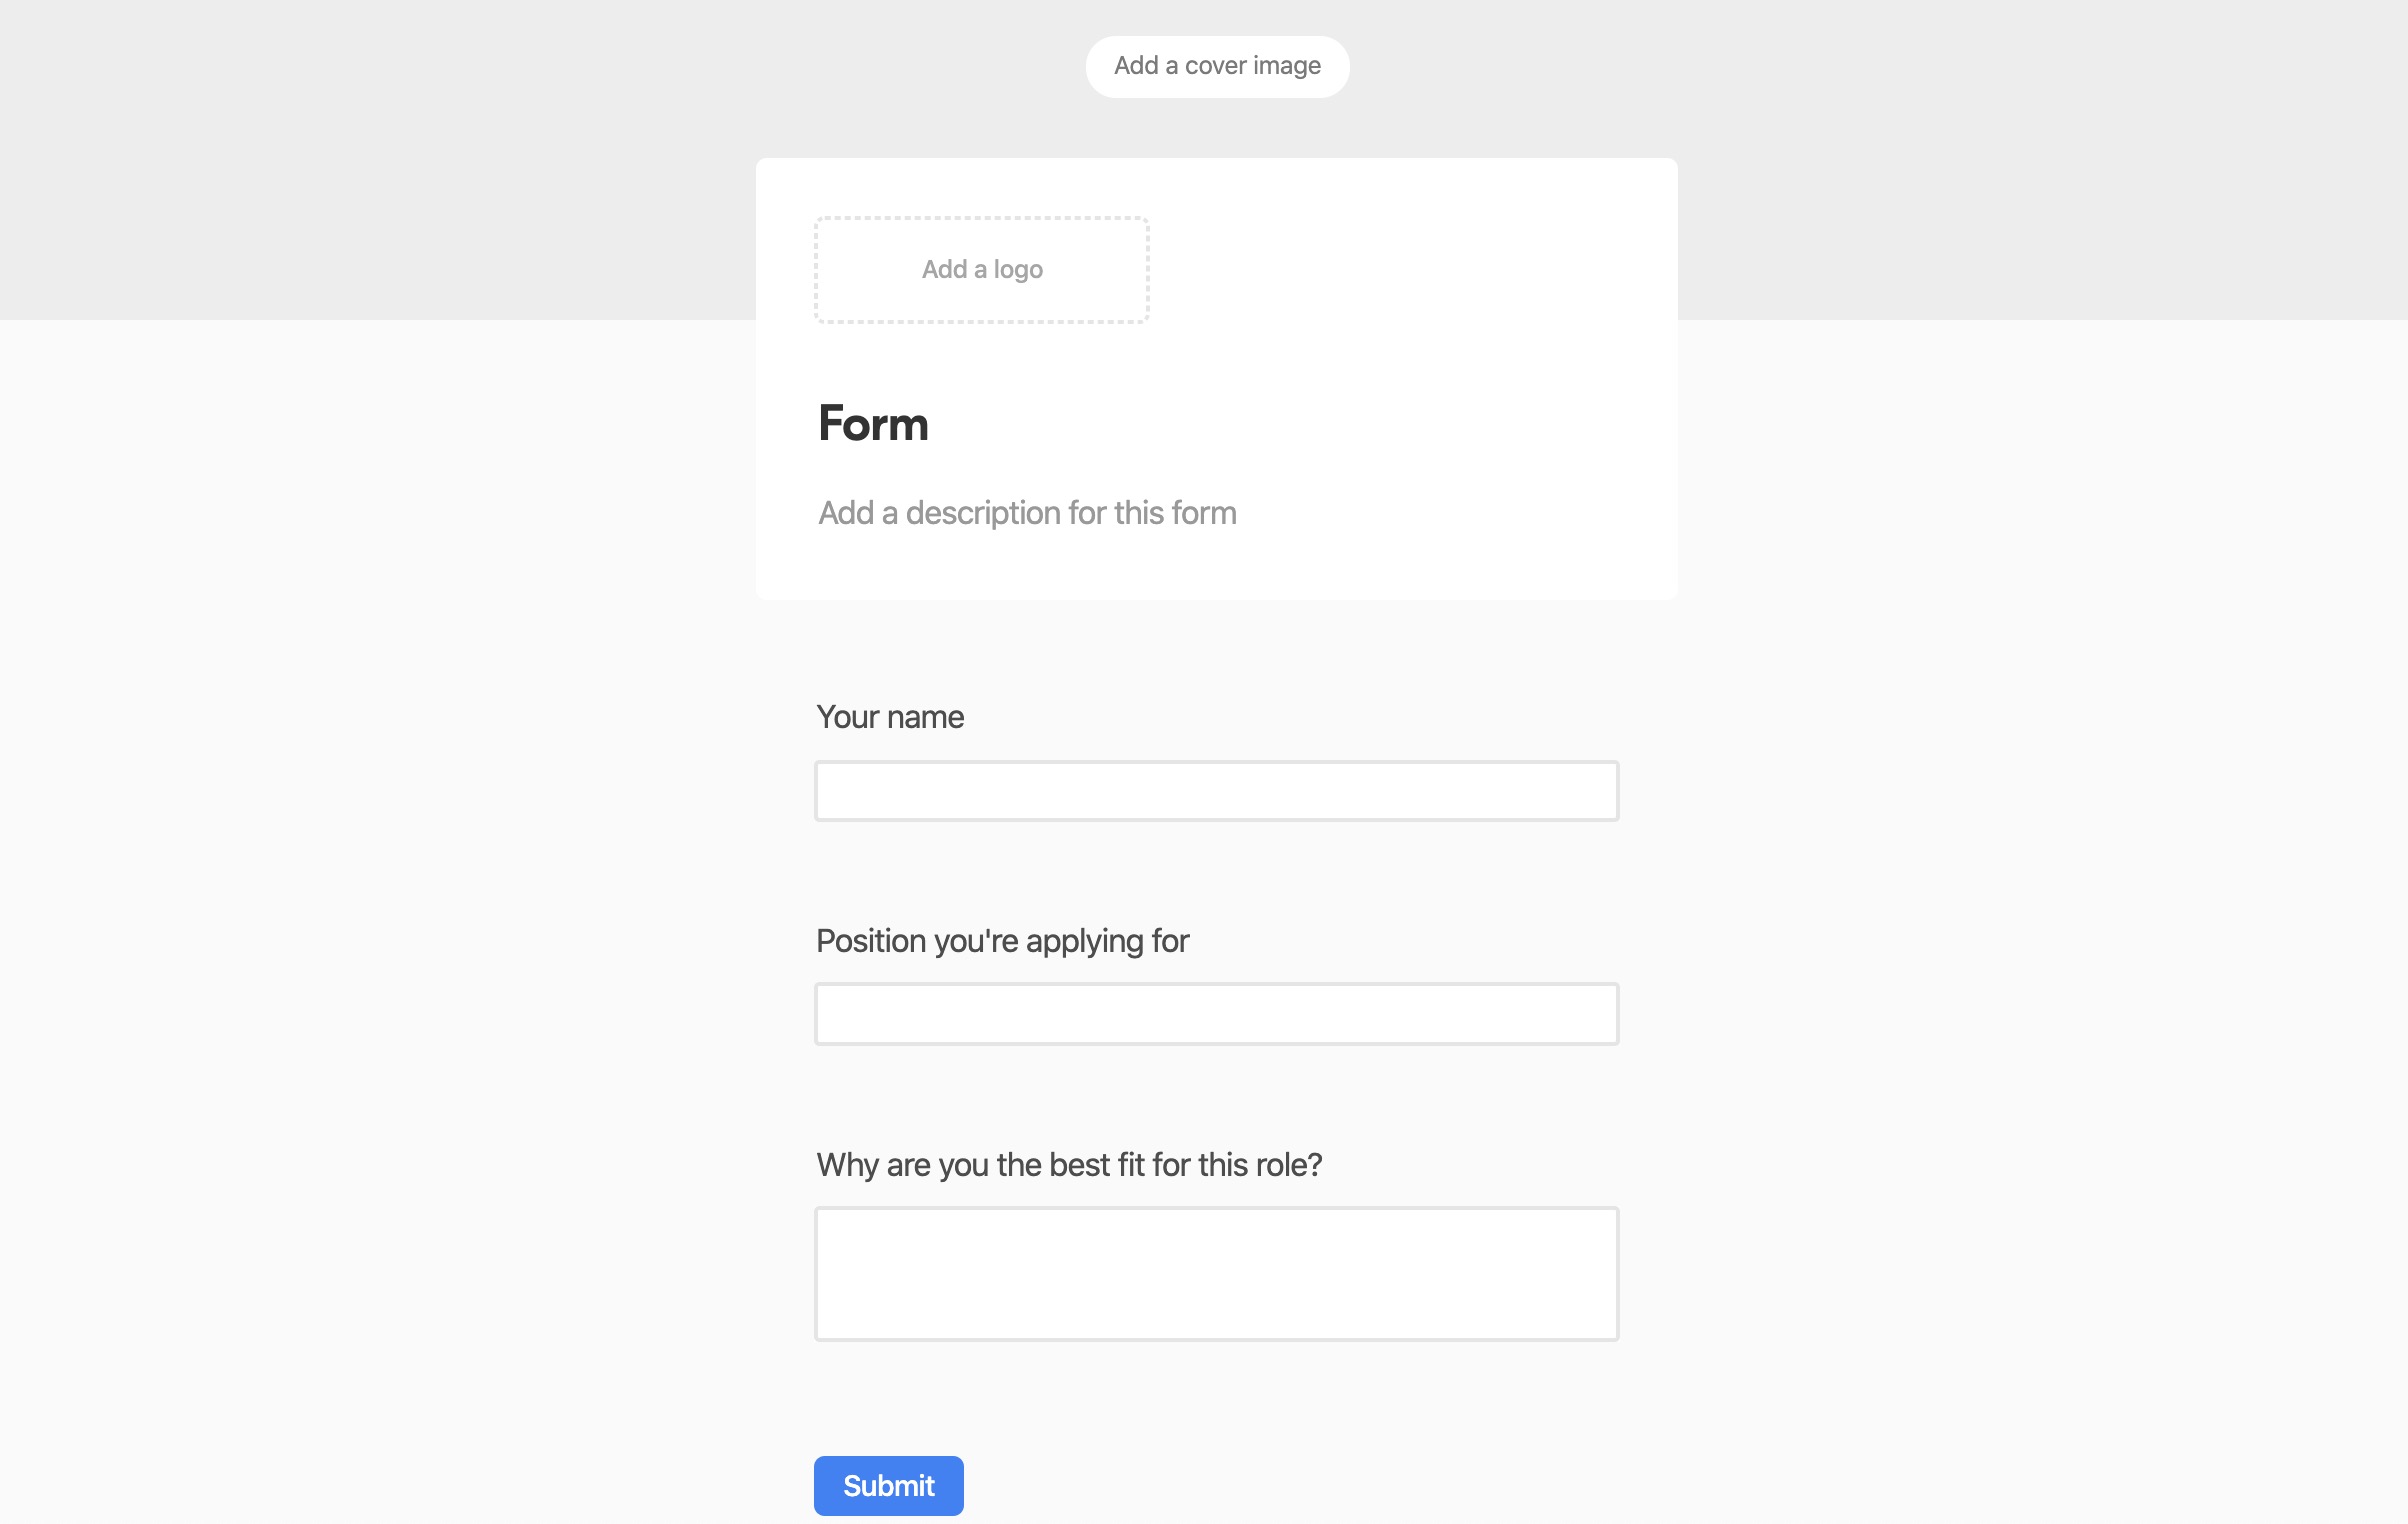
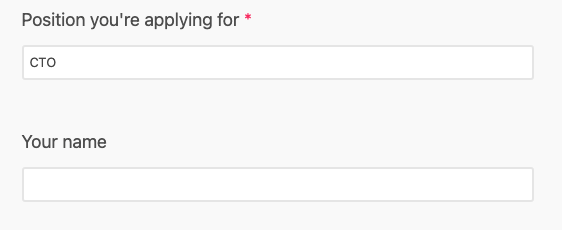
You may want to adjust the field names to be more targeted to job applicants filling out the form. We'll change Role / Title to Position you're applying for, and Prospect Name to Your Name. Note that this only changes how the field name appears on the form - the actual field names, as shown in the grid view, remain the same as before.
Now you're ready to send the form - already pre-filled with their basic information - to your prospective hires. To do so, we'll need to write a formula using the ENCODE_URL_COMPONENT
function. Here's what that should look like when we're done.
Writing formulas
Step 1
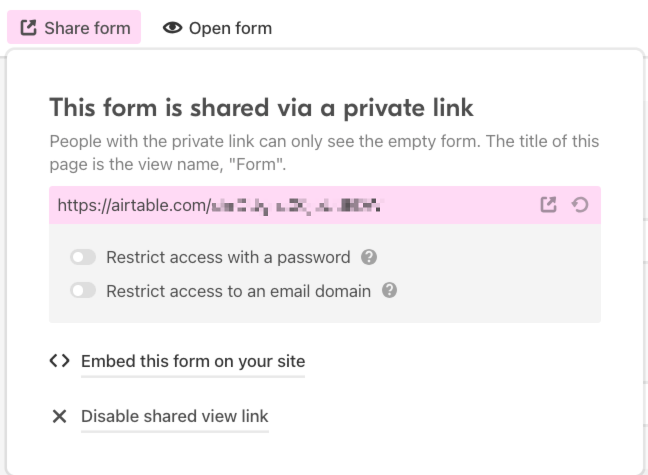
We'll start writing the formula by including some of the basic information needed. Clicking on the "Share form" button will show you the newly created form's URL.
Copy the form URL, and paste into a new formula field (we called ours Encoded form URL). At the end of the URL insert a question mark, like so:
"https://airtable.com/YOURFORMURLHERE?"
Here's the result of the first part of the formula:
Step 2
Next, we'll want to add to this URL by chaining on a new function. To do this we will first insert an ampersand (&) as a separator. So we will do the following:
We are looking to prefill a form input so we'll add the text
'prefill_'
followed by another separator &.Add the
ENCODE_URL_COMPONENT
function. The encode URL function will translate the text name of your field (Role / Title
) into an encoded URL.Follow this by
& '=' &
Lastly, we'll ensure to encode the value in the field (the title in the Role / Title field) by adding
ENCODE_URL_COMPONENT({Role / Title})
Leaving us with a formula that looks like this:
'https://airtable.com/YOURFORMURLHERE?'
& 'prefill_' &
ENCODE_URL_COMPONENT('Role / Title') & '=' & ENCODE_URL_COMPONENT({Role / Title})
Building on step 1, here's the next portion of the pre-filled URL.
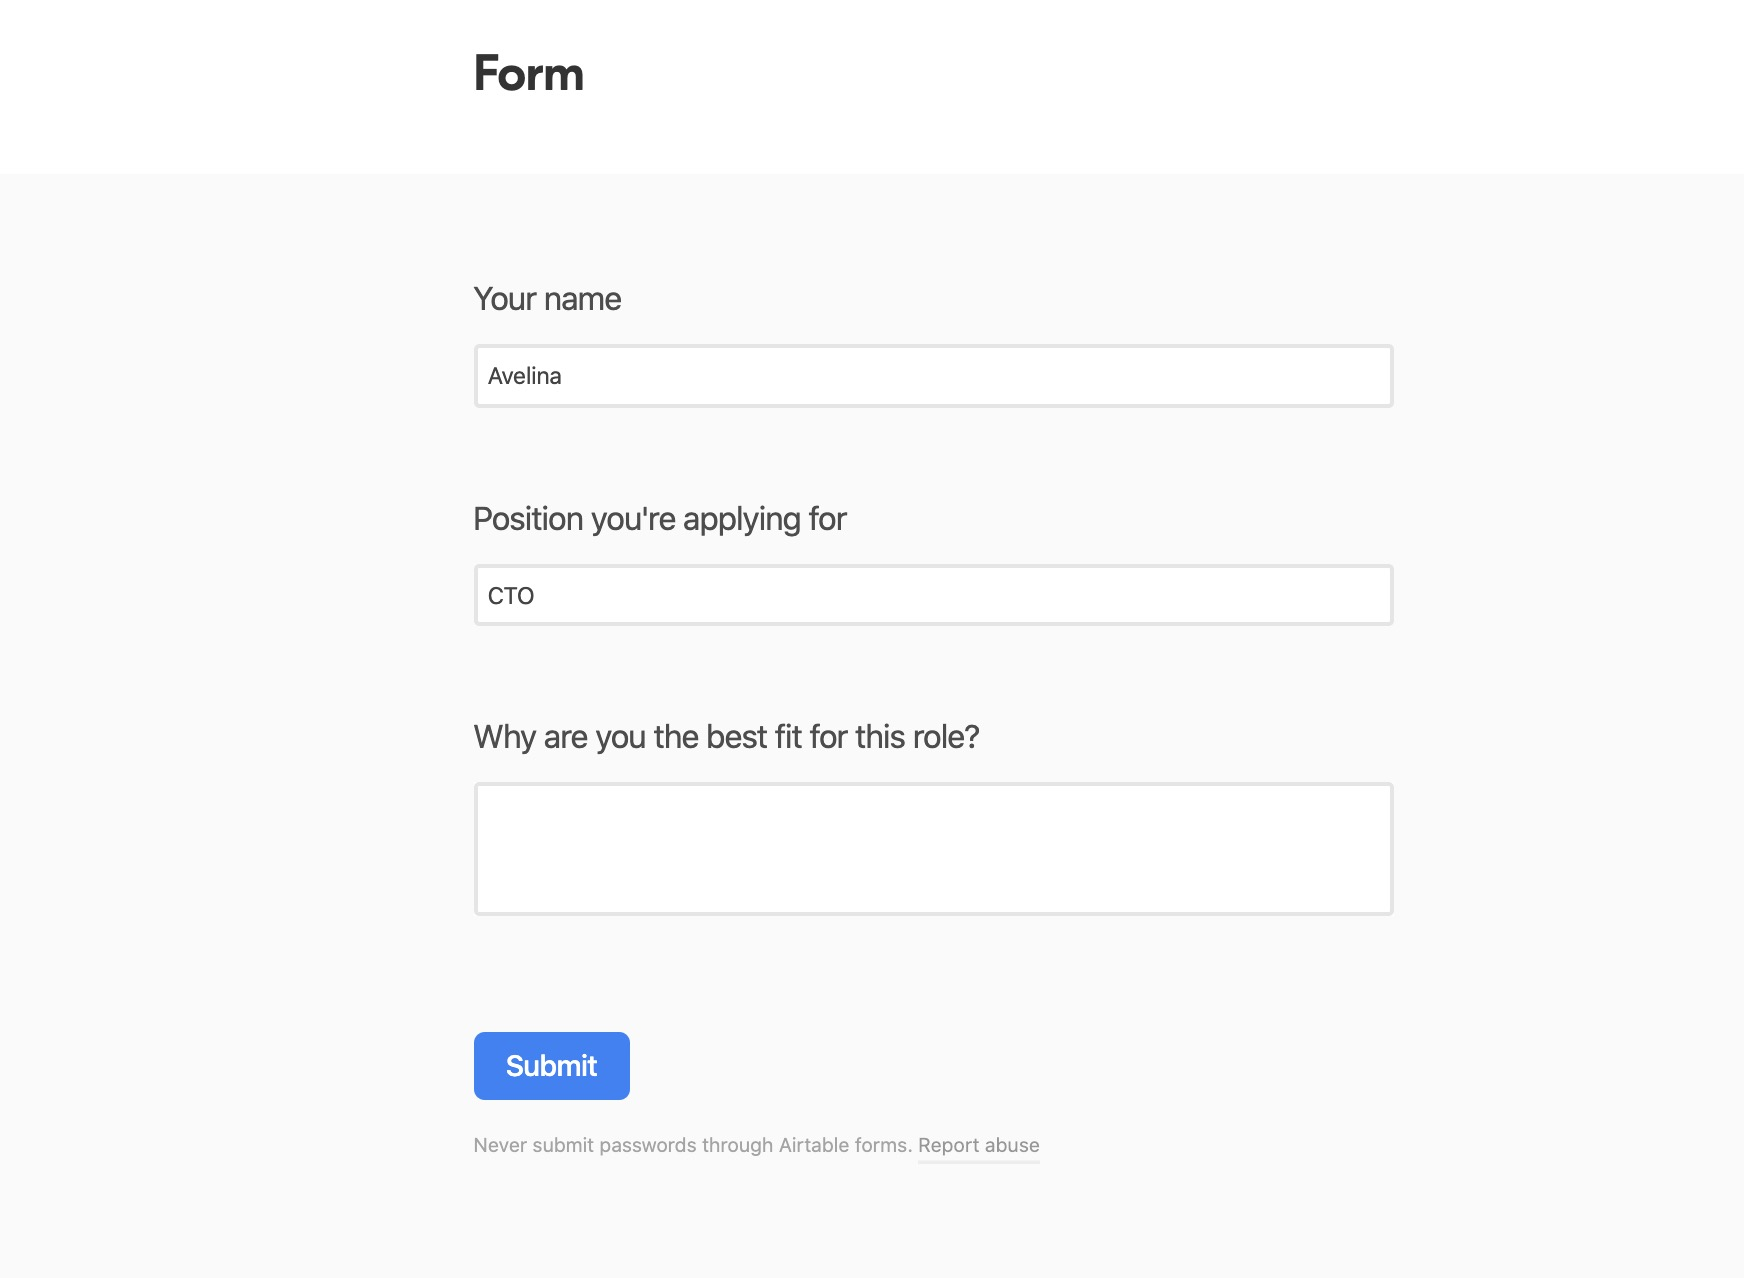
Clicking on one of the URLs we just created (in the Encoded form URL field) we can now see that the value for that record has been prefilled into our form. Pretty neat!
We can see that the field that should show the prospect's name is still empty though. So one step to go!
Step 3
TIP
If you'd like to prefill more than one field in the URL, you'll need to add the "&prefill_" url parameter between each field you'd like to fill, like so:
'https://airtable.com/FormUrl?'
&
'prefill_' & ENCODE_URL_COMPONENT({Field1}) & '=' & ENCODE_URL_COMPONENT({Field1})
&
'&prefill_' & ENCODE_URL_COMPONENT({Field2}) & '=' & ENCODE_URL_COMPONENT({Field2})
The last piece of information we need to add to the URL is the prospect's name. To do this:
Add another separator (
&
)This prefill will be a bit different because it is the second field we are prefilling. When prefilling multiple fields we need to add an ampersand within the prefill string. Like so
'&prefill_'
We'll follow with another separator (
&
)Add the
ENCODE_URL_COMPONENT
function. The encode URL function will translate the text name of the field ('Prospect Name'
) into an encoded URL.Add another separator (
&
) followed by ('='
) followed by another separator(&
)Lastly, we'll ensure to encode the value of
{Prospect Name}
by addingENCODE_URL_COMPONENT({Prospect Name})
'https://airtable.com/YOURFORMURLHERE?'
&
'prefill_' & ENCODE_URL_COMPONENT('Role / Title') & '=' & ENCODE_URL_COMPONENT({Role / Title})
&
'&prefill_' & ENCODE_URL_COMPONENT('Prospect Name') & '=' & ENCODE_URL_COMPONENT({Prospect Name})
The results in the full pre-filled URL for each unique record in your table:
You can test out each URL by clicking them and seeing the unique date filled in the form.
Tabla de contenido
Etiquetas