Note
Prefilled form links have a maximum length of 8,000 characters. If your prefilled form URL is longer than the maximum length, the link will not work and your prefilled form will not load. If you run into this issue, consider limiting the number of fields you prefill or reducing the length of prefilled values.
When using a prefilled form URL for linked-record fields, the form may not populate as expected if it has already been opened. In their case, they had to manually reset the form using the “Clear form” link at the bottom before the prefill values appeared correctly.
All plan types | |
Any user can theoretically create a prefilled form URL, but typically this responsibility should rest upon the owner(s) or creator(s) of the base at your organization. | |
Platform(s) | Web/Browser |
Creating a prefilled form URL
Note
The steps outlined below are specific to form view URLs. However, you can generally follow the same steps for standalone forms when adding encoded parameters to the URL. You will want to utilize the core URL of the form which will look like this in your address bar:
https://airtable.com/appxxxxxxxxxxx/pagxxxxxxxxxxx/formIf you are building prefill links dynamically using Airtable formulas, you do not need to encode values manually. Use the built-in
ENCODE_URL_COMPONENT()formula function to automatically encode any field name or value. The manual reference table below is only needed if you are constructing a static, one-time prefill URL by hand.
When making an Airtable form, you can use prefill_ parameters in the URL of the form to prefill specific fields. Note that this feature cannot be used to edit the information that already exists in your base; only collaborators with editor permissions or above can edit existing records.
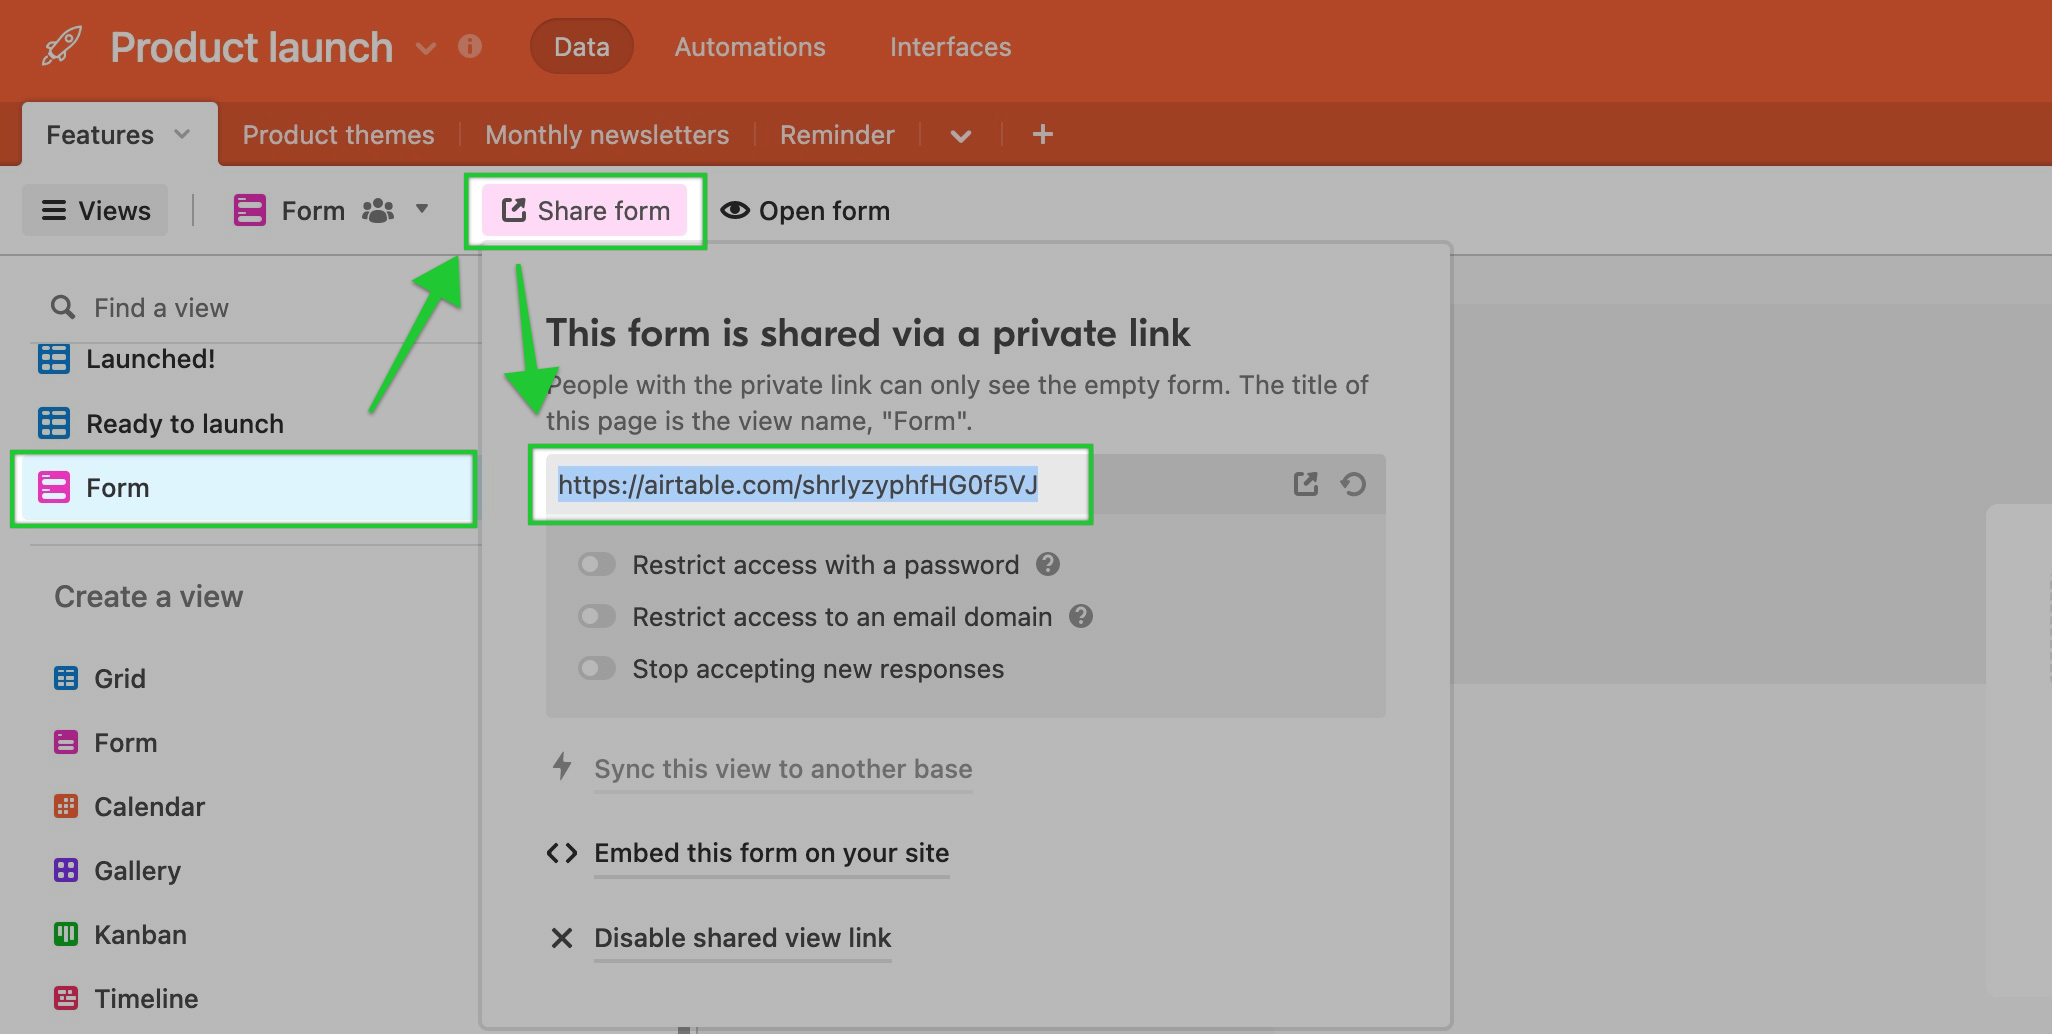
Copy your form URL
Find the URL for the form you wish to prefill and copy the URL to your clipboard.
Understanding URL parameters for encoding
Once you get the form URL, you can add parameters in the form URL to prefill fields. Knowing exactly what formatted text to use to properly encode the URL can be difficult, especially when special characters are being used in a field's title or a record's value. Check out this website to find the proper encoding for various symbols. At Airtable, we use UTF-8. Here are some common examples:
Symbol in Airtable | Encoded output | Symbol in Airtable | Encoded output |
Blank space | %20 | Blank space (alternative) | + |
/ | %2F | ( | %28 |
; | %3B | ) | %29 |
: | %3A | & | %26 |
[ | %5B | $ | %24 |
] | %5D | , | %2C |
{ | %7B | ! | %21 |
} | %7D | @ | %40 |
Using prefixes in the prefilled URL
Note
Field IDs can be used instead of the field name. Field IDs are available through our API, or through the Field Manager (Team, Business, and Enterprise Scale plans only).
Start by adding a ? to the end of the URL.

Then, type
prefill_and the name of the field you wish to prefill. The part afterprefill_must exactly match the field name as it appears in the table. Additionally, the field label/name in the form or the field ID can also be used to identify the correct field to prefill. Note that spaces in the name of a field will need to be encoded as%20or to the plus sign+.

Finally, you'll insert an = (equals sign) and then type the value that you would like the field to be prefilled with. Similar to the last step, you'll need to use the proper encoded values for spaces and symbols. Other considerations are dependent upon the field type of the field being prefilled which are covered in the sections below.
If you are constructing your URL manually for a static value, you can encode special characters using the table above or a URL encoder tool. However, if you are generating this link dynamically inside an Airtable formula, wrap each field name and field value with
ENCODE_URL_COMPONENT()— for example:"prefill_" & ENCODE_URL_COMPONENT("My Field Name") & "=" & ENCODE_URL_COMPONENT({My Field}). This handles all special characters automatically, including ones you can't predict in advance.
Pre-filling a single select or multiple select field
If you are pre-filling a multiple select field, you can add multiple values by including commas between the options you are selecting:
https://airtable.com/shr12345678?prefill_FIELD=Option1,Option2Prefilling multiple fields
If you wish to prefill more fields, enter an ampersand (&) and then enter more prefill_ parameters.
![]()
Prefilling time
It's important to note that when prefilling time fields in a form you will need to use the ISO 8601 time format. Below is a breakdown of what each number in that format means:
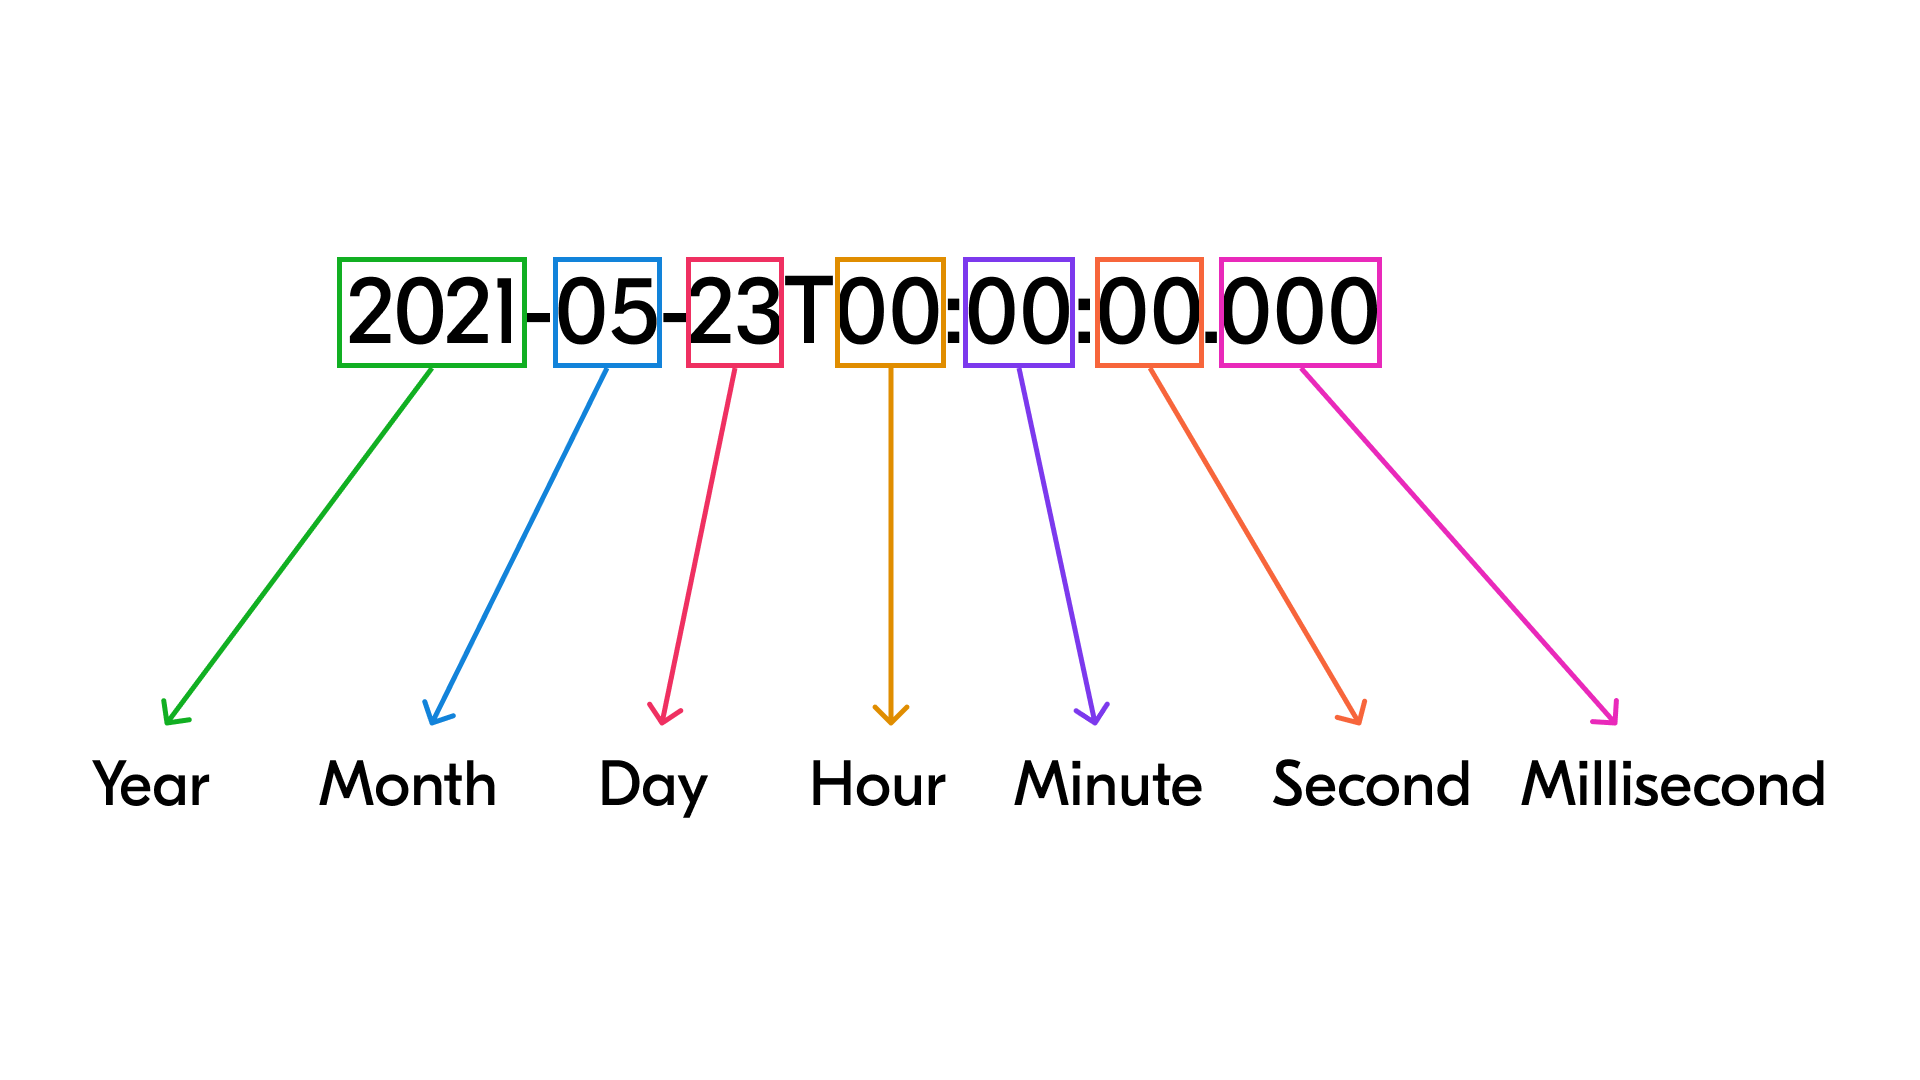
Here's an example of what a URL would look like for prefilling time into a form. Notice that the number 10 has been added to the hour section of the ISO 8601 format. This means that the form will be prefilled to 10 am.
![]()
Prefilling linked records
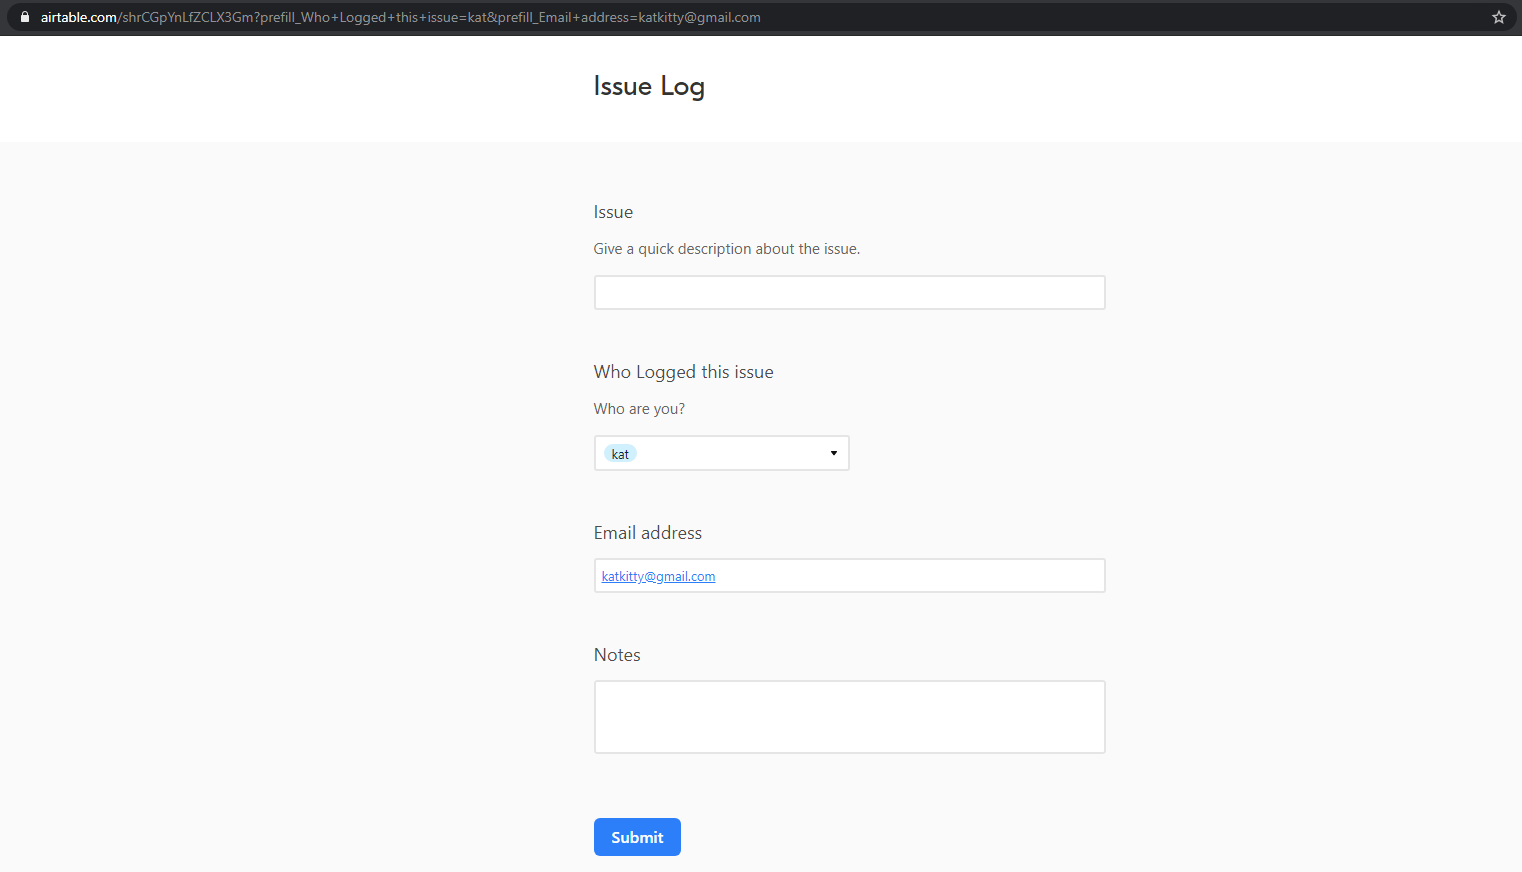
You can prefill a linked record input on a form by appending prefill_YOURFIELDNAME=YOUR_RECORD_ID to the form's URL.
Note
The "YOURFIELDNAME" and "YOUR_RECORD_ID" values are meant as placeholders. You will need to match the field names and record ID values to the corresponding data in your specific base. Imagine the field name you are wanting to prefill is named "Project" and you want to prefill that with a record ID "Recexample12345" then you would input
prefill_Project=Recexample1234. A reminder that adding multiple prefilled fields is covered above.
If you are looking to prefill multiple linked records, then be sure that the record IDs are each separated by a comma and do not include any spaces. This is also an important consideration when you are using the values from a Rollup field to prefill the form URL values using formulas. In these cases, you'll need to add a formula function such as SUBSTITUTE() to remove the space like so:
SUBSTITUTE({Array field name},
     " ",
   "")
For a walkthrough on how to prefill linked record inputs in a form, we recommend checking out this video demo.
Hiding a prefilled field from the submitter’s view
Sometimes, you might prefill a field for a submitter that you do not want them to edit, such as an internal feature ID for a product feedback form or a support ticket number for a support survey.
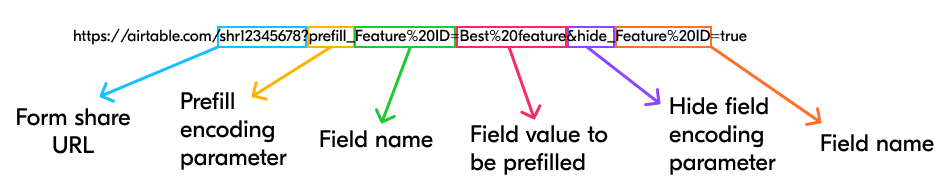
You can hide a form field from a submitter by using the hide_FieldNameOrTitle=trueencoded URL parameter. Similar to prefill_FieldNameOrTitle=value, the string FieldNameOrTitle should be properly encoded. For example, if your form field “Feature ID” should be prefilled with “Best feature” and hidden, your URL would look like this:
https://airtable.com/shr12345678?prefill_Feature%20ID=Best%20feature&hide_Feature%20ID=true
Let's break that formula down one more time:
When a field is prefilled and hidden via URL, the form field will not be shown to the user. However, the value will still be entered into the record when the form is submitted.
Note
Use caution to not prefill values that may violate your privacy or compliance practices.
This feature is not a security measure. The prefilled value will be visible in the URL that is generated for the pre-filled form. When the form submitter clicks on the URL, the prefilled value will be visible in the address bar of the browser that the form submitter is using. If a form submitter decides to delete encoded URL components from the address bar, then hidden fields will appear in the form
Testing your prefilled URL
The URL that you have created will prefill a form for you when accessing it.
Note
If you use automations to send emails with prefilled form links, note that hyperlinked text can support URLs up to 1,000 characters long. If a URL string is more than 1,000 characters, the text cannot be hyperlinked and the full URL string will be displayed in the sent email instead.
Using formulas to create a prefilled form URL
By leveraging Airtable's formula field you can put some front-end effort into crafting a solution that will simplify prefilled URL creation in the future.
The first question to ask yourself is where the formula field should go. The answer is that it depends upon the way your base has already been set up. You could add it into an existing table, but that may not always be the best practice. For this example, we are going to create a new table that will act as a prefilled form URL "playground" so that you can experiment with different field values and minimize the possibility of affecting records in other tables. Here is an example base that you can copy. It's the end result of following along in the steps listed below.
Step 1: Add "matching" fields to the table
For the sake of clarity, we will name this table "Prefilled form creator." You could also duplicate the table where the form resides and remove fields as need be. Just be sure to think about any implications this may have on the larger base (Automations, Scripts, Record limits, etc.).
Step 2: Create a new table
In this step, you'll want to add a field for each part of the form that you want to be able to prefill and/or hide in future form URLs. Of course you can always adjust your table and prefilled URL formula later, but it's good to think ahead, if possible.
If you duplicated a table in Step 1, then you would remove any unneeded fields in this step.
Step 3: Copy the form's URL
Navigate to the form view, click "Share form," and copy the URL.
Step 4: Add a formula field to the "Prefillled form creator" table
After copying the form's URL, navigate back to the "Prefilled form creator" table and add a formula field. To begin we will add the CONCATENATE() function in the formula builder and paste in the form URL with quotes around it. You can click save at this point.
Step 5: Start encoding and adding fields to the formula function
Note
Why
ENCODE_URL_COMPONENT()? Wrapping each dynamic field name and value with this function ensures any character — spaces, slashes, ampersands, parentheses, and others — is safely encoded automatically. This is especially important when field values are user-generated or otherwise unpredictable, since you cannot manually encode a value you don't know in advance. TheSUBSTITUTE()approach shown in older examples only handles spaces and will produce broken URLs if other special characters appear in a value.
The formula you create will need to be uniquely set up based on the form and table that you have created. Here is the formula from the example base:
CONCATENATE(
  "https://airtable.com/shrKySmaJbYOvdlfi?",
  "prefill_", ENCODE_URL_COMPONENT("People"), "=", ENCODE_URL_COMPONENT(People), "&hide_People=true",
  "&prefill_", ENCODE_URL_COMPONENT("Link type"), "=", ENCODE_URL_COMPONENT({Link type}), "&hide_Link+type=true",
  "&prefill_", ENCODE_URL_COMPONENT("Status"), "=", ENCODE_URL_COMPONENT(Status), "&hide_Status=true"
)
The concepts for building out this formula are discussed elsewhere throughout this article. In short, you can see that the structure of the formula follows a pattern of adding a prefill_ element followed by a &hide_ element.
There are some important universal concepts to think about regardless of your base's design:
In this example formula you'll notice that the
CONCATENATE()function has been wrapped by theSUBSTITUTE()function. This is because we want any spaces in the formula to be replaced with the + character so that the outputted URL is properly encoded.Related to that is the
{Multi select formula}field. Since the multi-select field's output is an array that includes spaces in between each choice, we want to remove those spaces in preparation for usage in the prefilled URL formula. Otherwise, those spaces would be improperly substituted by theSUBSTITUTE()function mentioned above.This formula hides each of the prefilled fields selected. To show a prefilled field, you would either remove the associated
&hide_fieldName=trueline or change thetruevalue tofalse.
Using an extension to create a prefilled form URL
One of our community extensions streamlines creating prefilled URLs.

FAQs
Can I create a hidden field on a form that isn't visible to the person filling out the form?
Yes, please see the Hiding a prefilled field from the submitter’s view for details. Additionally, automations with the "When a form is submitted" trigger can be used to add information to the record that is created when a specific form is submitted.
Can I prefill special characters into form fields?
Yes. The recommended approach is to use Airtable's built-in ENCODE_URL_COMPONENT(component_string) formula function, which automatically encodes any special characters in a field name or value. This is especially important for dynamic values. For static URLs where all values are known in advance, you can alternatively encode special characters manually using a reference like this encoding chart.
Can I prefill user fields with information?
Yes, however pre-filling a user field only resolves by:
Pre-filling the form URL with the exact user name (not case sensitive)
In the user field being used, if the option to Allow adding multiple users has been toggled on, then multiple exact user names or one or more group names can be added as a pre-fill value.
Group names also need to match exactly for this functionality to work.
Can only resolve to users that are already added to your base (either as references or collaborators).
Why do prefilled values sometimes show the wrong data?
If you send different people unique links to the same form (for example, each link prefills a different hidden client ID), a submitter's browser can sometimes reuse an older prefilled value (due to caching) instead of the one in the link they just opened. This usually happens when someone opens more than one of your form links in the same browser tab or session, or reopens a link they already visited.
To avoid this:
Ask each recipient to open their link in a new browser tab or an incognito/private window, especially if they may have opened another copy of the form recently.
Avoid testing multiple prefilled links back-to-back in the same tab—use Clear form at the bottom of the form, or open a fresh tab, between tests.
If you're generating links dynamically with a formula, regenerate the link each time rather than reusing a saved or emailed copy.
This applies to any potential prefill parameter set in an encoded/prefilled form URL.