- Cómo empezar a usar Airtable
- Introducción a los aspectos básicos de Airtable
- Cómo comunicarse con el equipo de soporte de Airtable
- Pantalla de inicio de Airtable
- Glosario de terminología de Airtable
- Airtable technical requirements
- Diferencias entre las funciones de Airtable para escritorio y para móvil
- Atajos de teclado de Airtable
- Cómo usar Markdown en Airtable
- Adding descriptions in Airtable
- Finding Airtable IDs
- Automatizaciones de Airtable
- Descripción general de automatizaciones
- Guías de automatizaciones
- Guías de automatizaciones integradas
- Guías de automatizaciones en Airtable
- Linking existing records using automations
- Conditional groups of automation actions
- Repeating groups of Airtable automation actions
- Creating recurring records using automations
- How to delay Airtable automation runs
- Prevent automations from triggering by mistake
- Use automations to timestamp status updates
- Desencadenantes de automatizaciones
- Desencadenantes de Airtable
- Airtable automation trigger: When record matches conditions
- Airtable automation trigger: When a form is submitted
- Airtable automation trigger: When record created
- Desencadenante de automatización de Airtable: cuando se actualiza un registro
- Airtable automation trigger: When record enters view
- Desencadenante de automatización de Airtable: a una hora programada
- Airtable automation trigger: When webhook received
- Airtable automation trigger: When a button is clicked
- Airtable automation trigger: When email received
- Desencadenantes integrados
- Desencadenantes de Airtable
- Acciones de automatización
- Acciones en Airtable
- Acción de automatización de Airtable: enviar correo electrónico
- Airtable automation action: Create record
- Airtable automation action: Update record
- Airtable automation action: Find records
- Airtable automation action: Sort list
- Acción de automatización de Airtable: ejecutar un script
- Airtable automation action: Generate with AI
- Acciones integradas
- Airtable automation actions: Slack
- Airtable automation actions: Google Workspace
- Airtable automation action: Send MS Teams message
- Airtable automation actions: Outlook
- Airtable automation actions: Jira Cloud
- Airtable automation actions: Jira Server / Data Center
- Airtable automation actions: Salesforce
- Airtable automation action: Create post in Facebook Pages
- Airtable automation actions: GitHub Issues
- Airtable automation action: Hootsuite post
- Airtable automation action: Send Twilio SMS
- Acciones en Airtable
- Bases de Airtable
- Using Airtable Cobuilder
- Descripción general de las bases de Airtable
- Creating and duplicating bases in Airtable
- Structuring your Airtable bases effectively
- Moving Airtable bases between workspaces
- Tables in Airtable
- Crear enlaces para compartir bases de Airtable
- Importing third-party data into Airtable
- Uso de las perspectivas
- Troubleshooting Airtable base performance
- Versiones beta de Airtable
- Colaboración en Airtable
- Asistencia de Airtable Enterprise
- Información general
- External badging in Airtable
- Creating and using Airtable components
- Ask an Expert beta overview
- Data residency at Airtable
- Descripción general de los grupos de usuarios en Airtable
- API de Enterprise de Airtable
- Creating and managing data retention policies in Airtable
- eDiscovery APIs in Airtable
- Airtable and data loss prevention
- Acceder a los registros de auditoría de Enterprise en Airtable
- Configuración de Jira Server/Data Center para conectarse con Airtable
- Panel de Administración de Enterprise
- Descripción general del panel de administración de Enterprise
- Usuarios: panel de administración de Enterprise en Airtable
- Detalles del usuario en el panel de administración de Airtable
- Grupos: panel de administración de Airtable
- Espacios de trabajos: panel de administración de Enterprise de Airtable
- Bases: panel de administración de Enterprise en Airtable
- Interfaces: Panel de administración de Enterprise en Airtable
- Data sets - Airtable admin panel
- Managed apps - Airtable admin panel
- Components - Airtable admin panel
- Informes: panel de administración de Enterprise en Airtable
- Airtable admin panel settings
- Guía práctica de Enterprise
- Gestionar a los admins de Enterprise en el panel de administración
- Uso de organizaciones
- Organizational branding for apps in Airtable
- Enterprise Hub in Airtable
- Enterprise Hub : Org unit assignment with user groups
- Desactivar, retirar el acceso y reactivar usuarios desde el panel de administración
- Gestionar el acceso de usuario a espacios de trabajo y bases
- Airtable Enterprise Key Management
- Custom terms of use
- SSO en Enterprise
- Información general
- Extensiones de Airtable
- Descripción general de las extensiones
- Extensiones por Airtable
- Extensiones integradas
- Campos de Airtable
- Descripción general de los campos
- Archivo adjunto
- Campos basados en fecha
- Fórmula
- Empezar a usar fórmulas
- Fundamentos de fórmulas
- Soluciones frecuentes: principiante
- Soluciones habituales: intermedias
- Soluciones habituales: avanzado
- Campo de texto largo
- Campos de registros vinculados
- Campos con números
- Otros campos
- Campos de compilación, búsqueda y recuento
- Campos de selección y colaborador
- Integración con Airtable
- API
- Getting started with Airtable's Web API
- Crear tokens de acceso personal
- Airtable Webhooks API Overview
- Service accounts overview
- API web de Airtable: usar filterByFormula o parámetros para ordenar
- Airtable API Deprecation Guidelines
- Airtable API: Common troubleshooting
- Managing API call limits in Airtable
- Enforcement of URL length limit for Web API requests
- Servicios de integración
- Third-party integrations via OAuth overview
- Troubleshooting disconnected OAuth integrations in Airtable
- Options for integrating with Airtable
- Third-party integrations - Common troubleshooting
- Low-code integrations - Common troubleshooting
- Integrating Airtable with external calendar applications
- Visualizing records from Airtable in Tableau
- Visualizing Airtable records in Microsoft Power BI & Power Query
- Integrating HubSpot with Airtable
- Using Zapier to integrate Airtable with other services
- Using Zapier's Multi-Step Zaps to find and update records
- Using IFTTT to integrate Airtable with other services
- Integrating with AWS Lambda & DynamoDB
- Herramientas para desarrolladores
- API
- Diseñador de Interfaces de Airtable
- Descripción general
- Diseños de página
- Elementos
- Adding and removing elements in interfaces
- Adding layouts to interfaces
- Formatting elements in interfaces
- Interface element: Button
- Interface element: Calendar
- Interface element: Chart
- Interface element: Filter
- Interface element: Gallery
- Interface element: Grid
- Interface element: Kanban
- Interface element: Number
- Interface element: Record picker
- Interface element: Text
- Interface element: Timeline
- Aprendizaje y recursos
- Gestión de Airtable
- Política de Airtable
- Registros de Airtable
- Sincronización de Airtable
- Vistas de Airtable
- Espacios de trabajo de Airtable
- Impresión
- Compartir
- OscuroLigero
- PDF
Interface element: Chart
- Actualizado en 06 Aug 2024
- 3 Minutos para leer
- Impresión
- Compartir
- OscuroLigero
- PDF
Plan availability | All plan types/levels |
Permissions | Please consult this support article for a breakdown of Interface Designer permissions.
|
Platform(s) | Web/Browser, Mac app, and Windows app |
Related reading |
|
Note
This element is only available in element-based Blank, Record review, and Record summary layouts.
Chart elements are meant to help display data insights based on data held in a base similar to the Chart extension.
Adding chart elements
If this is the first time you've added elements to an interface, please consult this help article first.
Find the Chart element by clicking + Add element in the lower left portion of the interface editor.
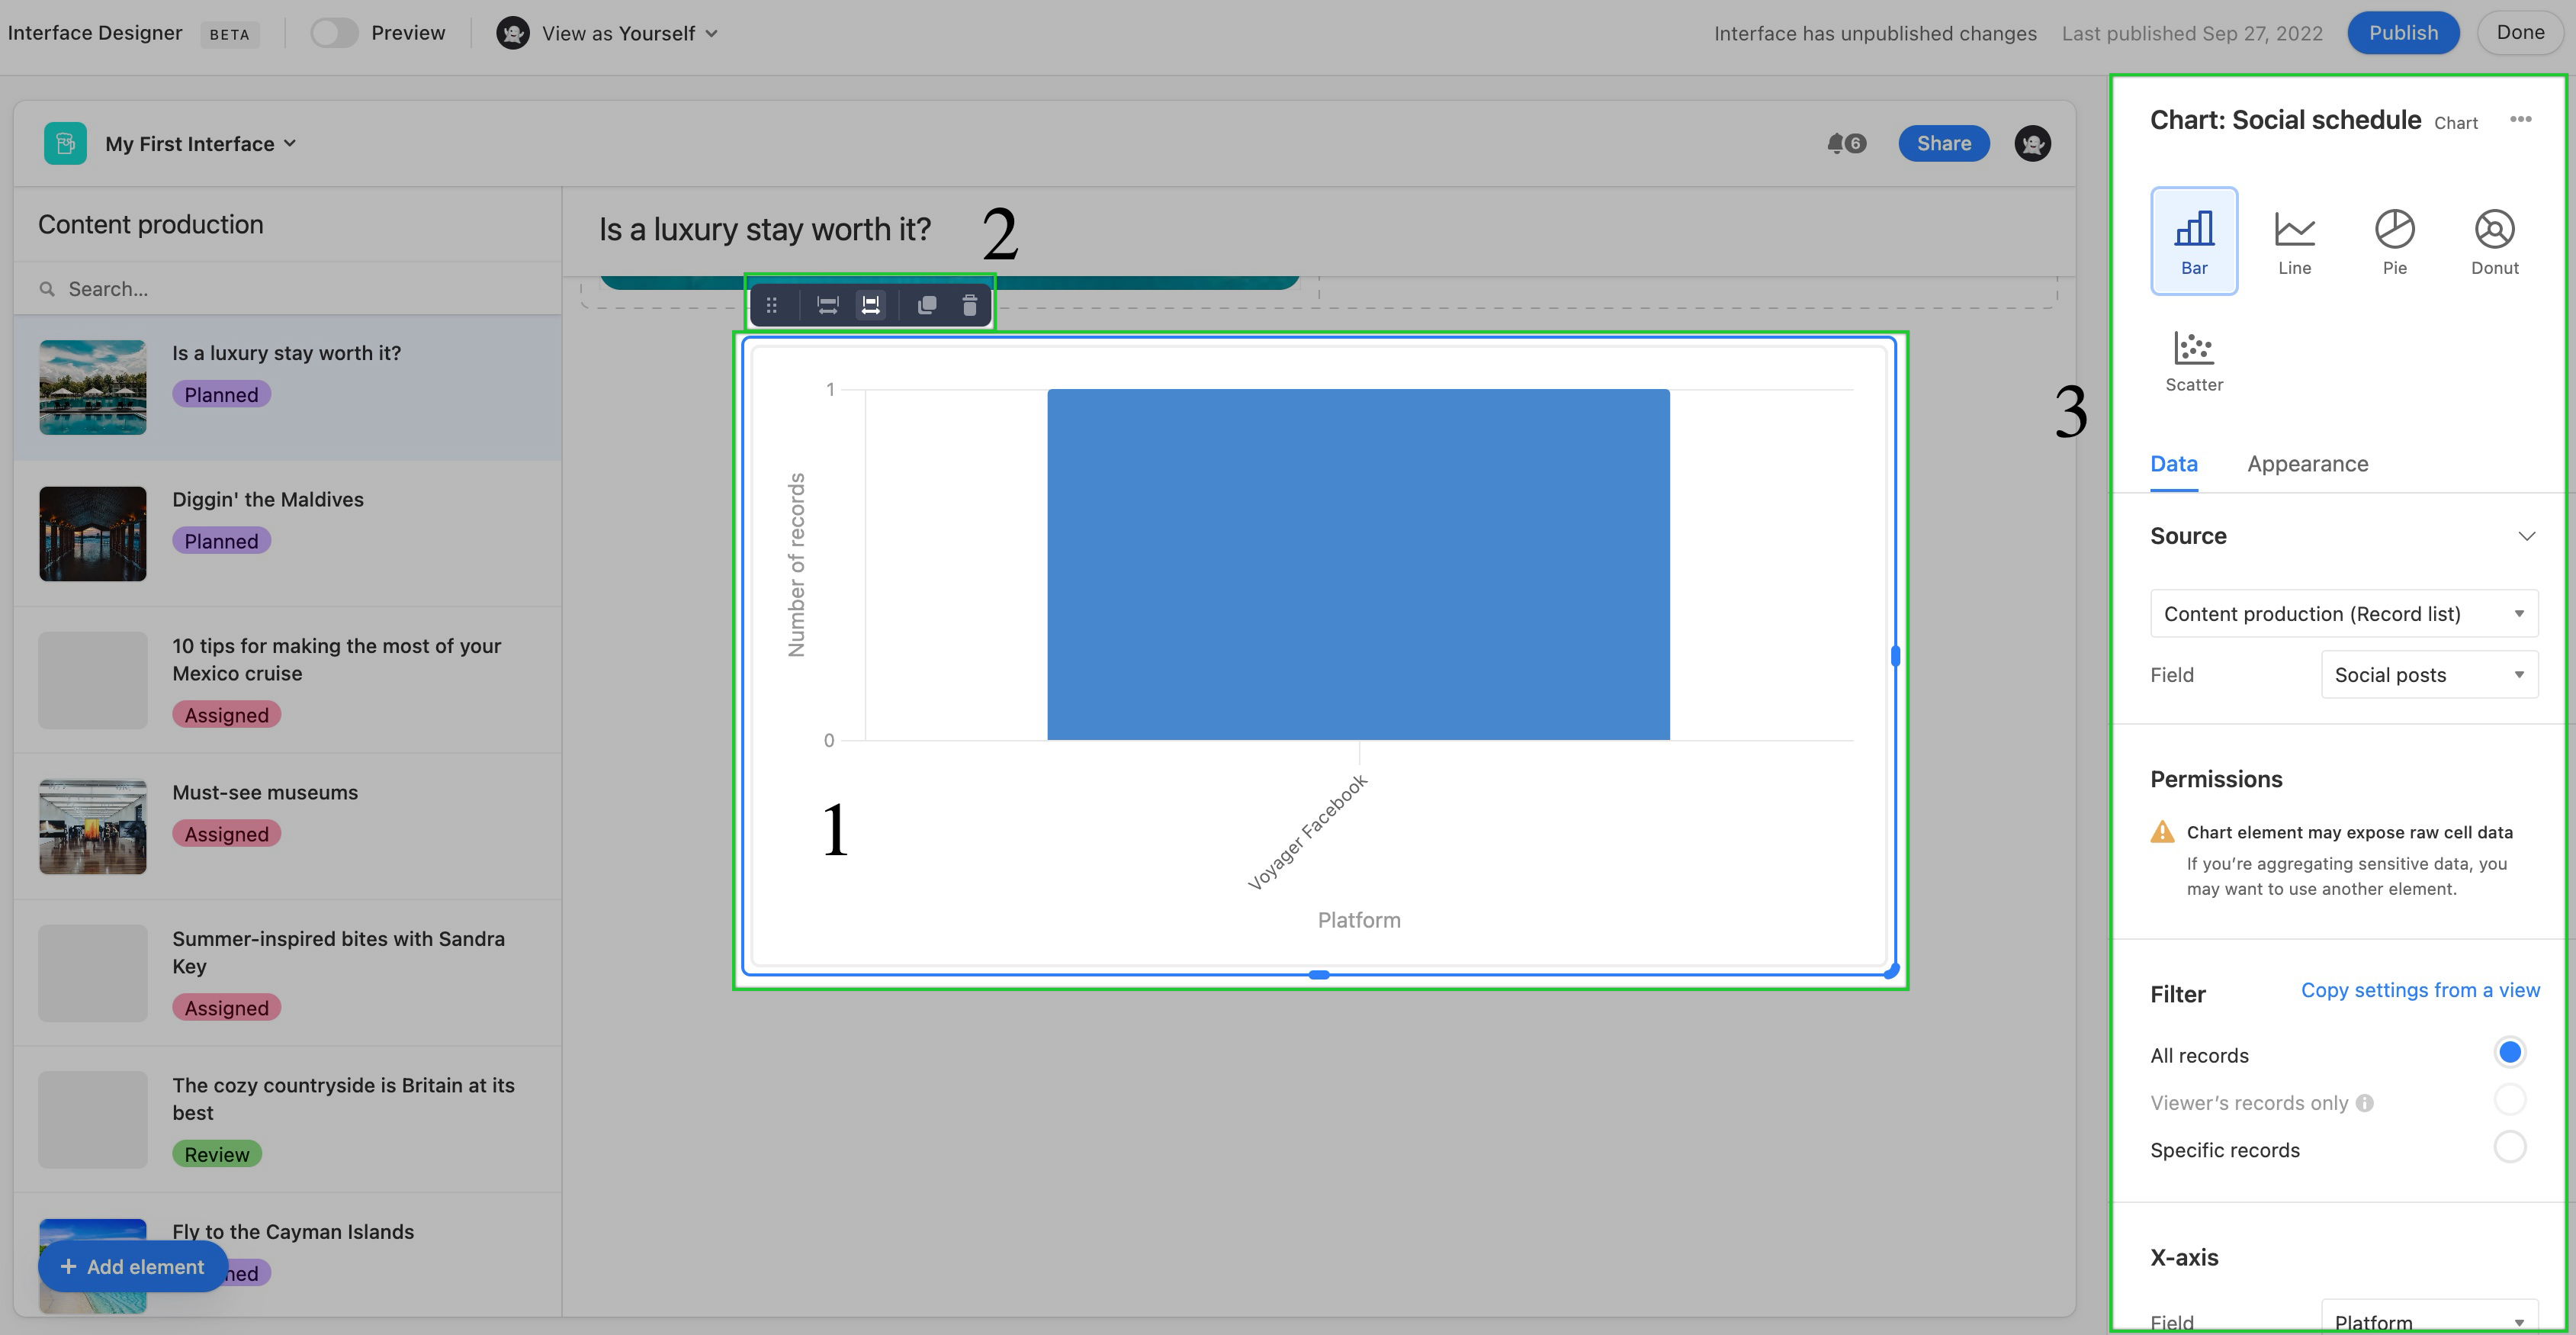
Once the element has been placed 1, additional formatting 2 and configuration options 3 will appear.
Next, you'll want to decide which type of chart. Choose between Bar, Line, Pie, Donut, and Scatter.
You'll then move on to configure the Data and Appearance sections discussed below.
Chart data configuration
First up, configure the source of the chart. Typically, this will be a particular table from the underlying base.
As a reminder, chart elements can expose raw data that may be sensitive, and therefore should not be used if you have concerns with viewers being able to see that information.
Next, set up filters. Choose to copy filter settings from a view in the underlying base or from the three general filters. By default, the All records option will keep the chart unfiltered. The Viewer's records only option will only show chart data related to the interface viewer if their name (or a group they belong to) has been added to a user field in the underlying base. You can specifically set one, and only one, user field for this option. Finally, you can set Specific records by condition(s) or condition group(s) to filter the underlying data.
Depending upon the chart type you have chosen you will see Categories field and Values or x-axis and y-axis configuration options for the chart. Feel free to adjust the variations options until the chart is displaying data in the meaningful way you would like it to appear.
![](http://cdn.airtable.document360.io/d0ee2ee4-3f78-47c7-b388-85e40be9fb89/Images/Documentation/interface_designer_chart_element_configuration_10112022.jpg)
Chart appearance configuration
The final steps in setting up a chart element are to modify its appearance.
Colors - Here you can adjust the color scheme. There are several preconfigured color palettes to choose from or you can Use colors from the base. The latter option allows you to have the chart reflect the color schema already set in a select field from the underlying base.
Labels - Next you can add helpful text labels (Title, Subtitle, and the field/legend label) to the chart element.
Legend - Lastly, you can Hide or show a legend for the chart in the Left, Right, Top, or Bottom of the element.
![](http://cdn.airtable.document360.io/d0ee2ee4-3f78-47c7-b388-85e40be9fb89/Images/Documentation/interface_designer_chart_element_appearance_10112022.jpg)
Chart element dependencies
If the chart you are creating is connected to a filter element, then it's important to consider how the filters set at the chart element level may or may not interact with the filtering options available in the filter element.
You can switch the chart type to another chart type after building it out. However, keep in mind that certain charts offer more configuration options than others. So, be sure to look back through both the Data and Appearance sections of the configuration sidebar.
Supported fields for chart elements
Field type | x-axis support | y-axis support |
---|---|---|
Autonumber | ✅ | |
Barcode | ✅ | |
Checkbox | ✅ | |
Count | ✅ | ✅ |
Created time | ✅ | |
Currency | ✅ | ✅ |
Date | ✅ | |
Duration | ✅ | |
✅ | ||
Formula | ✅ | ✅ |
Last modified | ✅ | |
Linked record | ✅ | |
Long text | ✅ | |
Lookups | ✅ | ✅ 1 |
Multiple select | ✅ | |
Number | ✅ | ✅ |
Percent | ✅ | ✅ |
Phone number | ✅ | |
Rating | ✅ | ✅ |
Rollup | ✅ | ✅ 1 |
Single line text | ✅ | |
Single select | ✅ | |
URL | ✅ | |
User | ✅ |
1 Must be looking up or rolling up a value that is formatted numerically.
Attachment, Button, Created by, and Last modified by fields are unsupported in the chart element.
FAQs
What is the difference between a chart extension and a chart element?
Chart interfaces do share some similarities with chart extensions. However, interfaces were created with granular permission flexibility in mind. For that reason, chart extensions are better served for workflows where everyone on your team has access to the underlying base. In instances where most end-users are using interfaces instead, we recommend you build charts in interfaces so that more of your team is able to visualize the data you are presenting in the interface.