- Getting started with Airtable
- Introduction to Airtable basics
- Contacting Airtable Support
- Airtable home screen
- Glossary of Airtable terminology
- Airtable technical requirements
- Feature differences between Airtable on desktop and mobile Updated
- Airtable keyboard shortcuts
- Using Markdown in Airtable
- Adding descriptions in Airtable
- Finding Airtable IDs
- Airtable Automations
- Automations Overview
- Automation feature walkthroughs
- Integrated automation walkthroughs
- Airtable automation walkthroughs
- Linking existing records using automations
- Conditional groups of automation actions
- Repeating groups of Airtable automation actions
- Creating recurring records using automations
- How to delay Airtable automation runs
- Prevent automations from triggering by mistake
- Use automations to timestamp status updates
- Automation Triggers
- Airtable Triggers
- Airtable automation trigger: When record matches conditions
- Airtable automation trigger: When a form is submitted
- Airtable automation trigger: When record created
- Airtable automation trigger: When record updated
- Airtable automation trigger: When record enters view
- Airtable automation trigger: At scheduled time
- Airtable automation trigger: When webhook received
- Airtable automation trigger: When a button is clicked
- Airtable automation trigger: When email received Updated
- Integrated Triggers
- Airtable Triggers
- Automation Actions
- Airtable Actions
- Integrated Actions
- Airtable automation actions: Slack
- Airtable automation actions: Google Workspace
- Airtable automation action: Send MS Teams message
- Airtable automation actions: Outlook
- Airtable automation actions: Jira Cloud
- Airtable automation actions: Jira Server / Data Center
- Airtable automation actions: Salesforce
- Airtable automation action: Create post in Facebook Pages
- Airtable automation actions: GitHub Issues
- Airtable automation action: Hootsuite post
- Airtable automation action: Send Twilio SMS
- Airtable Bases
- Using Airtable Cobuilder
- Airtable bases overview
- Creating and managing Airtable bases
- Structuring bases in Airtable
- Moving bases between workspaces in Airtable
- Creating and managing tables in Airtable
- Creating Airtable base share links
- Importing third-party data into Airtable
- Using insights in Airtable
- Troubleshooting Airtable base performance
- Airtable Betas
- Collaborating in Airtable
- Airtable Enterprise Support
- General Enterprise information
- External badging in Airtable
- Using app library and components in Airtable Updated
- Ask an Expert beta overview
- European data residency at Airtable
- Airtable user groups overview
- Airtable Enterprise API
- Creating and managing data retention policies in Airtable
- eDiscovery APIs in Airtable
- Airtable and data loss prevention
- Accessing Enterprise audit logs in Airtable
- Set up Jira Server / Data Center to connect with Airtable
- Admin panel pages
- Airtable admin panel overview
- Users - Airtable enterprise admin panel
- Airtable admin panel user details
- Groups - Airtable admin panel
- Workspaces - Airtable Enterprise Admin Panel
- Bases - Airtable admin panel
- Interfaces - Airtable admin panel
- Data sets - Airtable admin panel
- Managed apps - Airtable admin panel
- Components - Airtable admin panel
- Reports - Airtable admin panel
- Settings - Airtable admin panel Updated
- Managing Enterprise organizations
- Managing Enterprise admins in admin panel
- Using Organizations
- Organization branding for apps in Airtable
- Enterprise Hub in Airtable
- Enterprise Hub: Org unit assignment with user groups Updated
- Deactivating, removing access, and reactivating users in the admin panel
- Managing user access to workspaces and bases
- Airtable Enterprise Key Management Updated
- Custom terms of use Updated
- Enterprise SSO
- General Enterprise information
- Airtable Extensions
- Airtable Fields
- Fields Overview
- Attachment
- Date-based fields
- Formula
- Getting Started with Formulas
- Formula Foundations
- The essentials of Airtable formulas
- Formula writing tips for beginners
- Troubleshooting formulas
- Basic calculations
- Conditional statements
- Logical arguments
- Working with dates
- Displaying DATETIME_FORMAT using the date field in Airtable
- Working with date functions in Airtable
- Calculating the difference between dates in Airtable
- Supported DATETIME_DIFF unit specifiers in Airtable
- Supported DATETIME_FORMAT format specifiers in Airtable
- Using the DATETIME_PARSE() formula in Airtable
- Working with timezones
- Record functions
- Text functions
- Numeric functions
- Common Solutions: Beginner
- Common Solutions: Intermediate
- Common Solutions: Advanced
- Long Text Field
- Linked Record Field
- Linking records in Airtable Updated
- Limiting linked record selection to a view in Airtable Updated
- Dynamic filtering in linked record fields
- Linking to one, many, or a subset of Airtable records
- Converting existing fields to Airtable linked records
- Reordering record links in Airtable
- Understanding linked record relationships in Airtable
- Number-Based Fields
- Other Fields
- Rollup, lookup, and count fields
- Select and user fields
- Integrating with Airtable
- API
- Getting started with Airtable's Web API
- Creating personal access tokens
- Airtable Webhooks API Overview
- Service accounts overview
- Airtable Web API - Using filterByFormula or sort parameters
- Airtable API Deprecation Guidelines
- Airtable API: Common troubleshooting
- Managing API call limits in Airtable
- URL length limitations for web API requests
- Integration services
- Third-party integrations via OAuth overview
- Troubleshooting disconnected OAuth integrations in Airtable
- Options for integrating with Airtable
- Third-party integrations - Common troubleshooting
- Low-code integrations - Common troubleshooting
- Integrating Airtable with external calendar applications
- Visualizing records from Airtable in Tableau
- Visualizing Airtable records in Microsoft Power BI & Power Query
- Integrating HubSpot with Airtable
- Using Zapier to integrate Airtable with other services
- Using Zapier's Multi-Step Zaps to find and update records
- Using IFTTT to integrate Airtable with other services
- Integrating with AWS Lambda & DynamoDB
- Developer tools
- API
- Airtable Interface Designer
- Interface Designer overview articles
- Interface layouts
- Interface elements
- Adding and removing elements in interfaces
- Adding layouts to interfaces
- Formatting elements in interfaces
- Interface element: Button
- Interface element: Calendar
- Interface element: Chart
- Interface element: Filter
- Interface element: Gallery
- Interface element: Grid
- Interface element: Kanban
- Interface element: Number
- Interface element: Record picker
- Interface element: Text
- Interface element: Timeline
- Learning and Resources
- Managing Airtable
- Airtable Policy
- Airtable Records
- Airtable Sync
- Airtable Views
- Airtable Workspaces
- Print
- Share
- DarkLight
- PDF
Business and Enterprise Scale only | |
Platform(s) | Web/Browser, Mac app, and Windows app |
Related reading |
Setting up SSO for ADFS
The admin panel is a centralized tool to help Airtable admins manage their organization. Learn how to set up SSO logins for your organization.
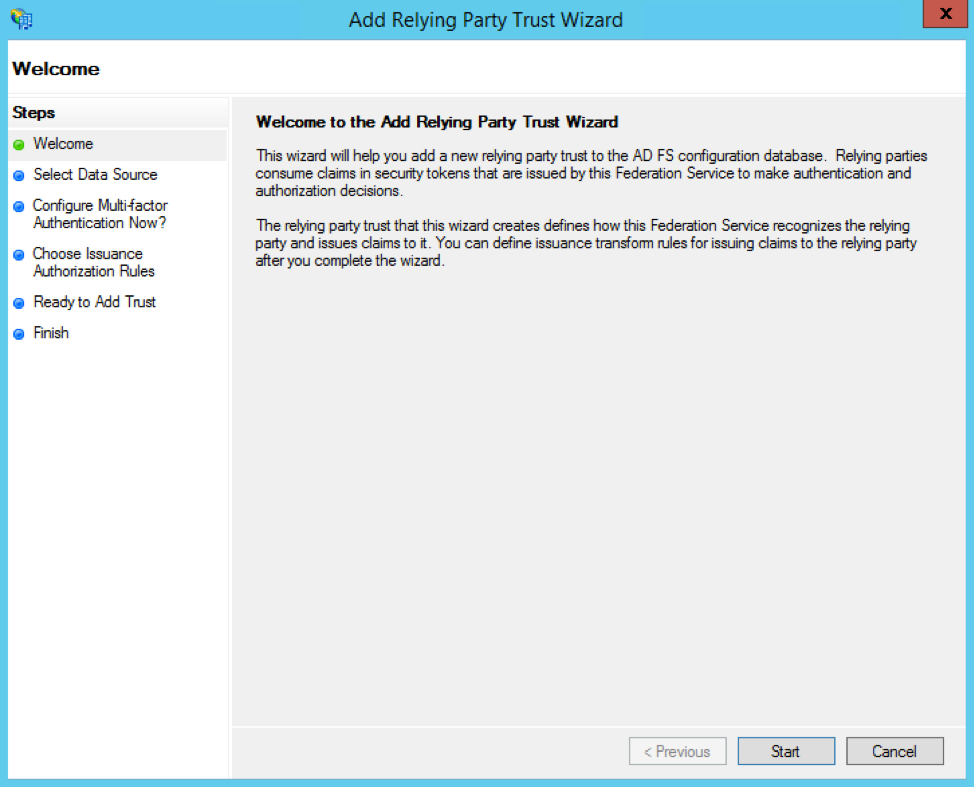
Step 1: Adding a “Relying Party” using the ADFS setup wizard
In the left navigation pane of ADFS, select Relying Party Trust, then Add Relying Party Trust, then Start.
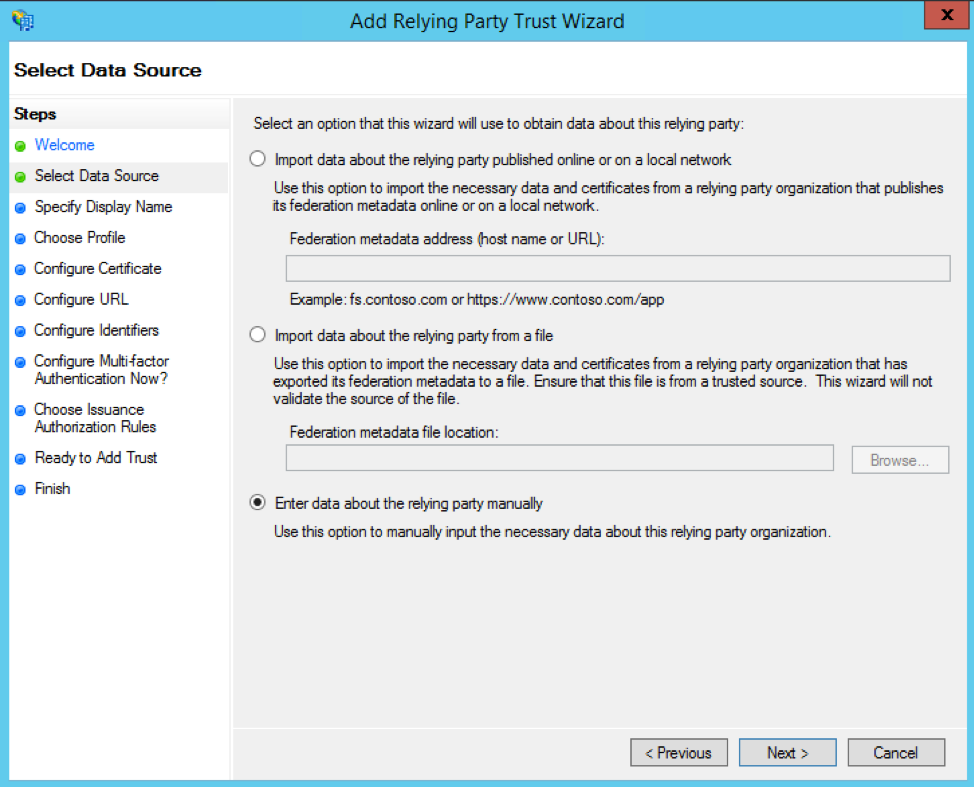
Click the radio button option to Enter data about the relying party manually, then click the Next button.
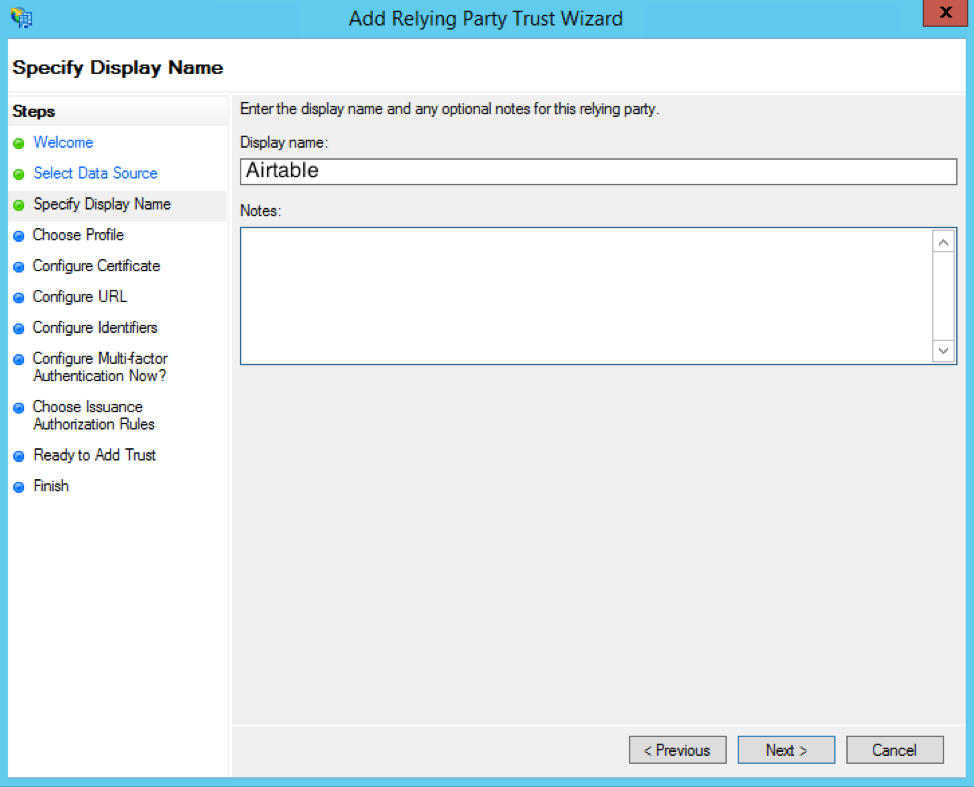
You can enter whatever display name you want (like "Airtable") and any optional notes—then click the Next button again.
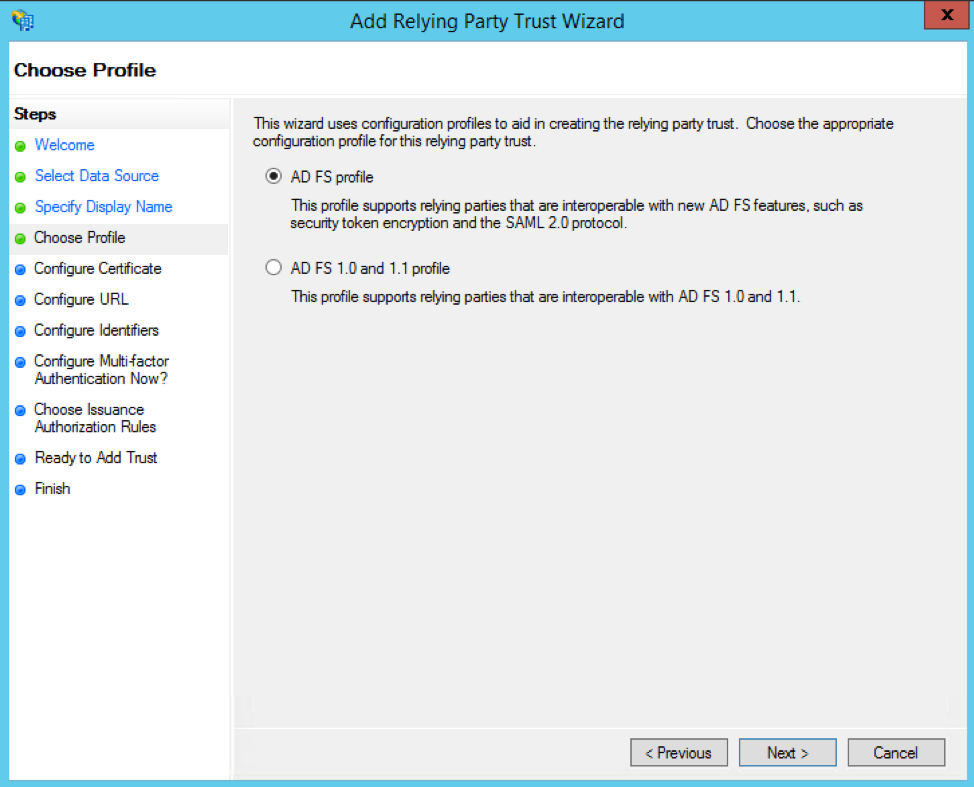
Next, pick ADFS profile as the configuration profile.
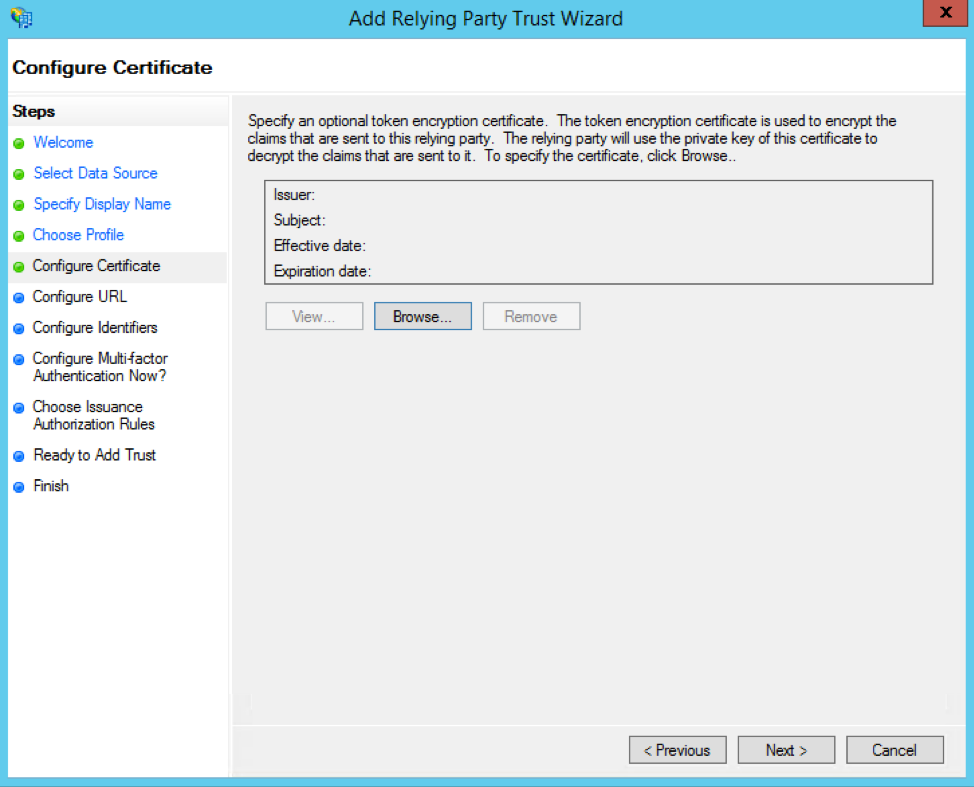
Click the Next button on the Configure Certificate page.
For the Configure URL page, check the Enable support for the SAML 2.0 WebSSO protocol box and paste in this URL:
https://airtable.com/auth/ssoCallback
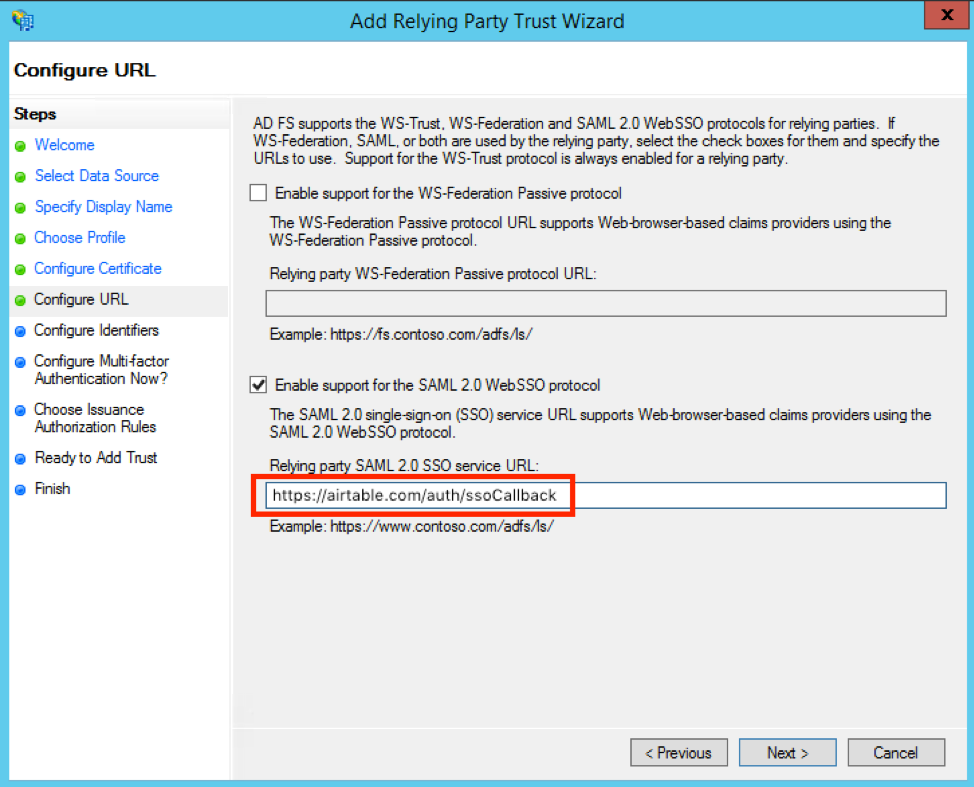
For the Configure Identifiers page, add https://airtable.com/sso/metadata0418.xml as a Relying party trust identifier.
On the Configure Multi-factor Authentication Now? page, choose the "I do not want to configure multi-factor authentication settings for this relying party at this time." option.
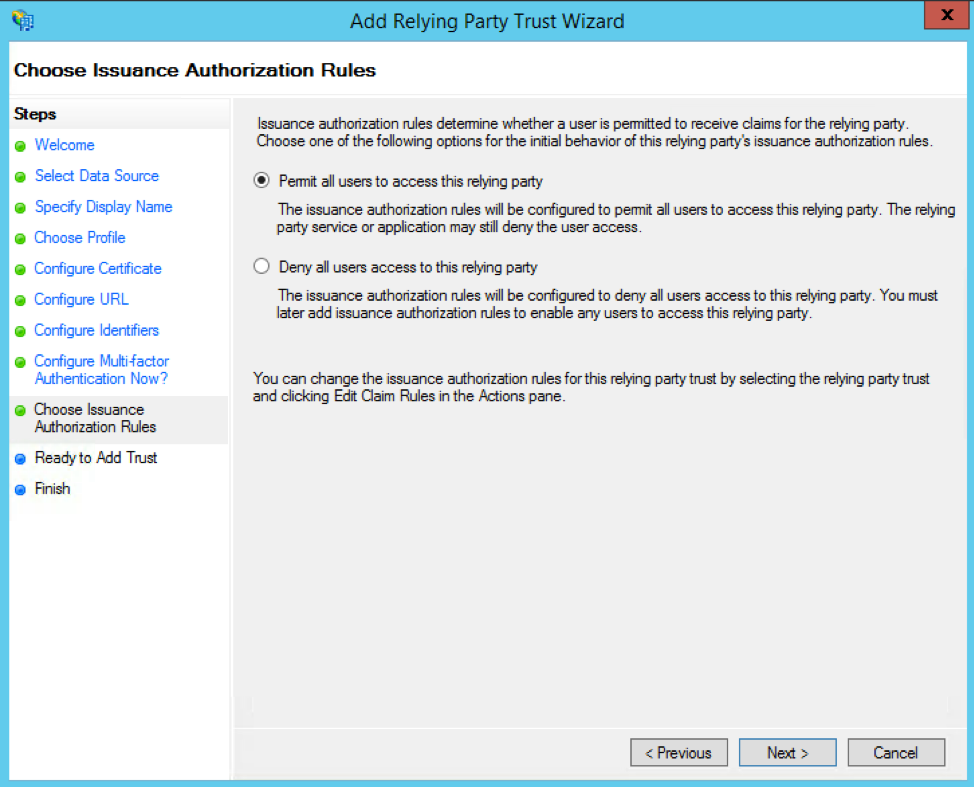
On the Choose Issuance Authorization Rules page, select the "Permit all users to access this relying party" option.
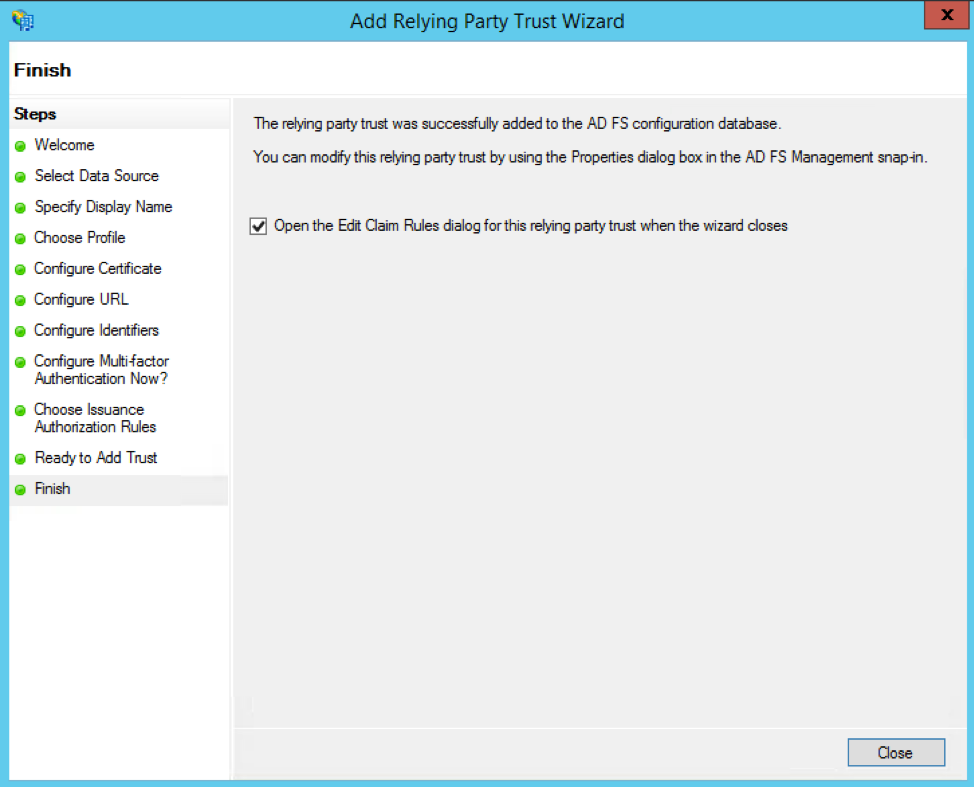
On the final screen of the wizard, check the "Open the Edit Claim Rules dialog for this relying party trust when the wizard closes" box. This will open the Edit Claim Rules dialog once you click the Close button.
Step 2: Adding a “Claim Rule” in ADFS
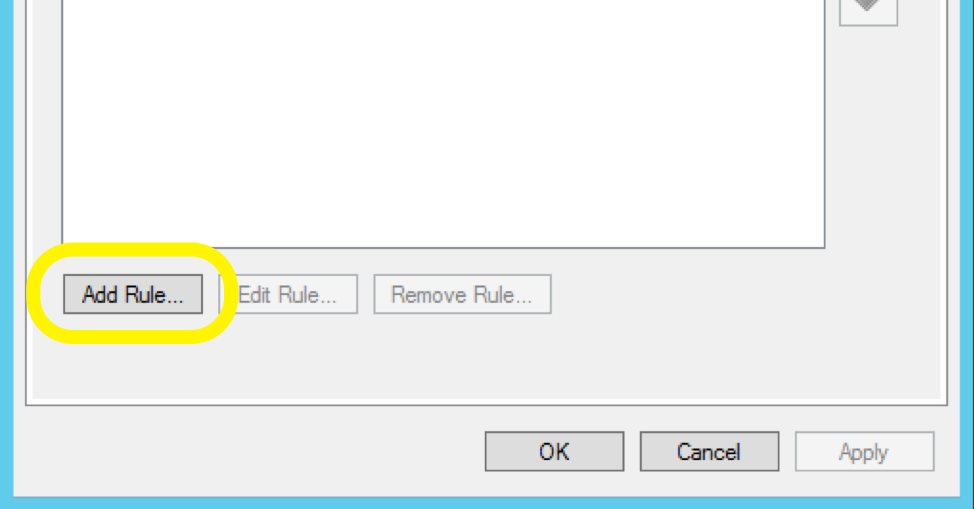
Once in the Edit Claim Rules dialog, go to the Issuance Transform Rules tab, then click the Add Rule button. This will open up the Add Transform Claim Rule Wizard.
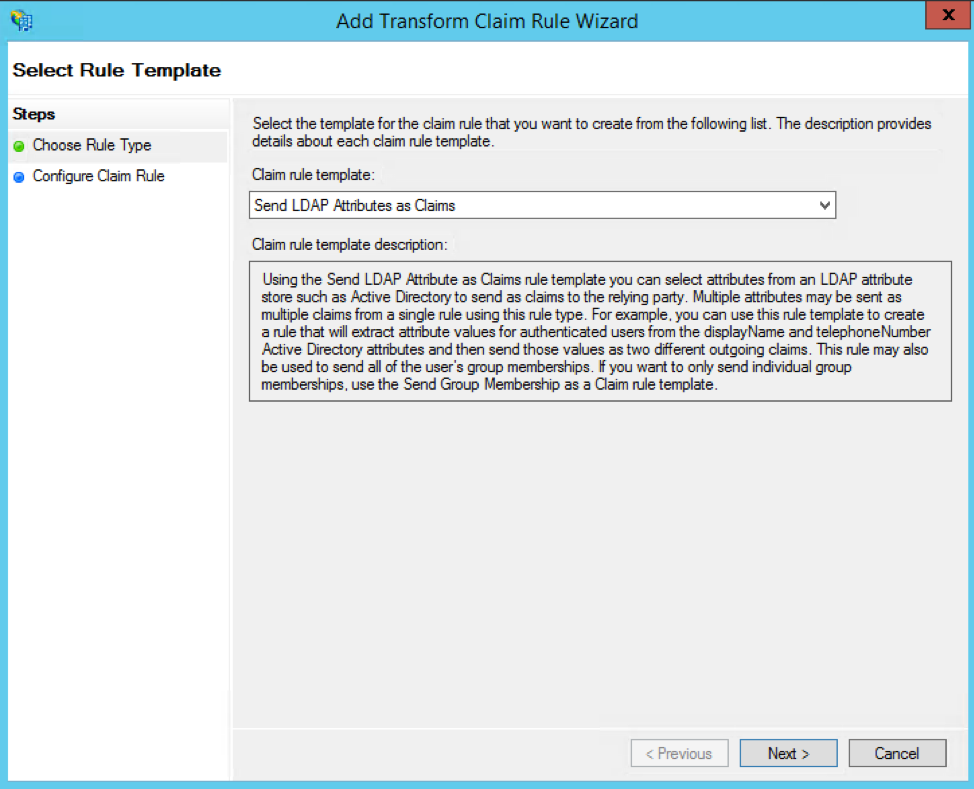
From within the Add Transform Claim Rule Wizard, you will be asked to Choose Rule Type. From the Claim rule template dropdown, select the Send LDAP Attributes as Claims option.
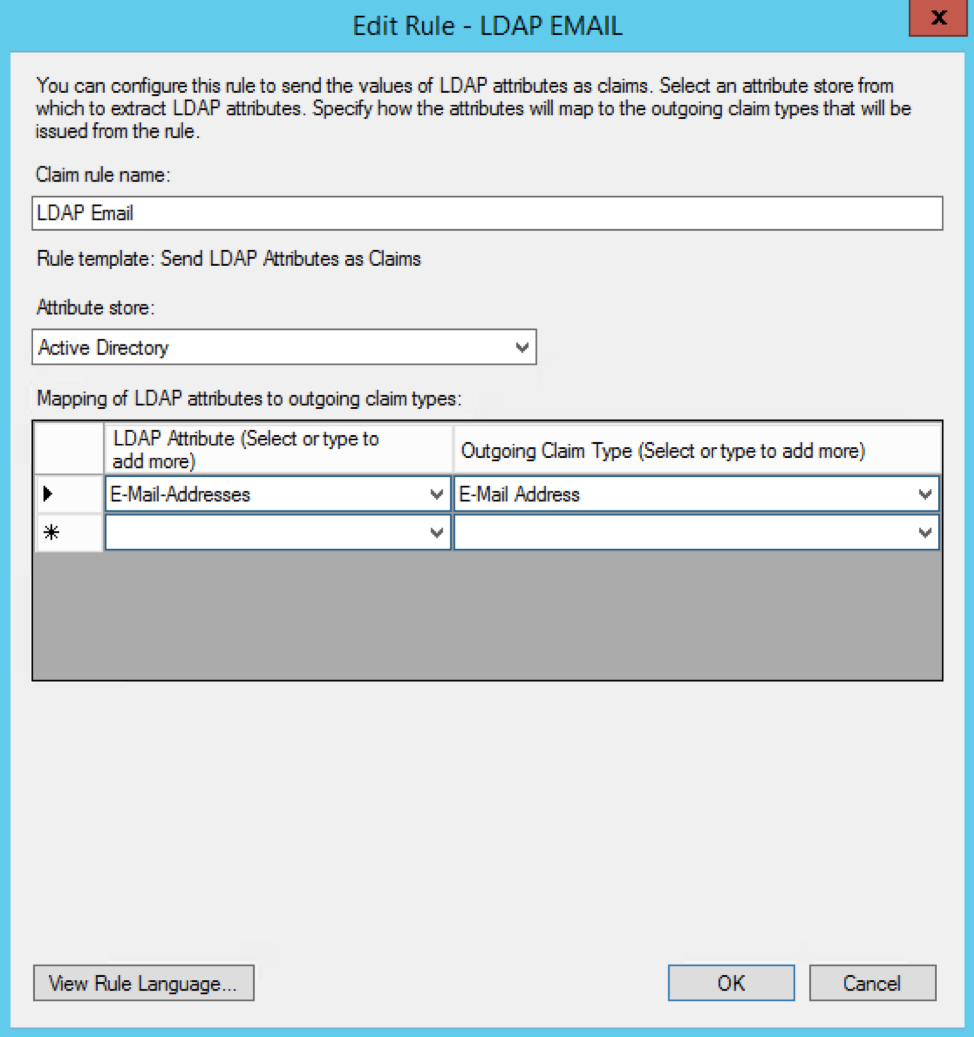
Give your claim rule a name (like "LDAP Email") and map the E-Mail-Addresses LDAP attribute in the left column to the E-Mail Address outgoing claim type in the right column.
You'll need to add another Transform Claim Rule here. This time, select the Transform an Incoming Claim option from the Claim rule template dropdown.
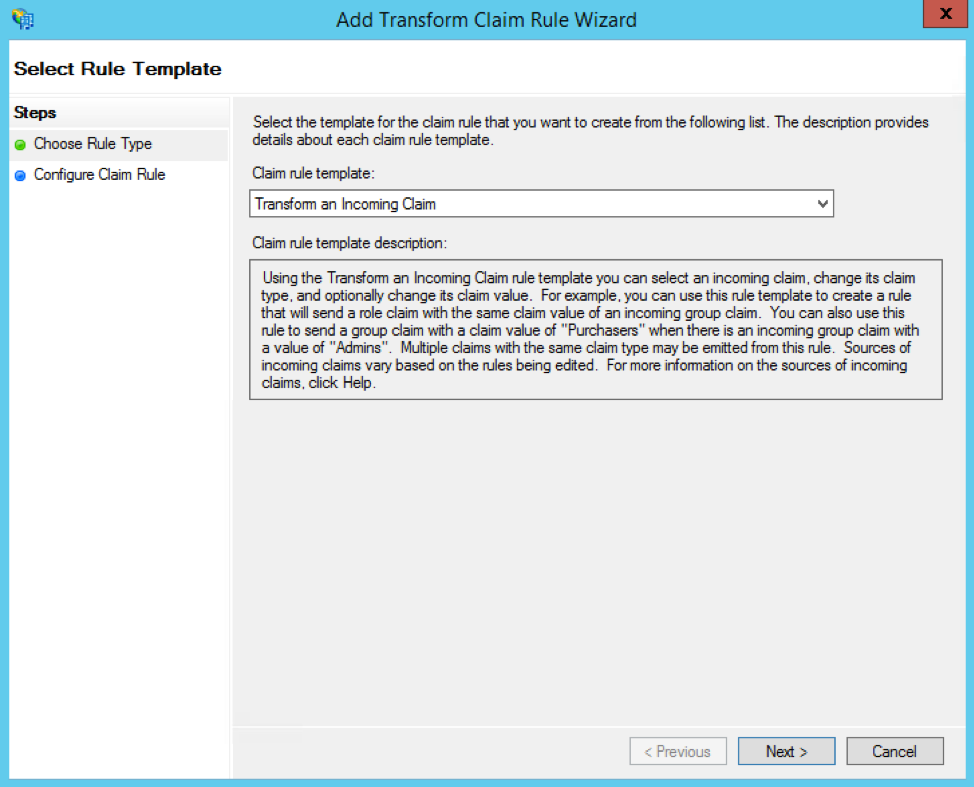
Give this claim rule a name (like "Email Transform"), then set the following values:
Set Incoming claim type to E-Mail Address
Set Outgoing claim type to Name ID
Set Outgoing name ID format to Email
Select the Pass through all claim values radio button
Airtable also supports the following additional attribute maps:
"urn:oid:2.5.4.4" -> Basic Information; Last Name
"urn:oid:2.5.4.42" -> Basic Information; First Name
When you're done, click the OK button to save this Claim rule, and OK again to exit the Transform Claim Rule Wizard.
Step 3: Editing Airtable’s relying trust properties in ADFS
Under the Advanced tab, select SHA-256 as the secure hash algorithm. Then, copy the following X.509 certificate and save it to something like airtable.crt:
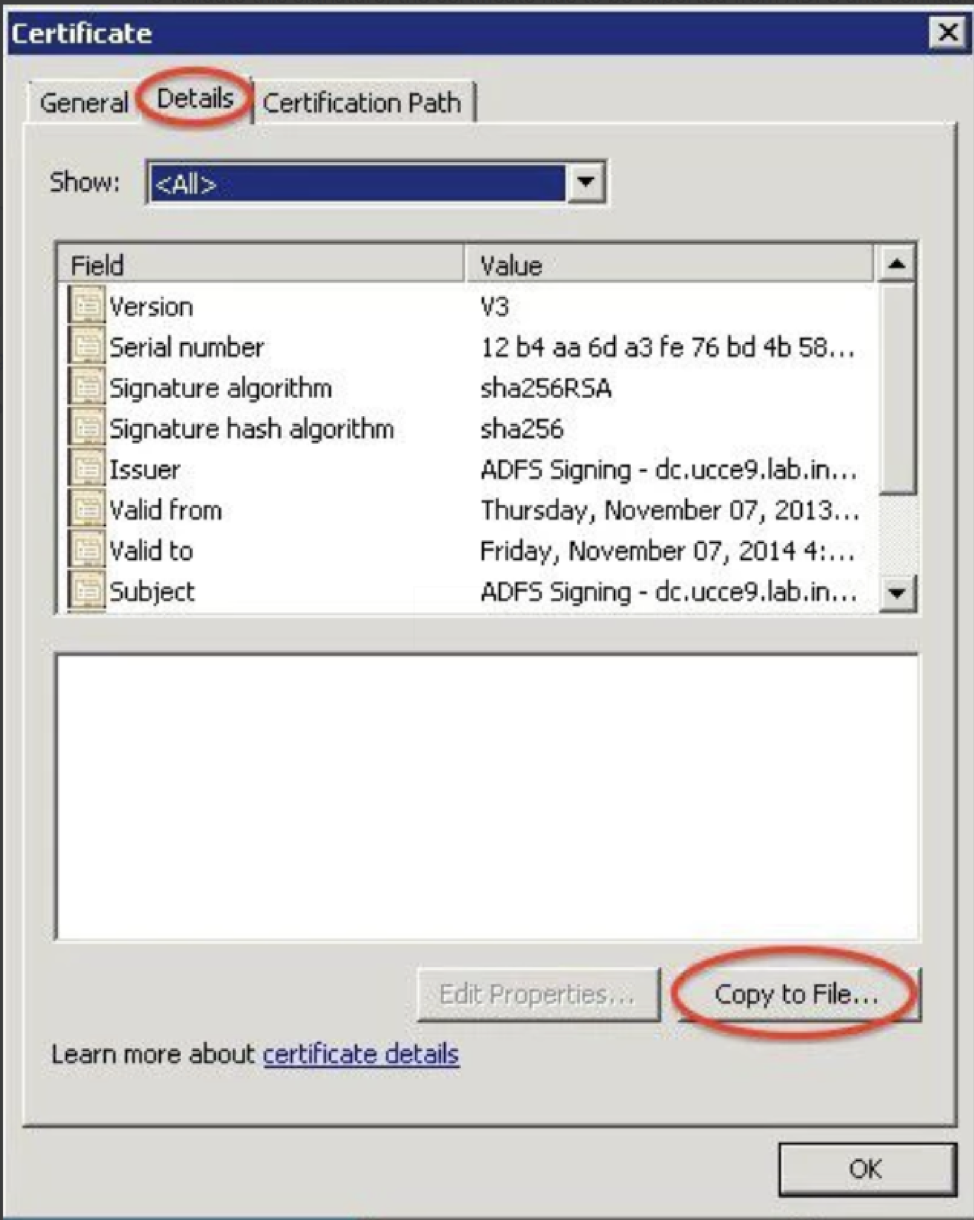
-----BEGIN CERTIFICATE----- MIIDUDCCAjgCCQDZhZQnLjon1zANBgkqhkiG9w0BAQsFADBqMQswCQYDVQQGEwJV UzELMAkGA1UECAwCQ0ExETAPBgNVBAoMCEFpcnRhYmxlMRUwEwYDVQQDDAxhaXJ0 YWJsZS5jb20xJDAiBgkqhkiG9w0BCQEWFXNlY3VyaXR5QGFpcnRhYmxlLmNvbTAe Fw0xODA0MjAyMzI1NTJaFw0zODAxMDEyMzI1NTJaMGoxCzAJBgNVBAYTAlVTMQsw CQYDVQQIDAJDQTERMA8GA1UECgwIQWlydGFibGUxFTATBgNVBAMMDGFpcnRhYmxl LmNvbTEkMCIGCSqGSIb3DQEJARYVc2VjdXJpdHlAYWlydGFibGUuY29tMIIBIjAN BgkqhkiG9w0BAQEFAAOCAQ8AMIIBCgKCAQEA3ORK7AMKzczh2JXWzKq4vI8jaHZ+ GcqNF6WHExEtPWrIN9Rpo/ogguZZ3BJs6dtUkPAt5M722BkJUggMFj9LREK8Vcl/ +3ffXJUhcIcatpXsq3iQE9Otbc5aFxSt6FKg410snTeI+VVYJ3cOgOQzO1ZEBjj8 DA1iB0w9ICd9DRj3LXa9S55B1q9TRPJwicbT9SwMJlF/VqSilS+QhDqhPiSrja7X WipQN3y0HwhqNlC3oPlBewjvyTLrmR6IGstxm01Wxj2JbHkGA9MgZKCMV5sQgA68 2DoIvbhDPOA/E5vjL5JwsyU/LjDhm0cfX6RiZ/OywGbs+KawLe29As+V9wIDAQAB MA0GCSqGSIb3DQEBCwUAA4IBAQC/ewo5+TeEGOnT6ko0X1C+Yduiu1IqXZc8Zw6w +9k06hg9IbO7u9VCevbKI/CwG4Il/6URGwqKKmU3kyUNsRmdsFMHWWrzeCPqa+94 FbRiaTjZcoV3I5++CjObWJgatIC9MLTxVKnQaGDSTk+dxwXOIANZ+iCh3SKQTRM+ r0YZUSIM+5hXWccsdnPtp+2GczzbUJ0rCWA/iQ0OwZrWpU0/XPnzjQguVrdIPDIh 3xPeT40txEg+mHAajGFfh6XhV86P8185fZ8R6G+gehqfByToNiCbb0BqipOaA+ej SDYXqYh7jx3D6X/gV9MnyGBVRy1t6COzk+OZDosPhkTFgclt -----END CERTIFICATE-----
Plain textUnder the Signature tab, click Add, then upload airtable.crt. Click OK to complete. Next, you'll need to export your token signing certificate. In ADFS, click the Certificates folder, then Token Signing certificate.
Click the Details tab, then click the Copy to File button.
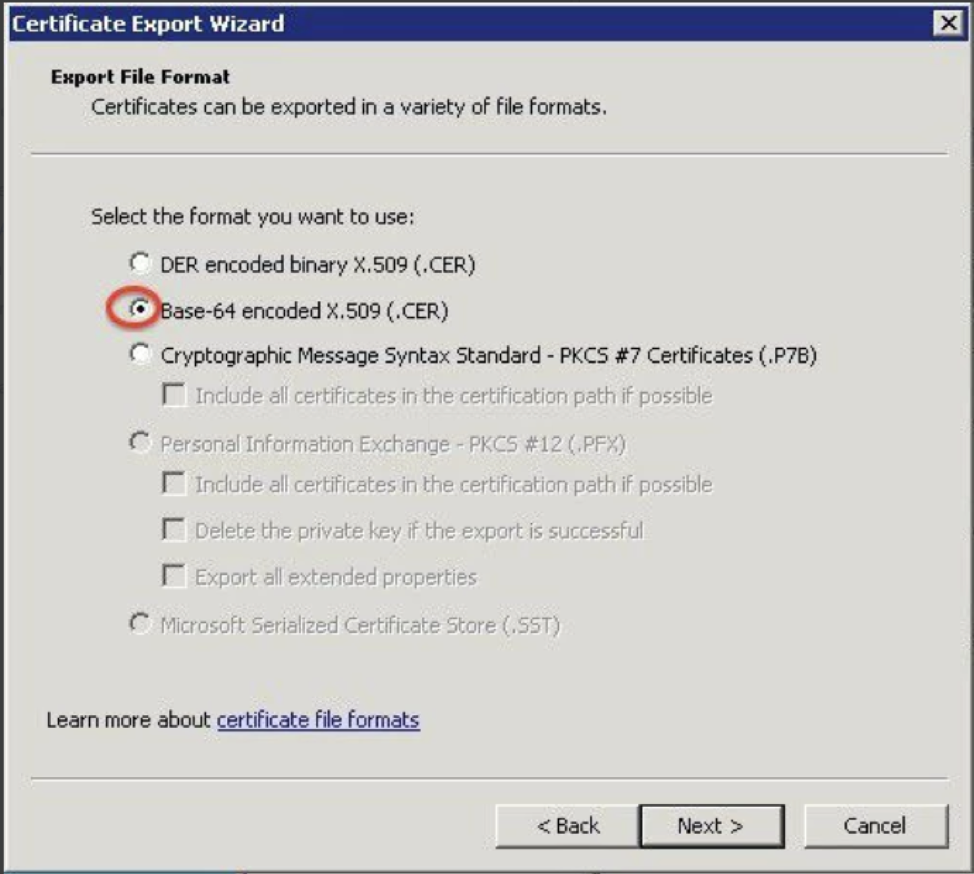
Next, export as a Base-64 encoded X.509 (.CER) file.
After that, submit your sign on URL and x.509 certificate (you can open the .cer file in a text editor and copy-paste it in) following the steps in this article.
After you have completed all of the steps, you should be able to log in from https://airtable.com/sso/login.
Troubleshooting
If you are still having issues, clickon the lower right corner to contact Airtable Support.
Please include any relevant ADFS logs (Control Panel → Administrative Tools → Event Viewer → Applications and Services Logs → AD FS → Admin).
FAQs
If another team in my company already uses SSO with Airtable, how does this impact my Business or Enterprise Scale account?
In Airtable, our system expects Enterprise Scale accounts using shared domains—domains federated to multiple Enterprise accounts—to use the same SAML metadata for SSO. What this means is that if your company has existing Enterprise Scale accounts with SSO configured, you will need to coordinate with the admins (or IT department) of the other accounts to obtain the current sign-in URLs, x.509 certificates, and ensure that your users have the necessary access to the Airtable tenant present in your company’s identity provider.
You can configure separate tenants or identity providers for domains unique to Enterprise Scale accounts, as each domain can be configured with its own SAML metadata.