Plan availability | All plan types with varying limitations |
Permissions |
|
Platform(s) | Web/Browser, Mac app, and Windows app |
Note
Consider having Omni create an automation for you. With Omni's AI capabilities, you can use plain text requests to build, update, and query data in your Airtable base.
Understanding webhooks basics
With the incoming webhook trigger for automations, you can connect Airtable with many of the tools and products that you and your team use (whether a third-party service or an internal tool). Normally, you’d have to write custom code and spin up your own infrastructure in order to handle webhooks, but now, whenever an event fires in another product, you can tap into the full power of Airtable Automations to handle it accordingly.
The incoming webhook trigger will create a unique URL that you can use to trigger an Airtable automation. You can use this URL with another service’s webhook configuration UI, or use it directly from your own custom code (e.g. from an internal tool). When Airtable receives a request at this URL, we’ll then trigger the automation that you configured (just like our other triggers).
This enables you to integrate with services that Airtable doesn’t currently support or to programmatically trigger automations, preventing you from having to write custom code or manage your own infrastructure.
NOTE
Remember that anyone who has the URL for your webhook trigger can trigger your automation. We recommend thinking carefully about how and where this URL might be shared.
Creating an Airtable automation triggered by a webhook
To create an automation triggered by a webhook:
Open your Airtable home screen.
Open the base where you want to create an automation.
Click Automations.
Click + Create new.
Click + Create automation.
Click + Add trigger.
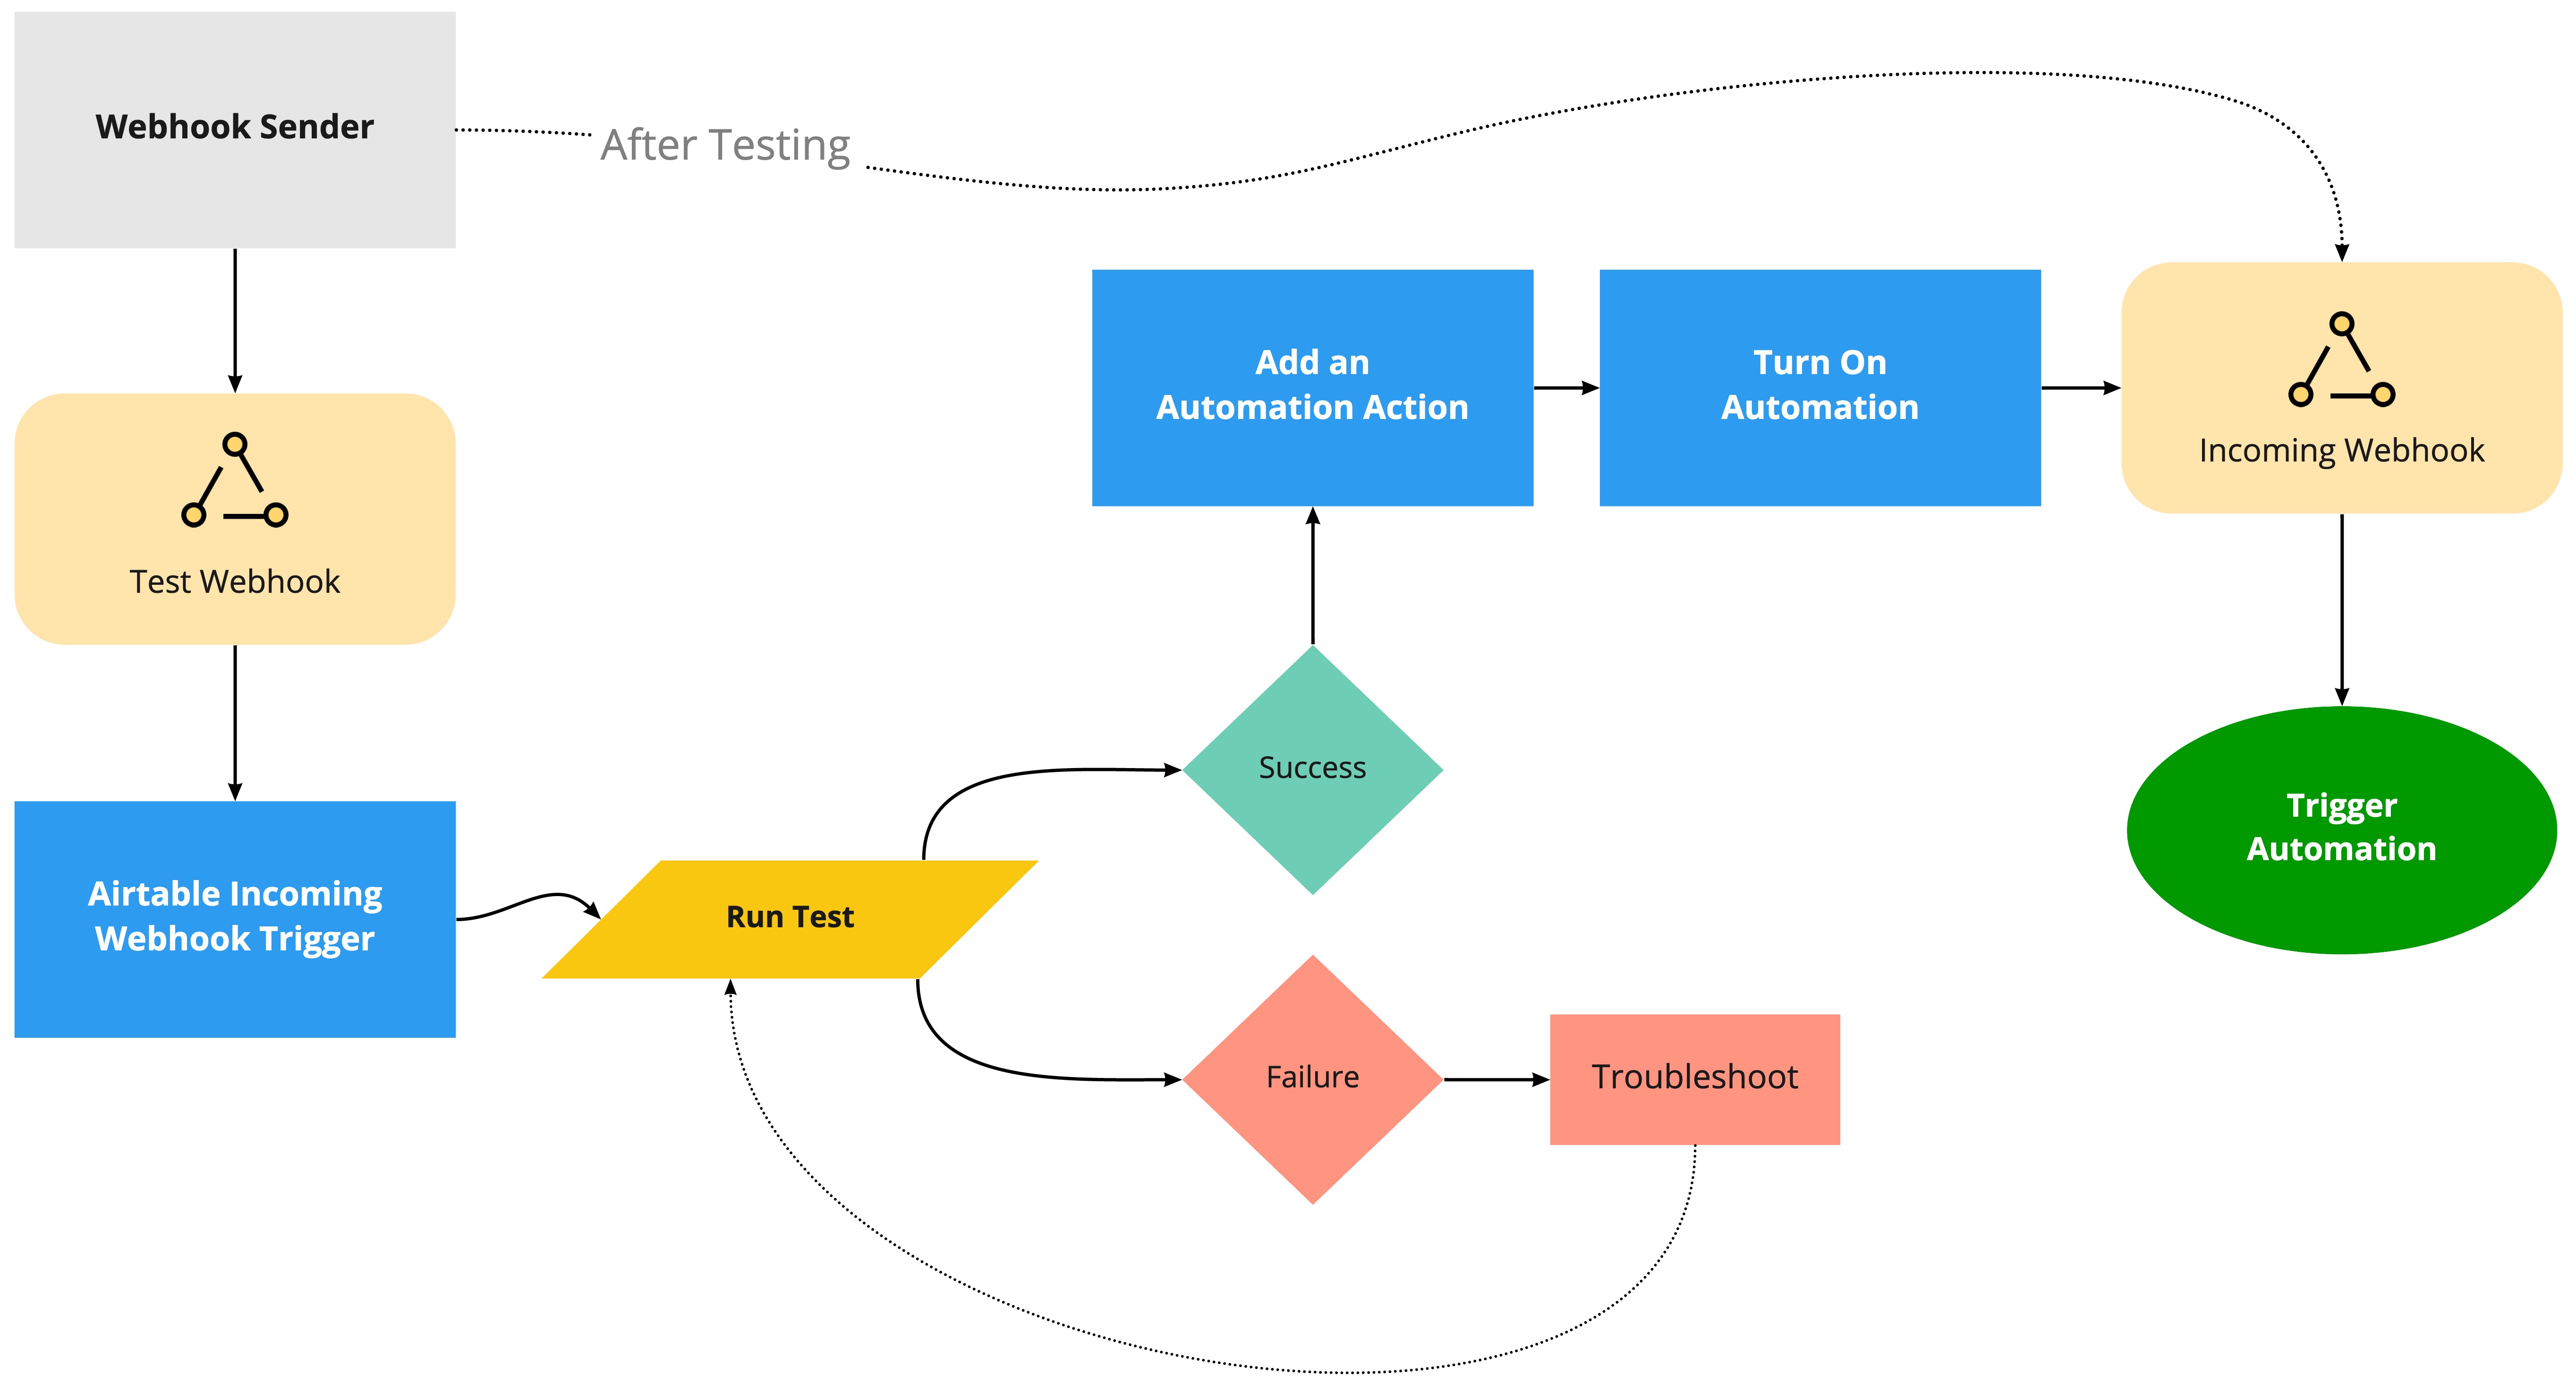
Once clicked, the available triggers will be displayed for you to choose from. Choose the When webhook received option. Once you’ve selected the trigger you’ll be taken to a new screen that displays your unique webhook URL and other information.
To set up your webhook you’ll first need to send an example webhook to the unique URL created for you. How you send an example webhook to this address depends on the application that you’re connecting to. We’ve included an example demonstration below if you’d like to a step-by-step guide to sending an example webhook.
Sending an example webhook
Start by visiting https://reqbin.com/. Paste the webhook URL (generated by Airtable) into the textbox near the top of the screen. Then, select the “Post” option.
Next, click the “Content tab” directly underneath where you pasted your webhook URL.
You can send over any JSON object in the test, but for sake of example we’ll use a simple object:
{"Company": "Airtable"}. Once you’ve entered your JSON object you can click the blue “Send” button to send a POST request to the Airtable webhook.After you send the example webhook, you should receive a success or failure message.
You’ll need to pass a successful request before proceeding. If your example webhook is successful you should receive a response of {“success”: true}. If you received this success response you can continue on to testing the webhook. If your request failed, then we offer a few troubleshooting tips here.
Once you’ve received a successful response for the example webhook, you need to test the webhook directly in the Airtable automation. Click the “Run test” button to start the test; you’ll receive a “Test ran successfully” message after the test is complete.
After running a successful test you can now add an automation action to make use of the data you want to send to the webhook. In our example, we’ll pass along the JSON object received by the webhook into Slack.
The data you pass to the incoming webhook can now be used in any automation action. As a simple example, we’ll pass along the JSON object setup in the example above to Slack. Start by clicking the + Add action button below the automation trigger, and select the Send message action for Slack. After selecting your connected Slack account, and picking a channel, you can insert the JSON object into the body of a Slack message.
Finally, test and turn on the automation. Be sure to test all of the steps in the automation that you are building. Once every part of the automation has tested successfully, you’ll be ready to turn the automation on. Find the red colored “OFF” toggle and click it so the automation now appears as “ON” in green.
Failed requests
If your request failed there are a few things to help troubleshoot:
Check that you sent a valid JSON payload. A tool like https://jsonlint.com may be useful.
To add multiple variables, make sure you properly format your content as a JSON object ( i.e.
{"Company": "Airtable", "Name": "Testing"}).
Check that your request was sent with a Content-Type header of "application/json".
Check that you made a POST request.
Sending webhooks from Airtable Automations
Airtable Automations can start when a webhook is received (via the “When webhook received” trigger). However, there is no native Airtable action that can send an HTTP request to any URL you choose—sometimes called a generic “send webhook” action.
To push data to an external system over HTTP, you can try using the options below.
Use the Run a script action - The Run a script action runs in Airtable’s automation environment and can call
fetch()toPOST(orGET, etc.) to your endpoint. That’s the most flexible native way to send custom outbound HTTP requests from an automation.Example (replace the URL, payload, and
input.configkeys to match your automation):let webhookUrl = "https://your-webhook-url.com/endpoint"; let payload = { recordId: input.config.recordId, fieldValue: input.config.fieldValue, }; let response = await fetch(webhookUrl, { method: "POST", headers: { "Content-Type": "application/json", }, body: JSON.stringify(payload), }); if (!response.ok) { console.log("Request failed:", response.status, await response.text()); } else { let body = await response.text(); console.log("Response:", body); }Add input variables on the action so values from your trigger (or earlier steps) map into
input.config.Each script run has limits on how many
fetchcalls you can make, how long a request can run, and which kinds of URLs are allowed (for example, normalhttporhttpsURLs). If something fails, check the automation run history and script logs for the exact error.For more information, see the Run a script automation action article.
Use other automation actions (specific apps only)
Actions like Send a message to Slack or Send an email send data to specific products using Airtable’s integrations. They aren’t a substitute for a custom webhook URL, but they cover many “notify another tool” cases without code.
Use a third-party integration platform
Tools such as Make, Zapier, or n8n can connect to Airtable and call a webhook (or other APIs) when records change or when your logic runs.
Those services may need their own subscription and have their own limits and pricing.
FAQs
Do you have to send a JSON object in the example webhook?
If the Content-Type header is application/JSON, yes. The top level of the JSON-encoded data must be an object (as opposed to an array).
What request methods can be used in the example webhook?
Only POST requests can be made.
Are form-encoded payloads supported?
Yes, we support x-www-form-urlencoded payloads.
Is there a size limit on the payload request?
There's a payload size limit of 100kb per request.
Is there a limit on how many times a webhook can be triggered in a given amount of time?
There is a five-requests per-second limit when using the “When webhooks received” trigger.
Does Airtable handle signature verification?
Airtable does not support signature verification in the webhooks automation trigger.
What run limits do webhooks have?
Each webhook received that results in an automation run will count toward the automation run limits for your workspace plan.