There are times when you may need to create subtasks within Airtable to help keep you and your team on track for completing projects. It's important to think about how to set up your base to maximize Airtable's functionality. In this article, you’ll learn about two different ways to accomplish subtask tracking in an Airtable base.
Base design for creating and tracking subtasks
Depending on your workflow's individual needs there are two different base designs that we recommended considering:
Method 1: Subtasks in a long text field - Setting up a "Tasks" table that links to a "Projects" table and using a long text field to create a list of subtasks. This method is helpful when you want an easy and convenient way of seeing subtasks within the same view of the overall task record.
Method 2: Subtasks in another table - Creating a "Subtasks" table that links to a "Tasks" table that links to a "Projects" table. This method is helpful when you need more granularity and the ability to easily track subtasks as well, since it allows you more reporting options by using linked records, rollups, etc.
Each of these methods requires a prerequisite understanding of linked records, but we will cover some of the basic tenets of linked records in both methods. Choose your preferred method after reading about each below:
Method 1: Subtasks in a long text field
This method begins with creating a "Projects" table, then a "Tasks" table, and then renaming the default long-text field as "Subtasks".
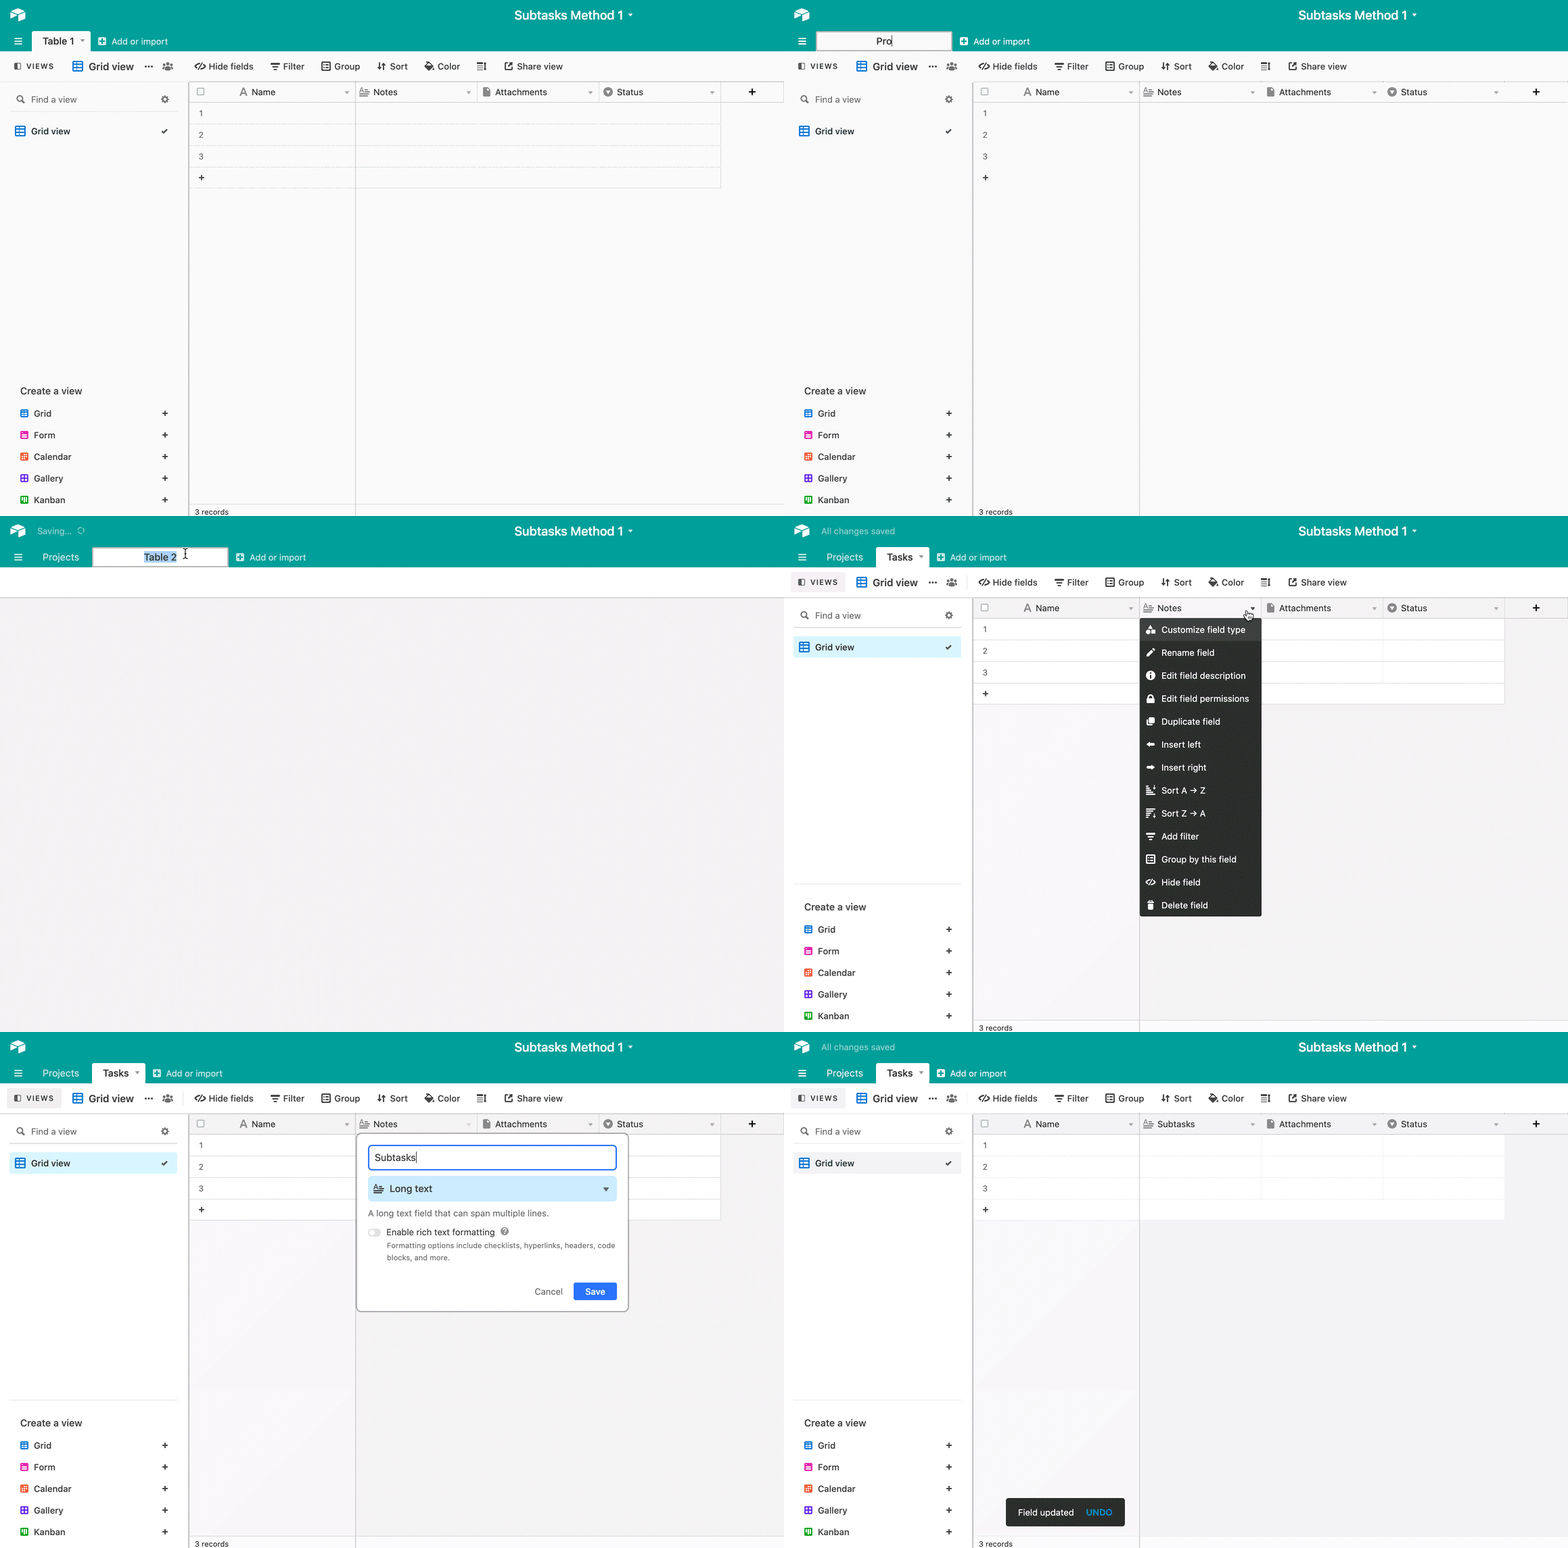
In the newly renamed "Subtasks" field make sure that rich text formatting is enabled. This will allow you to create a checkbox for each subtask by using brackets [ ] followed by a descriptive title for each subtask. It may also help to adjust the row height so that you can see all of the subtasks without having to expand the record.
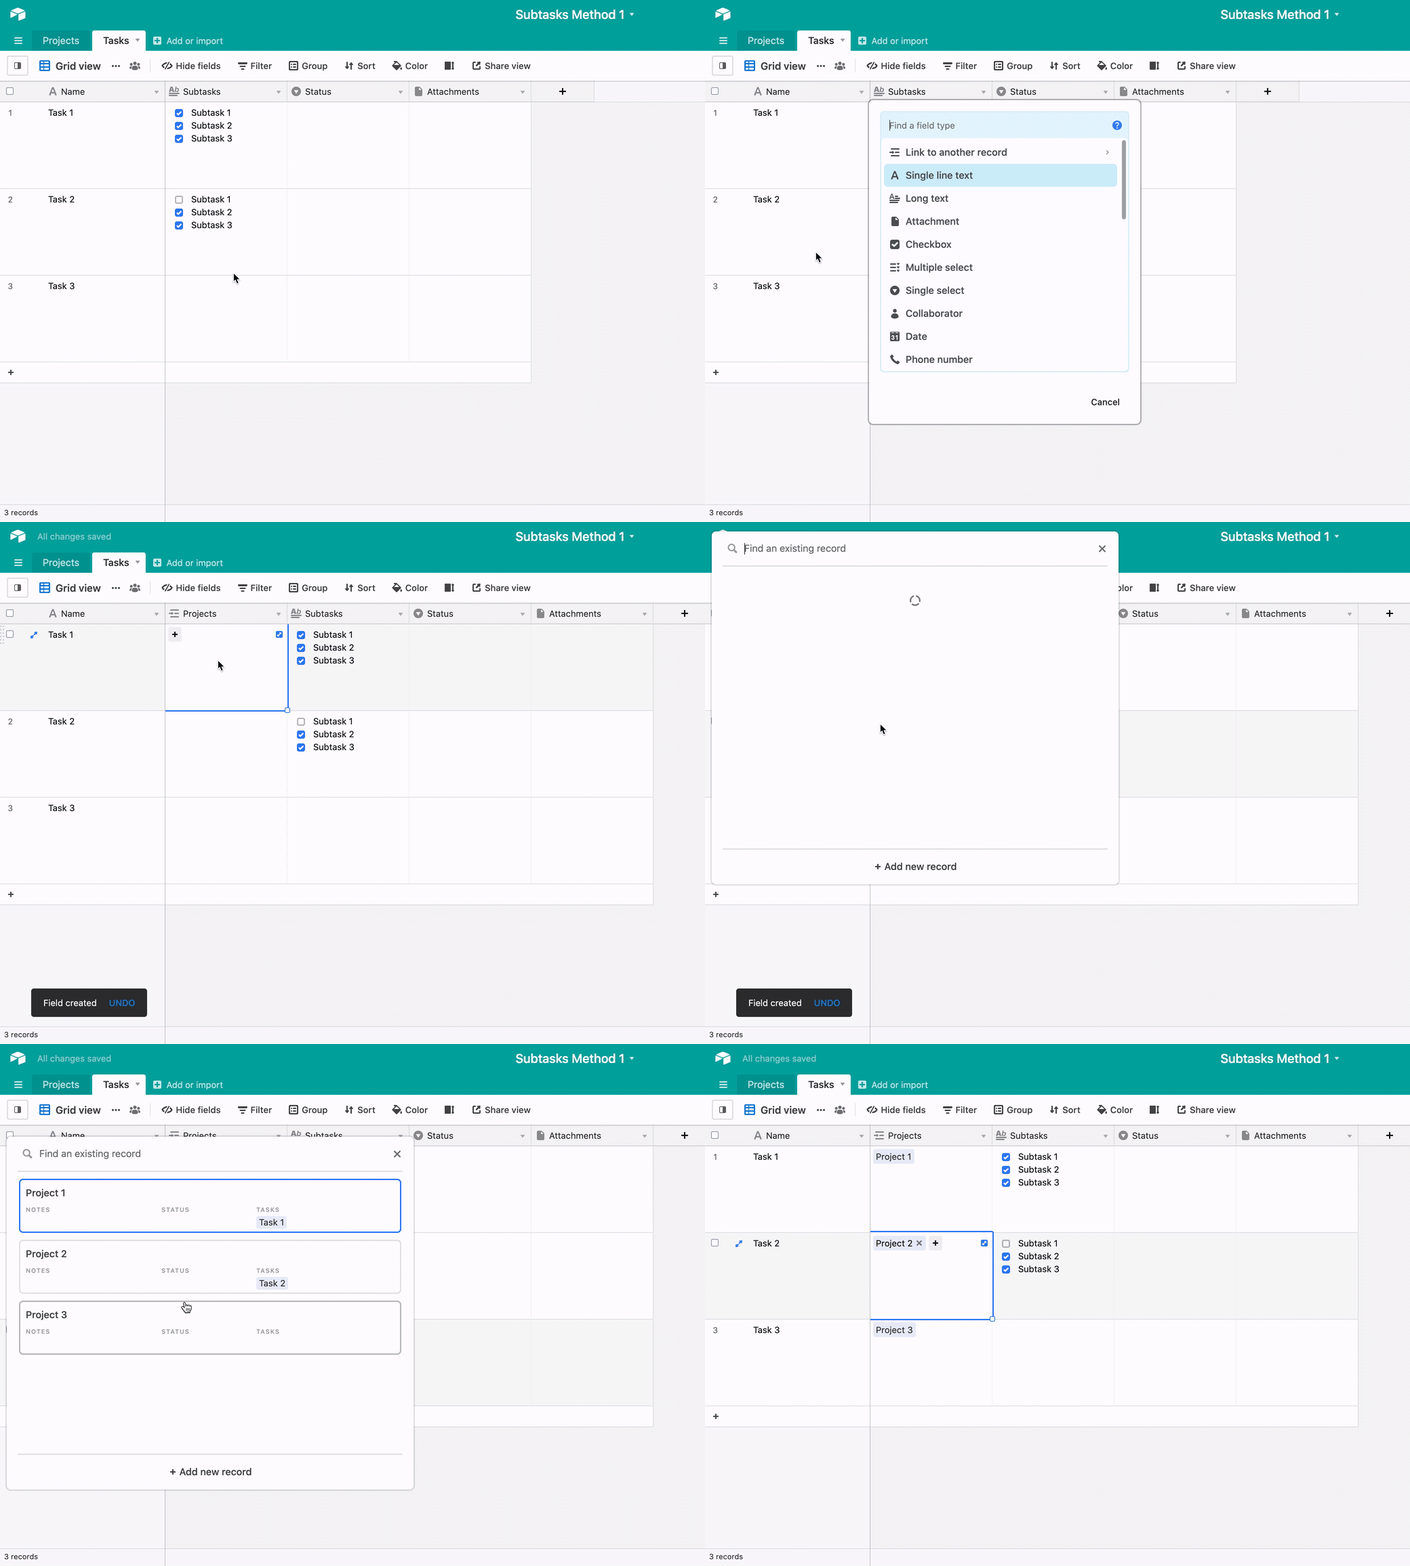
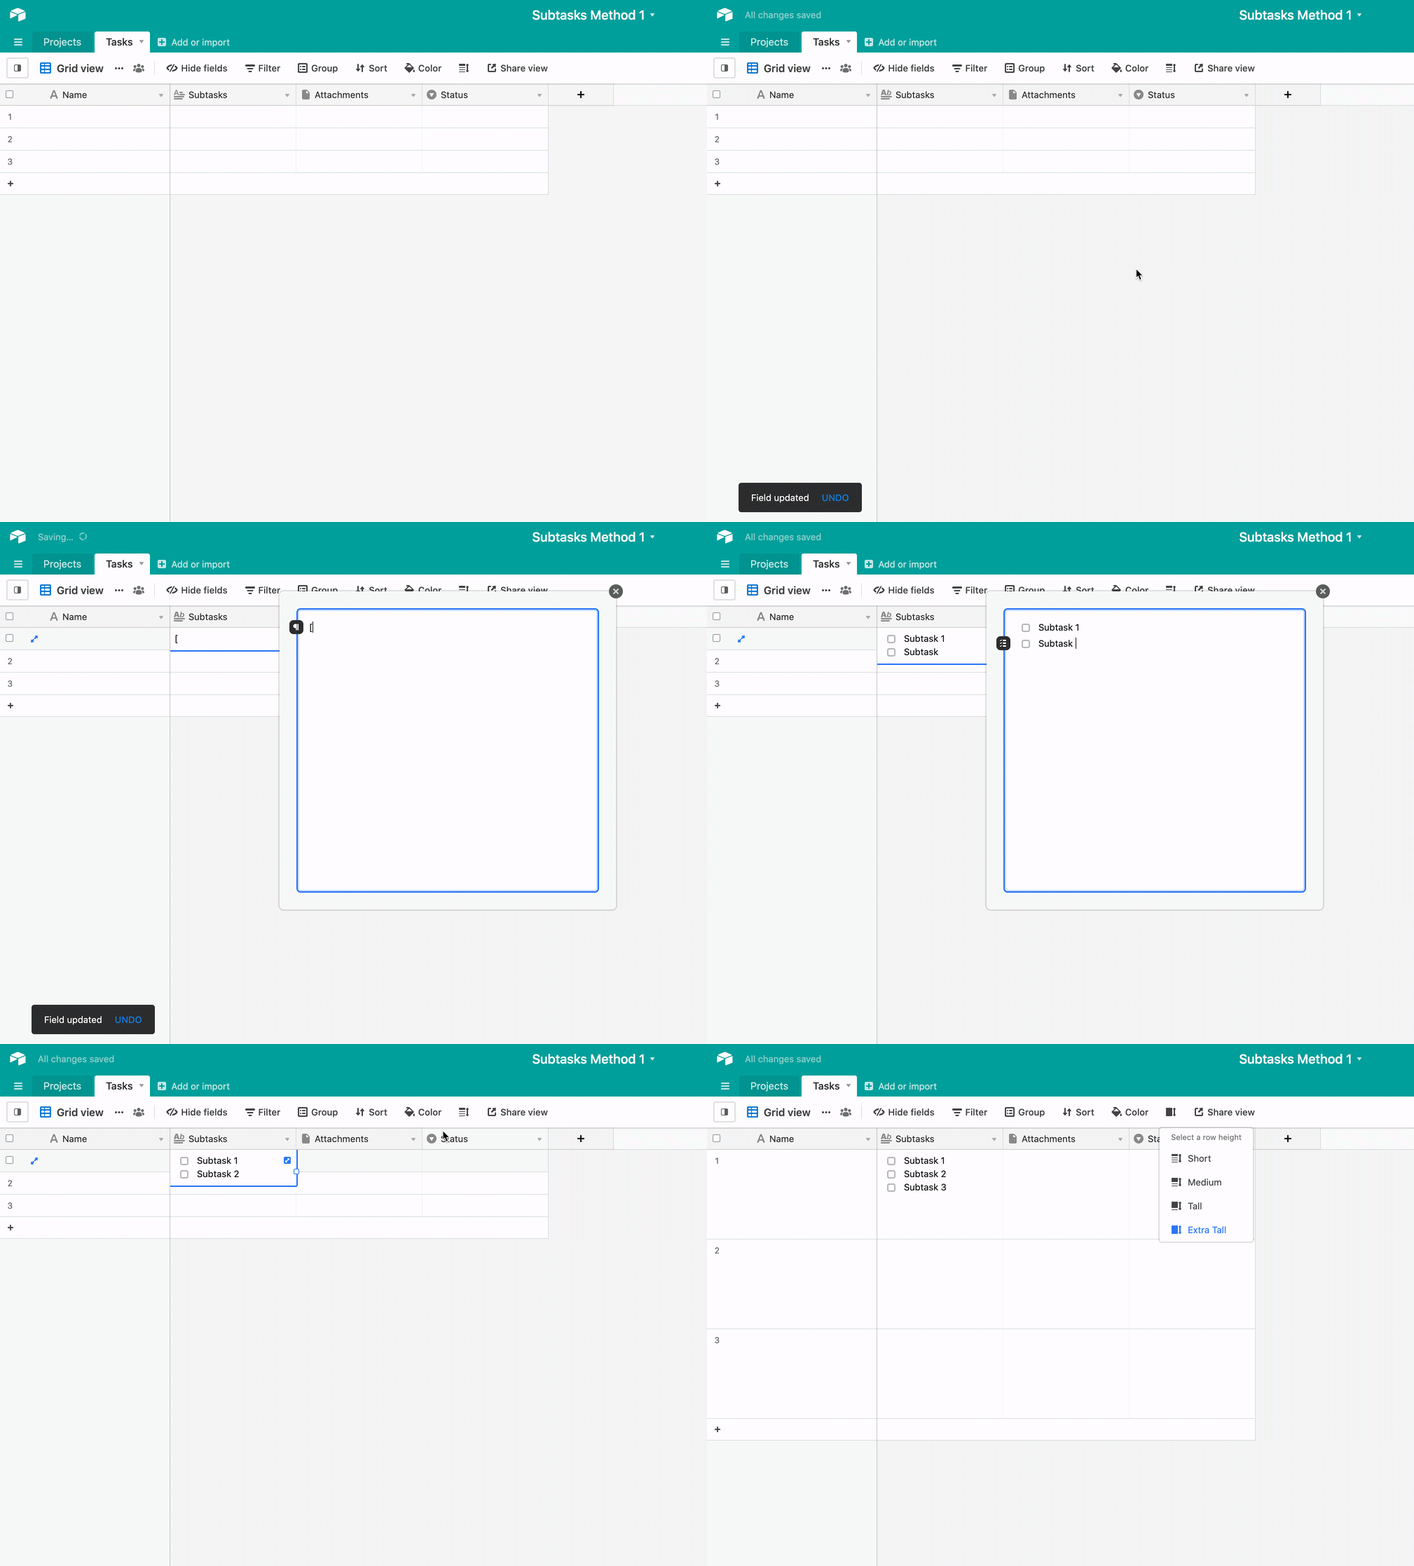 Now we can create a linked record field that allows us to create a connection between the tasks/subtasks table and the "Projects" table. This will allow you to employ many powerful Airtable features such as the use of lookup, rollup, and count fields as well as Automations. In this step, we add a linked record field and then link the corresponding projects related to each task.
Method 2: Subtasks in another table
This method begins with creating a "Projects" table, a "Tasks" table, and a "Subtasks" table.
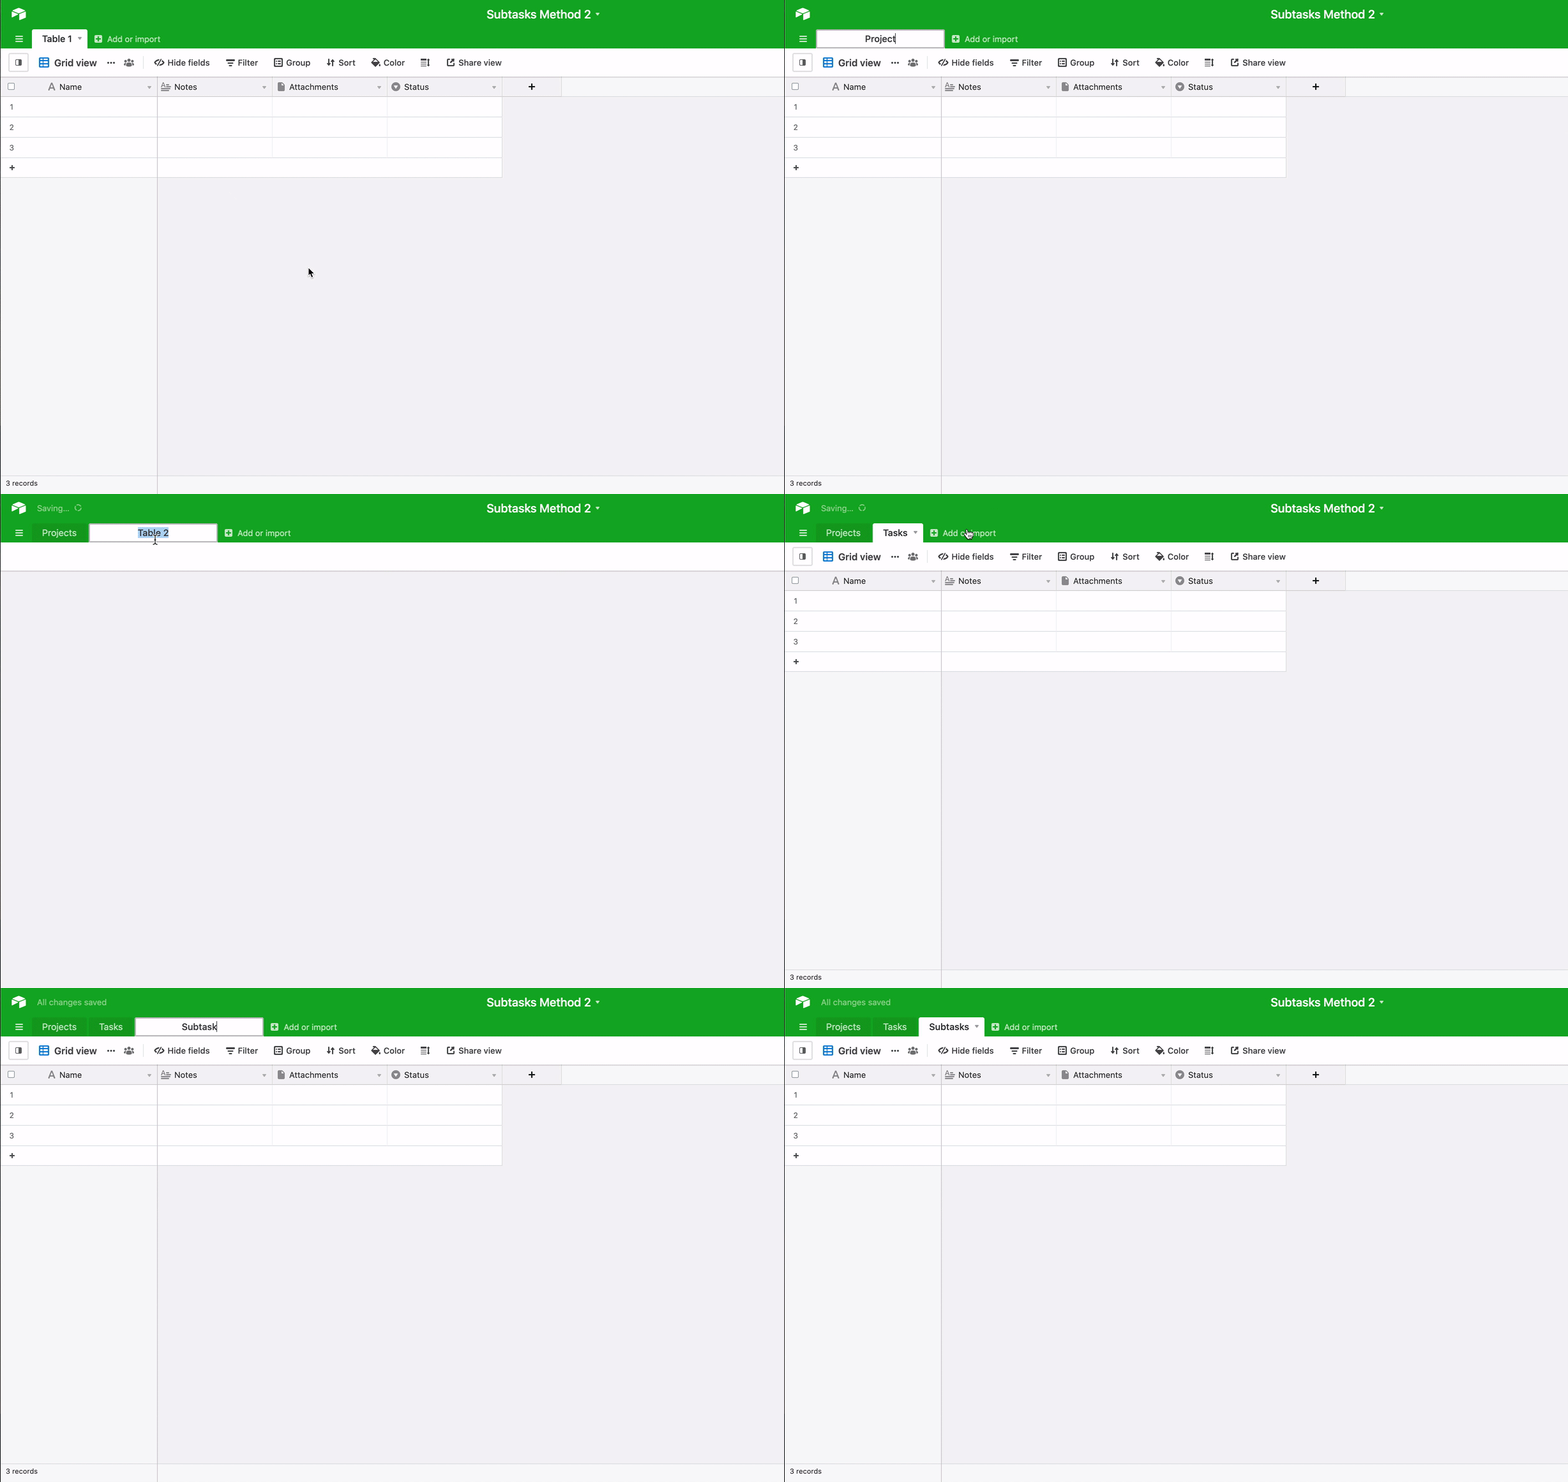 Next, we want to daisy chain these tables together using linked records.
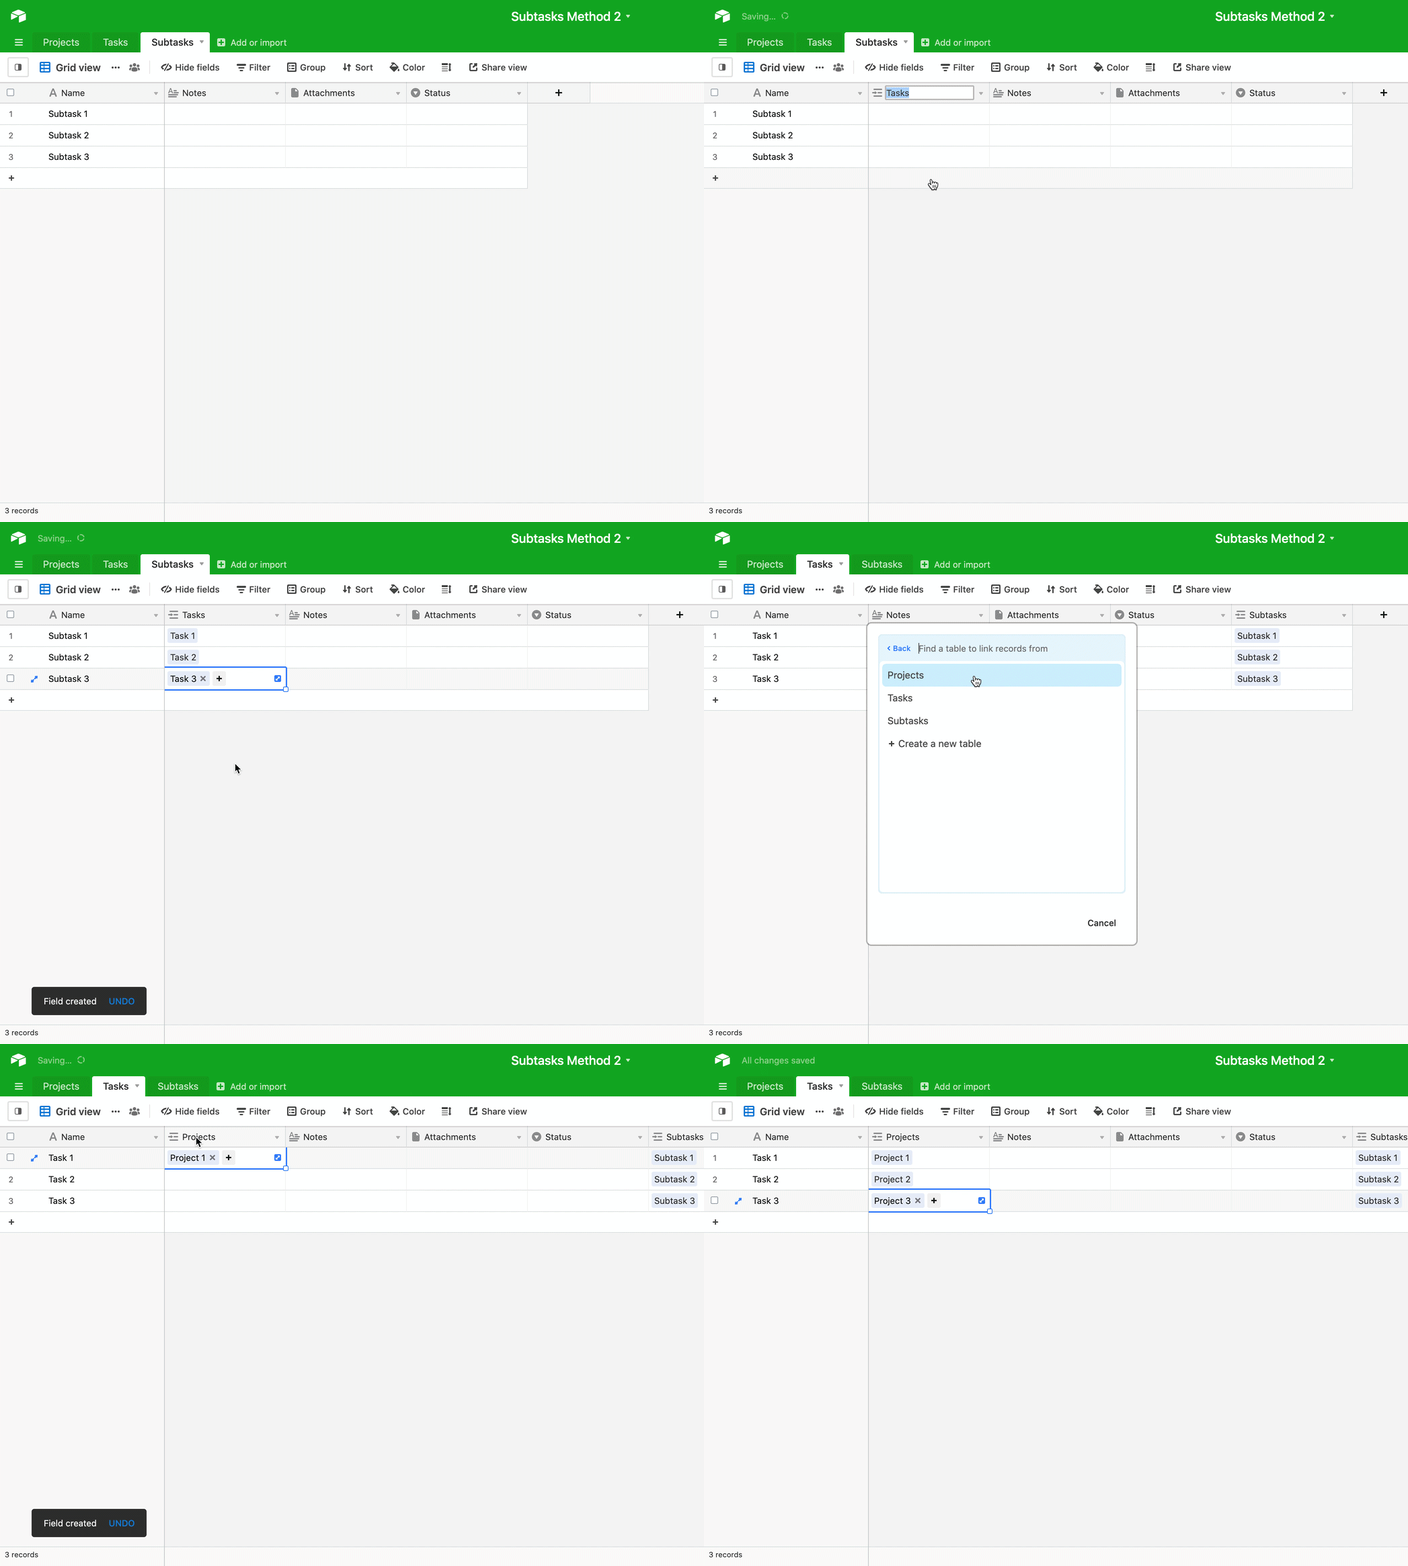 Now our "Projects" table and "Tasks" table are linked together, as well as our "Tasks" and "Subtasks" tables. As mentioned in Method 1 above, this will allow us to use other Airtable features to effectively track and manage projects more effectively.
Tracking subtasks using method 1
Tracking is possible for Method 1 as well but requires a bit more of an intensive setup. The formulas used in this example may or may not work with your base's design since formulas can break down for various reasons. It's essential to know how to troubleshoot formulas and use our formula field reference when attempting this setup.
You will need to set up three different formula fields for this use case. Keep in mind that you'll want to adjust "Subtasks," the name of the subtasks field in the example from above, to be the name of your base's subtasks field.
Formula 1: Total # of completed subtasks
IF(Subtasks,
LEN(Subtasks) - LEN(SUBSTITUTE(Subtasks, "[x", "[")
  )
 )
Formula 2: Total # of subtasks
IF(Subtasks,
LEN(Subtasks) - LEN(SUBSTITUTE(Subtasks, "[", "")
 )
)
Formula 3: Calculate the percentage of tasks completed
IF(Subtasks,
(LEN(Subtasks) - LEN(SUBSTITUTE(Subtasks, "[x", "[")
 )
)
/ (LEN(Subtasks) - LEN(SUBSTITUTE(Subtasks, "[", "")
  )
 )
)
Remember to change the formatting of the formula field to show as a percentage. You can also choose to show the output as a progress bar for a more visual display.

Here is an example of what these 3 formula fields would look like in a base:
![]()
Tracking subtasks using method 2
If you choose Method 2 for your base's design you will be able to track progress by following the steps below. The general process involves:
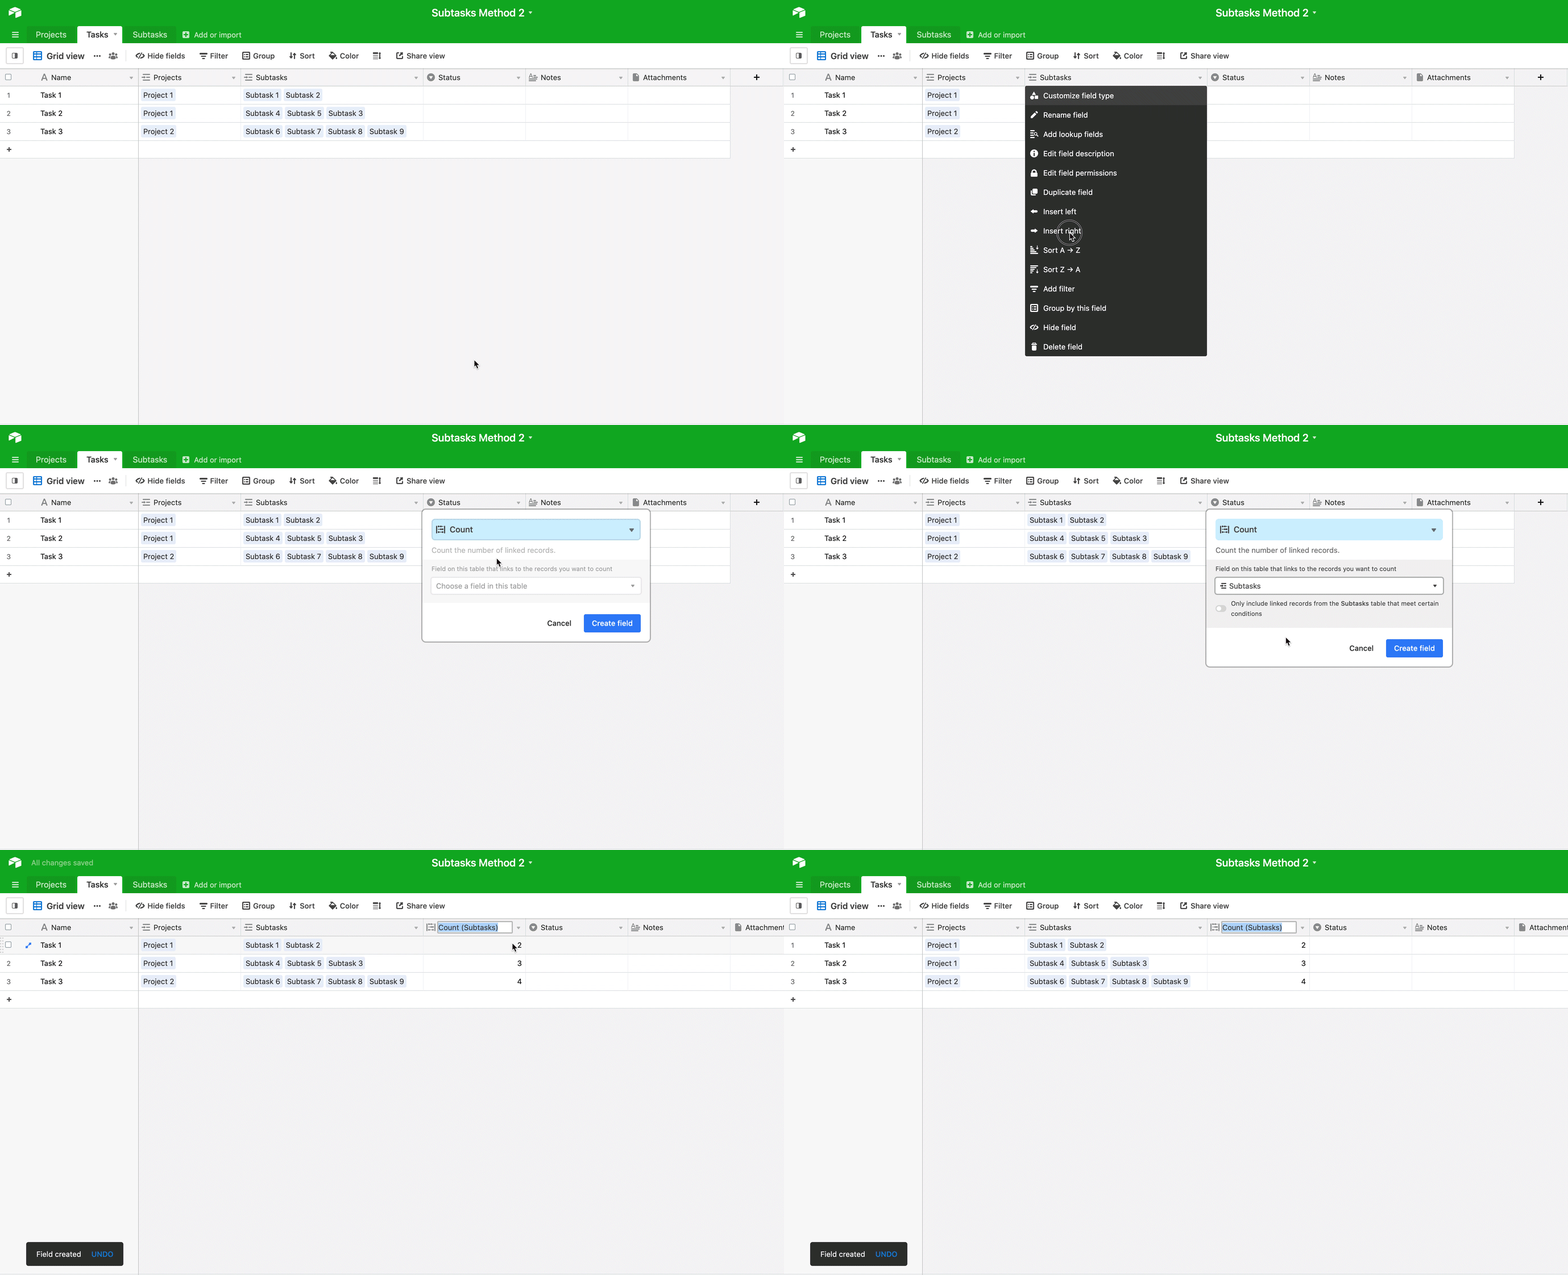
Step 1: Counting the total number of subtasks
In the "Tasks" table add a count field that counts the total number of records in the "Subtasks" linked record field. You can also rename this field to "Total subtask count.”
Step 2: Counting the number of completed subtasks
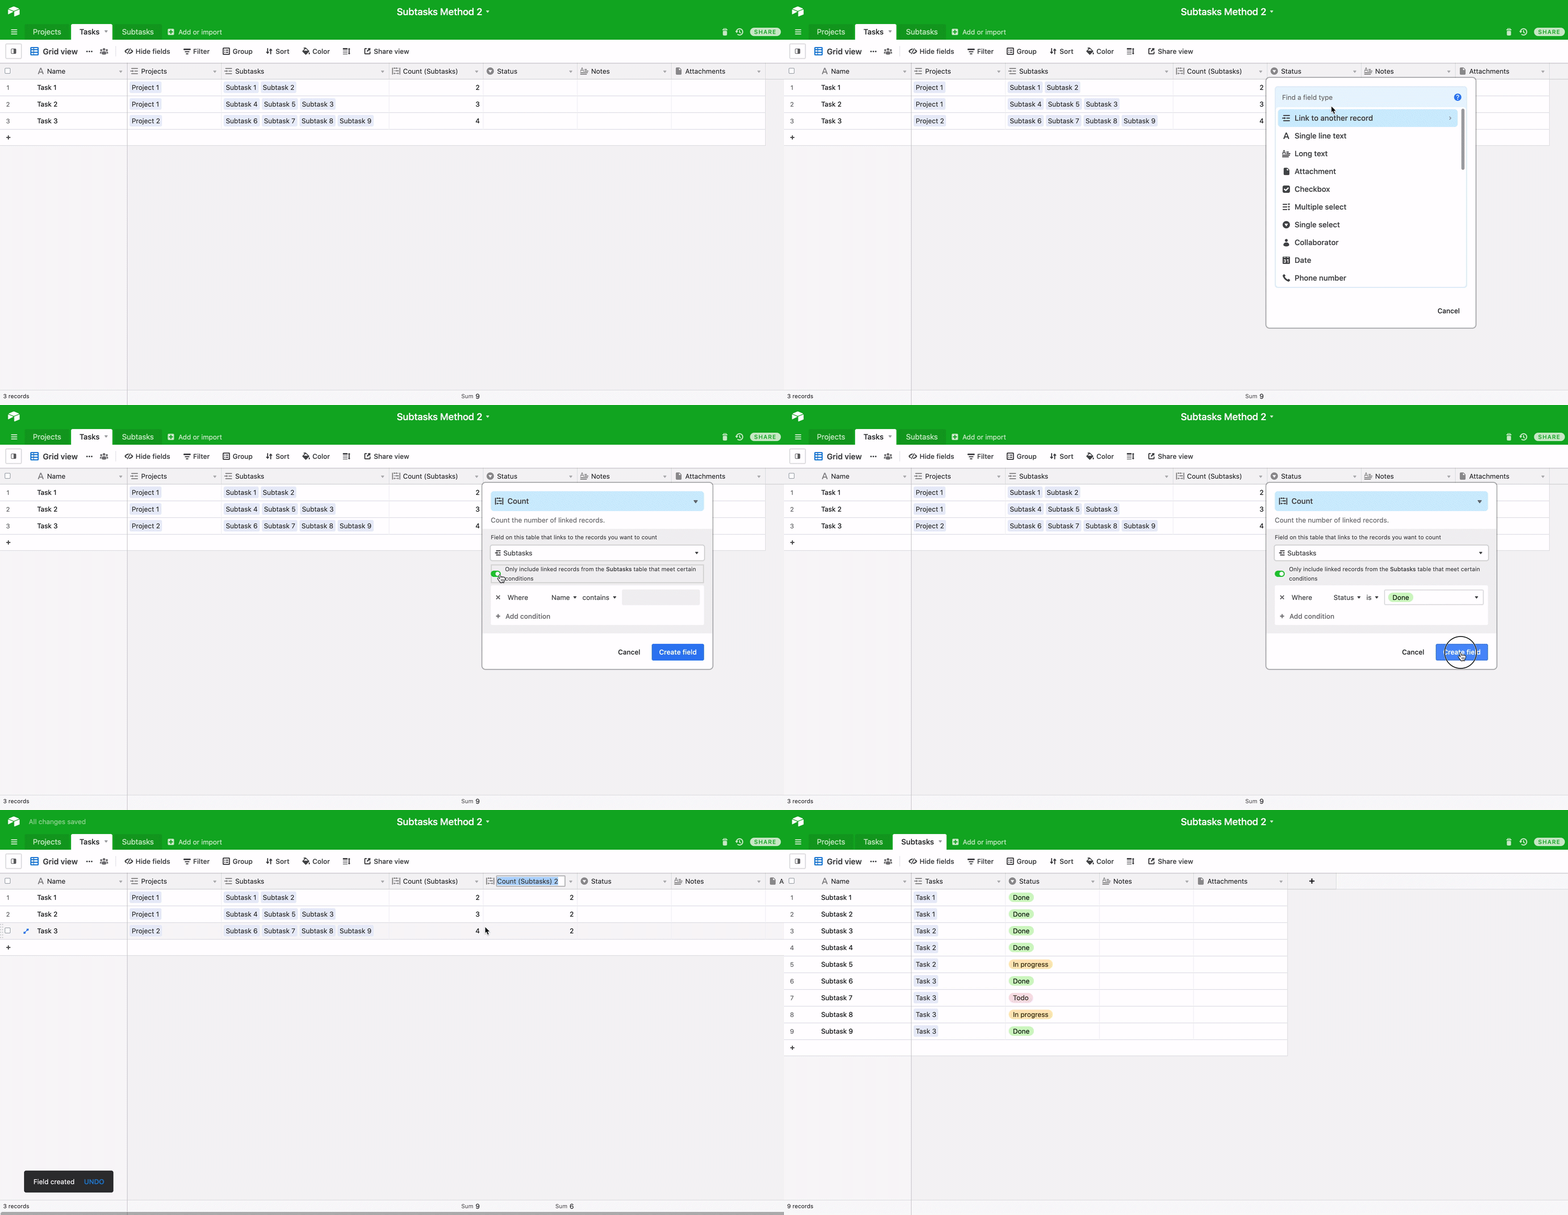
Create another count field in your "Tasks" table, but make sure that you set a condition so that only subtasks whose status is listed as "Done" show up. You can rename this field to "Subtasks completed".
Step 3: Setting up a formula to determine whether all of the subtasks for a given task are complete
Now we need to create a formula field that can calculate whether or not all of the subtasks for a certain field are complete. If so, then we want the calculation to output the text "Task complete". You can name this field "Status". In this example, the formula used is:
IF({Total subtask count}={Subtasks completed}, "Task complete")
![]()
Since all of the subtasks were completed for Task 1 the formula outputs the status as "Task complete." Since there were still subtasks to complete for Tasks 2 and 3 the formula field will remain blank until all subtasks are completed. You can follow this same general workflow to track your overall project status in the "Projects" table.
Note
By having formulas in your base that update when tasks are completed, you can create custom notifications using our Automations feature.