All plan types with different automations usage limits | |
Owners/Creators - Can create or edit automations in Airtable | |
Platform(s) | Web/Browser, Mac app, and Windows app |
Airtable Automations allow you to control when and where you receive notifications. You can easily set up automations to send notifications via email, Slack, or Microsoft Teams to yourself or others.
This guide walks you through building an automation that sends a notification when a record matches a condition you define — for example, when a form submission comes in. You'll set up two notification actions: one via email and one via Slack (or Microsoft Teams).
By the end, you'll have a working automation that:
Triggers when a record in your table meets a condition you define
Sends an email to the person who submitted the request
Posts a Slack message to your team's channel
Creating custom notifications using Airtable automations prerequisites
Before building the automation, make sure you have the following:
An Airtable account with a base you want to use
An account for whichever notification channel you want to use: email, Slack, or Microsoft Teams
An email field or user field in your table, so Airtable knows where to send the message (Email notifications only)
Your automation triggers when a record in your table matches a condition you define. Before building, decide which table you want to monitor, which field you want to watch, and what state that field needs to be in to trigger the automation.
You can use almost any field type. A few examples:
Field type | Example condition |
Single select | "Status" is "Needs approval" |
Date | "Deadline" is within 3 days |
Single select | "Status" is empty (new, unreviewed record) |
Creating custom notifications using Airtable automations
Step 1: Open the automations panel
Open your base in Airtable.
Click Automations in the top-center of your base.
Click + Create new…, then Create automation.
Step 2: Configure the trigger
Under "Trigger type," select When record matches conditions.
Select the table you want to monitor. (In the example: "Request log.")
Click + Add condition, choose the field you want to watch, and set the condition.
Note
Need a test record? Before moving on, test the trigger by clicking Test trigger. Airtable looks for a record that matches your condition — make sure at least one exists in your table. Click Use suggested record to let Airtable choose one, or Choose record to pick one yourself.
If you have an email or user field in your table, make sure your test record contains your own email address so you can receive the test notification in the next step.
Step 3: Add a Send email action
Click + Add advanced logic or action.
Under the Airtable header, choose Send email.
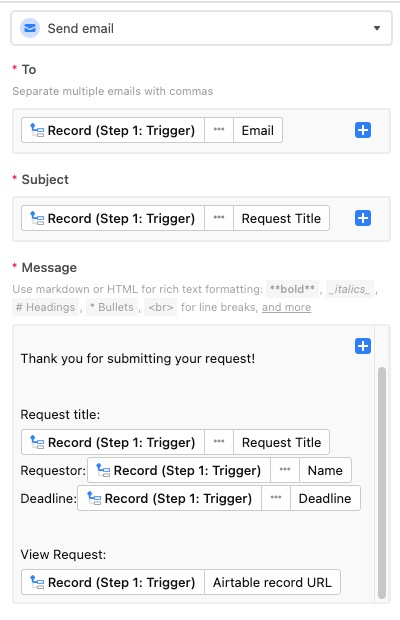
Fill in the To, Subject, and Message fields. You can mix static text with dynamic values pulled from the triggering record — click the blue + button in any field to insert a dynamic value.
For the example automation:
Field | Value |
To | Record (Step 1: Trigger) → Field values → Requestor: Email |
Subject | Record (Step 1: Trigger) → Field values → Request Title |
Message | Any text you like — consider thanking the requestor for their submission and summarizing what happens next. |
Step 4: Add a Slack (or Teams) message action
Note
First time connecting Slack? Click + Connect new account from the dropdown and follow the prompts. Once connected, select your account from the same menu.
Click + Add advanced logic or action again.
Under the Slack header, choose Send a message. (Substitute Microsoft Teams if that's your platform.)
Choose your Slack account and the channel where the message should appear.
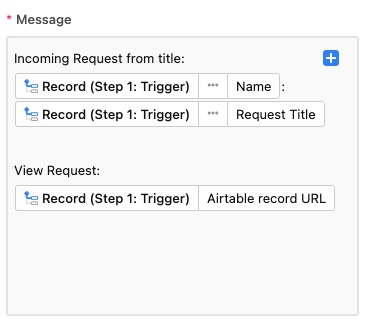
Compose your message using a mix of static text and dynamic values, just like you did for the email action.
For the example automation, the Slack message uses:
Static text: "Incoming Request from:"
Dynamic value: requestor's name and request title
Static text: "View Request:"
Dynamic value: the Airtable record URL
For additional Slack-specific configuration options, see the Slack action article.
Step 5: Test and enable the automation
Click Test automation to run both actions at once — or test each action individually using the test button within each action step.
If the results look right, give the automation a name and optionally add a description.
Toggle the automation on. From this point, notifications will send automatically whenever your condition is met.
Note
Want to set up a similar automation? Instead of starting from scratch, click the … icon next to this automation's name and choose Duplicate automation.
FAQs
How do I message multiple Slack users at the same time?
Separate multiple usernames with a comma. Note that each user will receive the message individually via Slackbot. If you want everyone to see the messages in a shared space, create a dedicated Slack channel and set the automation to post there instead.