Plan Availability | All plan types |
Permissions |
|
Platform(s) | Web/Browser, Mac app, Windows app, and iOS / Android mobile apps |
This article defines the different types of relationships between records in Airtable and provides examples so you can learn to identify them yourself. It also explains how to represent many-to-many relationships using a technique called “junction tables.”
The Airtable base layer represents a database. In databases, there are a few different ways to describe the relationships between different lists of entities. In Airtable, there are three general relationship types that can be created by using linked records:
One to one
One to many (Or many to one)
Many to many
One to one linked record relationships
The simplest kind of relationship is a one-to-one relationship. Suppose you have a list of people’s names, and a list of social security numbers. Each person has only one social security number, and each social security number is linked to one person. In the context of an Airtable base, a one-to-one relationship is usually best represented by consolidating the two lists of information together into a single table, using two fields.
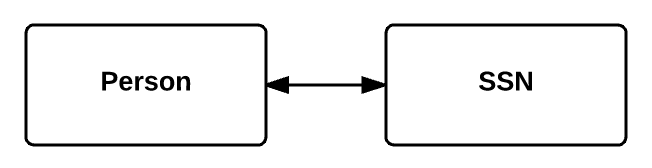
It is also possible to demonstrate a one-to-one relationship using a linked record field within the same table. Suppose you have a list of competitors in a figure skating competition. For each pair of individuals competing in a pairs skating event, their relationship is one-to-one, since each partner only has one other partner. If in this case, you made a linked record field where the table was linked to itself, then it would be possible to fill in a field of partners with record links across that same table. When self-linking, two fields will be created. One field is a “To” field and another is a “From” field. As linked relationships are added, they are mirrored in the other field. You can see those partner relationships in the image below represented by the arrows coming from the “To” linked record field to the “From” linked record field.
.png)
One-to-one relationships are comparatively rare because it tends to be unlikely that both sides of a given relationship can be matched to one and only one counterpart. Here are some other examples of one-to-one relationships:
People and Passport - Each person has only one passport from a particular country and each passport is intended for only one person.
Country and Flag - Each country has only one flag and each flag belongs to only one country.
Spousal Relationships - Each person has only one spouse.
One to many linked record relationships
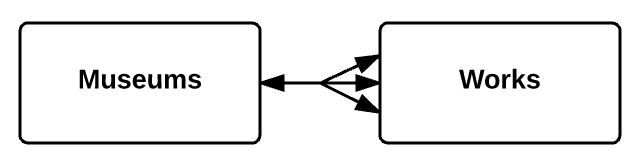
A more complex (but also far more common) type of relationship is one-to-many/many-to-one. For example, if you have a list of works of art and a list of museums, each work of art can only be in one museum at a time, but each museum can have many works of art. In a base, splitting these two lists of entities (museums and works of art) into two tables allows you to store information relevant to each entity. For works of art, this could include information like the artist and date of completion, and for museums, this could include information about the museum’s opening hours and its address.
If you were to make an Airtable base representing a one-to-many relationship between a list of museums and a list of works of art, you could put each of those lists into a museums table and a works table. Using linked record fields, you could then set it up so that every record in the works table is linked to one museum record, and every record in the museums table is linked to one or more records in the works table.
It will often make sense to have the two halves of a one-to-many relationship on separate tables, but when all entities in the relationship are of the same class, it may make more sense to use a self-linking table. For example, let’s say that you have a company directory with the names of all of employees: you want to model the relationships between managers and their subordinates, given that each manager manages many employees and each employee has only one manager. To do this, you could create self-linking linked record fields for each individual’s manager and subordinates.
Here are some other examples of one-to-many relationships:
People and Addresses - Each person can live at one address, but each address can house one or more people.
Owners and Pets - Each pet has one owner, but each owner can have one or more pets.
Farmer and Equipment - Each piece of farming equipment is owned by one farmer, but each farmer can own many pieces of equipment.
Many to many linked record relationships
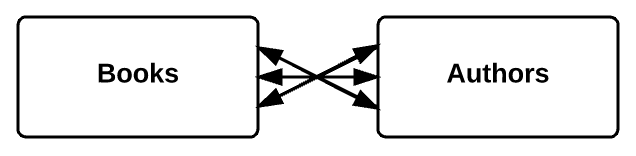
Lastly, entities can also have a many-to-many relationship. Let’s say you have a list of books, and a list of authors—each book may have one or more authors, and each author may have written multiple books. In this case, you have many books related to many authors. In Airtable, representing the relationship between these two lists of entities is as simple as making two tables and creating linked record fields.
In Airtable, representing a simple many-to-many relationship between two lists of entities is just as straightforward as representing a one-to-many relationship. With linked record fields, you can set it up so that every record in the books table is linked to one or more author records, and every record in the authors table is linked to one or more records in the books table.
As with one-to-one relationships and one-to-many relationships, there are times when it makes sense to represent many-to-many relationships on a single, self-linking table, such as when all entities are of the same class. Suppose you wanted to track the friendships within a group of people. Each person can have many friends, and in turn, each of those friends can have many other friends. You could track this many-to-many relationship on a single table with a self-linking record field.
Here are some other examples of many-to-many relationships:
Ingredients and Recipes - Each food item can be used in multiple recipes and each recipe requires multiple ingredients.
Doctors and Patients - Each doctor sees many patients and each patient sees many doctors.
Employees and Tasks - Each employee works on many tasks at a time while each task is being worked on by one or more employees.
Customers and Products - Each customer can purchase many products, and each of those products can be purchased by many different customers.
Understanding linked junction tables
Often, representing a many-to-many relationship in Airtable is as easy as linking two tables together. However, in some situations, you don’t just need to know that there is a relationship between two entities—you also need to be able to express and store other information about that relationship. In these cases, you’ll need to create a third table, called a junction (or join) table. You can think of the junction table as a place to store attributes of the relationships between two lists of entities. If you'd like to quickly build junction tables automatically, we recommend checking out the Junction Assistant extension.
Example 1: Students and classes
If that sounds abstract, let’s look at a specific example: Suppose you have a list of students and a list of classes. There’s a many-to-many relationship between the students and their classes, since each student can take multiple classes, and each class can have multiple students enrolled. You could just make a table of students and a table of classes, link them together, and leave it at that. But what if you wanted to store information about each student’s grade in the class? Or which semester that student took the class? Do you put this information in the table of students, or in the table of classes?
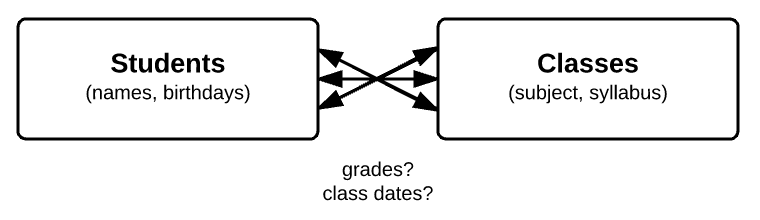
The students' grades in their classes and the times which they took the classes can be considered attributes of the relationships between the students and the classes in which they enrolled. Since the relationships each have their own relevant lists of information, the best way to proceed is by making a junction table.

Let’s build this junction table step-by-step.
Say you already have a table of students and a table of classes.
We can make a new table which has a field linked to students and a field linked to classes. You could call the table "Grades," "Enrollment," "Students/Classes," or whatever helps you remember that this table is a junction table between the Students and Classes tables.
We still need to fill in the primary field for this junction table. One of the best ways to name records in a junction table is to use a formula, which takes data from other fields in the table to compose a unique name for each record. This can be particularly useful for a junction table, as often the records representing the relationships between concepts don’t lend themselves particularly well to a single unique primary field. Information relevant to each student’s relationship with a class (such as the grade, or the semester in which a class was taken) can also be put in this table. In this case, let’s say we use a formula to combine the Class, Semester, and Student name together. The output would look something like this
English 101 - Spring 2026 - Casey JonesIf you return to the Students or Classes tables, you’ll see that new fields linked to the junction table have been created automatically. You can create rollup or lookup fields on these tables to automatically pull information from the junction table into the Students or Classes tables.
Example 2: Applicants and interviewers
Here’s another example of when you would want to use a junction table: You have a list of job applicants, and a list of interviewers. Each applicant goes through multiple interviews with different interviewers, and each interviewer hosts multiple interviews with different applicants. The interview can be thought of as the relationship between an applicant and an interviewer, and as such we would need a junction table to store information about each interview.

For this example there would be the following basic relationships:
Applicants - Linked to the Interview table with one or more interviews.
Interviews - Linked to a single applicant and one or more interviewers.
Interviewers - Linked to the Interview table with one or more interviews.
Example 3: Clients, client orders, products, and manufacturers
Here’s a more complex example. Suppose you want to make an Airtable base organizing your lists of clients and their orders, and products and their manufacturers. Each client can place many orders, but each order is only associated with one client:

Similarly, each manufacturer can make many products, but each product can only have one manufacturer:

Each client order can have many products, and each product can be part of many client orders:

The problem here, however, is that there’s no good place to store information about the quantity of each product in a client’s particular order. The solution is to make a junction table between the client orders and products tables, which we can call the order line items table.

Here’s an example of what that would look like in an Airtable base:
The clients table is linked to the client orders table.
The client orders table is linked to the clients table and to the order line items table.
The order line items table takes the links from the products table and the clients’ orders table, and the quantity of each product, to create unique primary field values for each of the lines.
The products table is linked to the order line items and the manufacturers:
Finally, the manufacturers table is linked to the products table in a one-to-many relationship.
Calculated fields and junction tables
When you have so many linked fields, it’s important to use lookup and rollup fields to your advantage to minimize the amount of data entry you need to perform. Suppose you wanted to have a field in the client orders table that would automatically calculate the total cost of an individual client’s order. To do this, you would:
Draw the information from the products table about the per-unit cost into the order line items table using a lookup field.
Then, with a formula, you could calculate the total cost per line item.
And finally, you can use a rollup field in the client orders table to sum up all the total cost of all of order line items in any given client’s order.
FAQs
Why are my collaborators able to link multiple records even when the "Allow linking to multiple records" setting is toggled off?
The “Allow linking to multiple records” setting only restricts adding multiple links via the record picker. Multiple links can still be created through automations or copy/paste, and turning the setting off does not alter existing links.