All plan types | |
Owners/Creators/Editors | |
Related reading | Locked views: Only available for Paid plan users who want to take extra precautions to ensure that the sorts they use won't get accidentally changed. This setting prevents alteration of a view's configuration unless it's been intentionally unlocked by someone with creator permissions. |
Platform(s) | Web/Browser, Mac app, Windows app, and mobile apps |
Sorting records in Airtable views
While in a view, you can sort your records so that they appear in a particular order according to the values in specific fields. Sorting your records in one view doesn't affect the order of records in other views—it just applies to the view you're currently using to look at your table.
Configuring a new sort
Click the Sort option from the view bar.
Then, pick a field to sort by from the list of fields.
To make it easier to find the field you'd like to use to sort, you can also type in the search bar.
Depending upon the field type that you are sorting by, there will be an additional option to choose the order of the sort. For instance, in text-based fields, you can sort alphabetically or reverse alphabetically, and in date fields, you can choose between earliest to latest or latest to earliest. We also cover this in more detail in the "Field types and sorting" section below.
Once you've selected the first field to sort by, you can add additional fields to sort by. Just click the Add another sort option.
Once configured you can:
You can remove any of the sorts you've applied by clicking the X button next to a particular field of your choice.
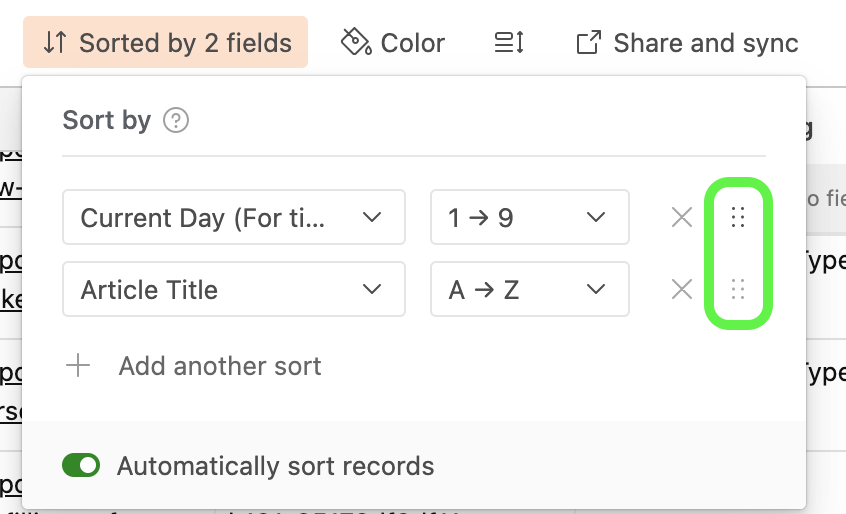
You can reorder the sorts by using the drag handles. We cover more about reordering in the next section below but remember that there is a hierarchical nature to the order of the sorting that will result depending upon the order of the fields chosen.
Applying a sort from another view's configuration
To apply a sort that has already been configured in another view, click the Sort option from the view bar, then click Copy from a view...
This will open a window where you will:
Choose a view to copy a configuration from.
Choose other configuration options to copy. By default, the Sorts option will be toggled on, but you can also apply Groups, Filter conditions, Field order, and other configuration options.
Click Copy configuration
Reordering a sort
To reorder the sorting order:
Click the Sort option from the view bar
Find the 6 dot icon next to the field you want to move.
When hovering over the icon you should see a hand icon appear where your mouse pointer is located.
Click, drag, and then drop the field in the position you would like it to be in the sorting order.
Understanding field types and sorting
Different field types can be sorted in different ways. Note that in almost all cases, sorting in ascending order will place blank values first.
Text field types, like single line text fields, long text fields, or formula fields that return text, can be sorted in alphabetical (A → Z) or reverse alphabetical order (Z → A). Airtable uses natural sort order for text, so multi-digit numbers in text fields are ordered as single characters. For example, this means that the value "z2" would be sorted before "z11" because 2 is sorted as smaller than 11. Attachment fields can also be sorted alphabetically or reverse alphabetically by the file name.
Numerical field types, like number and duration, can be sorted in ascending numerical order (1 → 9) or descending numerical order (9 → 1). Rating fields can also be sorted in ascending numerical order or descending numerical order.
Date and time fields can use ascending order (1 → 9), which is from the earliest date to the oldest date, or descending order (9 → 1), which is from the oldest date to the earliest date.
Checkbox fields can be sorted by whether or not the box has been checked, so either (▢ → ✓) or the reverse, (✓ → ▢).
Single and multiple select fields are sorted according to the order of the options in the field's customization menu, either (First → Last) or (Last → First). If you're sorting on a single or multiple field, you can change the order in which records are being sorted by going to that field's customization menu (where you can alphabetize the options, if you'd like).
Automatic and manual view sorting
By default, when you create a new view, it'll have the Automatically sort records toggle turned on.
If this toggle is turned on, records will automatically sort themselves if a change occurs to a record that would cause it to be ordered differently according to the sort(s). You will not be able to manually reorder records using the record drag handles.
In grid view, if the Automatically sort records toggle is on, all fields on which sorts are being applied (and the sort menu button) will have a pale orange background to make it obvious that automatic sorting is happening on that field.
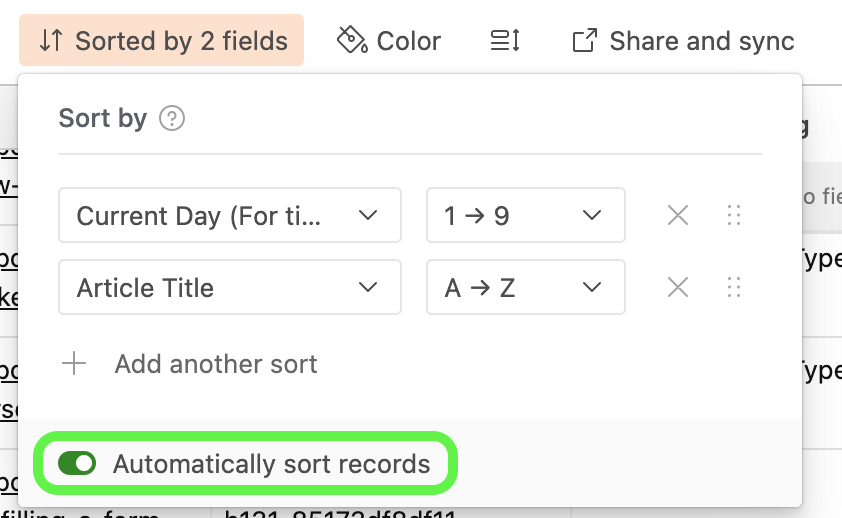
If the toggle is turned off, records will only sort themselves when a sort has been re-applied, and you can manually reorder records to your liking using the record drag handles. Turning off the Automatically sort records toggle will cause a Sort button to appear in the sort menu. After manually reordering the records in the view, you can re-apply the sort at any time by manually clicking this Sort option.

Sorting in different view types
Sorting in grid view
In grid view, sorting will change the order in which the records (rows) appear. The first-ordered record will appear in the first row of the table, the second-ordered record will appear in the second row of the table, and so on.
If the Keep sorted toggle is turned on and your grid view has grouped records, you can click and drag to move records between groups, but you will be unable to manually reorder records within a group.
If the Keep sorted toggle is turned on and your grid view does not have grouped records, you will not be able to manually reorder records at all.
Sorting in gallery view
In gallery view, cards will be sorted first left to right, then top to bottom. If the Keep sorted toggle is turned on, you will not be able to manually reorder the cards in the gallery by clicking and dragging them.
Sorting in calendar view
In calendar view, sorting will reorder records with the same date on the calendar, and will reorder records in the record list sidebar.
Sorting in kanban view
In kanban view, sorting will determine the order or cards within stacks. If the Keep sorted toggle is turned on, you will be able to move cards between stacks; however, you will be unable to manually reorder cards within stacks.
Sorting behavior from a view share link
If you create a view share link to provide access to a view to non-collaborators, the sorting criteria applied to the view will persist in the shared view. However, viewers will have the option to change any sorting criteria (as well as other view configuration options) - this will only affect how they view the records made available to them via the view share link, and not adjust any of the view configuration options in your table.
FAQs
How can I sort so that the cells with a date are first in date order, and blank cells are at the end?
To sort records in a view by a date field and have any records with blank date field values appear last:
Add a sort on the view by clicking Sort.
Next, select the date field that you want to sort by.
Finally, from the drop down next to the date field change the ordering from Earliest → Latest to be Latest → Earliest instead.