- Getting started with Airtable
- Introduction to Airtable basics
- Contacting Airtable Support Updated
- Airtable home screen
- Glossary of Airtable terminology
- Airtable technical requirements
- Feature differences between Airtable on desktop and mobile
- Airtable keyboard shortcuts
- Using Markdown in Airtable
- Adding descriptions in Airtable
- Finding Airtable IDs
- Airtable Automations
- Automations Overview
- Automation feature walkthroughs
- Integrated automation walkthroughs
- Airtable automation walkthroughs
- Linking existing records using automations
- Conditional groups of automation actions
- Repeating groups of Airtable automation actions
- Creating recurring records using automations
- How to delay Airtable automation runs
- Prevent automations from triggering by mistake
- Use automations to timestamp status updates
- Automation Triggers
- Airtable Triggers
- Airtable automation trigger: When record matches conditions
- Airtable automation trigger: When a form is submitted
- Airtable automation trigger: When record created
- Airtable automation trigger: When record updated
- Airtable automation trigger: When record enters view
- Airtable automation trigger: At scheduled time
- Airtable automation trigger: When webhook received
- Airtable automation trigger: When a button is clicked
- Airtable automation trigger: When email received Updated
- Integrated Triggers
- Airtable Triggers
- Automation Actions
- Airtable Actions
- Airtable automation action: Send email Updated
- Airtable automation action: Create record
- Airtable automation action: Update record
- Airtable automation action: Find records
- Airtable automation action: Sort list
- Airtable automation action: Run a script Updated
- Airtable automation action: Generate with AI
- Integrated Actions
- Airtable automation actions: Slack
- Airtable automation actions: Google Workspace
- Airtable automation action: Send MS Teams message
- Airtable automation actions: Outlook
- Airtable automation actions: Jira Cloud
- Airtable automation actions: Jira Server / Data Center
- Airtable automation actions: Salesforce
- Airtable automation action: Create post in Facebook Pages
- Airtable automation actions: GitHub Issues
- Airtable automation action: Hootsuite post
- Airtable automation action: Send Twilio SMS
- Airtable Actions
- Airtable Bases
- Using Airtable Cobuilder
- Airtable bases overview
- Creating and managing Airtable bases
- Structuring bases in Airtable
- Moving bases between workspaces in Airtable
- Creating and managing tables in Airtable
- Creating Airtable base share links
- Importing third-party data into Airtable
- Using insights in Airtable
- Troubleshooting Airtable base performance
- Airtable Betas
- Collaborating in Airtable
- Airtable Enterprise Support
- General Enterprise information
- External badging in Airtable
- Using app library and components in Airtable Updated
- Ask an Expert beta overview
- European data residency at Airtable
- Airtable user groups overview
- Airtable Enterprise API
- Creating and managing data retention policies in Airtable
- eDiscovery APIs in Airtable
- Airtable and data loss prevention
- Accessing Enterprise audit logs in Airtable
- Set up Jira Server / Data Center to connect with Airtable
- Admin panel pages
- Airtable admin panel overview
- Users - Airtable enterprise admin panel
- Airtable admin panel user details
- Groups - Airtable admin panel
- Workspaces - Airtable Enterprise Admin Panel
- Bases - Airtable admin panel
- Interfaces - Airtable admin panel
- Data sets - Airtable admin panel
- Managed apps - Airtable admin panel
- Components - Airtable admin panel
- Reports - Airtable admin panel
- Settings - Airtable admin panel Updated
- Managing Enterprise organizations
- Managing Enterprise admins in admin panel
- Using Organizations
- Organization branding for apps in Airtable
- Enterprise Hub in Airtable
- Enterprise Hub: Org unit assignment with user groups Updated
- Deactivating, removing access, and reactivating users in the admin panel
- Managing user access to workspaces and bases
- Airtable Enterprise Key Management Updated
- Custom terms of use New
- Enterprise SSO
- General Enterprise information
- Airtable Extensions
- Airtable Fields
- Fields Overview
- Attachment
- Date-based fields
- Formula
- Getting Started with Formulas
- Formula Foundations
- The essentials of Airtable formulas
- Formula writing tips for beginners
- Troubleshooting formulas
- Basic calculations
- Conditional statements
- Logical arguments
- Working with dates
- Displaying DATETIME_FORMAT using the date field in Airtable
- Working with date functions in Airtable
- Calculating the difference between dates in Airtable
- Supported DATETIME_DIFF unit specifiers in Airtable
- Supported DATETIME_FORMAT format specifiers in Airtable
- Using the DATETIME_PARSE() formula in Airtable
- Working with timezones
- Record functions
- Text functions
- Numeric functions
- Common Solutions: Beginner
- Common Solutions: Intermediate
- Common Solutions: Advanced
- Long Text Field
- Linked Record Field
- Linking records in Airtable
- Limiting linked record selection to a view in Airtable
- Dynamic filtering in linked record fields
- Linking to one, many, or a subset of Airtable records
- Converting existing fields to Airtable linked records
- Reordering record links in Airtable
- Understanding linked record relationships in Airtable
- Number-Based Fields
- Other Fields
- Rollup, lookup, and count fields
- Select and user fields
- Integrating with Airtable
- API
- Getting started with Airtable's Web API
- Creating personal access tokens
- Airtable Webhooks API Overview
- Service accounts overview
- Airtable Web API - Using filterByFormula or sort parameters
- Airtable API Deprecation Guidelines
- Airtable API: Common troubleshooting
- Managing API call limits in Airtable
- URL length limitations for web API requests
- Integration services
- Third-party integrations via OAuth overview
- Troubleshooting disconnected OAuth integrations in Airtable
- Options for integrating with Airtable
- Third-party integrations - Common troubleshooting
- Low-code integrations - Common troubleshooting
- Integrating Airtable with external calendar applications
- Visualizing records from Airtable in Tableau
- Visualizing Airtable records in Microsoft Power BI & Power Query
- Integrating HubSpot with Airtable
- Using Zapier to integrate Airtable with other services
- Using Zapier's Multi-Step Zaps to find and update records
- Using IFTTT to integrate Airtable with other services
- Integrating with AWS Lambda & DynamoDB
- Developer tools
- API
- Airtable Interface Designer
- Interface Designer overview articles
- Interface layouts
- Interface elements
- Adding and removing elements in interfaces
- Adding layouts to interfaces
- Formatting elements in interfaces
- Interface element: Button
- Interface element: Calendar
- Interface element: Chart
- Interface element: Filter
- Interface element: Gallery
- Interface element: Grid
- Interface element: Kanban
- Interface element: Number
- Interface element: Record picker
- Interface element: Text
- Interface element: Timeline
- Learning and Resources
- Managing Airtable
- Airtable Policy
- Airtable Records
- Airtable Sync
- Airtable Views
- Airtable Workspaces
- Print
- Share
- DarkLight
- PDF
Getting started with Airtable gallery views
- Updated on 05 Mar 2024
- 4 Minutes to read
- Print
- Share
- DarkLight
- PDF
All plan types | |
Owners/Creators - Can create, delete, modify, and lock/unlock fields. | |
Platform(s) | Web/Browser, Mac app, Windows app, and mobile support |
Creating a gallery view
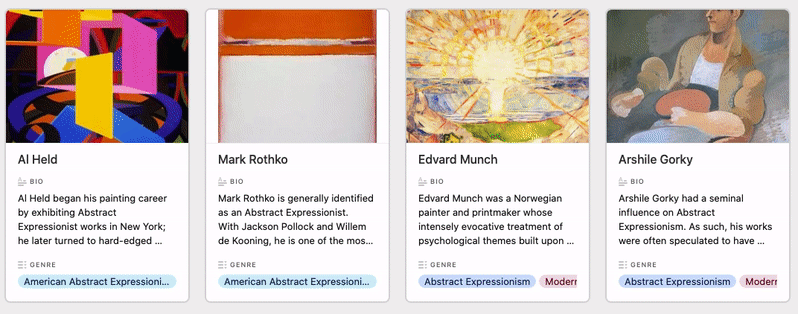
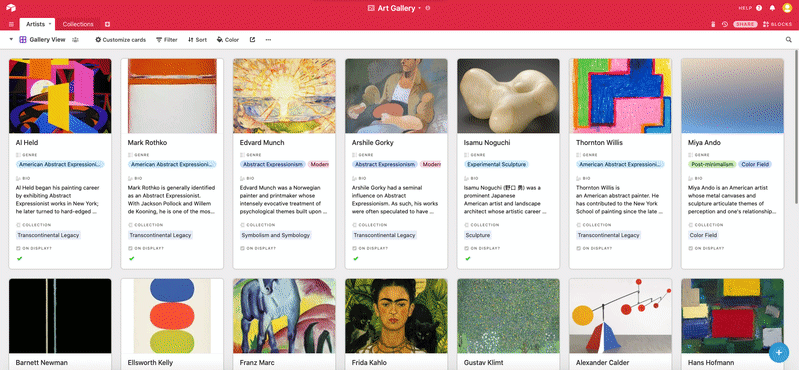
Gallery view is a special type of view that represents your records as large cards. In particular, the gallery view highlights your attachments—images, documents, and more.
To create a new gallery view, click the dropdown arrow in the view bar, then click the "Gallery view" option from among the new view creation buttons at the bottom of the dialog. Check out this support article for more information on creating new views.
This will create a gallery view and automatically select an attachment field (if one exists) to use as the gallery cover image. Note that when viewing records in gallery view, you will only be able to select a single record at a time.
Using drag and drop to add an attachment to a record
You can drag and drop a file (or multiple files at a time) onto the cover field of any gallery card to upload that file to the cover field. Note that you'll need to have the cover field already visible (toggled on) in the gallery view before you can drag and drop attachments to records in the view.
![Gallery Add Attachment](http://cdn.airtable.document360.io/d0ee2ee4-3f78-47c7-b388-85e40be9fb89/Images/Documentation/Gallery%20Add%20Attachment.gif)
Using drag and drop to create a new record
You can also create a new record by dragging and dropping a file onto the add new record button (the one which looks like a big + in a circle).
![Gallery Create Record](http://cdn.airtable.document360.io/d0ee2ee4-3f78-47c7-b388-85e40be9fb89/Images/Documentation/Gallery%20Create%20Record.gif)
If you drag and drop multiple files onto the add new record button, you'll be asked whether you want to create multiple records out of each of the attachments, or if you want to make one record with multiple attachments.
![Gallery Multiple Attachments](http://cdn.airtable.document360.io/d0ee2ee4-3f78-47c7-b388-85e40be9fb89/Images/Documentation/Gallery%20Multiple%20Attachments.jpg)
The cover field and arranging fields
The cover field is a designated attachment field, the contents of which appear at the top of each gallery card. When creating a gallery view, if your table has at least one attachment field, the first attachment field will be automatically set as your gallery view's cover field.
If you have multiple attachments in the cover field, you can mouse over the cover to scroll through the different attachments at a glance.
To change the cover field, click on the Customize cards option in the view bar. You can then use the dropdown in the cover field section to select a different attachment field as the cover field. You may also choose to have no cover field.
Note
If you don't have an attachment field in your table, you can add one by following the steps in this article. Without an attachment field, the gallery view will still display records as cards.
The slider at the top of the Customize cards menu allows you to choose whether the images on the cover fields will crop (fill the entire photo area by zooming and cropping the photo) or fit (zoom out to show the entire photo). Cover field images do not have a fixed aspect ratio, as the size of the image will change depending on the size of the window itself.
You can also choose which fields to show or hide on the gallery cards in the arrange fields menu by checking or unchecking the boxes for the appropriate fields, or by clicking the hide all and show all buttons. To rearrange the order of the fields as they appear on the card, simply click and drag the field names into the desired order using the drag handles to the right of the field names.
Note
Text used in single line or long text fields is automatically shortened in the gallery view to standardize the size of each card. The full name of the primary field does appear as a popover on hover, but enabling additional lines of text to appear on gallery cards is not currently supported. The full text can be viewed by expanding the record.
Filtering and sorting in gallery view
Filtering and sorting gallery cards works much like it does in grid view. To filter and sort records, click on the add filters and apply sort buttons in the view bar as necessary.
Hiding fields (customizing cards) in a gallery view
Unlike the grid view, the gallery view does not have a Hide fields button; instead, it has a Customize cards button. The Customize cards button lets you determine what fields are visible on your gallery view's cards.
How to hide fields on gallery cards
When the Customize cards menu is open, you can see which fields are showing (where the toggle is green and switched to the right) and which fields are hidden (where the toggle is grayed out and switched to the left).
To hide or show a field on the cards, click the toggle next to the name of the field you want to hide or show.
The Hide all and Show all buttons will let you quickly hide/show all fields (except the primary field, which cannot be hidden).
By clicking and dragging the drag handles on the field names, you can quickly rearrange the order of the fields on the cards.
If you have a large number of fields, you can type a search term in the Find a field search box to more easily find the field you're looking for.
You can also hide or show individual fields from the cards in your gallery view by clicking on a card to open up an expanded record.
FAQs
How do I delete a gallery view?
Can I selectively hide a field when it doesn't contain a value?
We do not currently support conditionally showing/hiding fields within a view. One workaround to accomplish this would be to create separate views that respectively filter out records when a certain field is empty or filled.