Plan availability | All plan types |
Permissions |
|
Platform(s) | Web/Browser, Mac app, Windows app, and some basic functionality on iOS and Android mobile apps |
Airtable views overview
In Airtable, a view is a particular way to look at and organize the underlying data in a table. The default type of view is a grid, but other types include form, calendar, gallery, kanban, timeline, list, and gantt. A given table can have multiple views and multiple view types.
Airtable view sections are organizational structures that allow you to access and manage all your views quickly. Custom view sections are manually created, but all other sections are automatically created by Airtable. These view sections are broken into several areas:
My personal views - A collection of your personal views.
More personal views - A collection of all of the personal views (across all base users) for the table you have opened.
My favorites - A collection of any views marked as your favorite.
Custom view sections - Learn more here.
More collaborative views - a default collection of all views that don’t belong to another view section listed above.
Accessing views in Airtable
To access views:
Open your Airtable home screen.
Select and open your preferred base.
Click on your preferred table.
You may need to click the three horizontal bars icon
 to open the views sidebar.
Certain view sections listed in the overview section above may not appear if that view type has not been created in the table you have open.
Click on a view’s name to open that view.
Views containing more than 1000 records will be loaded as a view preview. Jump below for more information.
Click Load all records to see all of the records within that view.
Consider using the search bar to find a specific record or create a view that filters out more records to create a more narrow dataset.
Creating views in Airtable
To create views in Airtable:
Open your Airtable home screen.
Open the base where you want to create a view.
Click + Create new…
You may need to click the three horizontal bars icon
to open the views sidebar.
Click the type of view you want to create.
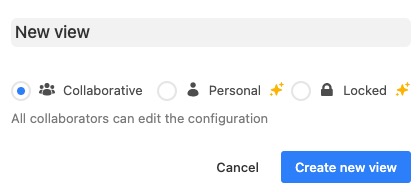
Name the view and choose who can edit the view by clicking Collaborative, Personal, or Locked.
Click Create new view.
From here, you may want to hide/show fields or filter, group, sort, and/or color records in the view.
Airtable view collaboration types
Airtable allows you to create the following view collaboration types:
Collaborative - Collaborative views allow all base collaborators to see and edit the view's configuration, such as sorting, grouping, and filtering.
Personal - Personal views are views that only you can configure and edit.
Locked - Locked views prevent all collaborators from changing a view’s configuration—like filters, field order, or visibility—until it’s unlocked by someone with Creator or Owner permissions.
To update a view’s type to a collaborative, personal, or locked view:
Open your Airtable home screen.
Open the base with the view you want to update.
Open the view you want to change.
You may need to click the three horizontal bars icon
to open the views sidebar.
Click the dropdown arrow to the right of the view’s name.
Hover over the view collaboration type currently set: Collaborative view, Personal view, or Locked view.
Select your updated view collaboration type.
Note
Personal and locked views are only available to users on paid workspace plans.
Deleting views in Airtable
To delete views in Airtable:
Open your Airtable home screen.
Open the base with the view you want to delete.
Click the … icon the right of the view’s name.
You may need to click the three horizontal bars icon
to open the views sidebar.
Click Delete view.
Adding a view section
Note
View sections are only available on paid plan workspaces.
Open your Airtable home screen.
Open the base and table where you want to create a view section.
Click + Create new…
You may need to click the three horizontal bars icon
to open the views sidebar.
Click Section.
Name the new view section you created.
You can now drag and drop the view section into a different order. Note that the “My favorites” and “My personal views” view sections will always default to be at the top of the list of sections.
You can also drag and drop individual views into the new section you have created.
Other view actions
To duplicate a view:
Open your Airtable home screen.
Open the base with the view you want to duplicate.
Click the … icon the right of the view’s name.
Click Duplicate view.
To favorite a view:
Note
Favorite views are only available on paid plan workspaces.
Open your Airtable home screen.
Open the base with the view you want to favorite.
Click the … icon the right of the view’s name.
Click Add to ‘My favorites.’
To reorder a view:
Open your Airtable home screen.
Open the base with the view you want to reorder.
From here, either:
Click the icon to the right of the … icon and drag/drop the view to your to your desired location.
Or, click the … icon, hover over Move to…, and select the section where you want to move the view.
To rename a view:
Open your Airtable home screen.
Open the base with the view you want to rename.
Click the … icon the right of the view’s name.
Click Rename view.
To copy a view configuration:
There are many things you can do to customize a view, such as:
Show or hide fields
(Re)arrange the order in which fields appear
Adjust the row height
Add filtering conditions
Group records
Apply sorts
Apply record coloring to color-code your records
If you've configured a view in a certain way—for example, by applying filtering conditions, sorts, and groups—you can take that view configuration from one view and apply it to another view. To copy a view configuration from another view:
Click on the dropdown next to the name of the view you are looking at, then select the Copy another view's configuration option.
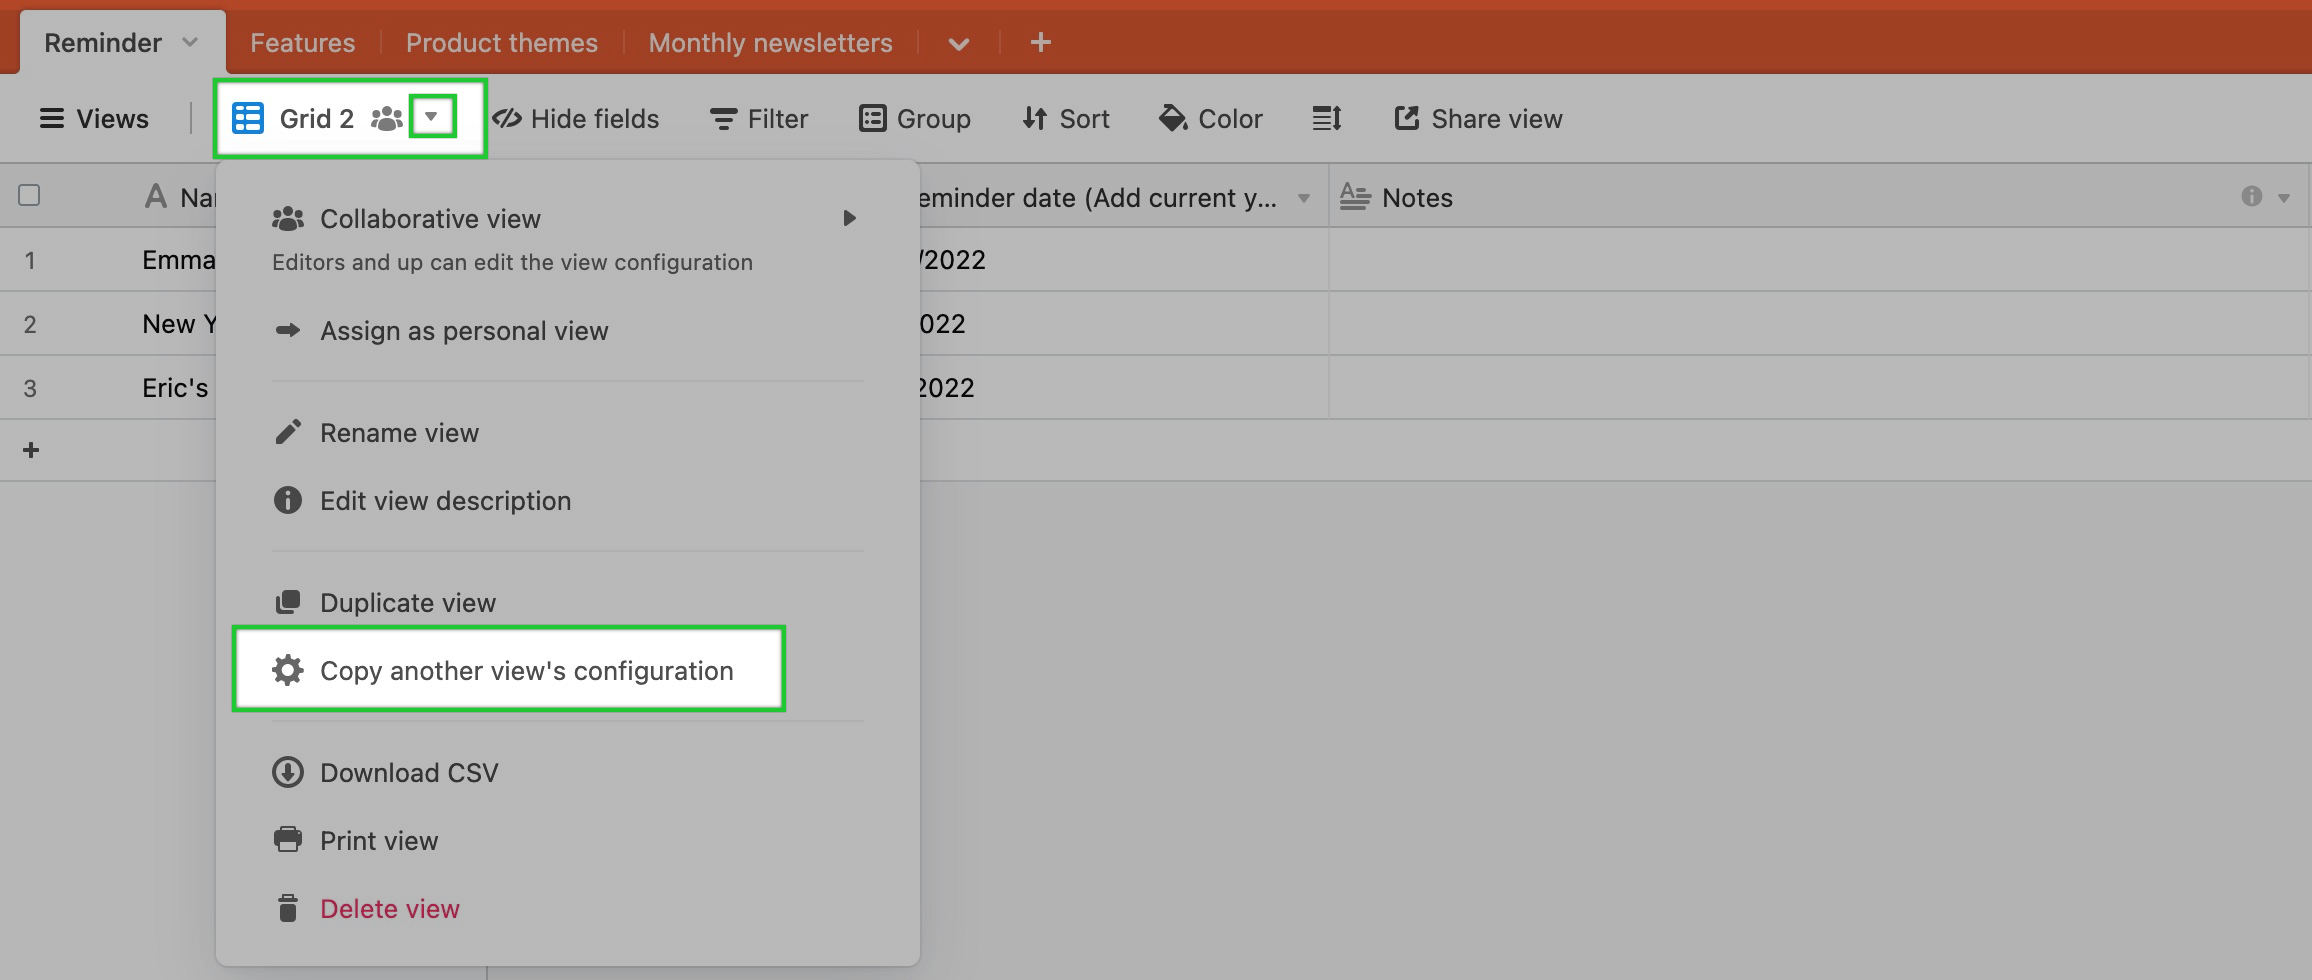
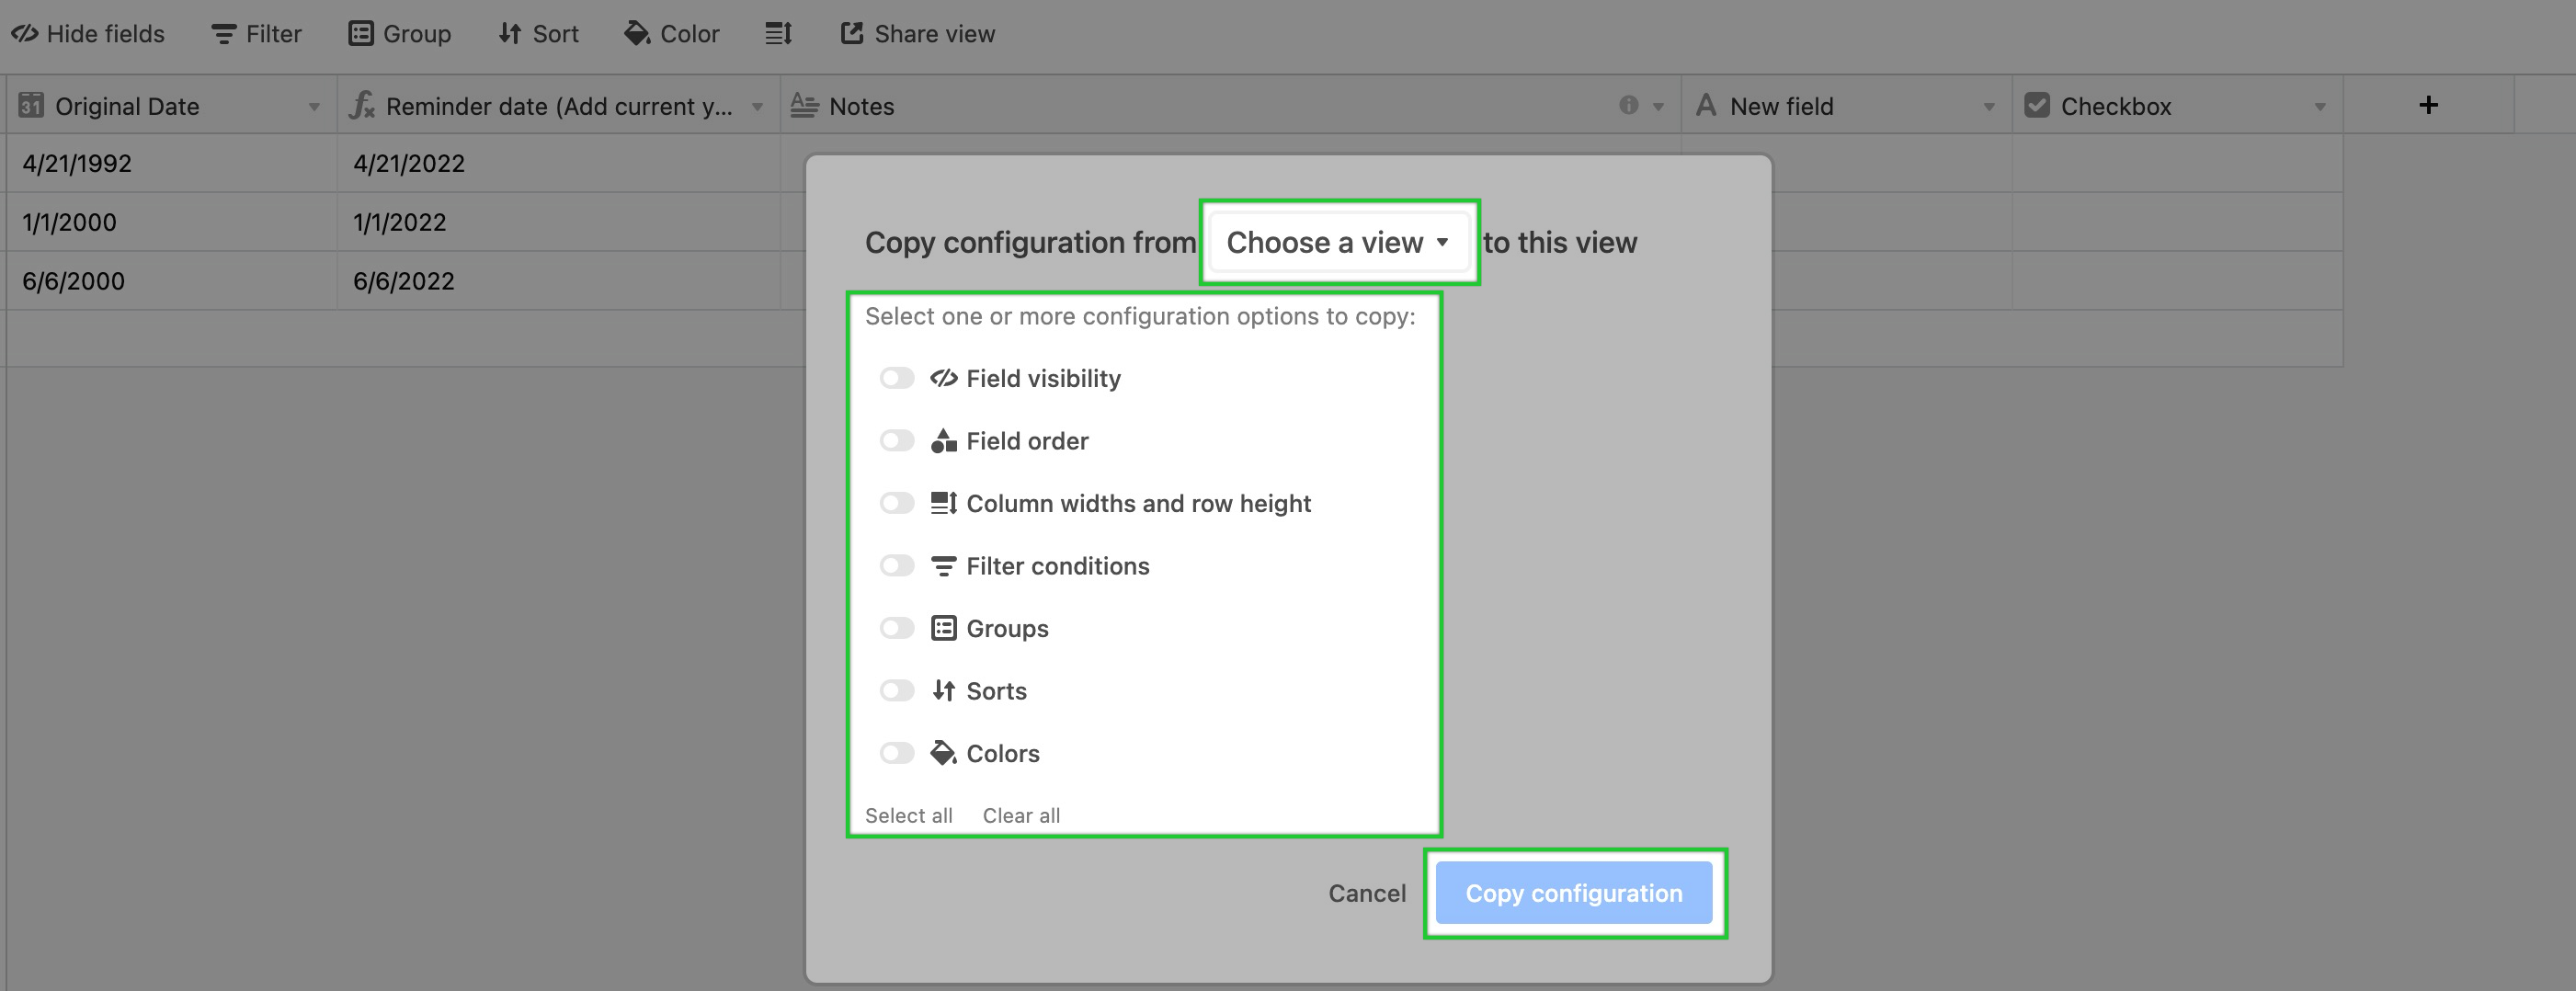
This will bring up a dialog box from which you can choose various configuration elements to copy over from another view.
Use the Choose a view dropdown to pick the target view from which you would like to copy configuration options.
Then, select the configuration options you'd like to copy over.
When you are finished setting up the options click the blue Copy configuration button. This will apply the selected configuration options to the active view.
A few notes:
The different view configuration options that can be copied vary depending on the view type. For example, since the Calendar view doesn't have grouped records, you can't copy groups to or from a calendar view.
You can only copy view configurations from views within the same table.
To configure row height in a view:
By default, a grid view displays its records at a short row height, designed for maximum density of records. At the short row height, each record shows one line of text and small attachment thumbnails. If you'd like to be able to see more text and larger images for your records, then you can adjust your row height from the default short setting.
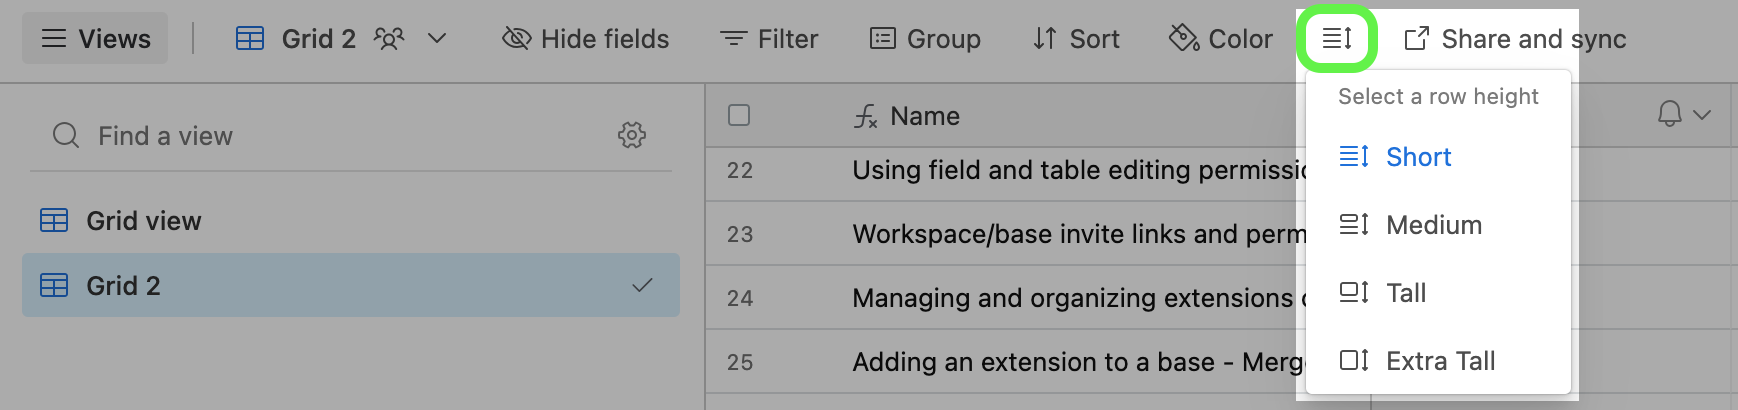
There are four different row height options:
Short (the most dense option, and the default height for new views)
Medium
Tall
Extra Tall (the most spacious option)
To change the row height in your current view, click the row height switcher in the view bar, then select the desired row height.
The shorter row heights allow you to see more records at once, whereas the larger row heights allow you to see more information per record. Specifically, larger row heights will show multiple lines of text in text fields, multiple lines of linked records, multiple lines of multiple select field options, multiple lines of collaborators in collaborator fields, and larger images.
Note
Changing the row height does not affect the height of field headers, which are not height-adjustable.
If you're a paid plan user with creator permissions and you want to ensure that your preferred row height configuration on a view won't get accidentally changed, you can lock the view, which will prevent all collaborators from altering a view's configuration until it's been unlocked by someone with creator permissions.
To print a view:
To print a view:
Open your Airtable home screen.
Open the base with the view you want to print.
Select the view you want to print.
Click the ˅ icon next to the view’s name.
Click Print view.
Click Print.
Note
Gantt views don't support direct printing. To create a printable version of a Gantt view, download it as a CSV or use the Page Designer extension.
Exporting grid views as CSVs
Note
Exporting grid views to CSVs is only available on our web and desktop applications.
If you want to download all of the records from a table, then ensure that the view you are exporting as a CSV does not contain any filters.
If you are accessing a shared view, the creator may limit other collaborators from copying base data, which turns off the option to download the data in this view as a CSV.
Interface creators can also turn on an option allowing end users to export interface pages as a CSV. Find more information in Step 5 of this support article section.
To export records in a grid view to CSV:
Open your Airtable home screen.
Open the base with the grid view you want to export.
Click the down arrow icon to the right of the view name you want to export.
Click Download CSV.
Understanding view preview loading behavior
Any view with more than 5000 visible records will initially load with a 1000-record preview. In the past, views containing many thousands of records would load very slowly. This change was implemented to allow end users to navigate through views more quickly and only load all the records within larger views when confirmed by the end user. Within the 1000 record preview:
You can update, add, and delete records as per usual.
Searching for records will search all records.
Extensions cannot be run while a view is in preview. Once it has been fully loaded, all extension functionality will be restored.
If you add filters that reduce the size of your view to under 5000 records, you’ll automatically leave the record preview and see all your records again.
You will see the total count of records as “Showing the first 1,000 of XX,XXX records”
To load all of the records within a larger view, click the Load all records button next to the record count.
You only need to click Load all records once per session. However, the view preview will reset if you refresh your browser.
The larger the set of records, the longer the load time will be in order to fully load the view.
FAQs
Do record counts in views count towards the overall base record total?
Not exactly. Since views are meant to give insights into the same data, the same records will appear in multiple views. The records that appear in multiple views will only be accounted for once. The total record count for a base is determined by adding the number of records that are in each table together. An unfiltered view in a table will give you an accurate count of the number of records in that table. Workspace owners can navigate to the workspace settings page to monitor base-level usage.
Why isn’t “My favorites” section in my view sidebar, where is it?
The “My favorites” section will only appear when you have at least one view favorited.
Does favoriting a view remove that view from its original location in the view sidebar or view section?
You can think of each of your favorite views like a shortcut that links back to the original view. The original view will not be moved, or affected, by starring it.
Can I export my entire base?
No, exporting a full base as a single file is not supported. Each table in a base will need to be downloaded as its own CSV. Since CSV files are text only, attachment files will also need to be exported separately (more info on how attachments are included in the CSV export below).
What information is exported in a CSV export of a view?
All field values visible in the view will be included in the export. Information not included in the export are record-level comments, field descriptions, base guide content, and data stored solely in extensions (like Description extension).
How are attachments included in a CSV export of a view?
Attachment fields will be included in the CSV file as a filename and URL. As of November 8th, 2022, attachment URLs obtained via the CSV export functionality will expire after a few hours. Read more about this behavior and why it's important for security here.
Can I use the API to pull a list of the views contained within a base?
Yes, using the List views endpoint can return all of the views from a base including the view ID, view type, and name as well as a couple of other optional parameters. Learn more here.
What happens to the "original" collaborative view if I choose to change it into a personal view?
If you choose to switch a non-personal view to a personal view, then it is worth pointing out that the "original" view will not remain after converting to a personal view. As a best practice tip, duplicate any views you wish to keep before converting them to a personal view.
Can I have a table with a single personal view?
You cannot make the only view in a table into a personal view. For every table, there must always be at least one collaborative grid view accessible to everyone in the workspace.
What happens when you duplicate a base containing personal views?
When you duplicate a base with personal views, those personal views will remain, even if the collaborator who created those views is no longer on the base.
What happens to the personal views of a collaborator who is removed from a base or workspace?
Personal views for removed collaborators will remain on the base, even after that collaborator is removed. You could choose to either reassign that personal view to another collaborator, or if you are an owner, or creator, on a base's workspace you could choose to remove that view.
Can you remove a personal view created by a collaborator who has been removed from that base?
Any owner, or creator, on a base's workspace can delete a personal view created by a collaborator, removed or otherwise.
If my base is not on a paid plan, will the default view type change in large bases?
Personal views are a premium feature available for bases within workspaces on paid Airtable plans only. So regardless of your base’s size, if your workspace is not on a current paid plan, you will not have access to premium or locked views unless your workspace plan is upgraded.
Will newly created views still default to personal views if I downgrade my workspace’s plan from a paid plan (Team/Business/Enterprise Scale) to Free?
Personal views are a premium feature only available for bases within workspaces on paid Airtable plans. So if you downgrade your workspace’s plan, you will lose the ability to create new personal views, and new view creation will default to collaborative views.
When I try to duplicate a collaborative view it keeps duplicating as a personal view, why is that?
In any table containing more than 20 views, new or duplicated views are automatically created as personal views rather than collaborative. You can update the view type at any time as needed.
How do I export my data to Excel (.xlsx) format?
Airtable doesn't directly export to Excel (.xlsx) format, but you can easily convert your data by first exporting as a CSV and then opening it in Excel:
Open your Airtable home screen.
Open the base with the grid view you want to export.
Click the down arrow icon to the right of the view name you want to export.
Click Download CSV.
Open the downloaded CSV file in Microsoft Excel.
Click File > Save As.
Select Excel Workbook (.xlsx) from the file format dropdown.
Click Save.
The CSV file will now be saved as an Excel workbook with full .xlsx formatting capabilities.