Plan availability | Enterprise Scale plans only with varying limitations. If you have questions about Enterprise Scale pricing and packaging, please click here. |
Permissions |
|
Platform(s) | Web/Browser, Mac app, and Windows app |
Note
Consider having Omni create an automation for you. With Omni's AI capabilities, you can use plain text requests to build, update, and query data in your Airtable base.
Prerequisite for using Jira Server/Data Center automation actions
Note
As of February 15, 2024, Atlassian no longer offers Server product support and recommends upgrading to Jira Data Center or Jira Cloud.
Learn how to configure automation actions to either create or update an issue in a Jira Server / Data Center (on-prem) instance. If your organization uses Jira Cloud, then refer to this documentation instead.
If this is your first time connecting your Jira Server instance with Airtable, then you’ll likely need to configure the server or work with your IT department to ensure that everything is set up for success. You can find more information about that process here.
Note
Jira Server / Data Center automation actions pair well with our Jira Server / Data Center Sync integration feature. Consider how implementing both features in your Airtable base may help to keep both services updated and matching.
Setting up an automation to create/update an issue in Jira
To set up an automation to create/update an issue in Jira:
Open your Airtable home screen.
Open the base where you want to create an automation.
Click Automations.
Click + Create new.
Click + Create automation.
Click + Add trigger.
Once clicked, the available triggers will display for you to choose from.
Search for and locate the “Jira Server/Data Center” actions.
Click the + Add advanced logic or action option.
Scroll down in the menu that appears and find the “Jira Server/Data Center” section.
While hovering over that option, click Create issue or Update issue. Depending on which option you choose, consult the next steps below:
Note
The values you configure in the next portion of the automation’s configuration can sometimes be static (same information included with every update sent to Jira) or dynamic (changes depending upon the information being held in the corresponding Airtable record). Keep that in mind, when building out the Jira Server automation action of your choice below.
(Option 1): Configure a “Jira Server/Data Center: Create issue” action
Feel free to enter a description of what the action will do. You can always add one later if you prefer to skip this step
Under “Configuration,” click the dropdown below the “Jira Server/Data Center” section. From here, either select a previously connected account or connect a new account. More information on managing connected accounts is available here.
Once you have connected an account, select the “Project” where you want to create or update an issue.
After choosing the project, choose the “Issue type” that will be created.
Now, you can start configuring the “Summary” section. Enter a static summary or click the cogwheel icon and the Dynamic option to utilize a token from a field containing summary information from an earlier automation step referenced in the underlying Airtable base.
Next, you’ll configure a “Description” of the issue. This description can include a mix of static information including text and emojis, as well as dynamic information from records in Airtable using the blue and white plus button to add those tokens.
Next up, you will likely want to choose the following additional fields:
Reporter - Choose a static reporter to attach to each created issue or leave this field blank.
Assignee - Choose a static assignee to attach to each created issue or leave this field blank.
Status - Select between Todo, In progress, or Done as a static status each time an issue is created. You may also insert a status field’s information, stored in Airtable, to dynamically cause this value to change depending upon the Airtable record used to create the issue in Jira.
Labels - Insert labels for each created Jira issue statically or dynamically.
Other issue data - The options in this portion of the configuration will vary by each project, since some projects will contain fields that others don’t.
After your action configuration looks the way you want it to, click Test action to ensure the issue to be created or updated is looking the way you want it to. Feel free to adjust the configuration before moving to the final step below.
(Option 2): Configure a “Jira Server/Data Center: Update issue” action
Feel free to enter a description of what the action will do. You can always add one later if you prefer to skip this step.
Under “Configuration,” click the dropdown below the “Jira Server/Data Center” section. From here, either select a previously connected account or connect a new account. More information on managing connected accounts is available here.
Once you have connected an account, select the “Project” where you want to update the issue.
Next, you may optionally choose to select an issue type from the dropdown menu that appears.
After choosing the project, you can start configuring the “Issue ID or key” section. Here, you can either enter a static ID/Key or click the cogwheel icon and the Dynamic option to utilize a token from a field containing ID/Key information from an earlier automation step referenced in the underlying Airtable base.
Next, you’ll configure which fields (Summary, Description, Labels) will be updated. You can configure the action to include just 1 field, a mix of 2 fields, or all 3 fields.
After your action configuration looks the way you want it to, click Test action to ensure the issue to be created or updated is looking the way you want it to. Feel free to adjust the configuration before moving on to the final step below.
NOTE
As a reminder, if you need to append a new field in your table to hold keys or IDs, then you'll need to retest the trigger step so that the automation uses the most current state of your base.
Test and turn on the automation - Be sure to test all of the steps in the automation that you are building. Once every part of the automation has tested successfully, you’ll likely be ready to turn the automation on. Find the red colored “OFF” toggle and click it so the automation now appears as “ON” in green.
NOTE
If you are encountering any issues during the automation setup process, then check out our general Automations troubleshooting guide here.
Security and OAuth scopes
Authentication
The Jira Server / Data Center integration on Airtable uses OAuth to authenticate requests from individual users in your Jira Server instance. The OAuth consent screen will look like this:
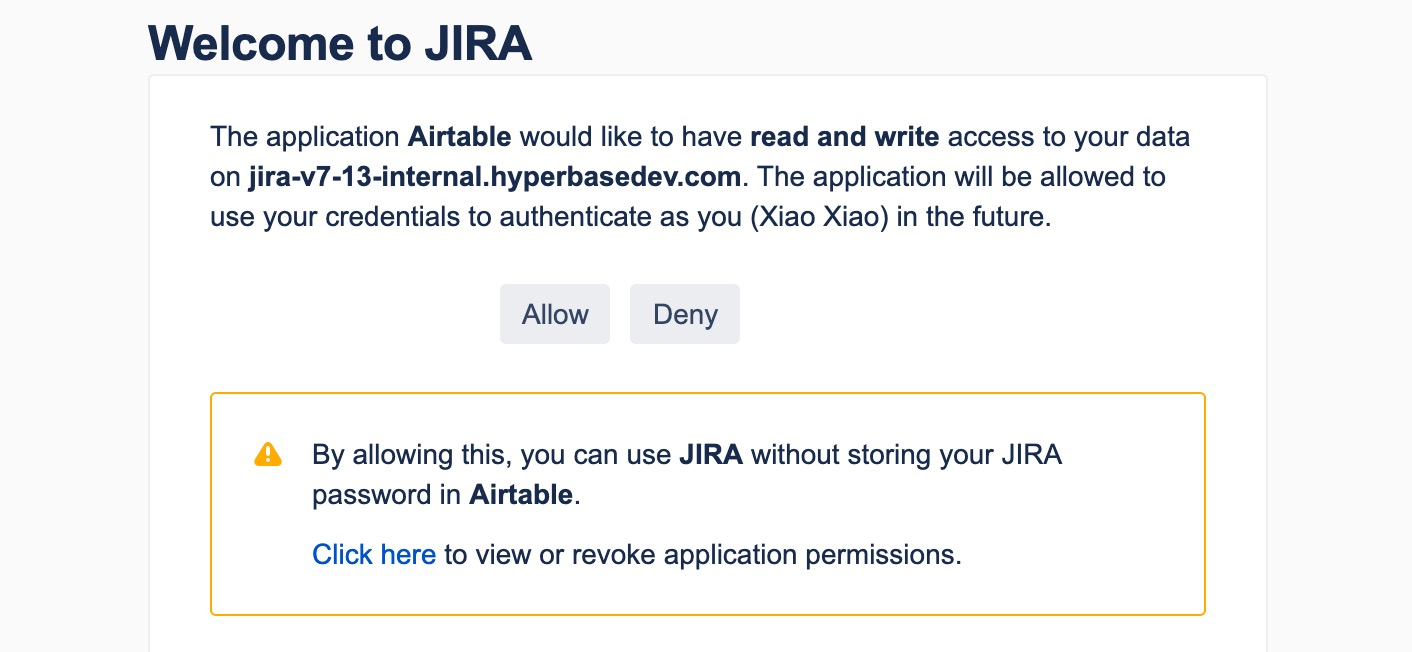
Airtable will only have access to the issues and filters that the user who connected the Jira account has access to. If the user who connected a Jira account has their Jira or Airtable account deactivated, the sync will stop working.
There is no separate plugin or app that needs to be installed on the user’s Jira instance. The data that we retrieve from Jira’s API is transmitted securely via HTTPS and will not be used for any purpose other than the synced table.
Jira Server/Data Center scopes
Airtable integrates with Jira Server / Data Center through OAuth 1.0a. You do not need to provide scopes and the integration’s permissions will match the individual’s permissions granted in Jira Server. For more information, check out Jira’s documentation here.
The tokens are transmitted between Airtable and Jira’s servers securely via HTTPS. On Airtable’s side, the tokens are stored in databases that are encrypted at rest.
FAQs
What if I have Jira Cloud?
Support documentation about Jira Cloud automation actions can be accessed here.
Do the Jira automation actions support custom fields?
Yes, but only string fields. Some types of custom fields, particularly those that come from plugins, may not be supported.
Can I use a Jira action to create sub-tasks in Jira?
Neither of our Jira Server actions support creating sub-tasks.
Can I use a Jira action to link Jira issues to one another?
We currently support linking an issue to a parent issue, but other types of issue links are not currently supported.
How do I use multiple JIRA sites?
To connect to another Jira site, you can select “Connect new account” from the account selection menu, and select the desired site as part of the authorization process.
How do I connect multiple Atlassian / Jira accounts?
This is a bit more complicated due to the Jira account authorization process. To add a second Jira account, you have to first log out of Atlassian in the same browser. Then, select “Connect new account” from the account selection menu and log in via the desired Atlassian account.
What happens to my automations if my Jira account gets deactivated?
If the Jira account for a related automation is deactivated or disconnected, then the automation will cease to work until a new Jira account is connected and configured.
Why are there no choices available for the “Reporter” dropdown?
The selected project and issue type in Jira does not allow the “Reporter” field to be set. More context from a Jira community post here.