- Getting started with Airtable
- Introduction to Airtable basics
- Contacting Airtable Support Updated
- Airtable home screen
- Glossary of Airtable terminology
- Airtable technical requirements
- Feature differences between Airtable on desktop and mobile
- Airtable keyboard shortcuts
- Using Markdown in Airtable
- Adding descriptions in Airtable
- Finding Airtable IDs
- Airtable Automations
- Automations Overview
- Automation feature walkthroughs
- Integrated automation walkthroughs
- Airtable automation walkthroughs
- Linking existing records using automations
- Conditional groups of automation actions
- Repeating groups of Airtable automation actions
- Creating recurring records using automations
- How to delay Airtable automation runs
- Prevent automations from triggering by mistake
- Use automations to timestamp status updates
- Automation Triggers
- Airtable Triggers
- Airtable automation trigger: When record matches conditions
- Airtable automation trigger: When a form is submitted
- Airtable automation trigger: When record created
- Airtable automation trigger: When record updated
- Airtable automation trigger: When record enters view
- Airtable automation trigger: At scheduled time
- Airtable automation trigger: When webhook received
- Airtable automation trigger: When a button is clicked
- Airtable automation trigger: When email received Updated
- Integrated Triggers
- Airtable Triggers
- Automation Actions
- Airtable Actions
- Airtable automation action: Send email Updated
- Airtable automation action: Create record
- Airtable automation action: Update record
- Airtable automation action: Find records
- Airtable automation action: Sort list
- Airtable automation action: Run a script Updated
- Airtable automation action: Generate with AI
- Integrated Actions
- Airtable automation actions: Slack
- Airtable automation actions: Google Workspace
- Airtable automation action: Send MS Teams message
- Airtable automation actions: Outlook
- Airtable automation actions: Jira Cloud
- Airtable automation actions: Jira Server / Data Center
- Airtable automation actions: Salesforce
- Airtable automation action: Create post in Facebook Pages
- Airtable automation actions: GitHub Issues
- Airtable automation action: Hootsuite post
- Airtable automation action: Send Twilio SMS
- Airtable Actions
- Airtable Bases
- Using Airtable Cobuilder
- Airtable bases overview
- Creating and managing Airtable bases
- Structuring bases in Airtable
- Moving bases between workspaces in Airtable
- Creating and managing tables in Airtable
- Creating Airtable base share links
- Importing third-party data into Airtable
- Using insights in Airtable
- Troubleshooting Airtable base performance
- Airtable Betas
- Collaborating in Airtable
- Airtable Enterprise Support
- General Enterprise information
- External badging in Airtable
- Using app library and components in Airtable Updated
- Ask an Expert beta overview
- European data residency at Airtable
- Airtable user groups overview
- Airtable Enterprise API
- Creating and managing data retention policies in Airtable
- eDiscovery APIs in Airtable
- Airtable and data loss prevention
- Accessing Enterprise audit logs in Airtable
- Set up Jira Server / Data Center to connect with Airtable
- Admin panel pages
- Airtable admin panel overview
- Users - Airtable enterprise admin panel
- Airtable admin panel user details
- Groups - Airtable admin panel
- Workspaces - Airtable Enterprise Admin Panel
- Bases - Airtable admin panel
- Interfaces - Airtable admin panel
- Data sets - Airtable admin panel
- Managed apps - Airtable admin panel
- Components - Airtable admin panel
- Reports - Airtable admin panel
- Settings - Airtable admin panel Updated
- Managing Enterprise organizations
- Managing Enterprise admins in admin panel
- Using Organizations
- Organization branding for apps in Airtable
- Enterprise Hub in Airtable
- Enterprise Hub: Org unit assignment with user groups Updated
- Deactivating, removing access, and reactivating users in the admin panel
- Managing user access to workspaces and bases
- Airtable Enterprise Key Management Updated
- Custom terms of use New
- Enterprise SSO
- General Enterprise information
- Airtable Extensions
- Airtable Fields
- Fields Overview
- Attachment
- Date-based fields
- Formula
- Getting Started with Formulas
- Formula Foundations
- The essentials of Airtable formulas
- Formula writing tips for beginners
- Troubleshooting formulas
- Basic calculations
- Conditional statements
- Logical arguments
- Working with dates
- Displaying DATETIME_FORMAT using the date field in Airtable
- Working with date functions in Airtable
- Calculating the difference between dates in Airtable
- Supported DATETIME_DIFF unit specifiers in Airtable
- Supported DATETIME_FORMAT format specifiers in Airtable
- Using the DATETIME_PARSE() formula in Airtable
- Working with timezones
- Record functions
- Text functions
- Numeric functions
- Common Solutions: Beginner
- Common Solutions: Intermediate
- Common Solutions: Advanced
- Long Text Field
- Linked Record Field
- Linking records in Airtable
- Limiting linked record selection to a view in Airtable
- Dynamic filtering in linked record fields
- Linking to one, many, or a subset of Airtable records
- Converting existing fields to Airtable linked records
- Reordering record links in Airtable
- Understanding linked record relationships in Airtable
- Number-Based Fields
- Other Fields
- Rollup, lookup, and count fields
- Select and user fields
- Integrating with Airtable
- API
- Getting started with Airtable's Web API
- Creating personal access tokens
- Airtable Webhooks API Overview
- Service accounts overview
- Airtable Web API - Using filterByFormula or sort parameters
- Airtable API Deprecation Guidelines
- Airtable API: Common troubleshooting
- Managing API call limits in Airtable
- URL length limitations for web API requests
- Integration services
- Third-party integrations via OAuth overview
- Troubleshooting disconnected OAuth integrations in Airtable
- Options for integrating with Airtable
- Third-party integrations - Common troubleshooting
- Low-code integrations - Common troubleshooting
- Integrating Airtable with external calendar applications
- Visualizing records from Airtable in Tableau
- Visualizing Airtable records in Microsoft Power BI & Power Query
- Integrating HubSpot with Airtable
- Using Zapier to integrate Airtable with other services
- Using Zapier's Multi-Step Zaps to find and update records
- Using IFTTT to integrate Airtable with other services
- Integrating with AWS Lambda & DynamoDB
- Developer tools
- API
- Airtable Interface Designer
- Interface Designer overview articles
- Interface layouts
- Interface elements
- Adding and removing elements in interfaces
- Adding layouts to interfaces
- Formatting elements in interfaces
- Interface element: Button
- Interface element: Calendar
- Interface element: Chart
- Interface element: Filter
- Interface element: Gallery
- Interface element: Grid
- Interface element: Kanban
- Interface element: Number
- Interface element: Record picker
- Interface element: Text
- Interface element: Timeline
- Learning and Resources
- Managing Airtable
- Airtable Policy
- Airtable Records
- Airtable Sync
- Airtable Views
- Airtable Workspaces
- Print
- Share
- DarkLight
- PDF
Customizing records in the Timeline view
- Updated on 18 Jun 2024
- 4 Minutes to read
- Print
- Share
- DarkLight
- PDF
All paid plans | |
| |
Platform(s) | Web/Browser, Mac app, and Windows app |
Grouping records into swimlanes
This article will dive into how to get your records looking just right in your timeline view. Please see this support article if you are looking for more general information about the timeline view. As with any view, there are several ways that you can customize records and their appearance within the timeline view. You can group your records into swimlanes, configure each record’s labels, filter or sort through your records, and change each record’s height, color, and label layout.
One of the most exciting features of the timeline view is the ability to group records into visually distinctive and collapsible swimlanes. Let’s take a quick moment to talk about terminology:
Grouping: Like other views, the timeline view allows you to group your records according to a field you select from your table.
Swimlanes: In the timeline view, when you add a grouping, your records are organized by that grouping and displayed visually on a horizontally-scrolling timeline called a “swimlane.”
Note
Adding a new grouping to a timeline view will add new swimlanes to your timeline based on the field you are grouping by.
Nesting swimlanes
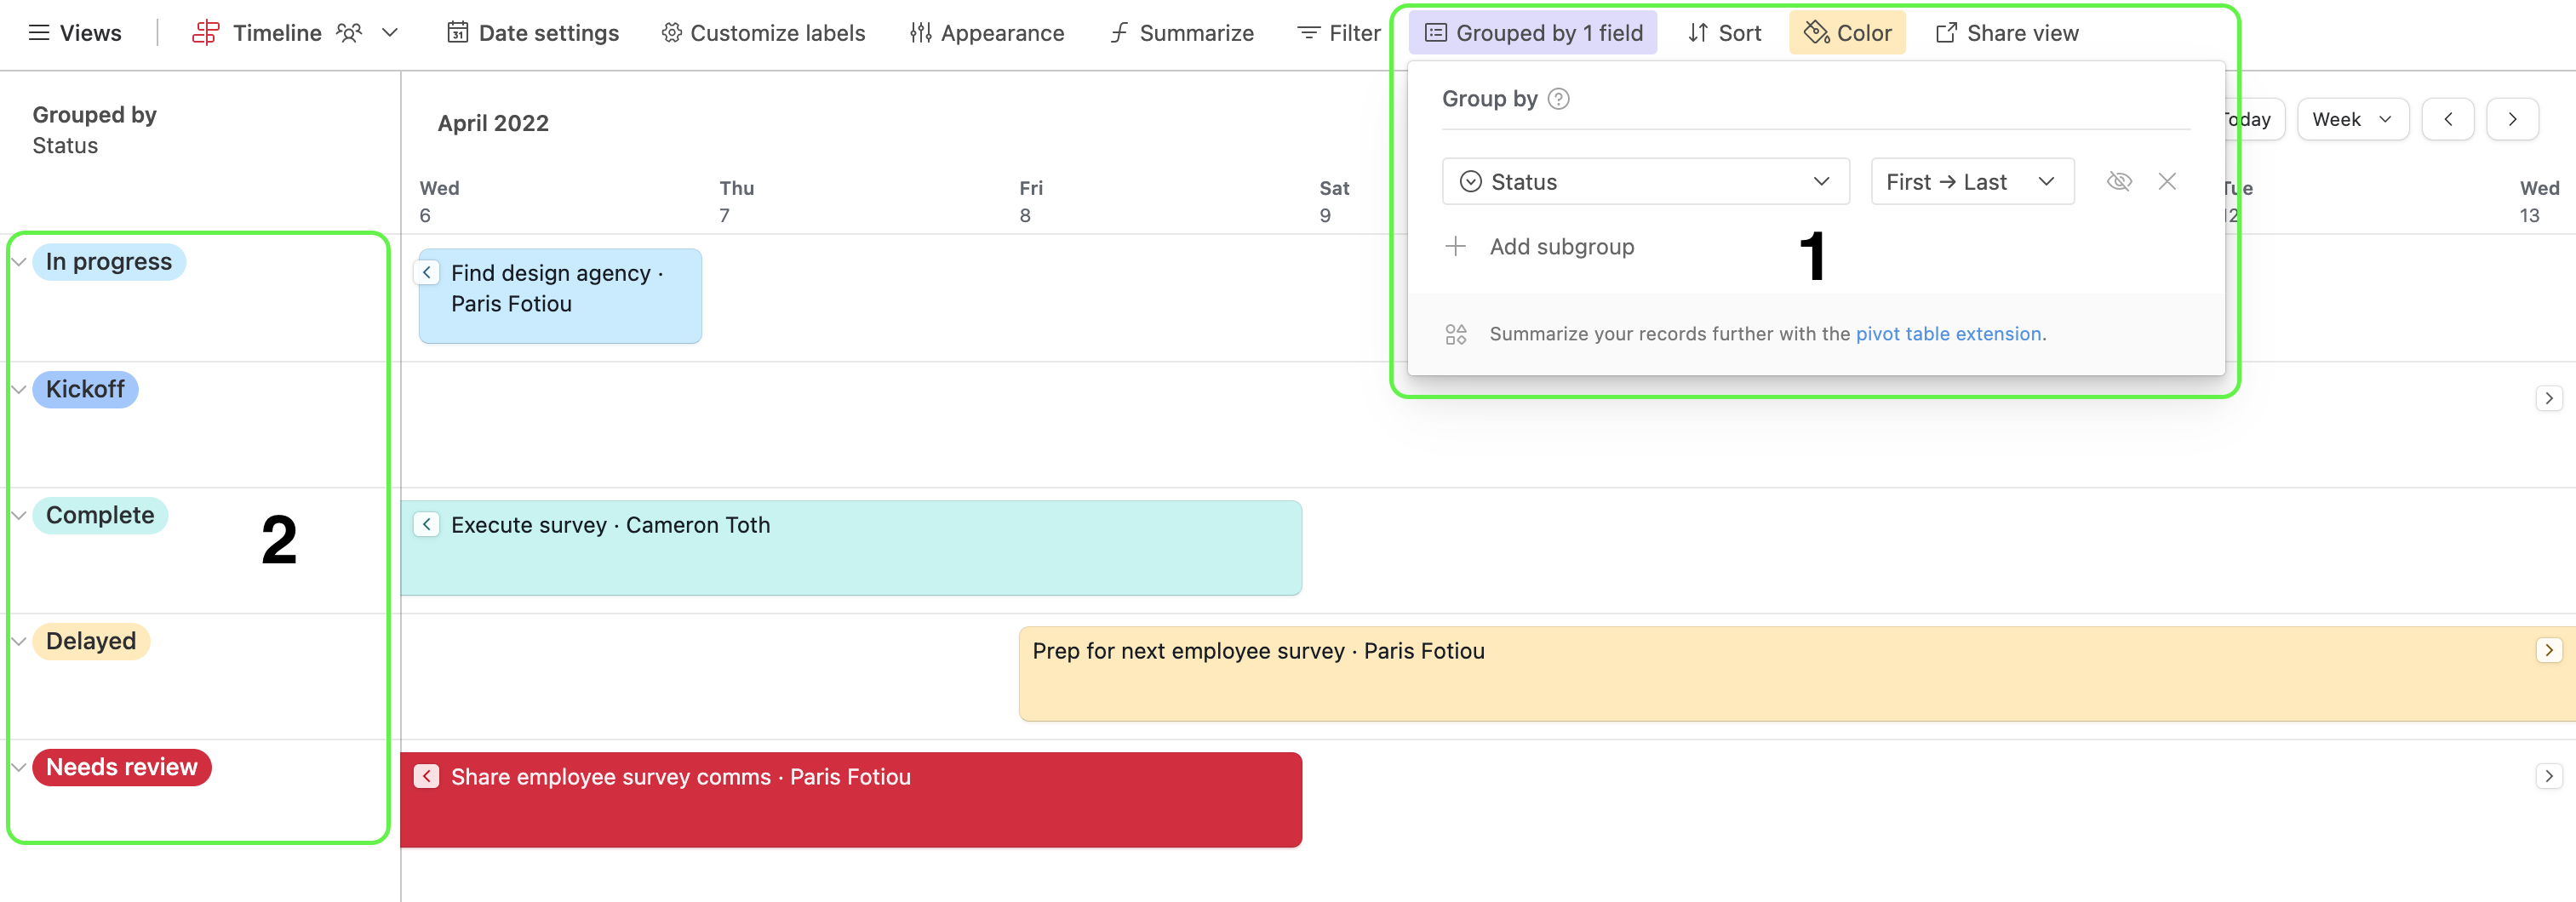
You can add up to three levels of grouping for each timeline view, allowing you to nest swimlanes within each other to gain additional insight into the records in your timeline.
To add a new nested level of grouping, open the grouping menu and click on the Add subgroup option.
We encourage you to play around with different levels of swimlane nesting on your timeline — displaying your data in different ways can give you new insights.
You can rearrange the order of record groupings to affect how swimlanes are nested on your timeline. You can click on the pull handle for a group and drag and drop it to a different position in the grouping menu, changing the swimlane order as shown below:
Showing groups with no records
Not every swimlane will have records that match that grouping’s current criteria.
For example, if you are grouping by priority and have no low priority projects, a swimlane would be empty.
By default, the timeline view will Hide groups with no records in swimlanes. However, you can Show groups with no records by clicking on the group setting and then clicking the … three-dot icon next to the group of your choice.
Customizing labels
Clicking on the Customize labels button will open up a menu allowing you to choose which fields you want to see on each record in the timeline, and how that field’s text will appear as a label.
In this menu, you can toggle each field’s visibility as a label for your timeline’s records. You can also drag and drop fields to reorder how those labels are displayed in your timeline view.
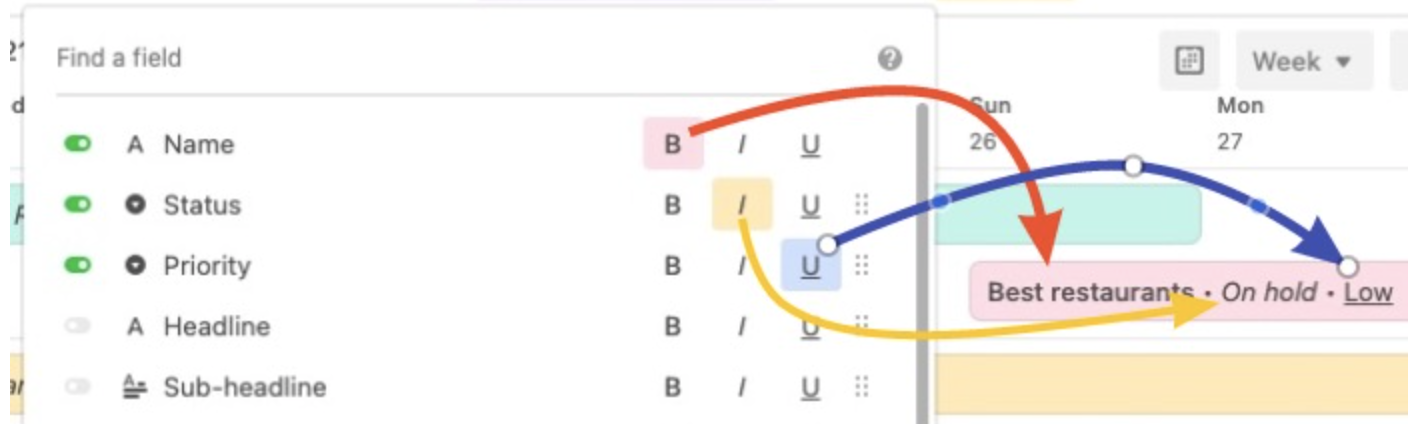
You can draw attention to a particular field by emphasizing how it’s labeled on your record by bolding, italicizing, or underlining that label’s text.
The primary field of your record will always be the first label for each of your timeline records.
You can click each of the buttons next to a field’s name to either bold, italicize, or underline that field’s value.
Changing the height, width, and layout of your records
Clicking the Appearance option will reveal additional options:
Record height - As with any other view the options are short, medium, tall, and extra tall. The short height setting will not allow you to configure the
Record width - Options are Precise (default) or Expanded. When the expanded setting is chosen dragging records in the timeline view to reorder dates will not be supported.
Stack labels vertically - When toggled off (default), included field info will show up horizontally. When toggled on, included field info will stack vertically. Experiment when you are setting up the view to see what works best for your needs.
Wrap labels - Turning on this option will automatically format field information to fit better within the given space of the timeline view records.
Filtering records
Filtering records enables you to only show some of the records in the table within your timeline view. To filter records, click on the filter icon just above the timeline.
Changing record colors
You can customize the color of the records in your timeline view by using the "Record color" settings. There are two options to choose from:
By condition - will allow you to set conditions, and if records meet those conditions, those colors will be applied.
By select field - will apply colors to your records based on the token colors used in the single select field of your choosing.
Sorting records
In each swimlane, older records in the timeline will always stack on top of newer records.
However, if two records have the same start date, you can choose to sort which record will display on top of the other by adding a sort.
You can remove an active sort by clicking on the “x” next to that sort to remove it.