Plan availability | All plan types |
Permissions |
|
Platform(s) | Web/Browser, Mac app, and Windows app |
Note
You can alternatively perform many of the same bulk field actions from the field manager.
Selecting multiple fields
Bulk field actions allow you to make changes to multiple fields at the same time. To select multiple fields:
Visit your Airtable home screen.
Open your desired base → table → view.
Click the name of the field you want to start with.
Press and hold Shift and ➔ (arrow key).
Release on the field you want to end on.
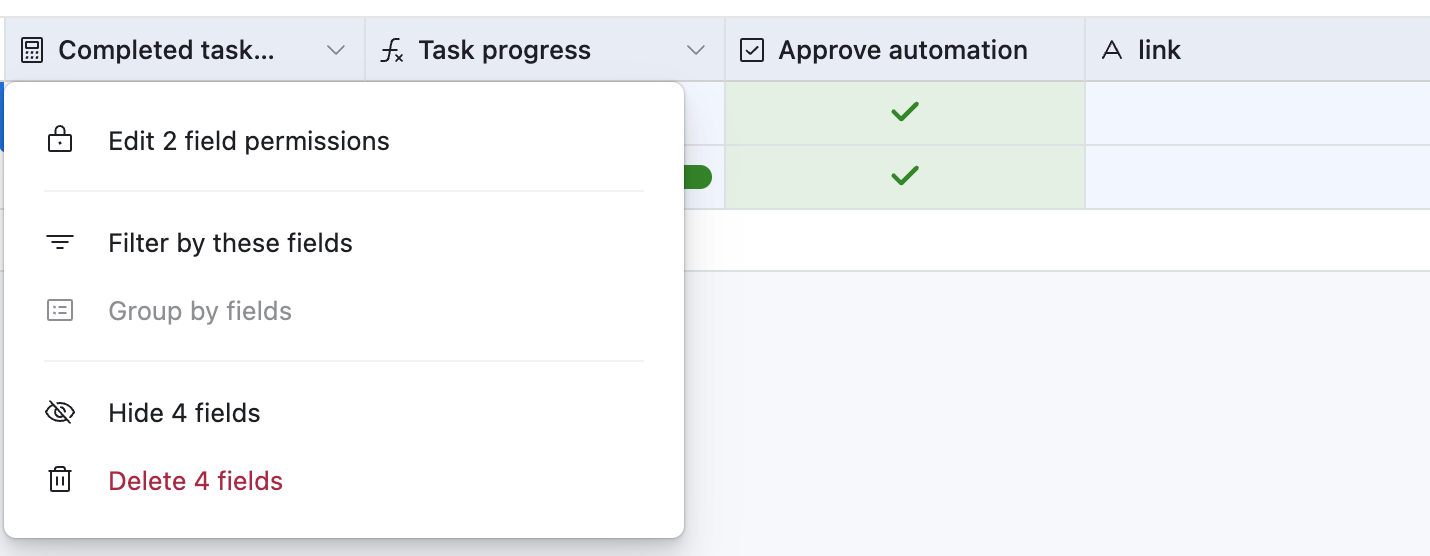
Click any field header’s dropdown arrow to see a menu of bulk update options.
Editing permissions for multiple fields
To edit permissions for multiple fields:
Visit your Airtable home screen.
Open your desired base → table → view.
Click the name of the field you want to start with.
Press and hold Shift and ➔ (arrow key).
Release on the field you want to end on.
Click any field header’s dropdown arrow to see a menu of bulk update options.
Click Edit X field permissions.
This action opens a settings window allowing users to adjust permissions for the selected fields.
NOTE
If permissions are set to anything other than Editors and up, then you can optionally toggle on/off the ability to update forms through Airtable forms (“Allow this field to be set in records created through forms”) or automations (“Allow this field to be modified by automations”).
Deleting multiple fields
Visit your Airtable home screen.
Open your desired base → table → view.
Click the name of the field you want to start with.
Press and hold Shift and ➔ (arrow key).
Release on the field you want to end on.
Click any field header’s dropdown arrow to see a menu of bulk update options.
Click Delete X fields.
Grouping multiple fields
To group multiple fields:
Visit your Airtable home screen.
Open your desired base → table → view.
Click the name of the field you want to start with.
Press and hold Shift and ➔ (arrow key).
Release on the field you want to end on.
Click any field header to see a complete list of permission options.
Select Group by fields.
This action will automatically group the grid view by the selected fields in the order they appear in your current view—learn more in our Grouping records in Airtable article.
Filtering multiple fields
To filter multiple fields:
Visit your Airtable home screen.
Open your desired base → table → view.
Click the name of the field you want to start with.
Press and hold Shift and ➔ (arrow key).
Release on the field you want to end on.
Click any field header to see a complete list of permission options.
Select Filter by these fields.
This will automatically create filter conditions based on those fields which you can adjust as needed.
Hiding multiple fields
To hide multiple fields:
Visit your Airtable home screen.
Open your desired base → table → view.
Click the name of the field you want to start with.
Press and hold Shift and ➔ (arrow key).
Release on the field you want to end on.
Click any field header to see a complete list of permission options.
Select Hide fields.
Once you've selected this option, you can adjust which fields are hidden by clicking hidden fields from your menu bar.
Moving multiple fields
To move multiple fields:
Visit your Airtable home screen.
Open your desired base → table → view.
Click the name of the field you want to start with.
Press and hold Shift and ➔ (arrow key).
Release on the field you want to end on.
Click and drag the selected fields to move them before or after other fields in your view.
FAQs
How many fields can bulk actions be applied to simultaneously?
Bulk actions allow you to filter up to 50 fields within a single table.
Bulk actions allow you to group up to 3 fields within a table.
There are no limits on how many fields you can perform actions like updating field permissions, moving fields, or hiding fields.
How do I update multiple records with the same information simultaneously?
To learn how to update multiple records simultaneously, check out our fill handle article.