All plan types with different automations usage limits | |
Owners/Creators - Can create or edit automations in Airtable | |
Platform(s) | Web/Browser, Mac app, and Windows app |
Preparing to link records with an automation
Learn how to set conditions to update existing records in your base to be linked to other records. We’ll show how to find records across tables and update existing records. The article below is still useful in many cases, but you might also find value in creating record templates that have similar functionality at times.
For this demo we’ve set up two tables, Projects and Tasks, that are linked directly together using a linked record field.
You can see our table set up below, and can copy this base if you’d like to follow along with the rest of this demo.
For our example workflow, every time we add a new project we’d like to link the same three tasks to that project:
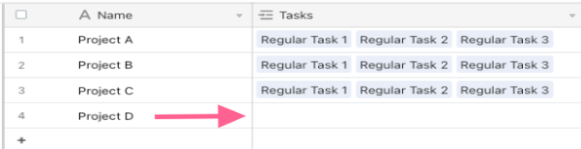
As you can see above our new project, Project D, will also need to be linked to the same set of Regular Tasks as all the previous projects. Now, we could go in and manually link every task, but that is time-consuming and error-prone. Automations to the rescue! The automation we’ll be crafting will add the tasks we specify to a project based on a condition we set. A common pattern for setting up a new automation is to create a checkbox field that can be used as the condition for triggering that automation.
Setting up your base and automation to link records
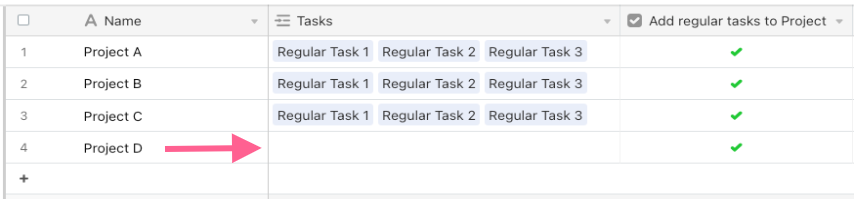
Step 1: Add a checkbox field
With the section above in mind, the first thing we will do is create a checkbox on the Projects table that we can use as an easy trigger to kick off this automation.
 With our checkbox in place we are up to begin creating our automation. We have three goals this automation will need to accomplish:
Identify the project to be updated (using the checkbox we just made)
Find all the Tasks that need to be linked to this project
Update the project that triggered this automation with the tasks we found in the last step
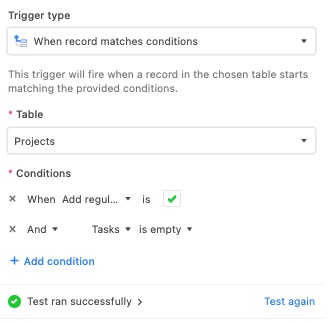
Step 2: Choosing a trigger
So we will start by creating a new automation and choosing the “When record matches conditions” trigger to take advantage of our new checkbox field. You can add a further condition to make sure our project has both the checkbox checked, and no other Tasks linked.
After testing out our trigger step, you can move on to setting up the two action steps.
Step 3: Configure the action steps
So we have accomplished the first of our three goals. We can now move on to steps two and three:
Identify the project to be updatedFind all the Tasks that need to be linked
Update the project that triggered this automation
Find records action
We now need to find all the records on the Tasks table that we’d like to link to this new project record. For our example, we know all the Tasks we’d like to link to have the same word (i.e. “Regular”) in their name field, which we can use to our advantage.
We can set up a Find Records action to find all the tasks that have the word “Regular” as part of their {Name} field.
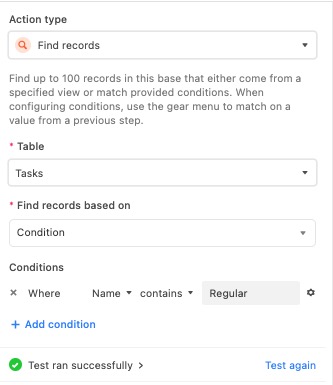
Now we can test this step to ensure that three records were found based on our search.
Update records action
Now we can tie everything together in our third automation step. Setting up our final step, using the “Update Record” action, we will update the project record that kicked off this automation. Note that when using the “Update Record” action we always want to make sure we choose the table where the record we are updating is located.
In this case, we are updating our triggering project record, which can be found in the Projects table.
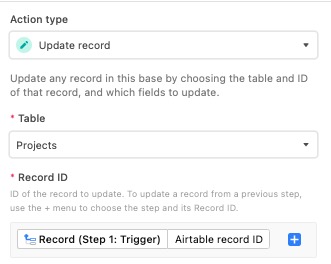
We know we have a reference to the project we’d like to update from our triggering step, because that project record triggered this whole automation! So we can choose to use the Record ID from our first step.
Note
The “Update Record” action only accepts the Record ID of the single record that will be updated. However, linked records are bidirectional—so when we update a linked record field the other side of that link is updated too. Meaning, that not only are we updating the project record above, but we are also updating each newly linked task record to have a reference to that project record.
Now that we’ve identified which record to update, we can choose what fields should be updated and the values to use for the update. We’ll be updating our project’s {Tasks} linked record field—so we can choose that field, then input the value of the Task records we previously found with our automation’s “Find Records” action.
When linking multiple records using an automation, make sure to choose to “Make a new list” of “Airtable record IDs”.
Again, test this action to ensure everything is testing successfully and working correctly.
Step 4: Test and turn on the automation
After conducting our final test, and switching our automation on, we can now see our workflow in action.