Plan availability | All plan types with varying limitations |
Permissions |
|
Platform(s) | Web/Browser, Mac app, and Windows app |
Related reading |
|
Airtable terminology |
|
Try it in Airtable |
Automations in Airtable allow you to save time and resources on redundant tasks, communications, and connections with other tools by using triggers to automate the work of your team and org.
Automation run limits by plan type
Note
Automation run limits reset on the first day of each month.
Workspace Plan | Automation runs (per month, per workspace) | Automation run history | Notes |
|---|---|---|---|
Enterprise Scale | 500,000 1 | 3 years | |
Business | 100,000 1 | 1 year | |
Team | 25,000 1 | 6 months | |
Free | 100 1 | 2 weeks |
|
1 Airtable counts an automation “run” each time a trigger is invoked. This means that both failed and successful automation attempts will count against a workspace’s monthly run allowance.
Understanding automation trigger types and action types
Note
Existing records in your base do not trigger a run for newly created automations.
After turning on your automation(s), any new or updated record that meets the configured trigger condition will run. Check out the Batch update extension to make larger updates to multiple existing records
What triggers are available to use with automations?
Records that leave and re-enter a view will trigger again.
What action types are available to use with automations?
Unavailable on the Free plan
Creating automations in Airtable
Note
Consider having Omni create an automation for you. With Omni's AI capabilities, you can use plain text requests to build, update, and query data in your Airtable base.
To create an automation:
Open your Airtable homepage.
Open the base where you want to create an automation.
Click Automations.
Click Create new …
Click either:
Browse automation catalog (AI must be enabled to use this)
Under “Suggested for your base” you’ll find helpful suggestions to use based on the data in your base
Under “Specific to your use case” you can choose from the different options of common business use cases
Or Create automation to start from scratch
If you clicked on an option from the automation catalog, then a request will be sent to Omni to build out the structure and automation in your base. If you click Create automation, then you will start the automation creation process from scratch by clicking + Add trigger.
Choosing an automation trigger
All automations start with a trigger that will prompt subsequent actions. So next, you will need to click + Add trigger. Once clicked, the available triggers will display for you to choose from.
Most of the trigger types correspond to certain base actions, so you will select a preferred table for this automation's trigger. However, there are a few exceptions:
If you choose the When record enters a view trigger, then you will also need to choose a specific view. Preferably, this view would be one you created specifically for this automation.
If you choose the At a scheduled time trigger, then you will set up some type of datetime interval logic that will determine when the automation is triggered.
If you chose the When webhook received trigger, then you will have different trigger setup steps outlined in this article.
The When a button is clicked trigger relates to a button in our interface feature outlined here.
Finally, integrated automation triggers, such as Google Workspace triggers, have entirely different setup steps determined by the tool that you are wanting to integrate with.
If you picked the wrong trigger by accident or would like to try another trigger type for your automation, then you can change your trigger type by choosing another option from the Trigger type dropdown.
Testing a trigger
You’ll need to allow our system to fetch a test record and its values. This testing is required.
In most automations, you can choose to allow our system to automatically find a record to test that has the matching conditions by clicking Use suggested record or you can manually choose a record by clicking Choose record.
When the test is complete, the results will be displayed including the values for the test record that triggered the automation. If you run into an issue during the testing process, then our Automation troubleshooting article may help.
Note
An automation won't trigger for records that already match the conditions at the time the automation was created. For those records to trigger an automation they will need to change states in order to momentarily not match the trigger conditions and then be changed back to match the conditions again.
For example, if an automation is triggered by a checkbox field being checked, then that record would need to be unchecked, then rechecked when the automation is on in order for it to trigger the automation to run.
You can think of a test as a snapshot of the way the information in the base looked when the testing step occurred. If you make changes to the base or the test record being used, then you'll want to test again in order to match the base's current state. To view the values of the record, you can look in the Results section for the full details.
Adding an action
When you have successfully tested the trigger, click on + Add advanced logic or action. Once clicked, the available actions will display for you to choose from.
Choosing an action will bring up different configuration options depending upon the type of action you choose. Let's take the Send an email automation action for example. After choosing this action, you will initially be able to add recipients, a subject line, and the message body.
The text in the body of the message can be a mix of static text and values from the triggering record. You can click the blue and white plus sign to dynamically add values in from the triggering record.
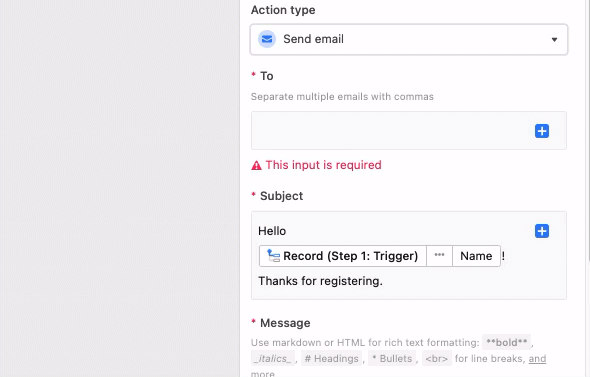
By clicking on the Show more options dropdown, you will have the ability to customize four additional parts of the automatic email you send out, which includes CC, BCC, From name, and Reply to.
This is just one brief example of the power of Airtable Automations. There is also the ability to add conditonal logic to your automations which will allow for different sets of actions to be run depending upon sets of specified conditions. More information about that feature is available here.
Testing an action
Test the action step to make sure it is successful. Again, testing each step of the automation process ensures that your automation will work as expected. Finding more information about a particular action's test is a similar process to the trigger test mentioned earlier. Click on the drop-down menu next to the test result to view the values being pulled from any records attached to your automation.
You may realize during testing that you need to make a change in the table by adding or modifying fields. If you do that, be sure to retest all of the steps so that your changes are correctly reflected in the configuration of the automation.
After successfully testing the action, you can move on to turning on your automation.
Note
Choosing test records is not available for any action steps in an automation. However, retesting and choosing a new test record in the trigger step will typically cause a different test record to appear in later action steps.
Turning an automation on or off
Once you have completed testing the automation's trigger and action steps, it's likely time to turn the automation on. At this point, it's a good idea to let other base creators and end users/colleagues know about the automation, especially those who may need to know about process changes or how the automation might personally affect them.
To turn an automation on/off:
Toggle the option next to the name of the automation from OFF to ON.
Once the toggle shows the green ON state, any future conditions that match the trigger set in the steps above will now trigger an automation run.
To turn an automation OFF, simply toggle the same button to that state.
Editing an automation’s desciption
We highly recommend this step!
You can edit an automation's description from that particular automation's comnfiguration window. The description of the automation will default to highlight the trigger and action steps you've chosen to use. To customize this description:
Click the Automations option on the top left portion of the screen from an open base to open the configuration window
Choose the automation you would like to add a new description to
Click on the drop-down and choose the Edit description option. You can also double-click on the description to edit it.
Understanding automation URLs
Your base ID (appXXXXXXXXXXXXXX) appears at the start of the URL path. This record URL format will occur in these places:
The URL property of a record output by a trigger/action.
The URL property of a table or view model retrieved by the run script action.
Using the run history
Airtable sends failed run notifications to the last user who enabled the automation containing failed runs. Understanding how to use the run history can help you gain more insight and detail about what may be causing a failed run.
Finding and using the run history
Navigate to the base containing the failing automation. You may also be accessing the failed run via direct link in a failed run notification email. In that case skip to 4 below.
Click Automations at the top of the page.
Select the automation containing the failed run from the automations list on the left side.
Click Automation history.
Click Run History.
From here you’ll see a status option to filter the runs: All, succeeded, failed, canceled, automation run created time, and run status.
When troubleshooting, you may want to choose the “Failed” option, but understanding how successful runs work can also reveal helpful information:
.png "automation_run_history_status_2024.png")
Information in the run history is collapsed. Clicking the > arrows will reveal more information.
First click the > next to the failed run.
Next, click the > next to the automation step that shows “X Fail” next to it.
The example below shows the steps it will take to drill down into an automation failing to run based on a scripting error to find the Execution log, but there are other times when you will need to drill down into view, field, or record values to find the issue that is causing a failed run:

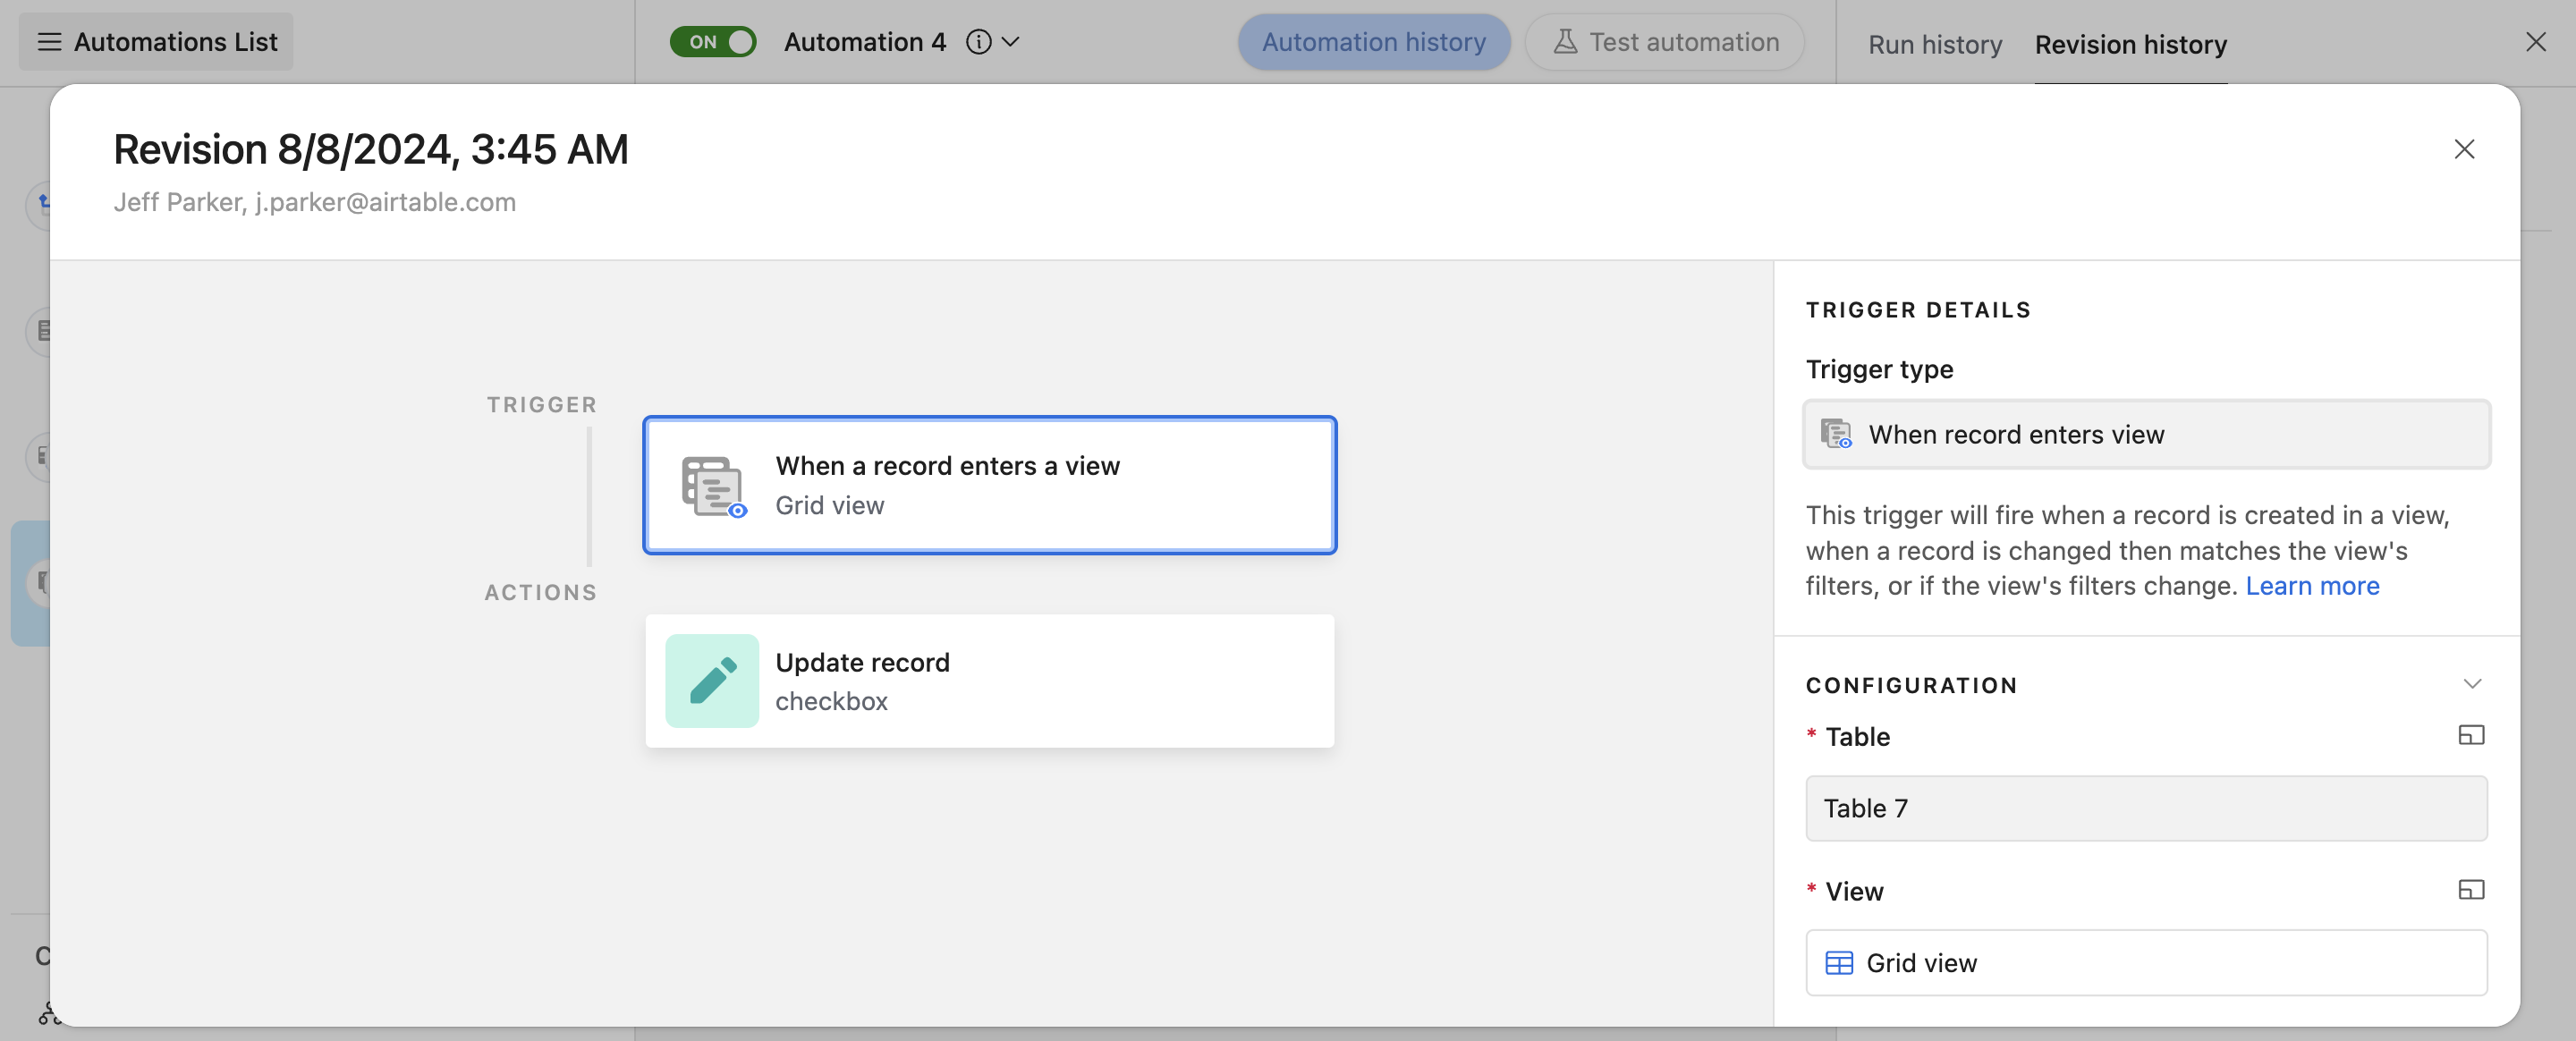
Using the automation revision history
You can also navigate to the "Version history" tab within the "Automation history" section to view previous versions of an automation and whoever authored that change. You may need to access this information to understand in what ways your automations have changed over time.
Finding and using the revision history
Navigate to the base containing the failing automation. You may also be accessing the failed run via direct link in a failed run notification email. In that case skip to 4 below.
Click the Automations tab at the top of the page.
Click on the automation containing the failed run from the automations list on the left side.
Click on the Automation history button.
Click on the Revision History button.
Once an automation has been turned on, a log of changes will appear. You will be able to view the following details after clicking on an individual revision history event:
The date and time of the revision (Time will appear in the user’s timezone)
Which user made the revision (Name and Email)
The configuration of the various steps of the automation (Trigger, actions, repeating groups, etc.). Clicking a log item will open a dialog with details about the configuration of that previous version. You will not be able to edit or test this previous version.
Tips to ensure proper setup
Create an automation-specific view
Before creating an automation, creating a view solely for that automation or set of automations is suggested. Take advantage of the power of filtering conditions here.
Lock a view to prevent unexpected runs
Consider locking the view and adding a note that editing the view filtering conditions could cause unintended automations to run.
Consider the trigger before creating your automation
Consider when you want the record trigger and subsequent action to occur. Is it when a record is created, a status is changed or when all fields in a record have been populated and the record is considered 'complete'? Some ideas include:
A status field changed to 'Ready to send email' or other appropriate phrase for the particular action.
A 'Created On' field using the created time field type. Set the view filtering conditions to only include records before today. This will create a delay on when records are sent.
Use a form. By only using a form to create new records, all fields are added simultaneously upon submission. Ideal for automations that trigger when a record is created.
For a simple way to mark a record as complete, add a checkbox field.
Learn about test records and how to determine which record is being used for the test
To turn an automation on, all trigger and action steps must test successfully. In trigger steps, a test record is chosen during the setup process. At least one record will need to match all of the parameters set in the automation to allow our system to find a test record for you to choose.
The following triggers currently will not allow you to choose the test data. Below, you'll see the expected way Airtable retrieves test data from these trigger sources:
One exception to this rule is the Find records action. Since that action's output is dependent upon the values set in the configuration process, results will vary.
New response Google Form trigger - Last response/row in the sheet the response is sent to.
Outlook Calendar: When an event is created trigger - The most recent event that has been created in the calendar you've chosen.
Outlook Calendar: When an event is changed trigger - The most recent event that has been created in the calendar you've chosen.
Outlook Email: When email is received trigger - The last email received in the inbox folder you've selected.
Manually determining a test record
Determining a test record can be extremely helpful in troubleshooting automations. When a trigger has tested successfully a dropdown menu will appear to view more details about the test record used.
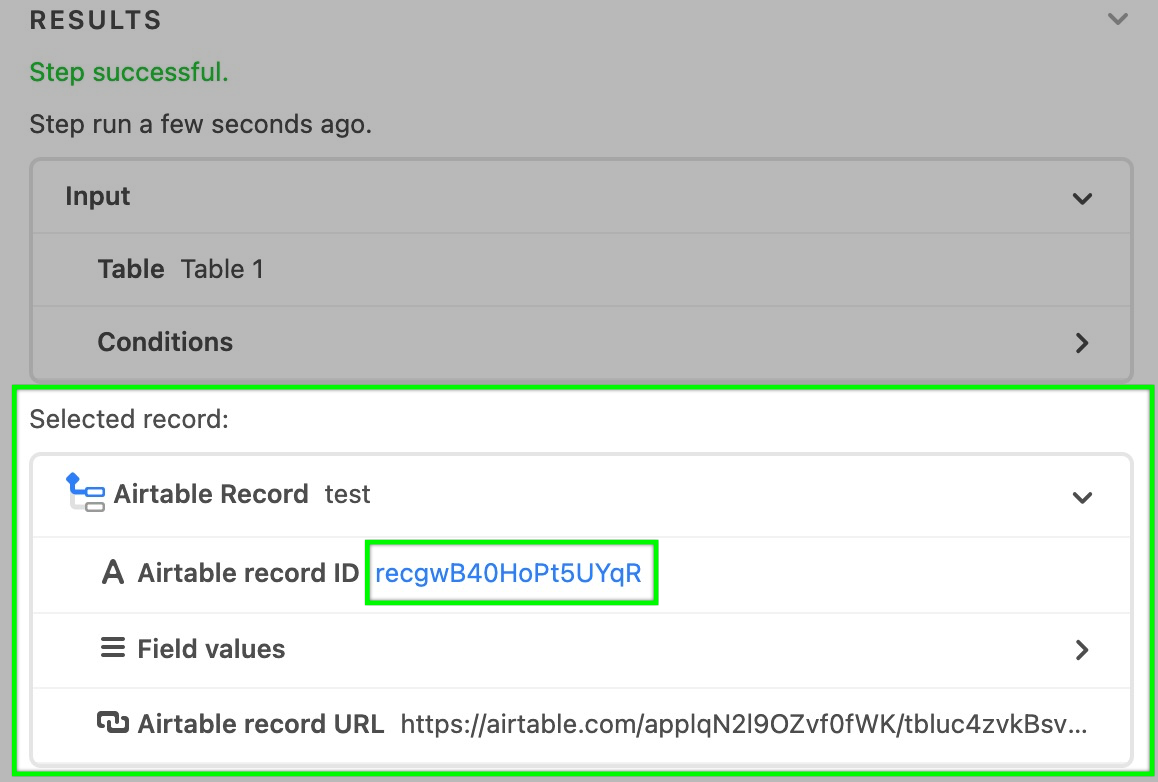
You can click on the blue hyperlink next to "Airtable record ID" to open the record within the Automations window as an expanded record. This will allow you to adjust the record in a way that may help to fix errors in your automation.
Consider using the RECORD_ID() function
The functionality above should work most of the time, but it's worth noting that you can also find the test record via its Record ID. You'll need to create a new formula field that will show each RECORD_ID()in the table that your automation is looking at. More information on that setup can be found in the Record ID article linked above. After the Record ID field has been created, you can pull the test record's ID from the automation setup window and then use the find feature to return the matching record. More on record IDs in the next section below.
Having a firm grasp of record IDs within Airtable can be very useful for Automations, especially when using the update record action.
Understanding permissions as they relate to automations
If your base has any field or table editing permissions that restrict editing to only specific users, you can add permissions for automations to make changes using this toggle: 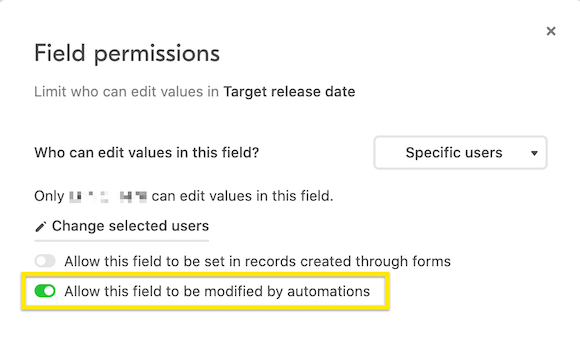
Linking records in automations
Automations give you more opportunities for flexibility than ever, allowing you to easily automate previously manual workflows. The linked record field allows you to capture the dynamic relationships between your records, to ensure your data is consistent across your different tables. If you are unfamiliar with creating records via automations we recommend reading this guide for context before reading on.
Note
Within automations, you can link records using the primary field value for any of the primary field types—except the formula field type.
Understanding linking in automation actions
You can use both the "Create record" and/or the "Update record" actions to link new or existing records, depending on the workflow you are building out. You can link records together by using either:
The primary field value of the record in the corresponding table you'd like to link to
Or by using the record ID of the record in the corresponding table you'd like to link to.
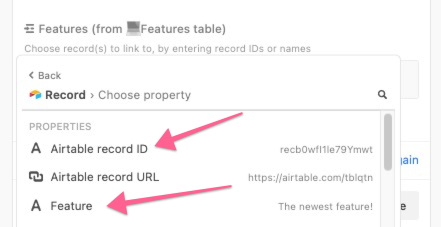
If you are linking a single record you can choose to use either the record ID, or the primary field value for the record you'd like to link to:
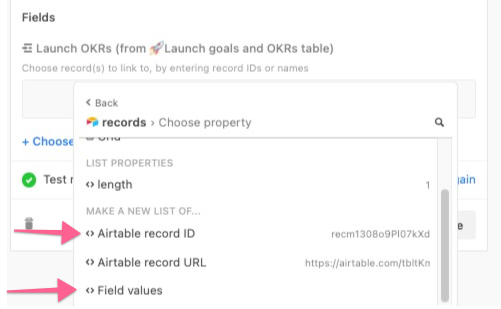
You can also link multiple records to a single record by looking under the header for "Make a new list of...", and choosing either "Airtable record ID" or "Field values":
You may end up first having to use the "Find record" action to get a reference to the records you want to link, if you are attempting to link pre-existing records in your tables. We recommend checking out this guide for an example of finding and linking records. Check out our Automations troubleshooting guide if you run into any problems along the way.
Understanding linked record timezones
Linked records are based upon the US date format and in the UTC timezone. This is important when using any time-based attributes from a linked record such as created time or last modified time.
FAQs
General
How many automations are allowed per base?
You can add up to 50 automations per base, but keep in mind that disabled automations are included in the 50 automations limit.
How many actions are allowed per automation?
You can add up to 25 actions per automation.
Does changing the name of a table, field, or view affect an automation’s ability to run when the automation references a table, field, or view?
In general, automations reference tables, fields, and views in the configuration of an automation by referring to backend IDs. Accordingly, when the name of a referenced portion of a base is changed, the name will update to match.
It’s worth noting that static text (not dynamic, token-based text values) mentioning a table, view, or field in an automation will not have a way to update based on changes made in the base. For example, If you were to type out a view’s name in a send email action’s body of text, then you would need to manually update the name to match the new name for the view.
Will automations run even if nobody has the base open?
Yes. Since automations are server-side, they will run even when nobody has the base open.
Who can create/edit automations?
Automations can only be created or edited by users with "Creator" (or "Owner") permissions.
Will an automation stop running if the creator of the automation is removed from the base?
They should keep running – automations don't rely on any specific user's Airtable credentials to run. Therefore, it should keep working even if a connected account's owner is removed from the base.
Do automations run retroactively?
No, automations only run from when they're switched on forward. For example, if there is a conditional trigger set up to “when a field is not empty”, and then that automation is turned on, the automation will not run on previous records with a value in the specified field. Making it so a record does not meet the conditions and then meets them again will trigger the automation, however. Alternatively, you can use the Batch update extension to make the necessary changes to older records in your table.
There are times when you will be able to “rerun” automations that have failed, but when you have many automation runs that would need to be rerun, it’s likely better to utilize the method mentioned above.
Is it possible to see a log/revision history of which users edited an automation?
Yes, you’ll find find an automation’s revision history by following these steps:
From a base, click the Automations button on the top left side of the screen.
Click the automation you want to investigate.
Click the Automation history button.
Click the Revision history option. Note that an automation must be turned on at least once before revealing revision history details.
Can my monthly automation run limit be increased?
Each Airtable plan has an associated automation run monthly limit. The only standard way to increase the limit is to move to a higher Airtable plan.
Is there a way to find/know which automations you’ve created in a specific base or workspace?
No, we recommend making a new table in the back to track automations that different users have made or currently “own.” You can open up the automation, copy the browser URL, and then add a URL field in the automation tracking table to allow for easy navigation in the future.
Is there a way to see which automation acted on an individual record?
Yes. Using the record revision history feature can allow you to determine the specific automation that made an update to a record.
Can automations be used in bases that utilize the two-way sync feature?
Yes, in some cases automations can be used alongside the two-way sync feature. You can find more info here.
How are "Has any of" and "Contains" in automation conditions different?
"Has any of" requires linked records or lookup values in Airtable, while "Contains" is a string operator.
How do I check an automations run history?
Note
For org-wide automation run history reporting, check the admin panel Reports section or contact your customer success manager.
Open your Airtable home page.
Select the base with the automation run history you want to review.
Click Automations in the upper-center of your base.
Click History in the upper-right corner.
Triggers
Do automation triggers work on formula fields?
Yes, they do work. They trigger about every 5 minutes while a base is loaded due to user interactivity, and once an hour otherwise.
Why do "When a record is created" and "When a record is updated" triggers fire before I'm done editing fields?
These triggers fire as soon as the first few characters are typed by the user. Consider this article about delaying automation runs, to prevent accidental “early” runs.
Can I make the "When a record is updated" trigger fire when a comment is added?
Comments on records are considered meta-data and can't trigger automations.
How is the test record chosen when testing an action step?
Find Records: All matched records
When a record matches condition: First matching record
When a record is created: First record in the table/view
When a record is updated: First record in the table/view
When a record enters view: First record in the table/view
Google sheets row created: Last row in the sheet
New response Google Form trigger: Last response/row in the sheet the response is sent to
Actions
Do "Send an email" recipients have to be collaborators?
Free - Yes, all recipients must be verified collaborators in the base where the automation resides.
Team - Can email 100 unique non-collaborator email addresses per day.
Business - 1,000 unique non-collaborator email addresses per day.
Enterprise Scale - No limit on the number of non-collaborators that you can email per day.
You can see your workspace's limit if you create a Send Email action on an automation.
In a digest, is it possible to render a date in a localized time zone instead of UTC?
Yes, use the “Actual run time” token as described in step two of this section in the timestamping automations article.
Can I apply custom formatting to a grid or list of records in an email?
No. You can use the Find records by view option to apply the same sort as is applied in the view, and you can choose if you want to truncate or not truncate long field values, but we don't provide customizability beyond that at the moment.