Plan availability | All plan types |
Permissions |
|
Platform(s) | Web/Browser, Mac app, Windows app, and some basic functionality on iOS and Android mobile apps |
Note
Certain advanced calendar features are only available on paid Airtable plans.
If you have at least one date field in your table, you can create a calendar view. Calendar views (as you might guess) allow you to look at your records on a calendar.
Creating a calendar view
Open your Airtable home screen.
Select the table where you want to add a grid view.
Click the three bar icon
 next to the name of the view to open the view sidebar if it isn’t already open.
Click Create new…
Click Calendar.
Give the view a name and decide what collaboration type the view should be, then click Create new view.
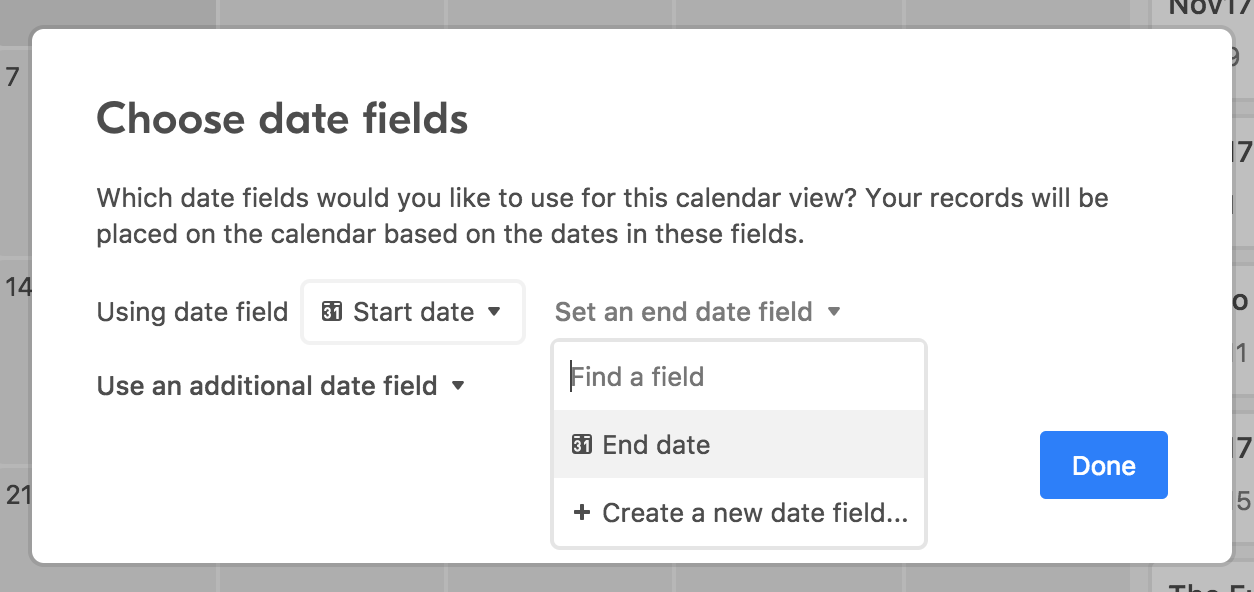
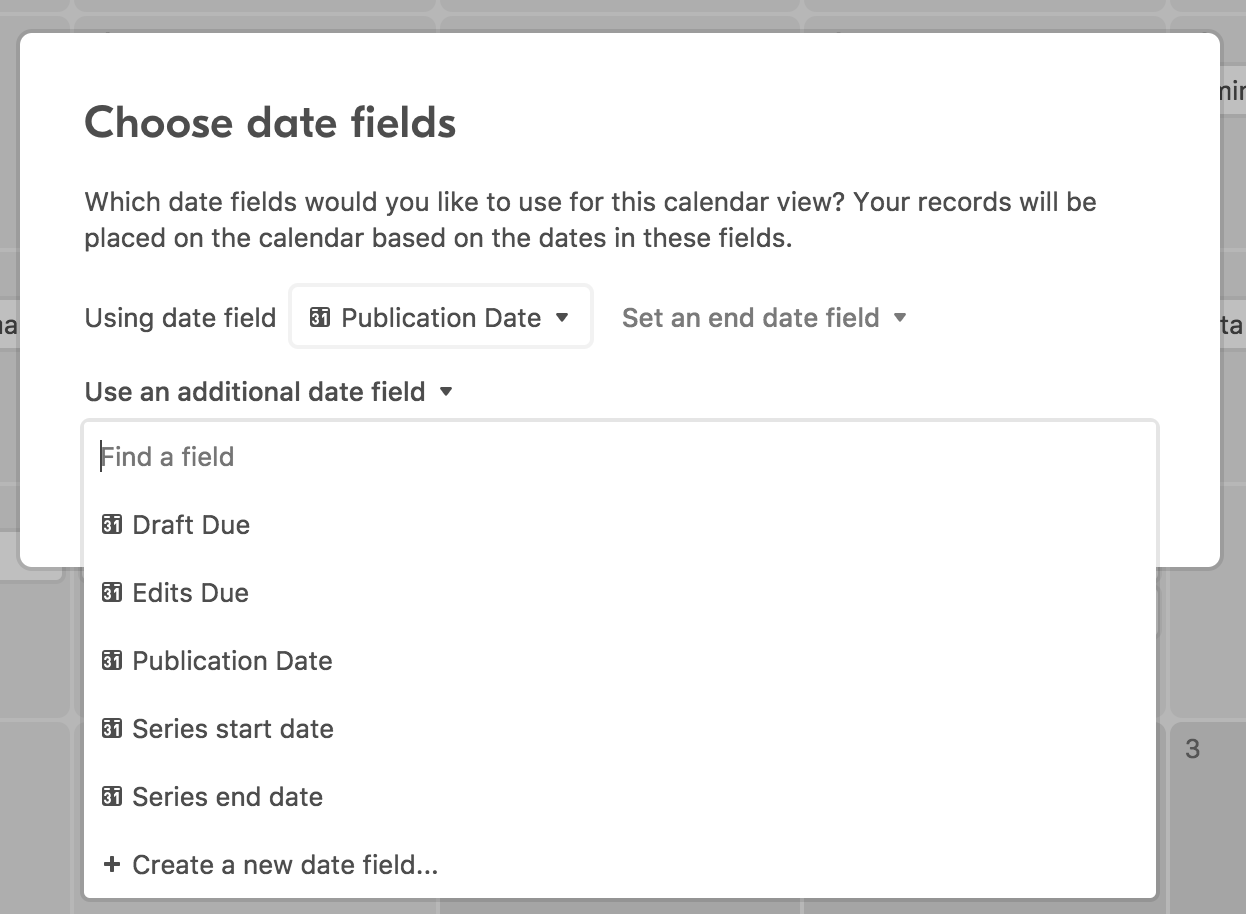
Next, choose a start date for the calendar to function from. If the table you are working out of does not contain a date field, then you will need to create at least one to continue.
For paid Airtable plans, you can optionally set an end date or additional date fields.
Records with values in both start and end date fields will show up on the calendar as ranges. You can click and drag on ranges to move them around, or click and drag on the edges of the ranges to lengthen or shorten them as desired.
You can also add additional date fields to represent other important dates on your calendar. It’s a good idea to add meaningful labels for the dates represented when you utilize this functionality.
When you are finished configuring the date fields, click Done.
From here you can move on to further configuring the view by filtering, sorting, or coloring records in the view.
Creating records in a calendar view
To add a new record on a particular date in Month or 2 week mode, you can click the + button that appears when you mouse over a date, or double-click on the date to which you want to add a record.
To add a new record at a particular time in Week, 3 day, or day mode, double-click on the date/time to which you want to add a record.
If you have one date field for the calendar, the date field for the new record will be automatically be set to the date that was clicked. If you are on a paid plan and have multiple date fields and/or date ranges plotted on the same view, clicking the + button or double-clicking will bring up a menu allowing you to specify which date field you want the record card to be plotted to. (The menu will use the labels you defined for your different fields and ranges.)
If you add a record with a date range, the date you clicked will set the start date.
Editing records in a calendar view
You can edit records directly from the calendar by clicking on a card. This will bring up a modal from which you can edit the primary field or the associated date field being used for scheduling. Clicking on the "Edit details" button will bring up the expanded record view; clicking on the "Delete" button will delete the record.
You can also edit a record by clicking on a card in the sidebar, which will open up that record's expanded view.
Note
To choose which field information shows up in each calendar record, you'll want to customize the calendar labels.
You can change record dates in a calendar view by clicking and dragging a card on the calendar which will reschedule the event, editing the value in its date field. Dragging a record card from the sidebar onto a date on the calendar will also change an event's date. If you drag a record to the sidebar, that will clear the value in the date field, "unscheduling" it.
Please note, that like all changes made in any view, the changes you make on a calendar view will also be reflected in the date field in all other views.
If you are on a paid plan and have plotted any date ranges, you can click and drag on them to move them around just like the single-field cards, or click and drag on the edges of the ranges to lengthen or shorten them as desired.
Creating calendar views and changing date fields
Once a date field has been selected, your calendar view will populate with the records from the selected date field.
To change the calendar view's associated date field (or date fields on paid plans only), click the calendar icon in the view bar. This will bring up the date field picker again.
Removing date fields and date ranges
To remove a date field or range, click the X next to the date field or range you wish to remove.

Customizing date/event labels
The Customize labels button can be found in the calendar view toolbar. Clicking this option will reveal a menu of options to customize the appearance of the events in your calendar. You can:
Add a cover image from an attachments field connected to that record. There's an additional toggle to "fit" or "crop" images.
Bold, italicize, and/or underline field names.
Move around the field order.
"Hide all" or "Show all" fields in the view.
Note
When using the cover field image option, only the first image that shows in a corresponding attachment field will appear in the calendar view record.
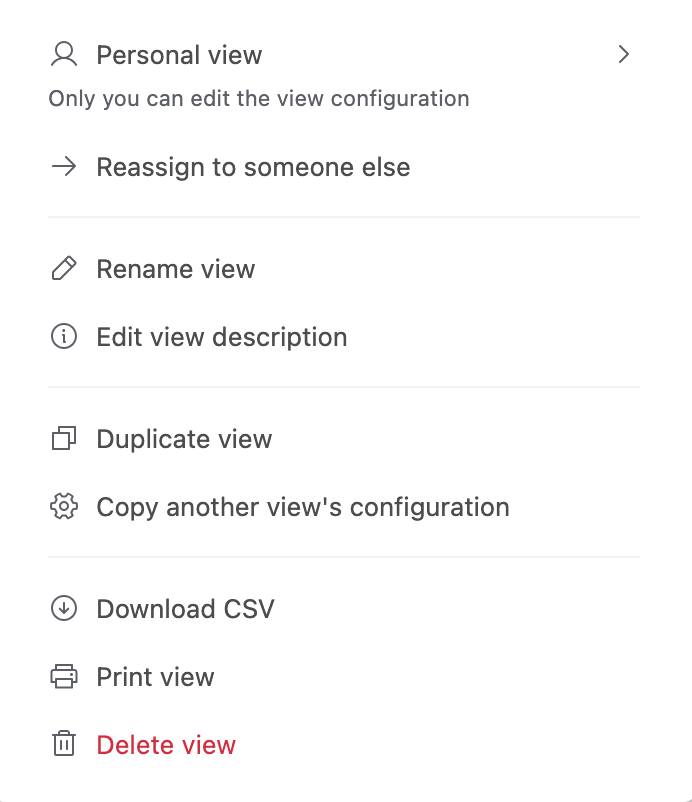
Deleting calendar views
To delete a calendar view:
Click the dropdown menu next to the name of the view.
At the bottom of this dropdown menu, click the Delete view option.
Click this to delete the view. In some cases, a warning box may appear if there are other dependencies in the base that rely upon this view. In those cases, you'll need to confirm the deletion of the view.
Additional calendar view options and actions
Using different calendar view modes
Timescales
Certain tasks require you to look at the big picture, while others require that you take a more granular view. Accordingly, you can adjust your calendar view to one of several timescales by clicking the toggle in the upper right corner of your calendar. You can choose from:
Day
3 day
Week
2 week
Month (default)
Custom - Open the “Change timescale” menu and click the Custom option. In the dialog that appears, enter in a number between 1 and 6 and either “days” or “weeks” as the unit.

Note
If you're in week, 3 day, or day mode, and the date field on which the calendar view is based also contains time values, the calendar view will show a timeline on the left side of the screen. We do not offer an annual/yearly view mode at this time.
Weekday mode
To access these options, open the “Change timescale” menu and select one of the options at the bottom of the menu.
The options to hide or collapse weekends are only available when the timescale is 1 week or longer; they are not supported for shorter timescales such as 3-day. For shorter timescales, weekend days are always shown at full width.
Calendar date height
These options are accessible in a menu labeled “Calendar date height” when hovered over. There are two options:
Compact (Default) - Show all dates in the view as equal in height, based on the available vertical space in the window. When there isn’t enough space to show all records in a date, we show an overflow token such as +2 more.
Expanded - This allows height in dates to show all records, making the calendar view scrollable. Date height is capped at 1000 records max

Note
The option to specify a date height setting is only available when the timescale is 2 weeks or longer. For shorter timescales such as 1-week, we automatically apply the “Expanded” height option. We also apply the “Expanded” option automatically when printing a calendar view.
Navigating to specific dates
We support two levels of forward/backward navigation.
You can navigate by a single unit (e.g. 1 week) or an full period (e.g. 3 weeks), based on the selected timescale.
If the timescale is 1 unit (1 day, 1 week, 1 month), then we’ll only show 1 level of navigation as before.
In addition, there’s a “Go to date” option that reveals a date picker menu when clicked. Here, you can click or type in a date, allowing you to jump to a date that otherwise may not be easily reached using the forward/backward buttons.
All options to navigate to another date (Forward/Backwards, Go to date, Today) are grouped together as the left most options in the calendar top bar.

Viewing calendar events in a record list
As mentioned in Changing record dates, you can use the sidebar listing your records to schedule or reschedule events by clicking and dragging records to and from the sidebar. You can also use the find record box to search through your records—it'll search through all fields for your query, not just the names of the records.
You can also click the dropdown arrow next to All records to instead view only Records with dates (arranged in chronological order), or to view only Records without dates.
You can also use the record list to jump directly to a record's position on the calendar by right-clicking on a card and selecting the Go to date option.
To hide the record list and just see the calendar, you can click the X button in the top right corner of the record list. To bring the record list back, you can click the Show record list button.
Integrating third-party calendars with Airtable
You can integrate an Airtable calendar view with your favorite third-party calendar app by getting an iCal link from a shared calendar view. For more specific instructions on how to do this, please see this article on integrating Airtable with external calendar applications.
Advanced calendar features
Users on paid plans have access to additional features. Included in these additional features is a set of advanced calendar features, designed so that teams with calendar-intensive workflows can get extra insights from their records and design extra-powerful calendars.
Defining date ranges
Select two different date fields in order to define a range.
Records with values in both fields will show up on the calendar as ranges.
You can click and drag on ranges to move them around, or click and drag on the edges of the ranges to lengthen or shorten them as desired.
Plotting multiple calendars on a single view
If you have more than one date field in the same table, you can plot both of them on the same calendar view.
You can plot up to 20 date fields (or date ranges) onto a single calendar view.
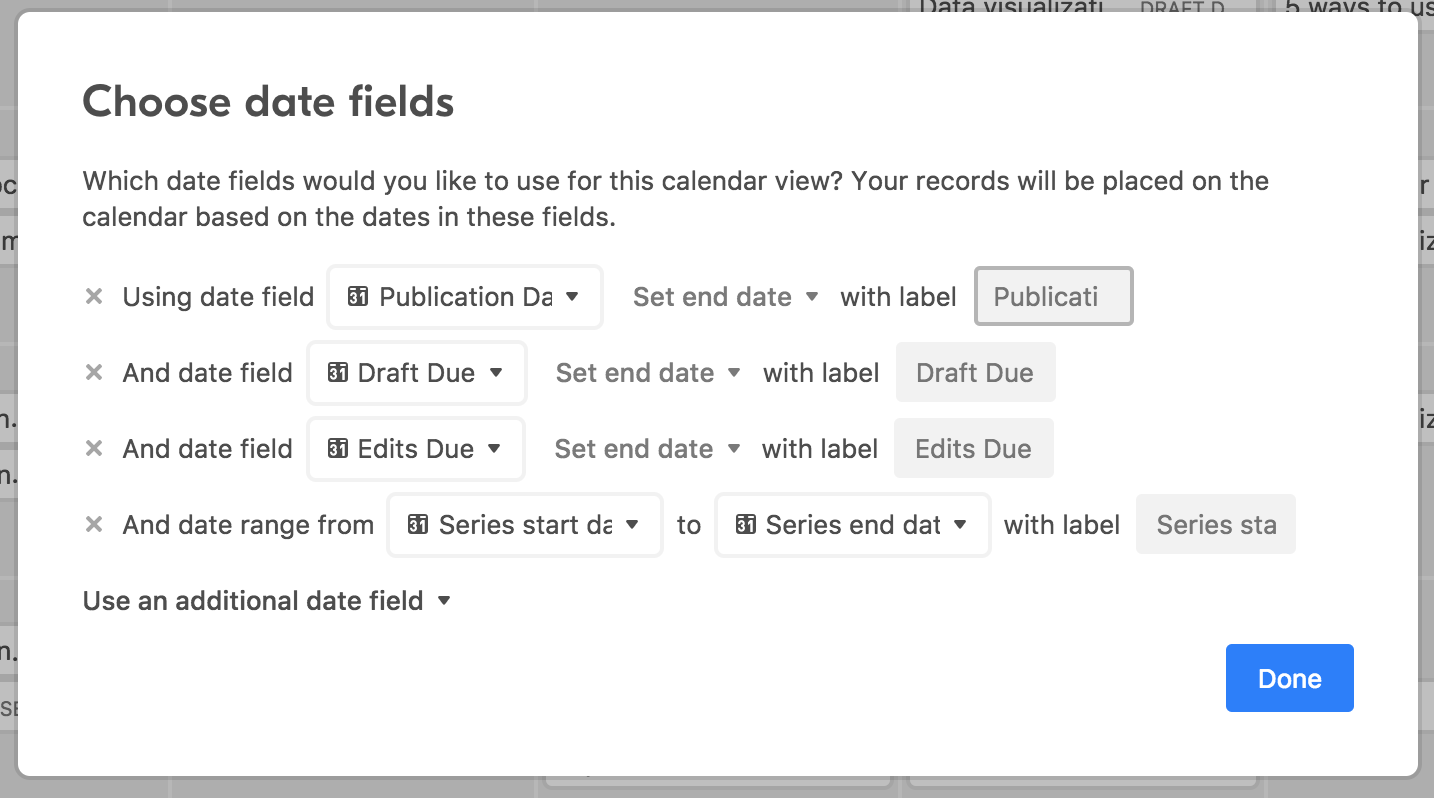
To more easily discern between your plotted fields and ranges, you can give each one its own helpful label.
Calendar view record coloring
Record coloring allows you to apply colors to records within a view—meaning that you can quickly discern meaningful distinctions between records more easily, without having to dig into the details.
In calendar view, as with record coloring in other view types, you can apply color to records by matching the color of the record to the color of an associated single select field, or automatically color records using custom filtering conditions.
Calendar views also have a unique option for record coloring that is only available when you've plotted multiple date fields and/or date ranges on a single view: record coloring by date fields.
Record coloring by date field lets you color the record cards in your calendar view based on the date field or date range used to create the card.
This is particularly helpful if you want to be able to quickly distinguish which cards came from which date fields or ranges — for example, if you're tracking multiple types of deadlines on a single calendar.
Record coloring applies color to the entire card as it appears on the calendar view. For more information on record coloring, please read through this guide.
FAQs
Can I reorder the way records are displayed on a day/week/year within the calendar view?
Records in the calendar view are always displayed by age, with the oldest record on top. We do not currently support the ability to change this ordering.
Can I hide fields within calendar view?
You can hide fields in a calendar view by expanding a record and toggling the field visibility once the record is expanded.
Which fields are visible in calendar view does not affect how records appear. Instead, hiding fields in a calendar view determines which fields are visible in expanded records for calendar view share links.
My calendar view is showing empty brackets next to event records, what might be causing this?
Likely, you have fields that are showing that don’t have values. In these cases, they will show as (empty). This can be adjusted with the “ Customize labels” menu which includes the “Hide all” toggle which will result in hiding these empty brackets.
Can I print a calendar view?
Yes, printing a view is possible by clicking the dropdown menu next to the name of the view and then selecting print view. Additionally, this will allow you to save a view in PDF format.
I can't seem to get the current month to load in my calendar view. How can I have it default to show the current month?
When a calendar view is opened for the first time (this applies whether it's opened within a base or a shared view), it will open to the nearest month/week/day that contains events. This means that if the nearest events are in a past month, then that past month will be displayed. Additionally, if the nearest events are in a future month, then that future month will be displayed.
For the calendar to open in the current month, there either needs to be:
Events in the current month OR
Events in both past and upcoming months, with the current month landing in the middle.
In a calendar shared view, it's possible to specify a default calendar timescale and default to a specific date, but there's no way to always show the current month regardless of the distribution of events.