- Cómo empezar a usar Airtable
- Introducción a los aspectos básicos de Airtable
- Cómo comunicarse con el equipo de soporte de Airtable
- Pantalla de inicio de Airtable
- Glosario de terminología de Airtable
- Airtable technical requirements
- Diferencias entre las funciones de Airtable para escritorio y para móvil
- Atajos de teclado de Airtable
- Cómo usar Markdown en Airtable
- Adding descriptions in Airtable
- Finding Airtable IDs
- Automatizaciones de Airtable
- Descripción general de automatizaciones
- Guías de automatizaciones
- Guías de automatizaciones integradas
- Guías de automatizaciones en Airtable
- Linking existing records using automations
- Conditional groups of automation actions
- Repeating groups of Airtable automation actions
- Creating recurring records using automations
- How to delay Airtable automation runs
- Prevent automations from triggering by mistake
- Use automations to timestamp status updates
- Desencadenantes de automatizaciones
- Desencadenantes de Airtable
- Airtable automation trigger: When record matches conditions
- Airtable automation trigger: When a form is submitted
- Airtable automation trigger: When record created
- Desencadenante de automatización de Airtable: cuando se actualiza un registro
- Airtable automation trigger: When record enters view
- Desencadenante de automatización de Airtable: a una hora programada
- Airtable automation trigger: When webhook received
- Airtable automation trigger: When a button is clicked
- Airtable automation trigger: When email received
- Desencadenantes integrados
- Desencadenantes de Airtable
- Acciones de automatización
- Acciones en Airtable
- Acción de automatización de Airtable: enviar correo electrónico
- Airtable automation action: Create record
- Airtable automation action: Update record
- Airtable automation action: Find records
- Airtable automation action: Sort list
- Acción de automatización de Airtable: ejecutar un script
- Airtable automation action: Generate with AI
- Acciones integradas
- Airtable automation actions: Slack
- Airtable automation actions: Google Workspace
- Airtable automation action: Send MS Teams message
- Airtable automation actions: Outlook
- Airtable automation actions: Jira Cloud
- Airtable automation actions: Jira Server / Data Center
- Airtable automation actions: Salesforce
- Airtable automation action: Create post in Facebook Pages
- Airtable automation actions: GitHub Issues
- Airtable automation action: Hootsuite post
- Airtable automation action: Send Twilio SMS
- Acciones en Airtable
- Bases de Airtable
- Using Airtable Cobuilder
- Descripción general de las bases de Airtable
- Creating and duplicating bases in Airtable
- Structuring your Airtable bases effectively
- Moving Airtable bases between workspaces
- Tables in Airtable
- Crear enlaces para compartir bases de Airtable
- Importing third-party data into Airtable
- Uso de las perspectivas
- Troubleshooting Airtable base performance
- Versiones beta de Airtable
- Colaboración en Airtable
- Asistencia de Airtable Enterprise
- Información general
- External badging in Airtable
- Creating and using Airtable components
- Ask an Expert beta overview
- Data residency at Airtable
- Descripción general de los grupos de usuarios en Airtable
- API de Enterprise de Airtable
- Creating and managing data retention policies in Airtable
- eDiscovery APIs in Airtable
- Airtable and data loss prevention
- Acceder a los registros de auditoría de Enterprise en Airtable
- Configuración de Jira Server/Data Center para conectarse con Airtable
- Panel de Administración de Enterprise
- Descripción general del panel de administración de Enterprise
- Usuarios: panel de administración de Enterprise en Airtable
- Detalles del usuario en el panel de administración de Airtable
- Grupos: panel de administración de Airtable
- Espacios de trabajos: panel de administración de Enterprise de Airtable
- Bases: panel de administración de Enterprise en Airtable
- Interfaces: Panel de administración de Enterprise en Airtable
- Data sets - Airtable admin panel
- Managed apps - Airtable admin panel
- Components - Airtable admin panel
- Informes: panel de administración de Enterprise en Airtable
- Airtable admin panel settings
- Guía práctica de Enterprise
- Gestionar a los admins de Enterprise en el panel de administración
- Uso de organizaciones
- Organizational branding for apps in Airtable
- Enterprise Hub in Airtable
- Enterprise Hub : Org unit assignment with user groups
- Desactivar, retirar el acceso y reactivar usuarios desde el panel de administración
- Gestionar el acceso de usuario a espacios de trabajo y bases
- Airtable Enterprise Key Management
- Custom terms of use
- SSO en Enterprise
- Información general
- Extensiones de Airtable
- Descripción general de las extensiones
- Extensiones por Airtable
- Extensiones integradas
- Campos de Airtable
- Descripción general de los campos
- Archivo adjunto
- Campos basados en fecha
- Fórmula
- Empezar a usar fórmulas
- Fundamentos de fórmulas
- Soluciones frecuentes: principiante
- Soluciones habituales: intermedias
- Soluciones habituales: avanzado
- Campo de texto largo
- Campos de registros vinculados
- Campos con números
- Otros campos
- Campos de compilación, búsqueda y recuento
- Campos de selección y colaborador
- Integración con Airtable
- API
- Getting started with Airtable's Web API
- Crear tokens de acceso personal
- Airtable Webhooks API Overview
- Service accounts overview
- API web de Airtable: usar filterByFormula o parámetros para ordenar
- Airtable API Deprecation Guidelines
- Airtable API: Common troubleshooting
- Managing API call limits in Airtable
- Enforcement of URL length limit for Web API requests
- Servicios de integración
- Third-party integrations via OAuth overview
- Troubleshooting disconnected OAuth integrations in Airtable
- Options for integrating with Airtable
- Third-party integrations - Common troubleshooting
- Low-code integrations - Common troubleshooting
- Integrating Airtable with external calendar applications
- Visualizing records from Airtable in Tableau
- Visualizing Airtable records in Microsoft Power BI & Power Query
- Integrating HubSpot with Airtable
- Using Zapier to integrate Airtable with other services
- Using Zapier's Multi-Step Zaps to find and update records
- Using IFTTT to integrate Airtable with other services
- Integrating with AWS Lambda & DynamoDB
- Herramientas para desarrolladores
- API
- Diseñador de Interfaces de Airtable
- Descripción general
- Diseños de página
- Elementos
- Adding and removing elements in interfaces
- Adding layouts to interfaces
- Formatting elements in interfaces
- Interface element: Button
- Interface element: Calendar
- Interface element: Chart
- Interface element: Filter
- Interface element: Gallery
- Interface element: Grid
- Interface element: Kanban
- Interface element: Number
- Interface element: Record picker
- Interface element: Text
- Interface element: Timeline
- Aprendizaje y recursos
- Gestión de Airtable
- Política de Airtable
- Registros de Airtable
- Sincronización de Airtable
- Vistas de Airtable
- Espacios de trabajo de Airtable
- Impresión
- Compartir
- OscuroLigero
- PDF
Airtable automation trigger: When a button is clicked
- Actualizado en 29 Feb 2024
- 3 Minutos para leer
- Impresión
- Compartir
- OscuroLigero
- PDF
Learn how the "When a button is clicked" automation trigger can allow you to connect an automation to a button element in interfaces. This powerful connection means that users collaborating in interfaces can cause an automation to run at the click of a button.
Introduction
All plan types/levels | |
"Owner" or "Creator" permissions are needed to create automations as described in the article below. | |
Platform(s) | Web/Browser, Mac app, and Windows app |
Related reading | Interface element: Button - In order to use an automation containing the "When a button is clicked" trigger, you'll need to connect it to an interface via the "Button element" in an interface. |
Airtable terminology | Interface - An interface is a curated representation of base data created using Interface Designer. Interfaces are fully customizable and can contain various visual elements, data sources, and permissions. Element - Elements are the essential building blocks of interfaces. Builders can add visual elements like grids and timelines, design elements like text and dividers, and functional elements like buttons and comments, to present their base data in a customized way. |
Creating a button-triggered automation
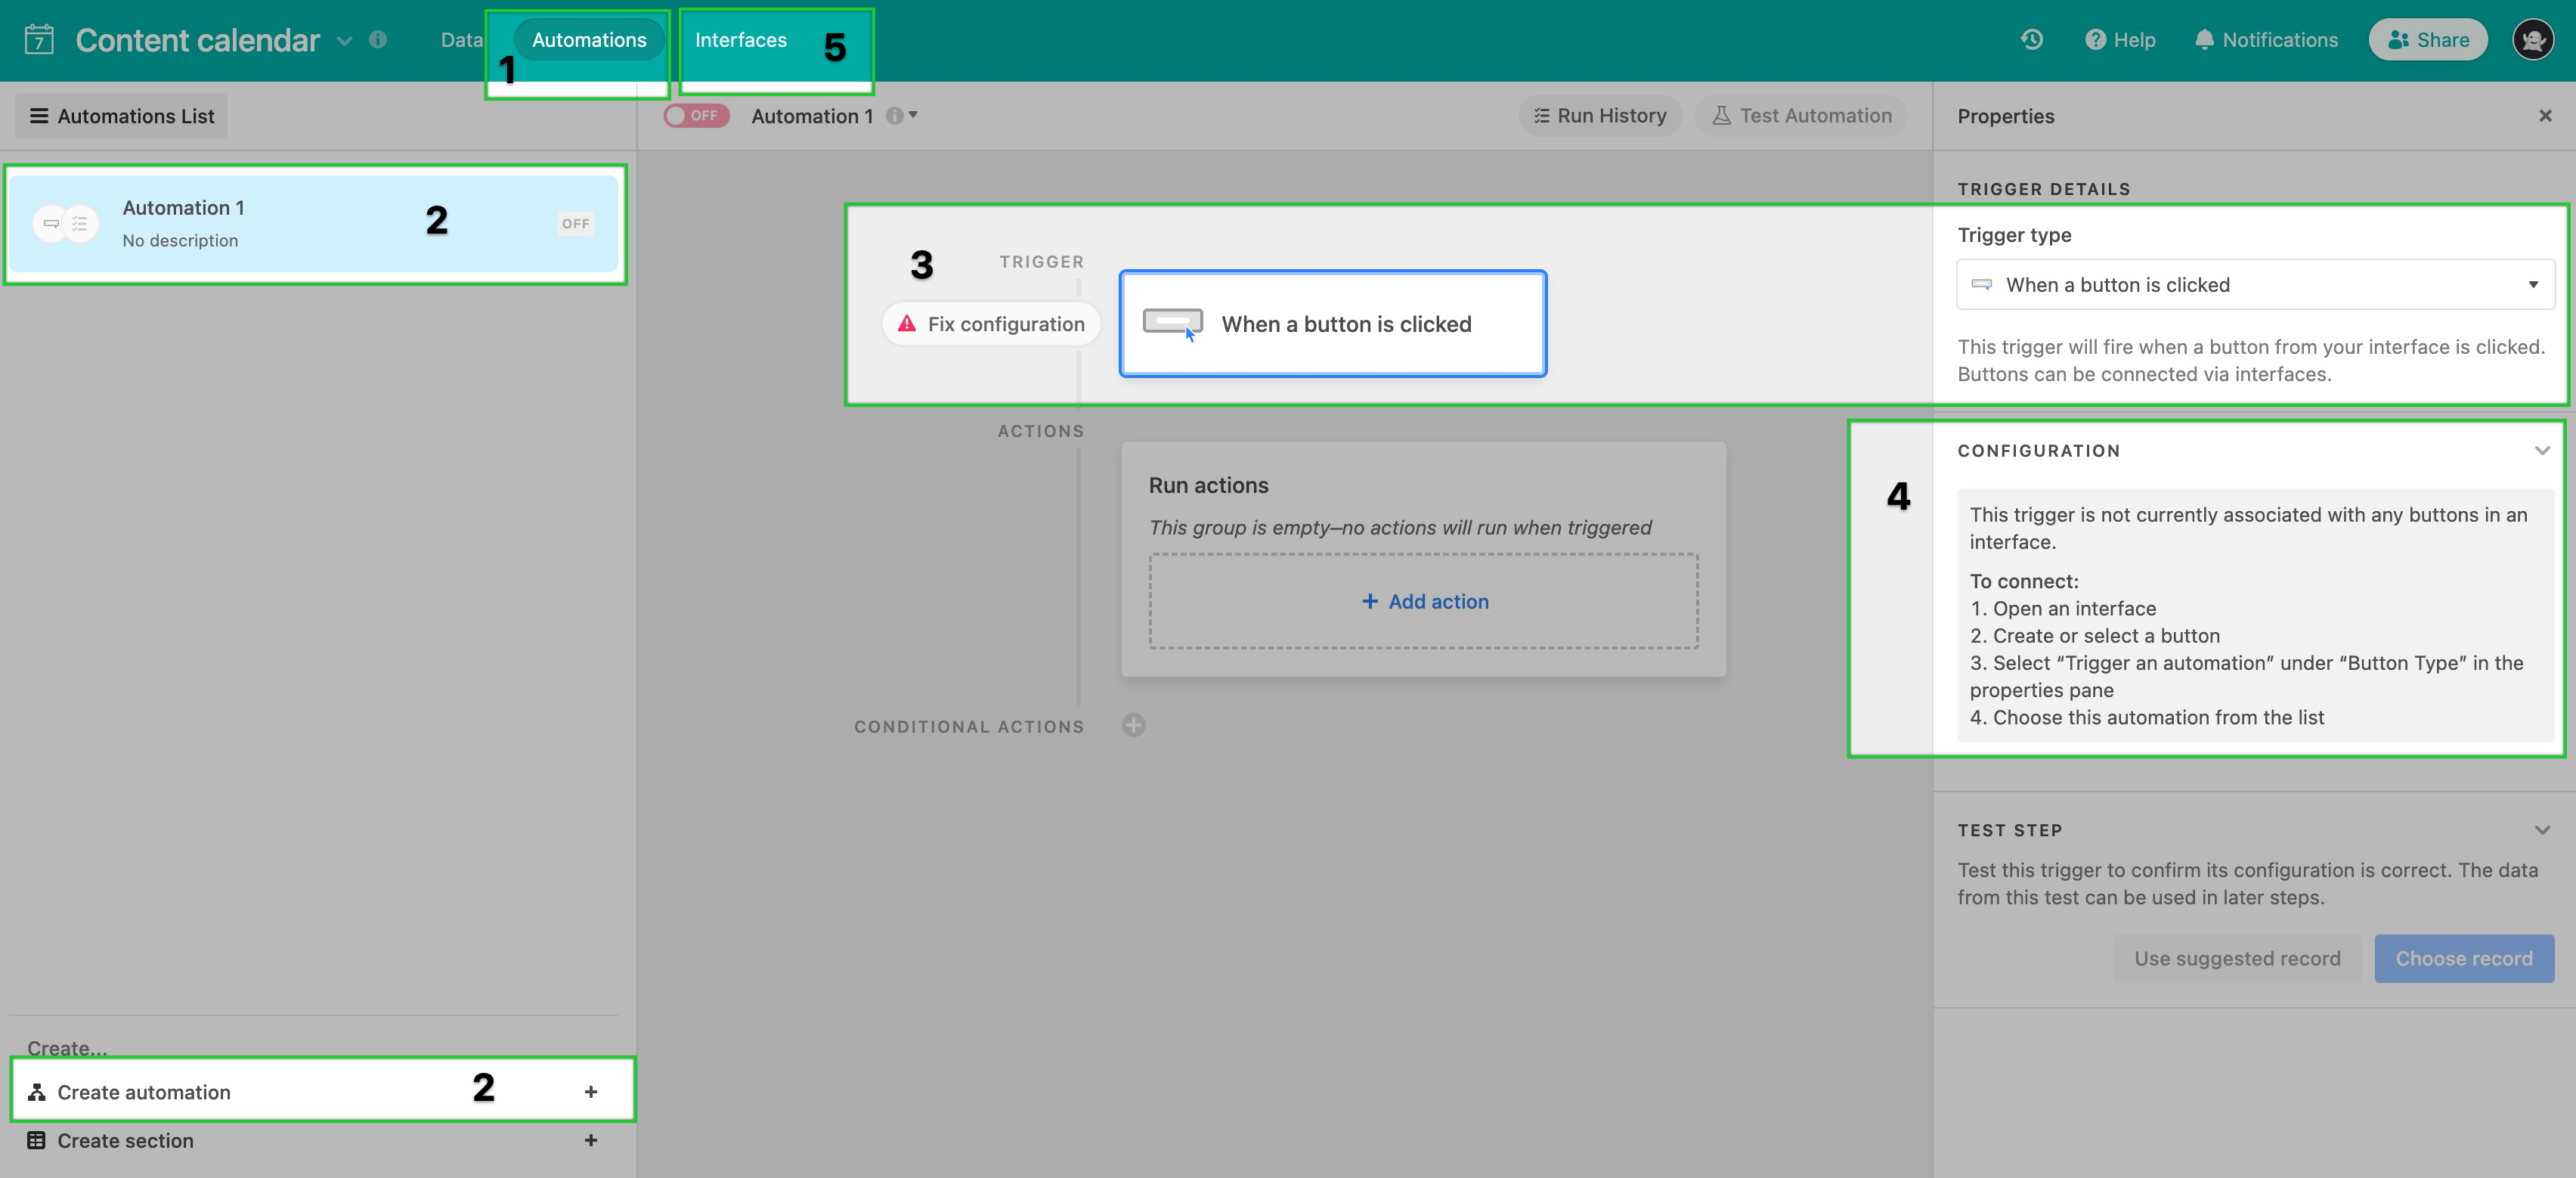
Navigate to the "Automations" tab in the base where you would like to create the automation.
NOTE
Keep in mind that incompatible automations can't be selected. Hover move your cursor over the automation(s) to learn why they aren't compatible.
Add a new automation or choose a previously configured automation.
Choose the "When a button is clicked" trigger from the drop-down list.
At this point, you'll see that the "Configuration" section has additional instructions.
To configure an automation containing this trigger type you will need to navigate to the "Interfaces" tab in the top left section of an open base and create a new interface or edit a previously created interface.
Connect the automation to an interface
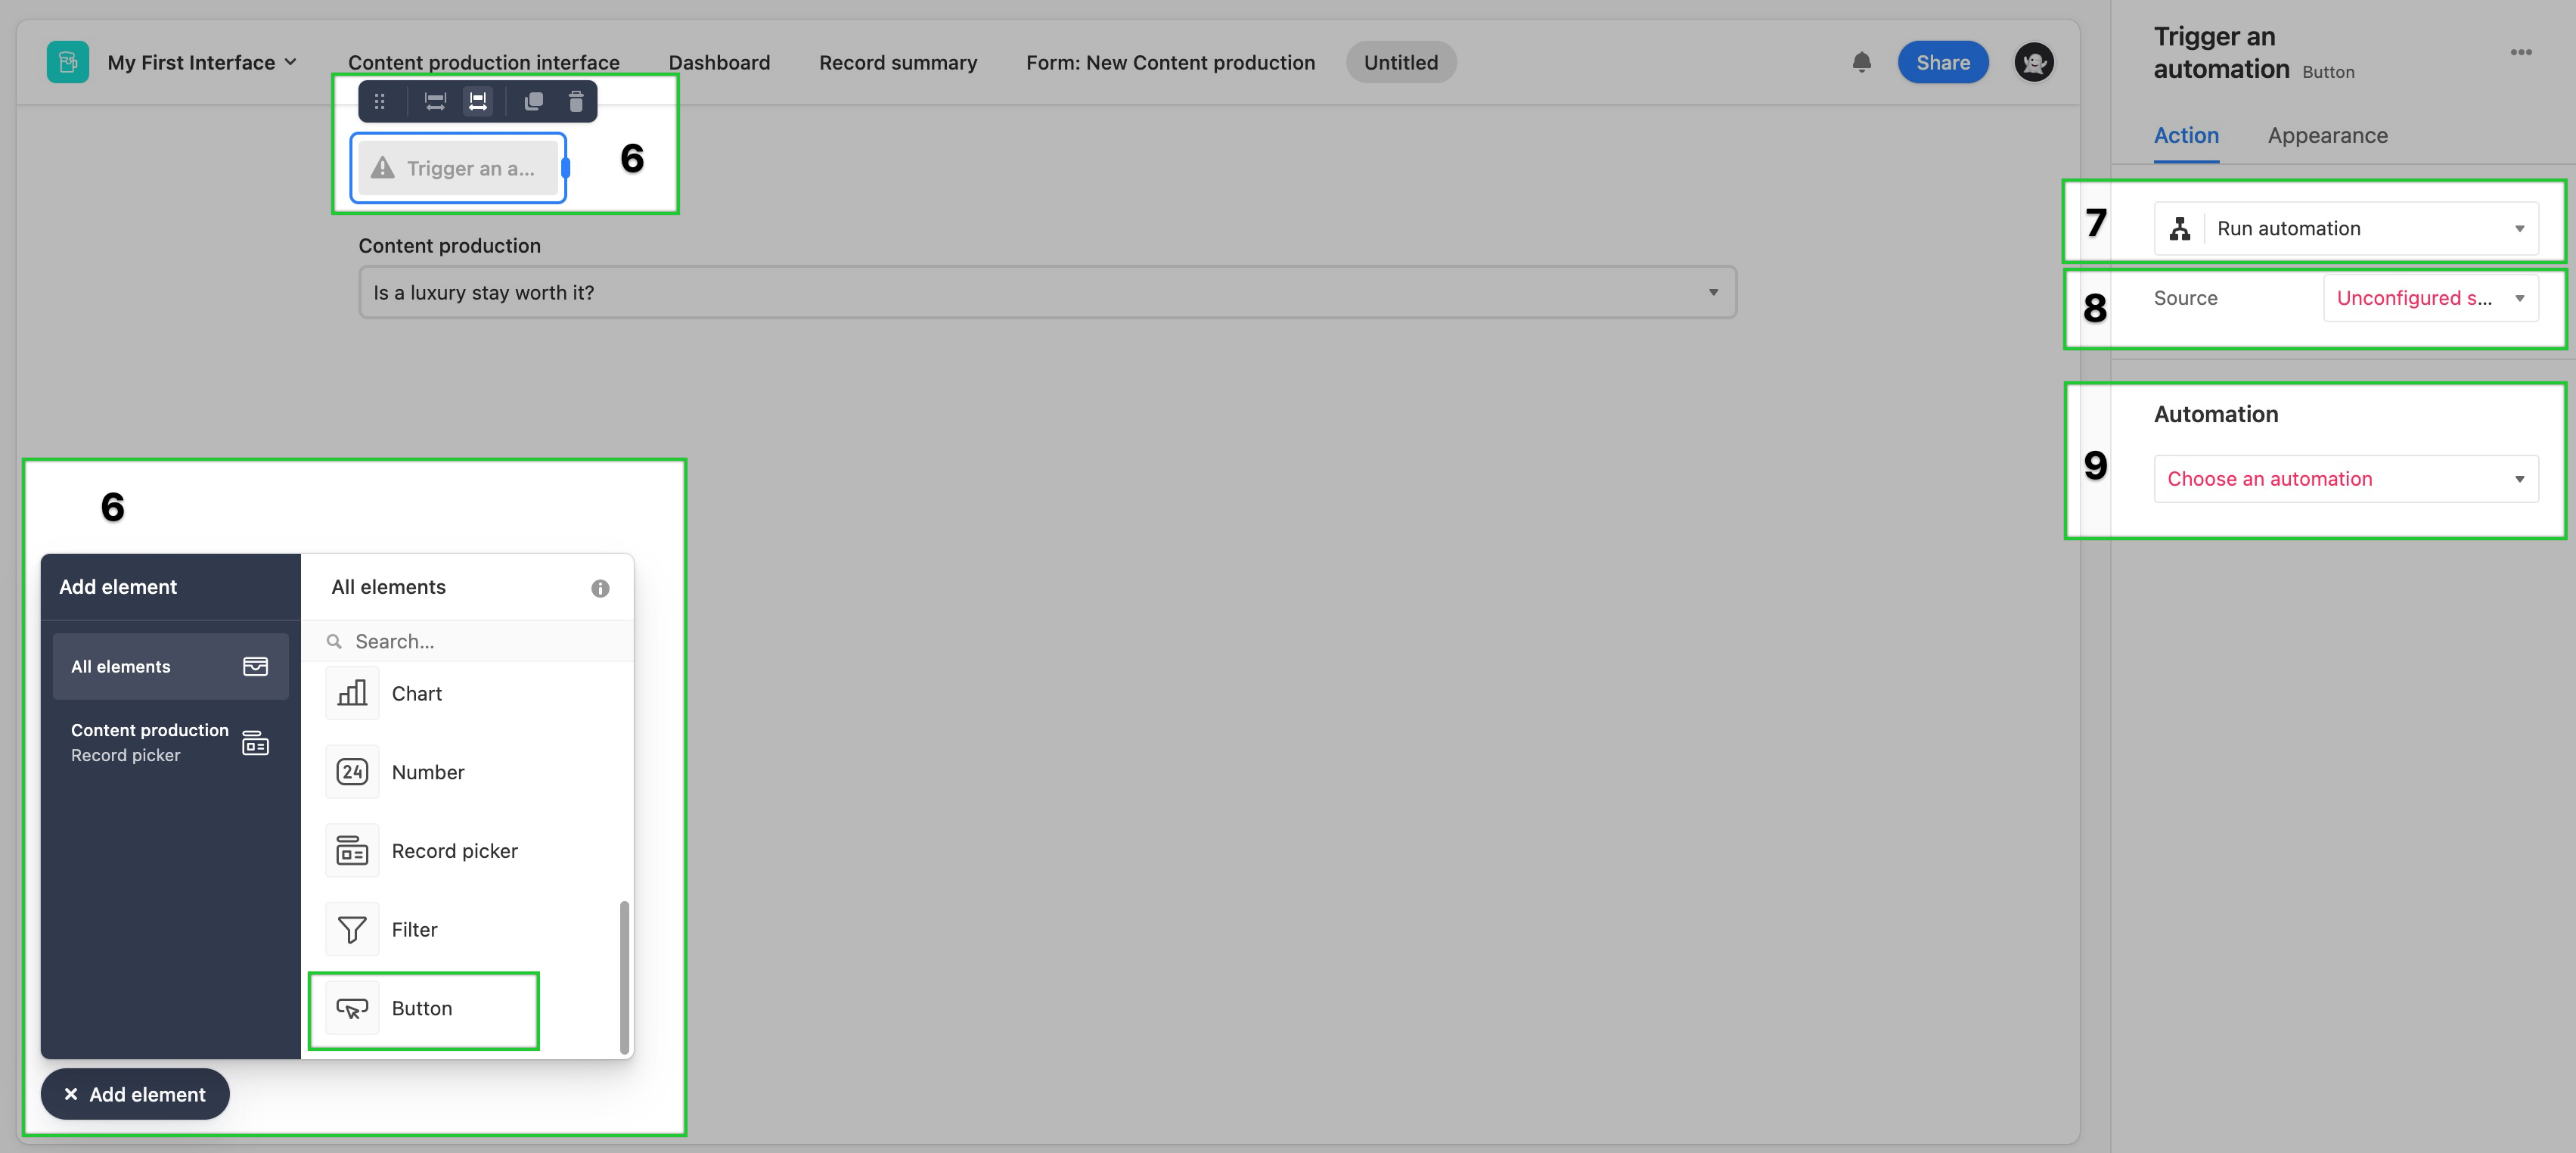
Enter editing mode in the interface of your choosing. There are two options for adding a button to an interface that will run an automation:
Button element
Add a button element or navigate to an interface page that contains the button element you want to configure. More information on button elements can be found here.
Choose the "Run automation" action type within the button element you are configuring. Next, choose a source for the button element. This step allows Airtable to determine which table the interface and automation will be using as a source. The interface page you added the button element to must contain either a Record picker element or the Record list element from the Record review layout.
Now, you will choose the automation that you began setting up in steps 1-3 above.
At this point, you can return to the automation to continue the configuration process there by clicking the box and arrow icon.
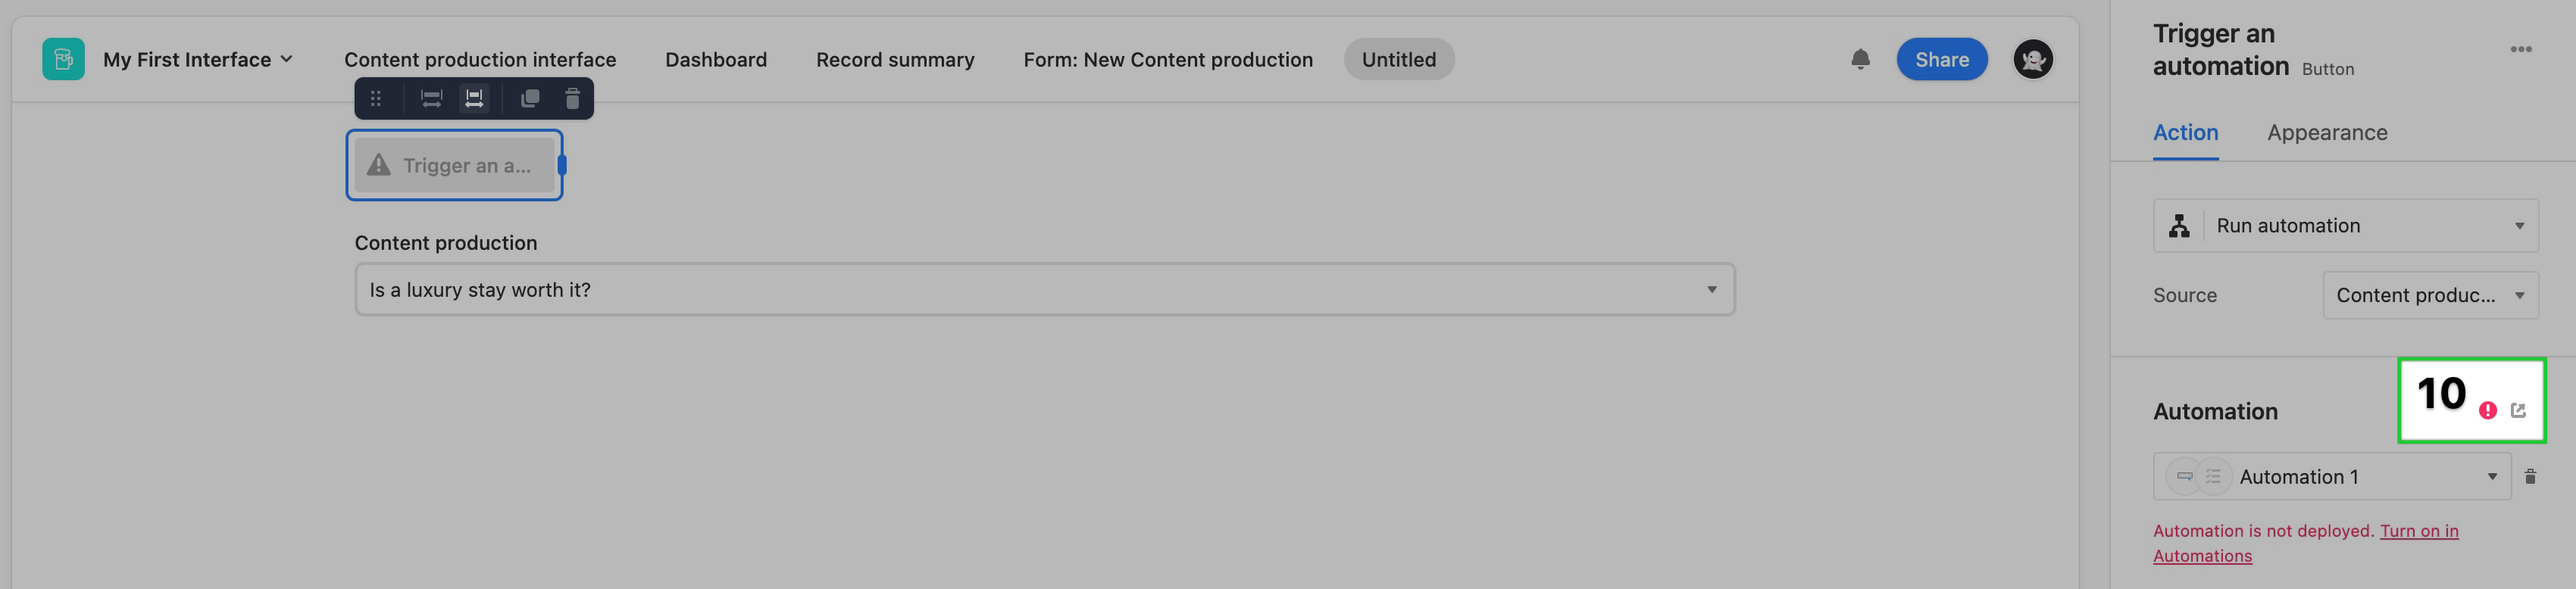
Configure one or more automation actions, test the automation, and then turn it on.
Once the automation has been turned on, you'll need to return to the interface and publish it before users interacting in the interface will be able to click the button you've created. Here, you can also make any adjustments to the button's name, appearance, and position on the interface page before publishing.
NoteIt's worth knowing that the user who clicked on a button in an interface can be referenced in later automation steps via tokens that reference the "When a button is clicked" trigger. This is extremely helpful when adding dependencies or follow-up communications to a workflow.
A button in a record detail layout
Open up or create a record detail page and add a button under the “User actions” section.
Then click the square and arrow icon to navigate to the button’s properties.
Under the “Action” section, click the Run automation option.
Under the “Automation” section select the automation that you began setting up in steps 1-3 in the section above.
Click the “Turn on in Automations” link to continue configuring the automation.
From here continue configuring the automation by adding one or more actions.
Once you’ve configured, tested, and turned on the automation, remember that you will need to return to the interface setup and publish the interface before end-users will be able to click the button and run the automation.
NoteIt's worth knowing that the user who clicked on a button in an interface can be referenced in later automation steps via tokens that reference the "When a button is clicked" trigger. This is extremely helpful when adding dependencies or follow-up communications to a workflow.
FAQs
What happens when a button element source changes?
The automation source will be automatically updated if your connected automation isn't connected to other button elements. But if your automation is enabled, any unpublished changes must be applied to the live automation.
Applying these changes may require the automation actions to be reconfigured to use the new source. Airtable recommends publishing the interface simultaneously to avoid source incompatibility between the published version of the interface and the automation.