Plan availability | All plan types |
Permissions | Owner / Creator - Can configure interface page layouts Please consult this support article for a breakdown of Interface Designer permissions. |
Platform(s) | Web/Browser, Mac app, and Windows app |
Interface buttons let end users take an action in one click while they use an interface—open another page, run an automation, update the record they are looking at, and more. They work especially well with Record review and Record detail, but you can also use them on other data layouts when those layouts support the User actions section.
Interface layouts supporting buttons
Note
Overview interface pages are built to orient people and link them to other pages or the web. They don’t use the same User actions → Buttons setup as data layouts (List, Grid, Record review, and so on), so you won’t add interface buttons there in the way outlined in this article.
The following interface layouts support interface buttons:
Record review
Record detail
List
Gallery
Grid
Kanban
Calendar
Timeline
Swimlanes
Note that buttons are also available in blank layouts. However, blank layouts offer a legacy (element-based) interface experience that requires different setup steps covered in this article. Additionally, many newer button features are unsupported in blank layouts. For that reason, we recommend using the layouts listed above.
The section below covers the basics of each button action type. For a more in-depth breakdown of setting up each action type, consult the information available here.
Button actions supported in interfaces
Note
Consult this section to understand which end user permissions are needed to be able to interact with the button types outlined below.
In the right panel, open User actions, then Buttons. From there you can usually add:
All interface layout types:
Go to interface page - This allows you to add a convenient button that links to another interface page in this interface. You can also choose whether or not to force the browser to open that interface page in a new browser tab.
Go to external URL - Add a link to another website, another interface, an Airtable base, and more. You can also choose whether or not to force the browser to open that interface page in a new browser tab.
Open Omni (only if Omni is turned on for your organization and available in interfaces)
All interface layout types except record detail or dashboard:
Open record creation form - This button action allows end users to open up a form to add a new record.
When the layout uses a Dashboard visualization:
If the page only shows a Dashboard chart, the Buttons menu is narrower. You’ll see Go to interface page, Go to external URL, and Open Omni (when available). You won’t see Open record creation form there.
Only record detail / record review layouts - Record review layouts include a record detail page as part of the interface you can configure, so these button actions are available in the individual record detail portion of that layout type.
Update record - Configure a button to perform single or multiple updates to a record. One example would be to quickly update a record's status with the click of a button. You can also set the button to automatically move to the next record once it is updated by enabling the toggle next to the “After update, move to next record” option in the configuration.
Copy link to record - This button will allow end users to quickly copy the interface URL of the specific record that is currently opened in the detailed view that the end user has open.
Delete record - A button to quickly delete a record opened from the chosen source. As always, users can press CMD Z to quickly undo an accidental deletion. Editors and creators with access to the underlying base can also access the base trash to restore deleted records.
Apply record template - This button type will apply a record template to an existing record, saving end users time when they need to add certain preconfigured information to a record. Applying a record template will populate template values into any empty fields and append template values into multi-value fields, such as multiple select fields. Note that clicking this button will not create a new record and it will not overwrite any existing values on the record.
Go to URL in record - This button action will open a URL that is stored in a field/cell in the current record that is opened. We recommend connecting this button action to a field specifically configured as a URL field type, though other field types such as single line text or formula can also be leveraged.
It’s important to remember that if the URL in the record goes to another Airtable surface, permissions may prevent end-users from accessing the link after clicking on the button.
Run automation - This button action will trigger an automation to run that is connected from the underlying base.
Note
If you don’t see an action, check that you’re on a layout that supports it, that Omni or Automations are available on your plan, and that your interface permissions allow that action for your role.
Adding buttons to interface pages
Regardless of the button type you are adding and configuring in an interface, follow these steps:
Open up a base in Airtable and click the Interfaces button at the top.
You may need to click the Pages option in the upper left portion of the interface editor screen. Click the page where you want to add a button. Remember that certain button actions are only supported in record review or record detail pages.
Now, in the configuration sidebar on the right side of the page, scroll down to the “User actions” section and find the “Buttons” option. Click the cogwheel icon to configure a new button.
Click the + Add button action option.
Next, configure the button properties by clicking the box and arrow icon.
Next, move on to configuring the button based on the type of button action you chose.
Configuring buttons in interfaces
Go to interface page
Once you’ve reach the button configuration properties, give the button a descriptive “Label” so that end users know what the button does.
Under the Action section, optionally require confirmation. Learn more about configuring button confirmation here. You can also change the “Action” to another available button action type if needed.
In the Data section, there are two settings to configure:
Choose the “Page” that end users will access when this button is clicked. Note that end users will only be able to access interface pages that have been shared with them. Additionally, you can only choose interface pages that are associated with the underlying base that you are working out of. If you are looking to send users to an interface page associated with another base, then use the “Go to external URL” button action instead.
Toggle on the “Open in new tab” option to force the interface page to open in a new tab rather than load the page on the current tab. By default, this option is toggled on, but there may be use cases where you want this option off.
Go to external URL
Once you’ve reach the button configuration properties, give the button a descriptive “Label” so that end users know what the button does.
Under the Action section, optionally require confirmation. Learn more about configuring button confirmation here. You can also change the “Action” to another available button action type if needed.
In the Data section, there are two settings to configure:
Choose the URL “Destination” that end users will access when this button is clicked. We always recommend inserting URLs with the
https://prefix here.Turn on “Open in new tab” if you want the URL from the field to open in a new browser tab. Leave it off to open it in the same tab.
Open record creation form
This button will open a form that can create a new record in the table associated with this interface’s underlying table.
Once you’ve reach the button configuration properties, give the button a descriptive “Label” so that end users know what the button does.
In the Data section, there are two settings to configure:
Source - This is the table where the record will be created. Note that only tables in the underlying base are available to choose from. Click the dropdown menu to select the table of your choice.
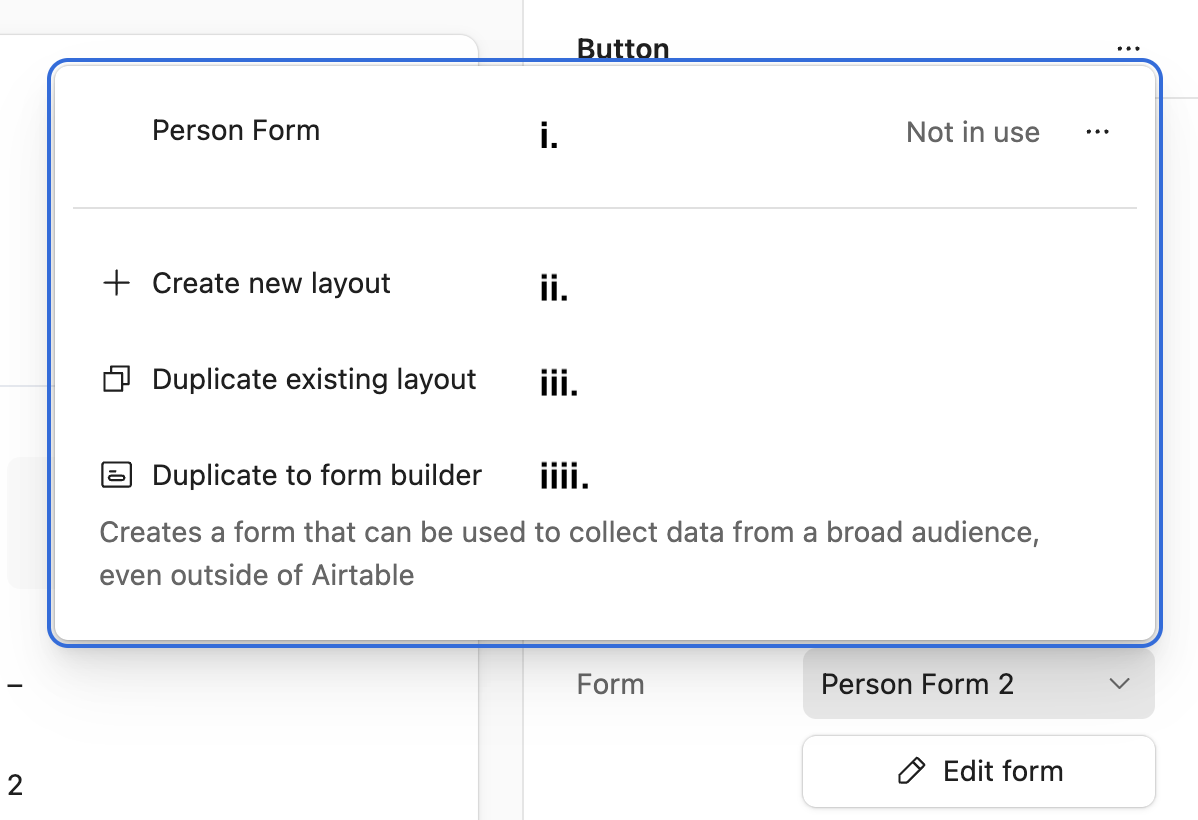
Form - Click Edit form if a form has previously been connected to this button that you want to adjust, otherwise, click the dropdown here to open up a modal where you can:
Choose an existing form layout configured in the past (You’ll also see how many times a form layout has been used i.e. how many times the form appears on other pages that are part of the interface you are editing.)
Create a new layout
Duplicate an existing layout
Duplicate to form builder
Update record
This button action can only update records associated with the table source connected to the record detail page where you are adding this button.
Once you’ve reach the button configuration properties, give the button a descriptive “Label” so that end users know what the button does.
Under the Action section, optionally require confirmation. Learn more about configuring button confirmation here. You can also change the “Action” to another available button action type if needed.
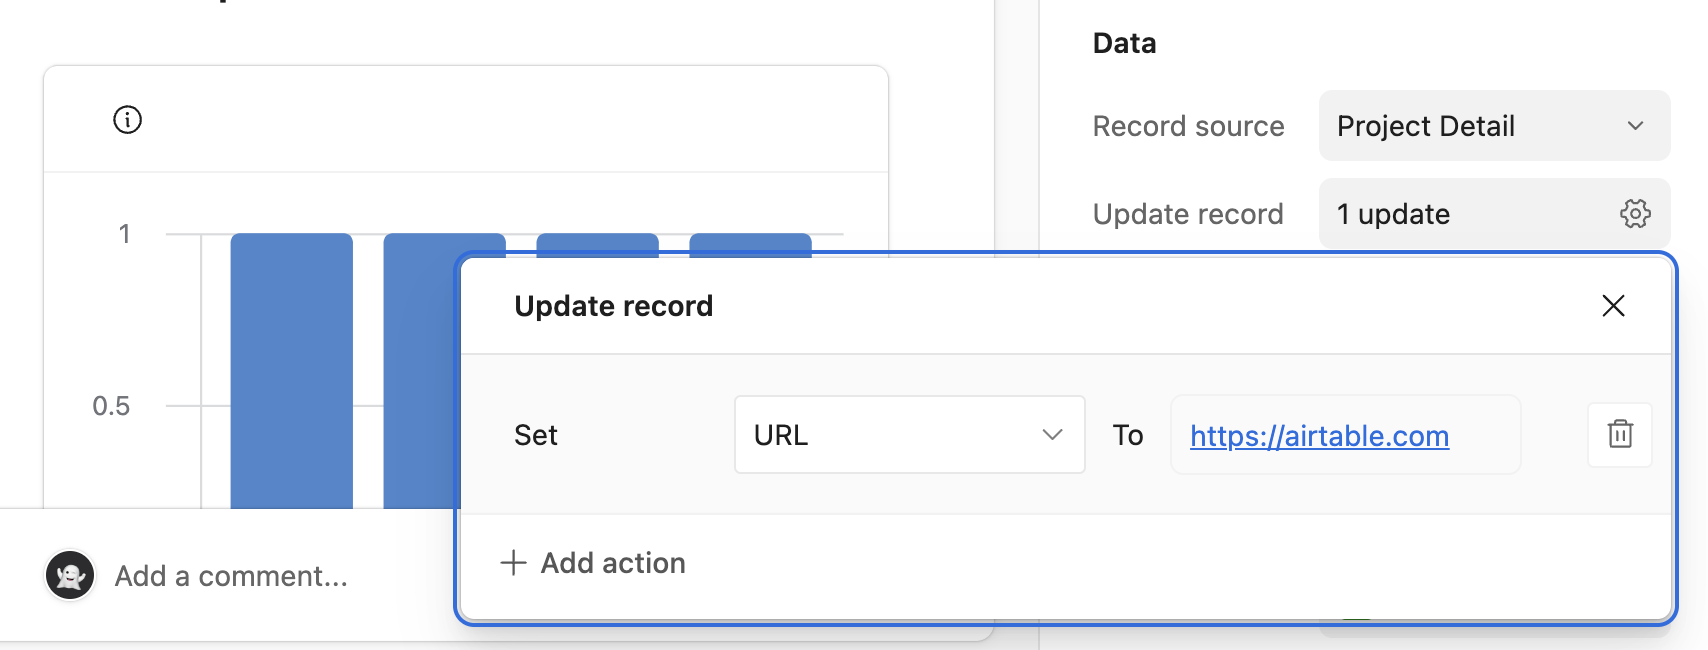
In the Data section, there are three settings to consider:
Record source - Not configurable. The source is connected to the underlying base table connected to this interface page.
Update record - Here you will set one or more actions (updates) to have the button perform when it is clicked. Click the cogwheel icon and then click + Add action to “Set” a field to be updated. Then, insert the value that the field will be updated with when the button is clicked. Note that this will overwrite, not append, any current value(s) in the field. Click the trash icon to delete a previously configured action.
After update, move to next record - Toggle this on to move the end user to the next record on their screen after the button has been clicked and the record update has been made.
Next, set up the Appearance of the button. This includes setting a “Color before” and a “Color after” the button is clicked. You can also customize the button to change the “Label after” the button is clicked. Then, choose whether to “Show check icon” next to a record that has been updated. Note, that records that already match the update conditions set up in the “Data” section will appear as complete.
(Enterprise Scale and Business plans only) Lastly, configure “Visibility” Rules for the button. Here, you can click the cogwheel icon to set filtering conditions based on your use case’s individual needs. One common use case is to only allow certain users to see this button. Another example would be to only show this button for records associated with a particular status or category.
Copy link to record
Once you’ve reach the button configuration properties, give the button a descriptive “Label” so that end users know what the button does.
Under the Action section, optionally require confirmation. Learn more about configuring button confirmation here. You can also change the “Action” to another available button action type if needed.
Next, you can change the Appearance of the button to be another color. By default, Airtable sets this color to be grey.
(Enterprise Scale and Business plans only) Lastly, configure “Visibility” Rules for the button. Here, you can click the cogwheel icon to set filtering conditions based on your use case’s individual needs. One common use case is to only allow certain users to see this button. Another example would be to only show this button for records associated with a particular status or category.
Delete record
Once you’ve reach the button configuration properties, give the button a descriptive “Label” so that end users know what the button does.
Under the Action section, the “Require confirmation” setting will always be turned on in order to prevent accidental data deletion. Learn more about configuring button confirmation here. You can also change the “Action” to another available button action type if needed.
Next, you can change the Appearance of the button to be another color. By default, Airtable sets this color to be red.
(Enterprise Scale and Business plans only) Lastly, configure “Visibility” Rules for the button. Here, you can click the cogwheel icon to set filtering conditions based on your use case’s individual needs. One common use case is to only allow certain users to see this button. Another example would be to only show this button for records associated with a particular status or category.
Apply record template
Once you’ve reach the button configuration properties, give the button a descriptive “Label” so that end users know what the button does.
Under the Action section, optionally require confirmation. Learn more about configuring button confirmation here. You can also change the “Action” to another available button action type if needed.
Under Data, there are two settings to configure:
Templates - Choose a previously configure record template associated with the underlying source table in the base to leverage. If there are no options to choose from, then you will need to follow the steps outlined in this support article first before continuing. Click the cogwheel icon and hover over the name of a template to edit (pencil icon) or show it (eye icon). “Showing” the template connects it to the button you are configuring. Once shown, X out of the record template configuration modal.
After update, move to next record - Turn on “After update, move to next record” if you want people to land on the next record in their list after the template is applied to the current record (this action updates the open record; it does not create a new one).
Next, you can change the Appearance of the button to be another color. By default, Airtable sets this color to be grey.
(Enterprise Scale and Business plans only) Lastly, configure “Visibility” Rules for the button. Here, you can click the cogwheel icon to set filtering conditions based on your use case’s individual needs. One common use case is to only allow certain users to see this button. Another example would be to only show this button for records associated with a particular status or category.
Go to URL in record
Once you’ve reach the button configuration properties, give the button a descriptive “Label” so that end users know what the button does.
Under the Action section, optionally require confirmation. Learn more about configuring button confirmation here. You can also change the “Action” to another available button action type if needed.
In the Data section, there are two settings to configure:
Turn on “Open in new tab” if you want the destination to open in a new browser tab. Leave it off if you want the link to open in the same tab.
Next, choose a “Field” from the underlying table that contains the URL from the record. To modify this, click the dropdown arrow next to this setting.
Next, you can change the Appearance of the button to be another color. By default, Airtable sets this color to be grey.
(Enterprise Scale and Business plans only) Lastly, configure “Visibility” Rules for the button. Here, you can click the cogwheel icon to set filtering conditions based on your use case’s individual needs. One common use case is to only allow certain users to see this button. Another example would be to only show this button for records associated with a particular status or category.
Run automation
Note
For an automation to be used with the “Run automation” button action, it must include the When a button is clicked automation trigger. Read more about the setup process here.
When configuring a button element to trigger an automation, the setup must follow a specific order to avoid a chicken-and-egg error. If you try to turn on the automation before connecting the interface button, the automation blocks you because the trigger has no connected source. If you try to select your automation from the button before the automation exists, there's nothing to select. Follow steps 1 → 2 → 3 in order to resolve this.
Create the automation first. In the Automations panel, create a new automation and set its trigger to "When a button is clicked." Leave the automation turned off — you cannot turn it on yet.
Connect the interface button to the automation. Back in the Interface Designer, add or select your button element, choose "Trigger an automation," and select the automation you just created. Connecting the button here resolves the "source unconfigured" message and satisfies the automation's trigger requirement.
Once you’ve reach the button configuration properties, give the button a descriptive “Label” so that end users know what the button does.
Under the Action section, optionally require confirmation. Learn more about configuring button confirmation here. You can also change the “Action” to another available button action type if needed.
In the Automation section, click the dropdown menu and choose a compatible automation. Alternatively, click the + Create new automation button and follow the steps outlined here. Name the automation and then click Continue in Automations to start building the automation in a new browser tab.
Once a compatible automation has been connected to this button action, you can change the Appearance of the button to be another color. By default, Airtable sets this color to be grey.
(Enterprise Scale and Business plans only) Lastly, configure “Visibility” Rules for the button. Here, you can click the cogwheel icon to set filtering conditions based on your use case’s individual needs. One common use case is to only allow certain users to see this button. Another example would be to only show this button for records associated with a particular status or category.
Turn on the automation. Now return to the Automations panel and enable the automation. The button is connected, so the trigger requirement is met.
Requiring confirmation for button actions
Note
The “Require confirmation” setting is unsupported in buttons created in blank layouts and buttons configured as the “Open record creation form” action.
Toggle on the “Require confirmation” setting in the Action section of a button’s configuration modal.
Give the warning box that will appear a “Title” that will help warn end users. By default, this title will appear as “Are you sure?”
Next, in the “Message” setting, type out a more descriptive explanation of what the button will do if the user confirms the action by clicking the button. Airtable will auto-generate copy based on the button action type you are configuring, but we recommend double-checking it for accuracy and sophistication.
Finally, in the “Button label” setting, choose the text that will appear in the confirmation button. By default, Airtable sets this as “Yes, continue.” Note that a “Cancel” button will always appear for a user to prevent a mistaken button click.
Test the button
It's always a good idea to test the button that you’ve configured, especially in more complex use cases, to ensure that it is performing the way you would like it to.
Understanding interface button permissions
End users with access to an interface page containing one or more buttons can only click on buttons that reflect their permission levels:
Users with Commenter or Read-only permissions can only click on buttons with the following action types:
Copy link to record
Go to URL in record (if they have access to the underlying base)
Go to interface page (if they have access to that page)
Go to external URL
In addition to the button action types above, users with Owner, Creator, or Editor permissions can click on buttons with the following action types:
Update record
Delete record
Apply record template
Run automation
Open record creation form
FAQs
Can an interface button perform multiple actions?
Each button is tied to one main action (for example, Update record or Go to external URL).
Some actions can still do several things at once. For example, Update record can change more than one field in a single click, but it stays one “Update record” button.
I don’t see the option to set my button to “Go to previous/next record” for the action type, why is that?
The “Go to previous/next record” action type is only available in legacy blank interface layouts. Record detail pages automatically include two buttons, ⌄ and ⌃, on each record page that allow end users to navigate through records.
Additionally, these navigation options are only available on the first‑level of record detail pages. So, if your interface has a record detail page inside of another record detail page, then it’s not possible to navigate through records in those deeper record detail pages.