Plan availability | All plan types |
Permissions | Owner / Creator - Can configure interface page layouts Please consult this support article for a breakdown of Interface Designer permissions. |
Platform(s) | Web/Browser, Mac app, and Windows app |
Note
Conditional fields or groups in record details are only available on Business or Enterprise Scale plans
In this article, we will cover the general setup steps and configuration options for the record detail layout. Record detail pages are an important part of most workflows that are powered by interfaces in Airtable.
These layouts can help end users to:
Explore and work with related data using linked records
Understand more detail about a specific record like a “Project” or “Campaign”
Have the opportunity to work with related data like “Tasks” or “Assets”
Interact in a collaborative surface where your team can comment, make edits, and take action with preconfigured buttons
See more detailed information about that record by viewing more fields
View record revision history when enabled
Showing record details in Interfaces
There are two ways to set up a page in your Interface to allow your collaborators to open record detail pages, and they work slightly differently depending on which layout your page is using.
(Recommended) Option 1: Showing a record detail page from pages using List, Gallery, Kanban, Calendar, Timeline, and Grid layouts
Open the interface page using a List, Gallery, Kanban, Calendar, Timeline, or Grid layout in Edit mode.
Click on the main area of the page to ensure that it is selected - you should see a blue outline around it.
In the properties panel on the right side of the screen, under the “User actions” section toggle on the Click into record details option.
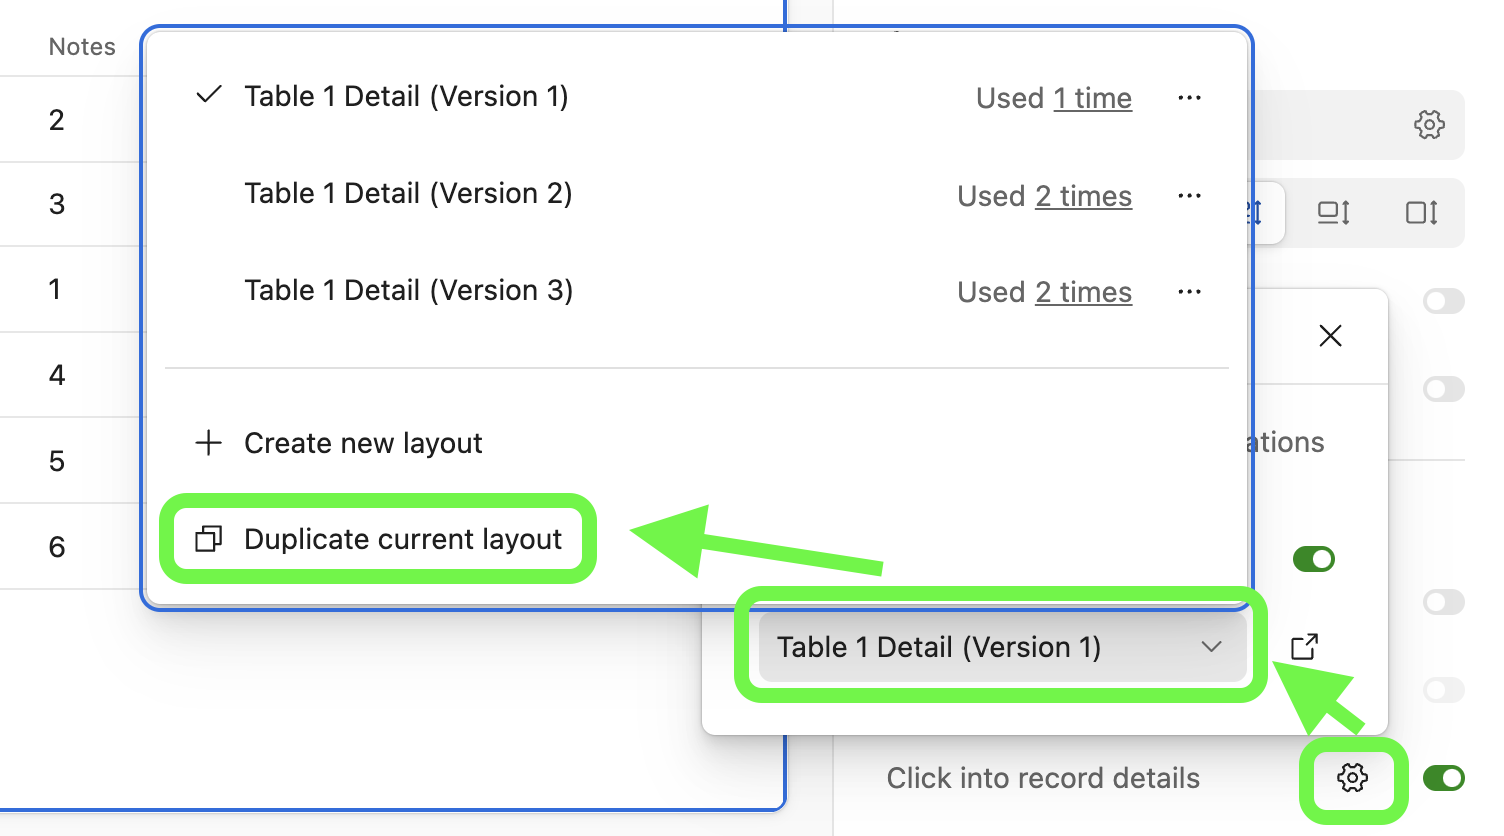
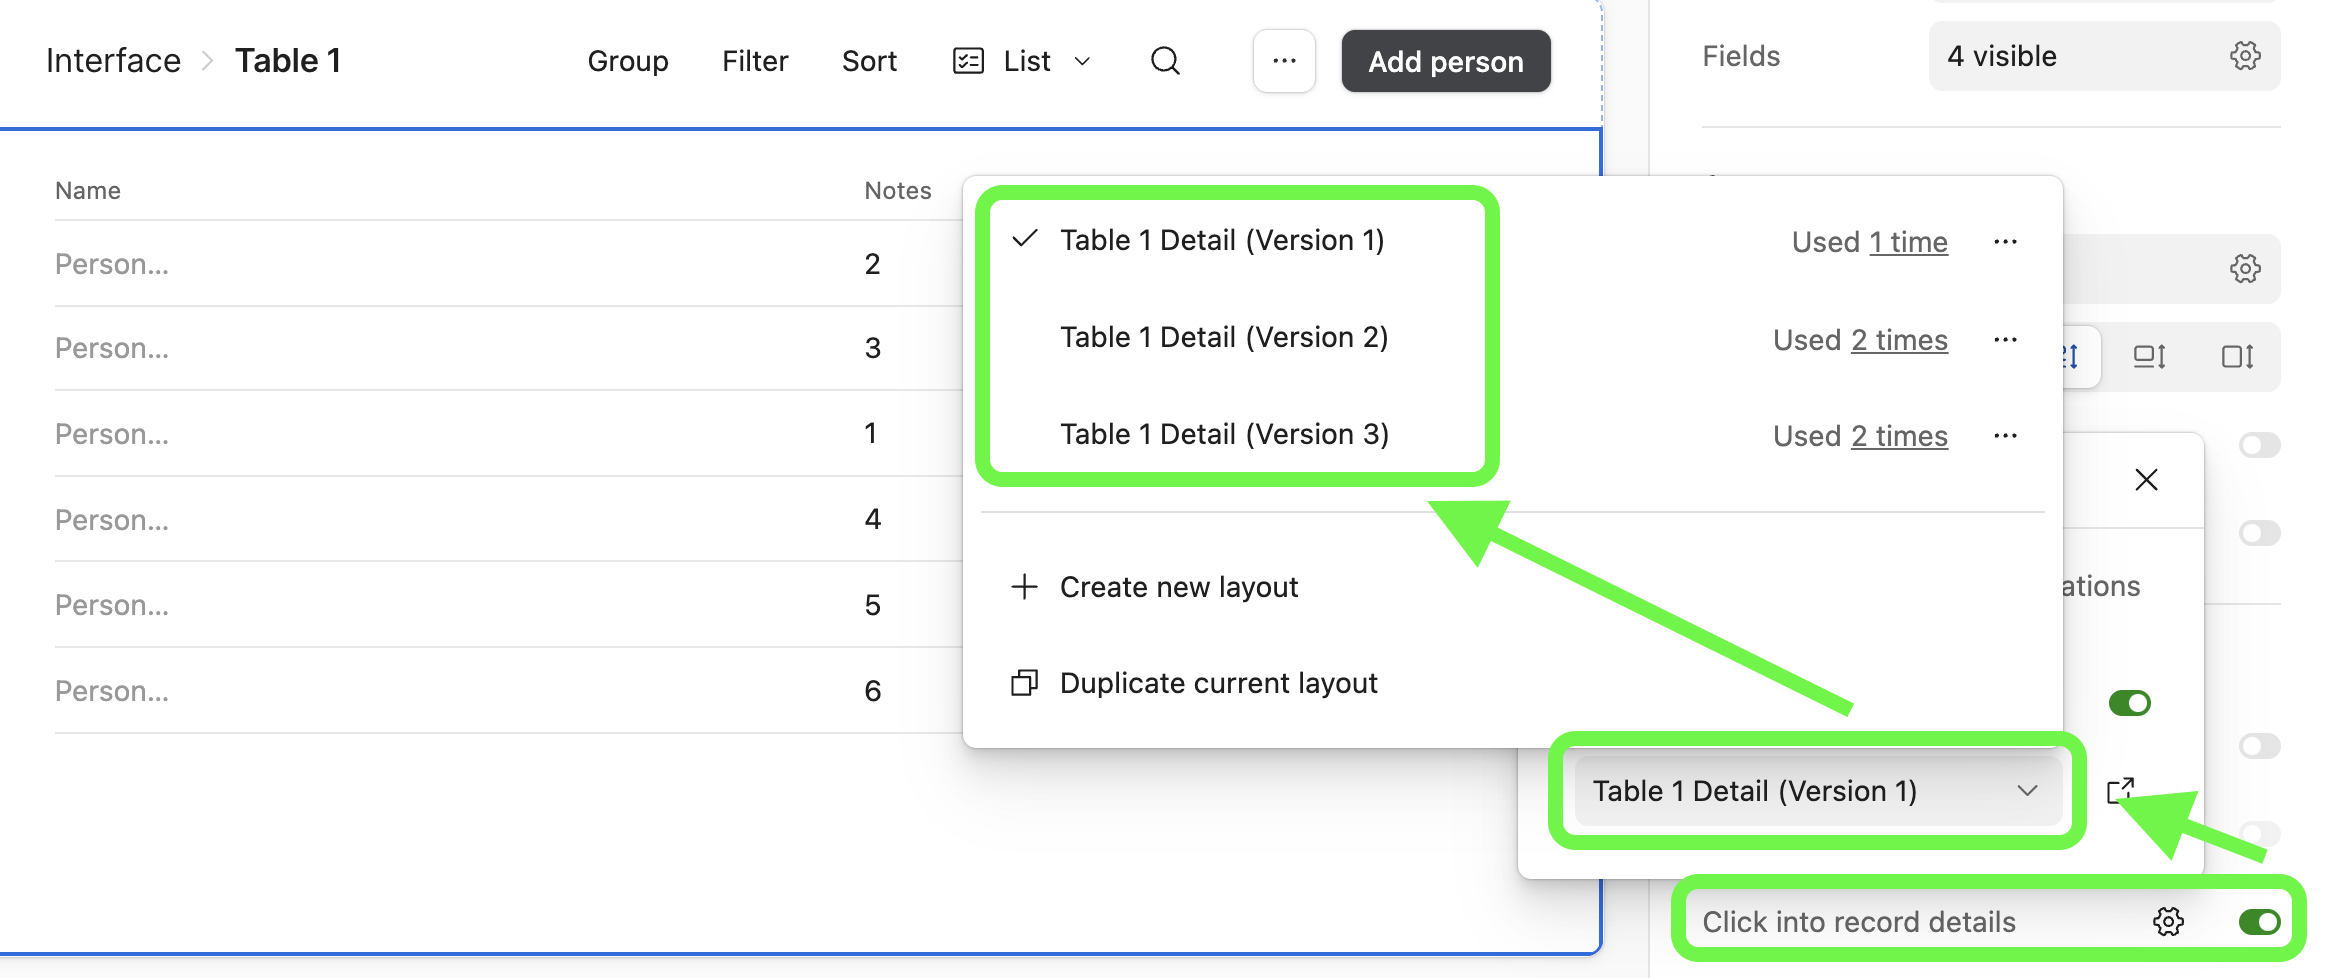
You’ll see a “Record detail pages” menu appear. From here, either:
Click the dropdown to use another record detail page that has already been created
Create a new record detail page - Click the + Create new layout option and begin configuring the page.
Duplicate a layout - Click the Duplicate current layout button and then modify/configure the page.
Click the up arrow icon to edit an existing record detail page.
Option 2: Showing a record detail page from pages using Blank layouts
Open an interface page using a Record review, Record summary, Dashboard, or Blank layout in edit mode.
Click on the Add element button.
Drag a List, Gallery, Kanban, Calendar, Timeline, or Grid element onto the page canvas.
Make sure the element is showing records from the table that you intend it to. Change the table if needed in the Source section of the sidebar.
In the Permissions section of the sidebar, toggle on Allow users to open record details.
You will then see a new record detail layout that your collaborators will be shown when they click on a specific record from this page. You can begin editing the record detail layout using the instructions in the rest of this article.
Configuring record details page settings
Follow the steps in option 1 above to open a record detail page in edit mode. There are multiple sections to consider when configuring a record detail page’s layout. You can change the page’s name in addition to:
Data

Title field - The title, shown at the top of a record detail layout, shows one particular field that is intended to help collaborators identify the record in question. By default, the primary field for the record is used as the title. *Only fields that are supported as the primary field of a record are able to be used as the title field within a record detail layout.
Fields - See how many fields are currently visible on the page. Additionally:
Find a field
Collapse or expand field groups
Hover over a field to reveal the … icon. Click this icon to Delete or Edit that individual field. Note that deleting the field removes it from the record detail page not from the underlying source table.
Toggle record visibility by clicking on the eye icon
Scroll to the bottom of the list of fields to the “Hidden” section to see any fields that will be hidden from end users.
Permissions - Choose between View-only or Editable.
This will affect all of the fields shown on the record detail page.
When turning on editability for all fields on the page, keep in mind that some fields may not be editable for two potential reasons:
The field was independently changed to be view-only or editable at the individual field or individual group level after the setting above was set.
Field or table permissions set in the base can also affect editability.
Learn more about configuring fields in a record detail page in another section below.
Appearance (Sidesheet or full-screen)

Title size - Choose between a large or extra large title on the record detail page.
Page style - Record detail pages display as a sidesheet by default, but this can be changed at any time, with no loss or change to the contents of the record detail layout. You can toggle between these options in the sidebar when viewing a record detail layout in edit mode.
Sidesheet - This option shows the record detail layout in a drawer that slides out from the side of the page on top of the original page, keeping the original page in view.
You can resize the sidesheet by hovering over the left edge of a sidesheet until you see the ↔ icon appear. Click and drag the edge of the sidesheet to your preference. Custom sizing is saved to your browser on a per-page basis, and other users using the same interface will be able to set their own custom sizing.
Choose the sidesheet option when:
You expect collaborators to browse multiple records in the same workflow - A sidesheet includes buttons for moving to the next or previous record.
You expect collaborators to interact with the initial list of records after the record detail page has been opened (e.g. to select a different record or apply different filters).
You want collaborators to keep the original list of records visible for greater context.
You expect collaborators to only comment on the record rarely, or in specific situations.
Full-screen - This will open the record detail layout on a new page that takes up the entire screen. Choose the full-screen option when:
You expect collaborators to focus deeply on one record at a time and not browse multiple records at once as part of their workflow.
You expect collaborators to spend more time working with a single record.
You want to display a large number of fields for that record and need more visual space.
You expect collaborators to comment on records often.
Groups

Tab navigation - Enabling tab navigation allows end users to click tabs to navigate through grouped sections of details on the record detail page. This is particularly useful in detail-rich pages containing many fields of data.
Collapsible groups - Enabling collapsible groups in a record detail page will allow end users to expand or collapse groups of fields.
User actions

Comments - Give end users the opportunity to comment on records when they have opened a record detail page. For more information on commenting in Airtable, see Commenting on records and @mentioning collaborators.
Revision history - Show end users revision history for the particular record that they have open. Note that:
With revision history, users will be able to see any changes that were previously made to fields that are visible in record details, as well as any changes moving forward. These changes may include:
Interface edits
Extensions
Automations
External applications (ex: OAuth)
Buttons - Add one or more buttons to the record detail page that end-users can click to perform a multitude of actions. For a more in-depth understanding of buttons consult this documentation.
Duplicating record detail layouts
You can duplicate record detail layouts to modify them for use in different interface pages without having to start again from scratch. Using different record detail layouts on different interface pages allows you to display different fields from a record, or the same fields in a different order, whenever a user clicks into the record.
To duplicate a record detail layout:
Open up the interface page that you want to configure in edit mode.
Click on the canvas where records are shown as a table visualization. This will open the specific properties panel options for that set of records.
Click on the cogwheel icon in the “User actions” section next to the “Click into record details” option.
Click on the ⌄ icon. Click the Duplicate current layout option. Modify this duplicated layout as needed.
Don’t forget to click Publish when you have completed updating the interface.
Reusing record detail layouts
You can also reuse previously configured record detail layouts to provide consistency in record detail page experience across the various interface pages that make up the interface you are building or modifying. A few notes about reusing record detail pages:
A record detail layout can be reused on other pages, even those pages that are part of another interface from the same base, as long as the page matches the same associated source table from the underlying base.
A record detail page cannot be reused in other interfaces that are part of a different base.
When you enable collaborators to click into record details from a new page, if a record detail layout has already been created for the table that contains the type of records shown on that page, it will automatically be reused.
You can see the different pages where a record detail layout is used in the sidebar when viewing that record detail layout in edit mode.
To reuse a record detail layout:
Open up the interface page that you want to configure in edit mode.
Click on the canvas where records are shown as a table visualization. This will open the specific properties panel options for that set of records.
Click on the cogwheel icon in the “User actions” section next to the “Click into record details” option.
Click on the ⌄ icon. Choose the record detail layout that you want to reuse. You’ll see how many times a certain record detail layout has been “used” across the interface that you are updating. You can always go back to the page-level properties and adjust which record detail layout to use when an end user clicks the Open > button record.
Don’t forget to click Publish when you have completed updating the interface.
Deleting record detail layouts
Keep in mind that deleting a record detail layout will delete that layout in any other locations where the layout has been reused as well. There are two places in edit mode where you can delete a record detail page:
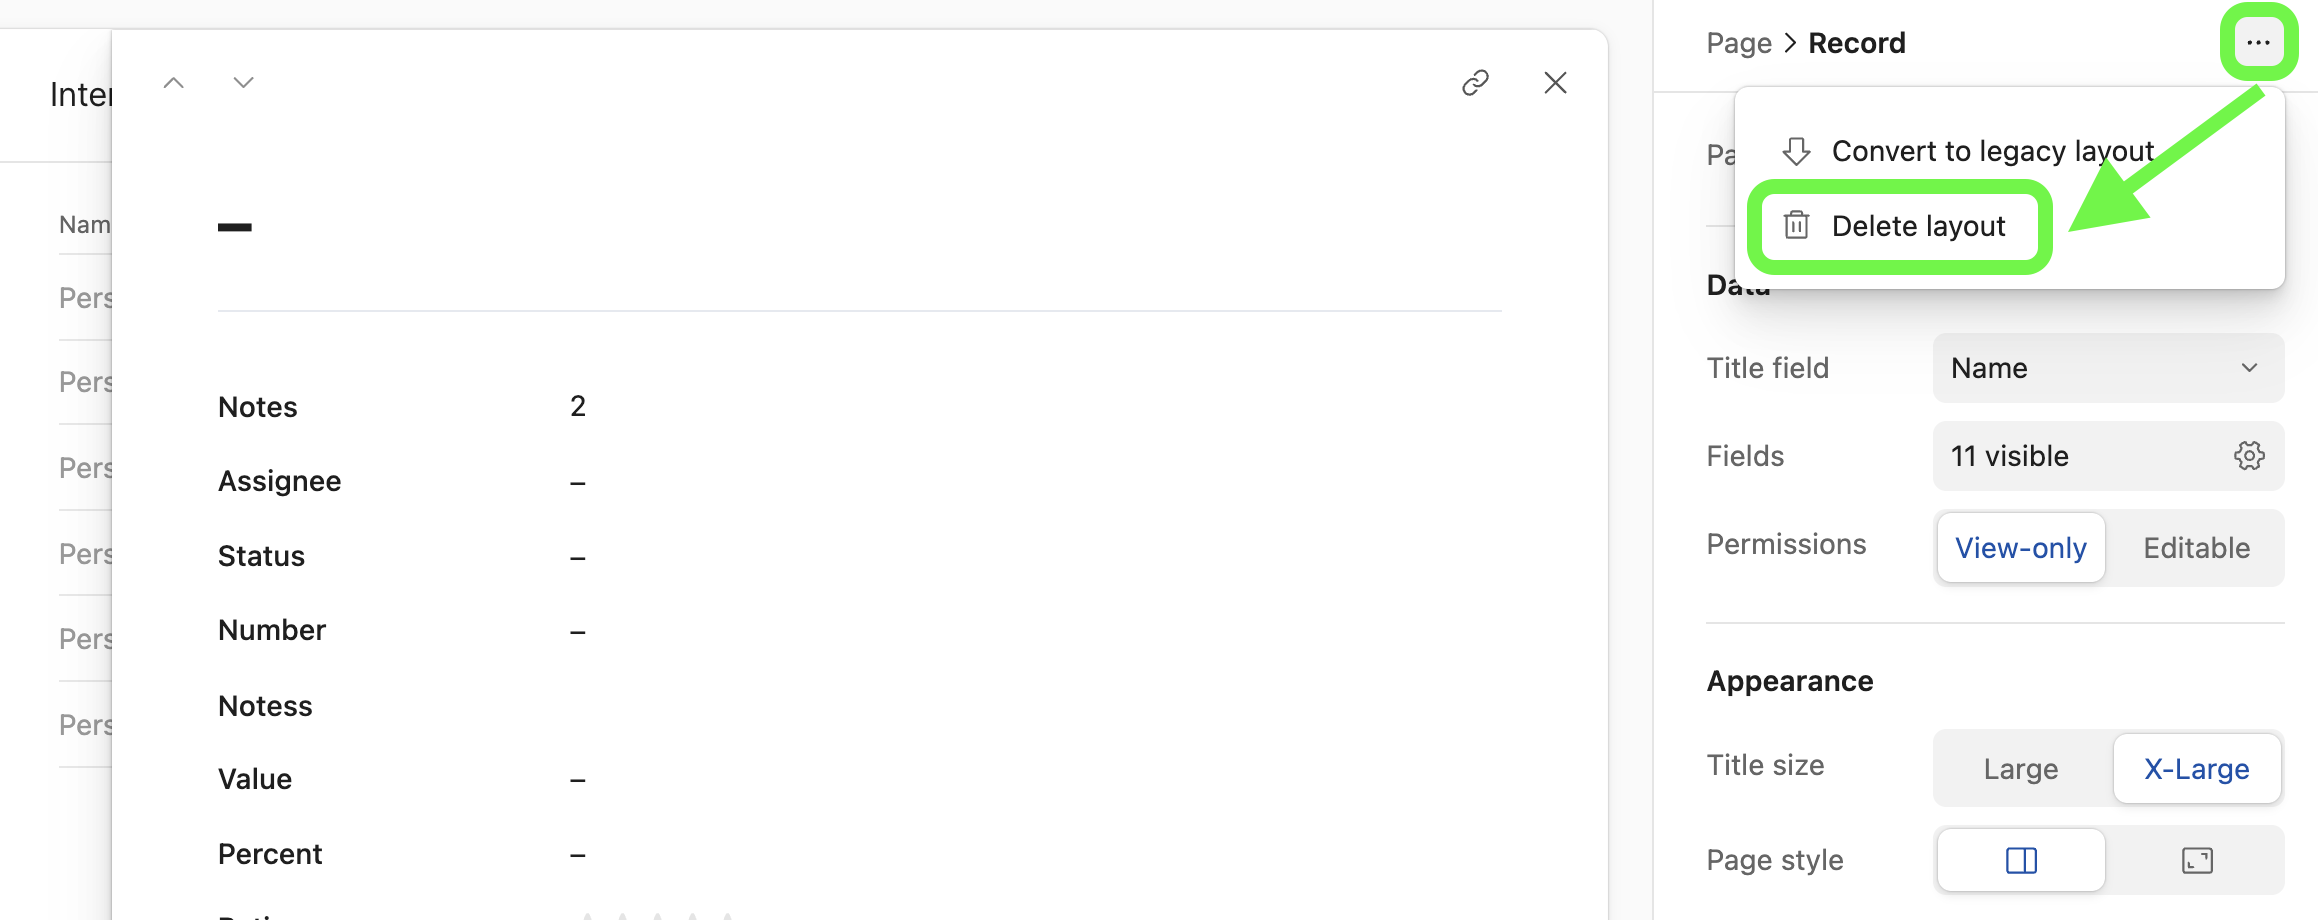
Record detail layout level - Navigate to the record detail page that you want to delete and click the … button at the top of the configuration panel on the right side of the page. Then, click Delete layout. A confirmation message will appear, click Delete again.
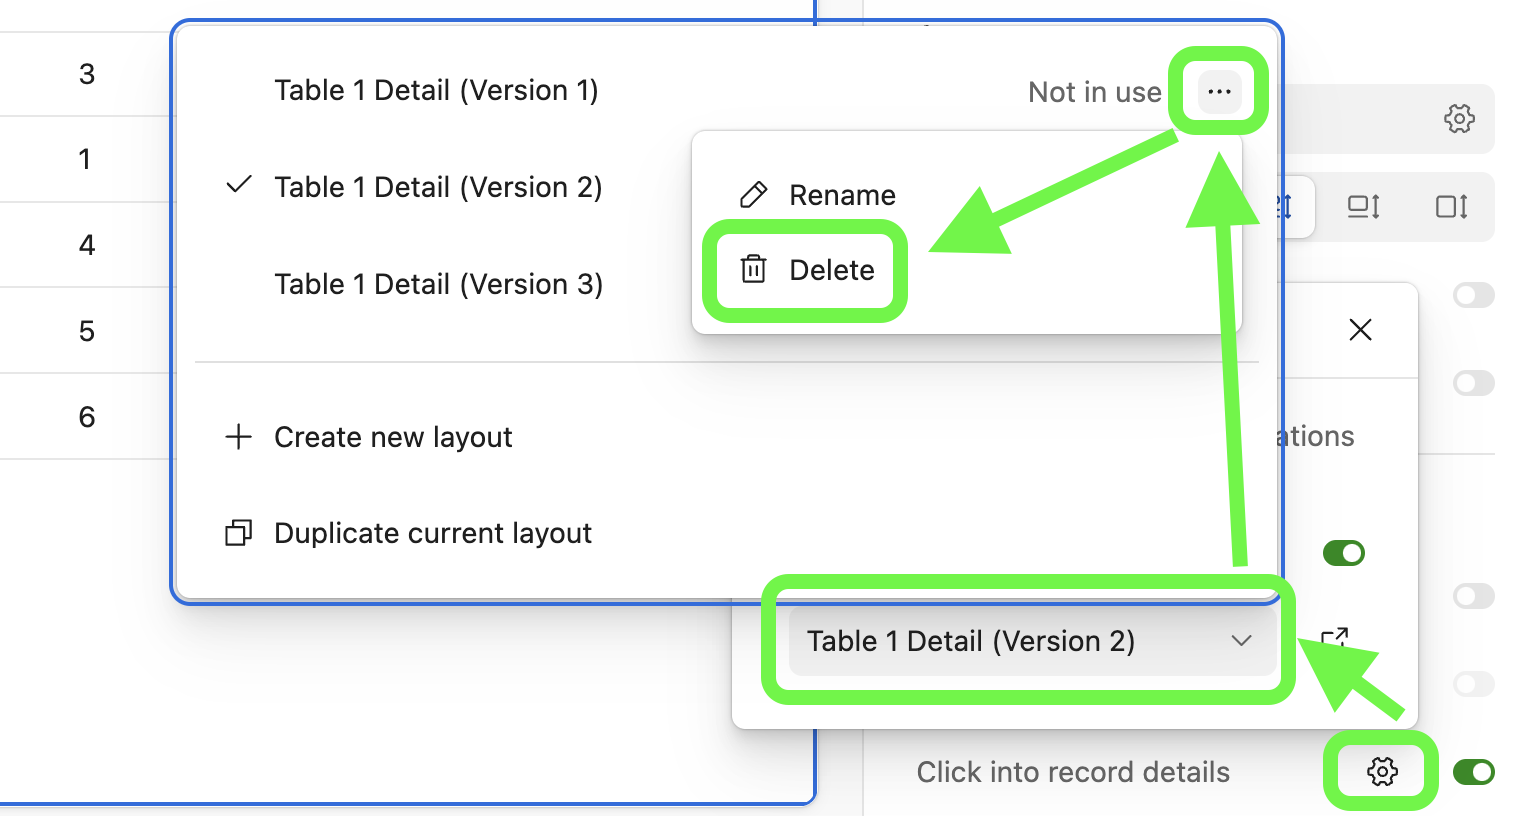
Page visualization menu level - Click on the canvas of a page visualization where the “Click into record details” option has been enabled and click on the cogwheel icon. Next, click on the ⌄ icon. Finally, click the … icon next to the record detail layout that you want to delete and click Delete. A confirmation message will appear, click Delete again.
Showing workflow stages in record detail layouts
“List” and “Stepper” appearance styles are available for any single select field shown in a record detail interface layout. Choosing the “Stepper” appearance option allows end-users to better visualize the current state of the record they are interacting with when they open the record detail page. Some common use case examples for this feature are:
Approval stages
Project status
Publication milestones
Review steps
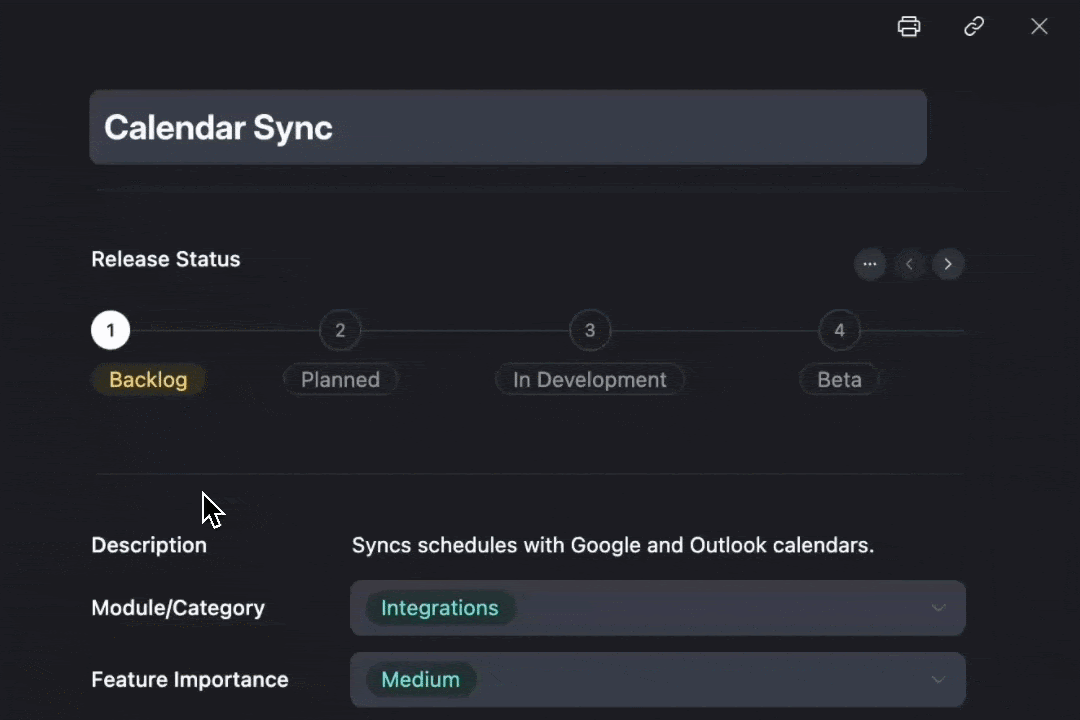
To enable the “Stepper” visual for a single-select field on a record detail page:
Open a record detail page in the interface of your choice.
Click on a single select field to open its configuration options.
Navigate to the “Appearance” section.
Choose the “Style” for the single-select field. There are three options
Field - Traditional dropdown/pill display
Stepper - Visual workflow progression
List - Vertical list with radio buttons
There will be different options to choose from under the “Format” setting depending on which style you chose.
At this point, it’s good to go back up to the “Data” section and set permissions for this field.
View-only - Status changes via buttons or automations
Editable - Users can click steps directly
The new appearances automatically work with your existing field options—no need to reconfigure anything. Be sure to click the Publish button when you are ready so that end-users will see this updated stepper visual.
Upgrading element-based record detail layouts
Follow these steps to upgrade or convert legacy (element-based) record detail layouts:
Open the interface in Edit mode.
Navigate to the element-based record detail layout that you would like to upgrade.
Next to the name of the record detail page click the … icon. Then, click the Upgrade layout button.
A confirmation screen will appear that will show you how many and which locations in the interface are currently referencing the layout.
After understanding any impact the change may make, click the Confirm button.
Some additional information will appear about the upgraded layout.
Once you confirm the upgrade, the page will be duplicated. The original will be renamed to include an “(Old)” suffix. Any elements with the “Click into record details” enabled with this page selected will be updated to link to the new, upgraded page automatically.
Click the Open legacy layout button to open the old page so you can compare the two side-by-side and make any necessary adjustments to the new page. Otherwise, click Done to enjoy the additional features of the upgraded layout.
Note
If you need to revert to the old layout, you can “Revert unpublished changes” on the affected pages or update any layouts with the “Click into record details” option enabled to link to the old page instead.
Adding, reordering, removing, and customizing fields
The record detail page canvas is a clickable space where you can cause additional options to appear in the properties panel on the right side of the page. From the canvas, you can:
Add group - Hovering over a line break on the canvas will reveal the option to + Add group. Groups allow you to section out the various fields that make up the record detail page.
Add field - Hovering in between fields on the canvas will reveal a + button. Click this to add an existing field from the source table or click + Create field to add a new field to the form page. This will also add the new field in the underlying source table.
Remove a field - Clicking on an individual field will reveal a … icon. Click this icon to reveal a menu where you can Remove the field from the form page. *This does not delete the field in the source base.
Field Visibility - In the Rules section of a field’s properties, builders can click the cogwheel icon to set up conditions for when to show a field on the record details page. By default, the visibility rules will be set to “Always show field.” A few important callouts:
This functionality is only available on Business and Enterprise plans
This functionality is not supported on iOS or Android interface experiences
We don’t recommend using this for sensitive fields. Although visually hidden, underlying record/field values may still be exposed. Visibility should not be equated with security in this case.
Reorder fields - You can also reorder/move fields around on the canvas by clicking, holding, and dragging those fields around. You can drag and drop fields above or below other fields, into other groups, or next to other fields (4 maximum, but can vary depending on field type and space constraints).
Using groups in record detail pages
Groups in record detail pages allow you to section together one or more fields on the page for end users. To create a new record detail group:
Click into the page-building canvas. Find a line break on the page and hover over it.
Then, click + Add group.
A New Group will appear. Click on the New group text box. Feel free to rename the group at this time.
This will open up configuration options in the properties panel on the right:
Title - Rename the grouping of fields
Fields - Choose to show or hide
Show group title - Toggle whether to hide or show the group title
Show description - Toggle to show and add a description for the group. Find the “Click to add text” section to add the description.
Show background color - Give the form a slight gray background color to help visually separate the group from other groups or fields.
Field labels - Choose whether field labels (titles) will appear on the Side or on Top of the fields in the group. The “Side” option is not available when two or more fields are next to each other.
Buttons - Choose to add a button into the group that end users can click to perform an action.
Rules - By default, the Visibility rules will be set to “Always show group.” However, builders can click the cogwheel icon to set up conditions for when to show a group of fields on the record details page. A few important callouts:
This functionality is only available on Business and Enterprise plans
This functionality is not supported on iOS or Android interface experiences
We don’t recommend using this for sensitive fields. Although visually hidden, underlying record/field values may still be exposed. Visibility should not be equated with security in this case.
To delete a form group from the canvas:
Click on the group’s name.
Click Delete
A confirmation window will appear. Click Delete again to remove the form group.
To move fields to a new group:
Click into the canvas where the group currently resides.
Click, hold, and drag the group to another location on the canvas.
Using multiple level lists in record detail pages
When your interface contains a linked record field, you can leverage it on record detail pages to create a list visualization that highlights a hierarchy of record dependencies. This allows end users to drill down into details, expanding and collapsing . A common example of this is a Project → Tasks → Subtasks or a Marketing campaign → Key deliverables/Milestones → Assignments hierarchy. Learn more about list views here.
To create a list visualization on a record detail page:
Navigate to an interface in Edit mode.
You’ll need to have enabled the “Click into record details” option as highlighted in the walkthrough above.
Next, open that record detail page to access its properties and configure its look.
You may already show a linked record field such as a “Tasks” link using the Project → Tasks → Subtasks example or you may need to add the linked record field to the record detail page.
Click the linked record field to access its properties.
By default, under the “Appearance” section, the “Show as” setting will be Field. You’ll need to change this setting to View to continue.
Once it is showing as a view, click onto the page canvas where the linked records are showing. This will reveal the properties for the list.
Next, configure the “Hierarchy” by clicking the cogwheel next to the “Levels” setting.
This will open a popup walkthrough to set up the hierarchy for your use case. Click Done once you have configured the hierarchy. Note that you can set a maximum of 3 levels.
At this point you can further configure the list visualization to fit your needs before publishing the interface.

Using charts in record detail pages
When the table that your record detail page is sourced from contains one or more linked record fields, you can add a chart to the page to highlight visual understandings revealed by those linked record relationships. For more general information about charts in interfaces consult this support article that covers the interface dashboard layout option.
Adding a chart to a record detail page:
Navigate to an interface in Edit mode.
You’ll need to have enabled the “Click into record details” option as highlighted in the walkthrough above.
Next, open that record detail page to access its properties and configure its look.
On the canvas click the + button. You can also click the + Add group button if you’d like to create a group of charts.
Click on the Chart option that appears at the bottom of the menu that appears.
Airtable will pre-populate some of the settings of the chart, but you will want to go through and configure each of the following options to fit your use case:
Title - Give your chart a brief title that will tell other users hat is being shown.
Description - Add more description as necessary to give other users context about the chart.
Show description as tooltip - Optionally show the description as a tooltip button
 that other users can click on for more details.
Type - Choose to visualize the chart as a Bar (default), Line, Pie, Donut, or Scatter plot.
Data
Source - Choose which linked record field to use as the source for the chart you are configuring.
Bar, Line, and Scatter charts:
x-axis
y-axis
Pie and Donut charts:
Categories
Values
Filter by - Add one or more conditions or conditional groups to filter the data that is included in the chart.
Appearance
Color - Here you can adjust the color scheme. There are several preconfigured color palettes to choose from.
Bar orientation - Bar chart types only. Choose between horizontal or vertical orientation.
Legend orientation - Pie and donut chart types only. Choose to show the legend on the left, right, top, or bottom. You can also hid the legend by choosing the “Hidden” option.
Show record count in chart - Bar, line, and scatter chart types only. Toggle this option on to show the underlying raw record count on the chart.
Show record count in legend - Pie and donut chart types only. Toggle this option on to show the underlying raw record count in the legend.
Show percentage on chart - Pie and donut chart types only. Toggle this option on to show percentages inside the chart.
Once you’ve configured the chart as needed for your use case, don’t forget to Publish the interface so that end users can see the updated record detail page.
Using numbers in record detail pages
When the table that your record detail page is sourced from contains one or more linked record fields, you can add a number to the page to highlight visual understandings revealed by those linked record relationships.
Adding a number to a record detail page:
Navigate to an interface in Edit mode.
You’ll need to have enabled the “Click into record details” option as highlighted in the walkthrough above.
Next, open that record detail page to access its properties and configure its look.
On the canvas click the + button. You can also click the + Add group button if you’d like to create a group of numbers.
Click on the Number option that appears at the bottom of the menu that appears.
Airtable will pre-populate some of the settings of the number you are adding to the page, but you will want to go through and configure each of the following options to fit your use case. Note, that you may need to click onto the number to configure these properties:
Title - A brief title will help other interface users understand what the number shown means.
Subtitle - Leave this blank if you do not need a subtitle to explain what the number is showing.
Data (Source) - Choose which linked table to source your number calculation from. Click Edit field if you need to make a change.
Filters (Filter by) - Choose whether to filter linked records with conditions or conditional groups.
Appearance
Type - Choose whether the number shown will be a count of the linked records or a summary. When choosing the summary option, you’ll also need to configure which Field the summary will be made on as well as the Summary type. This functions siumilarly to the summary bar, which you can learn more about here.
Color - Click the cogwheel icon to choose a color for the number. You can also optionally toggle the “Background color” option. Lastly, you can also conditionally color numbers as outlined in this support article.
User actions (Click to see underlying records) - Lastly, you can also toggle this option on to allow end users to drill down even further to see the underlying linked records that make up the count or summary of the number shown.
Once you’ve configured the chart as needed for your use case, don’t forget to Publish the interface so that end users can see the updated record detail page.
Note
It’s worth noting that numbers will always appear at the top of a group in the record detail page. However, you can move numbers to a different group or start a new column within the same group.
Configuring linked record fields in record detail pages
There are three settings to configure for linked record fields in record detail pages:
Add records through a form - Toggling on this option will allow end users with editor permissions to add a new linked record via an interface form layout.
Link / unlink records - When this setting is toggled on, end users with editor permissions can:
Link or unlink existing records in the record detail page. Note that new records would need to be added through a form by enabling the “Add records through a form” option.
Link and unlink directly, when shown as a field.
Only List and Grid currently support unlinking. Gallery, Kanban, and Timeline allow linking only, so users must unlink via a field version of the linked record or from the linked record’s own detail page, when shown as a view.
Reorder records — When a linked record field is displayed in Card style, builders can now enable a "Reorder records" toggle independently of the "Link/unlink records" toggle. This allows end users to drag and drop linked records to rearrange their order without being able to add or remove links. Previously, reordering was only available when "Link/unlink records" was also enabled.
Click into record details - When this option is toggled on it will allow end users to click into any records that are linked / shown on the interface page. This effectively shows another record detail page of that individual linked record’s details.
Using a formula field to link to individual record detail pages
Note
The steps that follow will not link to individual record detail pages in interfaces created using the blank layout.
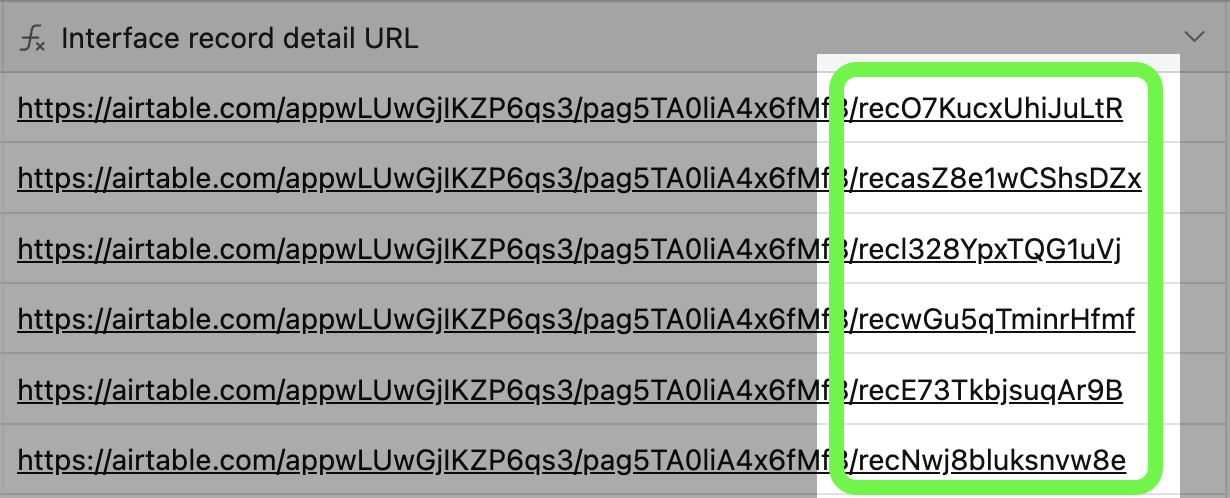
To create a dynamic link to a specific interface record detail page:
From a browser, navigate to an interface containing a record detail page and expand any record to show the record's details.
If you are not already in edit mode, click the ⌄ icon next to the name of the interface and click Edit pages.
On the canvas, click the blue and white + button in the field header row and add a new formula field.
Create a dynamic, record-specific formula like so:
Copy the following formula:
CONCATENATE("https://airtable.com/appxxxxxxxxxxxxx/pagxxxxxxxxxxxxx/", RECORD_ID())Copy the portion of the URL from the browser bar until you find the "?" character. For example, only copy "https://airtable.com/appxxxxxxxxxxxxx/pagxxxxxxxxxxxxx" from the longer URL that you will find.
.png)
Replace the “https://airtable.com/appxxxxxxxxxxxxx/pagxxxxxxxxxxxxx/” portion by pasting the URL that you copied in step 2.
Name and save the new formula field. You'll see a clickable link appear for each record that will open a new tab in your browser to that specific record’s record detail page. You can share this link with other users who have access to the same interface.
FAQs
How do I delete a record detail layout?
Record detail pages can be turned off or deleted.
To turn off a record detail page:
Navigate to the layout of your choice.
Find the section marked “Click into record details” below the “User actions” section.
Toggle the record detail page off.
To delete a record detail page:
Navigate to the layout of your choice.
Find the section marked “Click into record details” below the “User actions” section.
Click the cog wheel icon, then click the drop-down menu.
Finally, click the three dot … icon and click the Delete option.
Why am I seeing a "This record was hidden" message when opening up a record detail page?
Users with interface-only permissions are only able to click into 3 levels of record detail pages.
This limit is necessary to maintain overall interface performance due to the load of checking permissions this many layers deep. The message you are seeing is what the system displays when you have reached the limit of expandable details.
If your Interface users will need to click into a larger number of expanded record details, we would recommend adding them as base collaborators rather than interface only collaborators. While this is not an ideal solution for data access, the base level collaborators would not run into this same limitation on number of expandable detail sidesheets.
Why don't my newly created fields appear as options in the record detail page configuration?
If newly created fields aren't showing up, the interface editor may not have loaded the latest field list from the source table. Click out of the record detail page configuration and navigate back to it to refresh it. It may also help to close and reopen the interface in edit mode entirely. When adding new fields to a base, it can take a moment for them to sync and become available in the interface builder's field selection options.
If your field still is not appearing, then confirm that the field was created in the correct source table that the record detail page is configured to display. Fields from other tables won't appear as options.
Why can't I make certain fields editable in my record detail page?
Computed fields — including formula, lookup, rollup, count, and autonumber fields — are automatically populated by the system. These fields will appear in record detail pages but cannot be made editable.