Plan availability | Business and Enterprise Scale |
Permissions |
|
Platform(s) | Web/Browser, Mac app, Windows App, and the Airtable iOS and Android mobile apps |
Airtable terminology |
|
Understanding multi-source sync concepts
Multi-source sync allows you to connect multiple bases. The records residing in each of the sources are aggregated together in the destination table.
This article will walk you through the basic setup of multi-source sync, and then introduce you to some core concepts to better understand all of the features. We’ll then cover a more advanced example and additional considerations to help you think through how to best use this robust feature.
Sync source - For the purpose of syncing in Airtable, a source is the origin where the synced data is coming from. Within Airtable, a source is a shared view with syncing enabled. We also offer several integrated (external) sync sources. So a source is any place where the data is coming from. Multi-source syncs will always involve bringing two our more sources into a single synced table.
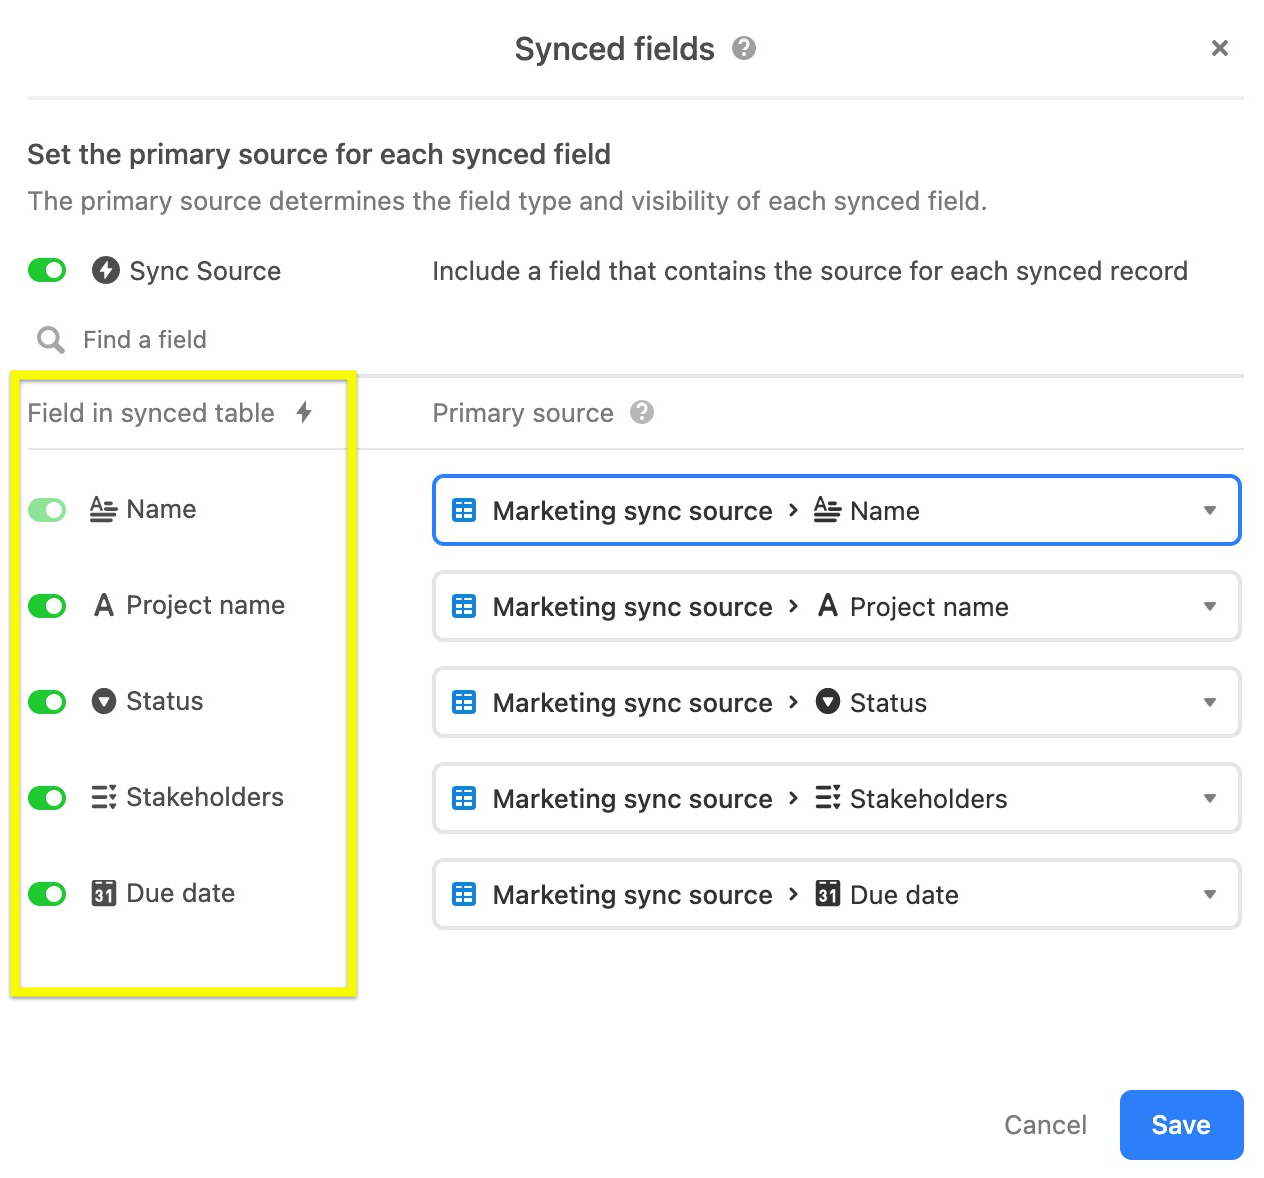
Multi-source sync field mapping
The main difference between single and multi-source syncs is that multi-source syncs require field mapping. Since data in a destination table’s fields can be provided by multiple sources, your choices during the sync setup process will determine how the source fields map to the destination’s synced fields. For example, if a field in one source is formatted differently than a field in another source, then the field mapping setup allows you to determine both where the data will be populated in the multi-source destination synced table as well as how it is formatted.
When adding a new source, we will try and match column names to existing column names. For columns that could not be matched, the default option will be to sync that data to a new field on the table instead. You can change any mappings or opt to sync any source field to a new synced field.
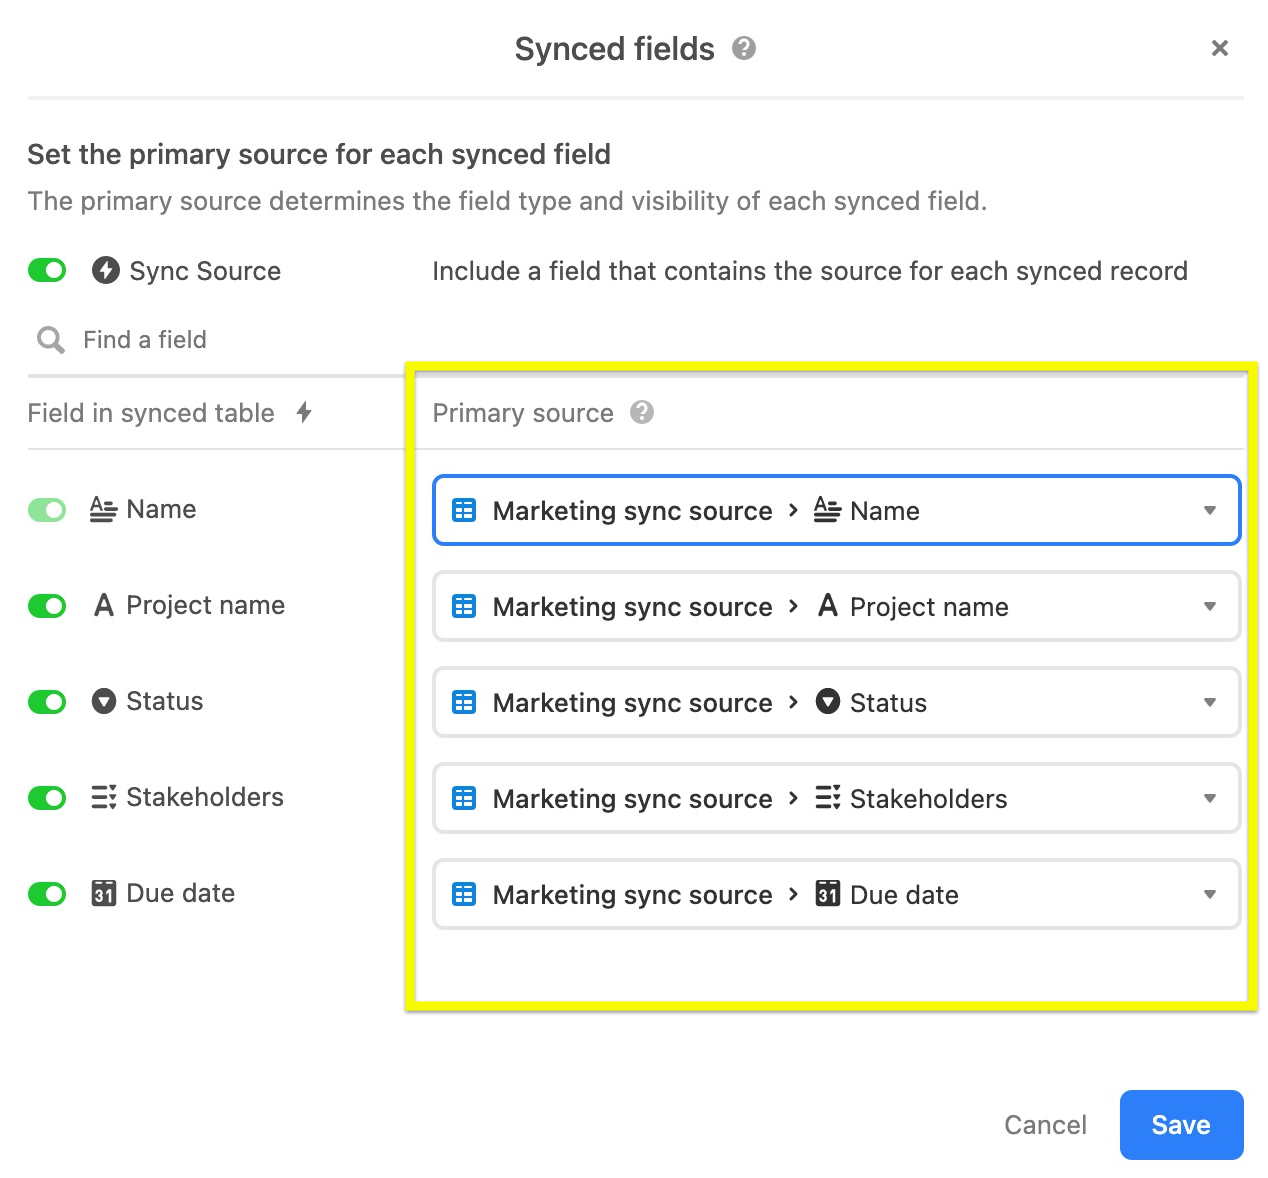
From the image above you can see that some fields were automatically mapped, while others were mapped manually. In particular, notice that the “Completion date” (single line text) field’s information has been mapped to the “Due date” (Date field), thus converting the field type to match the date field format of the primary source.
Primary source - For a sync with a single source, you can consider the single source to be the primary source for all fields. Whichever source first maps to a field, either when setting up the first source or by choosing the "Sync to a new field" option, becomes the primary source for that field. For every synced field you can change the primary source from the sync configuration window. The primary source for a field is what will determine:
The field type and configuration
Whether the field is removed when the source field is hidden or deleted.
Adding multiple sync sources
To set up multi-source sync you’ll need to already have one synced table created. If you’ve never set up a sync before, we recommend reading through our Airtable Sync - Basic setup article. Becoming comfortable with the way syncs work will help you understand the more advanced topics covered in this article.
Adding additional sources to create a multi-source sync:
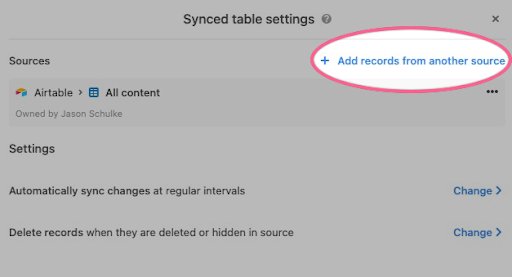
Once a synced table is already created, you can add other sync sources by opening the sync configuration menu. To do this, click the dropdown arrow next to your synced table and click Update sync configuration.
Next, click the Add records from another source option. Clicking this option will allow you to choose another source to sync from.
Note
In the scenario where there are two synced tables in a destination, if the tables share a a linked record field between them and either table has syncing of linked records enabled, then this will disable the option to perform a multi-source sync in both tables.
Depending on which kind of sync source option you chose, there will be varying configuration steps that you will need to follow. We discuss those steps in the various articles available for each sync source type:
Once you’ve gone through the necessary steps to add another sync source, you’ll then need to set up the field mapping based on your needs.
The field mapping setup allows you to determine both where the data will be populated in the multi-source destination synced table as well as how it is formatted.
When adding a new source, we will try and match column names to existing column names. For columns that could not be matched, the default option will be to sync that data to a new field on the table instead. You can change any mappings or opt to sync any source field to a new synced field.
After you’ve mapped the fields, under the “Advanced” section you can choose which field should be used as the primary field.
When you are done with the new sync source’s setup, click the Add source button.
Showing a sync’s source
The Sync source option allows you to see the name of the view from where the synced data is sourced from. When this option is toggled on it will populate your destination table with a new field that shows the name of the view source that each record in the synced table comes from. When you create a new sync, this option will default to being turned on. To turn this option on or off:
Navigate to the base containing your multi-source synced table.
Click the dropdown next to that table’s name.
Click Update sync configuration.
Click Change next to “Advanced sync options.”
Toggle on or off the toggle next to “Sync Source.”
Note
If you would like to be able to quickly navigate to the original source record, then setting up an “Open source record” button field is useful.
Understanding two-way and multi-source sync interactions
Combining the functionality of multi-source syncs with Airtable’s two-way syncing feature can be a very powerful system to configure. However, there are some important callouts to address in order to ensure that combining these two features together is successful for your needs. The information listed is also helpful when troubleshooting cases where changes in a multi-source, two-way synced table are either not possible to make or not syncing back to any source tables.
You’ll need to understand and, in some cases, investigate these three general product areas to allow for two-way syncing on a multi-source synced table:
Ensure two-way syncing is enabled in the source - For two-way syncing to occur in a multi-source sync, each source table will need to be configured to Allow edits from other bases. Consult this documentation to understand more about enabling two-way syncing in a source. If just one source table isn’t
Please note that you will still be able to set individual fields as editable/non-editable, just not the records coming from any specific source.
Check sync destination schema & field mapping - Editable synced fields require that a corresponding field be mapped in the multi-source sync destination to each and every source. The reasoning behind this is that because the field “doesn't exist” in some sources, the system is unable to reflect the sync changes bidirectionally across all sources. By making it uneditable, we prevent the system from being confused over where to allow changes for the sync. As an example, let’s say that there is a “Status” field on the multi-source synced table, but only a “Status” field on 2/3 sources. In this case, the “Status” field will be uneditable in the destination until a corresponding “Status” field is added or shown in the third source. This previously missing or unconnected “Status” field will then need to be mapped correctly in the multi-source sync's settings.
Users may see the error message “This field does not exist for every source” in their synced table when this happens.
Look out for any field and/or table permissions - Field or table editing permissions can be configured in both the destination multi-source table as well as any of the sources connected.
If there are field or table permissions established in the multi-source destination table that prevent users from editing fields, then users will not be able to edit the table from the multi-source destination table. However, users with access to a source table will be able to make edits from the source that reflect in the destination table if similar field or table editing permissions have not been configured in the source.
If field or table editing permissions were established in one or more of the sync's sources, then that can also prevent edits in the multi-source destination table.
Our system registers syncs as if they're a user with ‘Editor’ permission levels. For example, if you set the “Status” field in one of the sources to only allow edits from ‘Creators’ or above, then the corresponding “Status” field in the destination table will become uneditable. Therefore, even if you have ‘Creator’ or ‘Owner’ permissions in the sync's source(s) and the multi-source destination, because the sync effectively has ‘Editor’ permissions, edits won't be accepted for that field until the permission level is adjusted again.
Users experiencing this may see the error message "This field can't be edited because at least one sync source doesn't allow it to be edited" in this case. Adjusting the permission level of the field or table to allow edits from 'Editors and above' should remove potential error messages.
If you are still experiencing issues with the editablity of a field, then check out the sync limitations listed here to see if the field is generally eligible for editing.
Additional multi source sync considerations
After a sync is created, users have the following options for every source field. These options can be found in the “Update sync configuration” window.
Select a new synced field in dropdown - Change the destination synced field for the source field of your choice. The type of the destination synced field will also change based on the primary source field.
Uncheck a field - This option will stop syncing data from this source to the mapped field. If this source was the primary source, then the synced field will also be destroyed.
Click Sync to new field in the dropdown
If the field was previously mapped to a destination:
If the source was primary - the synced field will be destroyed, and the data will be mapped to a new field instead.
If the source was not primary, the data from this source will be mapped to a new field instead.
If this field was previously unmapped - the data in the source field will be mapped to a new synced field.
FAQs
I cannot find the "Add records from another source" option, what might be occurring?
If the first source you set up is syncing linked records (the “Sync linked tables” option is enabled), then multi-source syncing is not supported.
Is there a limit to how many sync sources or synced tables I can have within my base?
You will have different limits for your synced tables according to the plan of the workspace your base belongs to. See our pricing page for more details on the sync limits for your workspace's plan.
How do I see what source a record is syncing from?
To visualize which source a record is syncing from, you'll want to enable the Sync source option in the Advanced field options menu. To navigate to a specific record from a source, you can use the Open Source Record button action to open the record in a new tab.
How is the field type determined when multiple sources are involved?
The primary source determines the field type.
How do I see which source is the primary source?
Navigate to the sync configuration window and select the change button next to the “Advanced field options” row.
why can't I edit a field in a multi-source two-way sync
In a multi-source synced table, an editable synced field must be mapped in every sync source, not just the one you care about. If a field is present in some sources but not all, Airtable makes it read-only in the destination, because it can't reflect edits back consistently across sources that don't have that field. This is expected behavior, not a regression. You have two ways to resolve it:
Map the field in every source. Add the field (matching the type where possible) to each source, make sure it's included in each source's shared view used for the sync, and map it in each source's field mapping in the destination's sync configuration. Once it's mapped across all sources, it becomes editable.
Make it a local (non-synced) field on the destination table instead. If you don't need it to come from every partner source, a local field is fully editable and simpler.
Why is the "+ Add records from another source" option is missing on one of my synced tables?
If the "+ Add records from another source" option is missing, it's likely because linked-record syncing ("Sync linked tables") is enabled on that table's sync. Multi-source syncing is not supported when linked-record syncing is part of the configuration, so Airtable hides the "Add records from another source" option on any synced table that has it enabled. A standard sync without linked-record syncing will still show the option — which is why one of your synced tables allows multiple sources and another doesn't. Additionally, if two synced tables in the same destination share a linked record field and either table has linked-record syncing enabled, the multi-source option is disabled on both tables.