Plan Availability | All plan types |
Permissions |
|
Platform(s) | Web/Browser, Mac app, and Windows app (with some additional limited support on mobile) |
Note
Prefer a hands on tutorial? Try it in Airtable.
Step 1: Defining your link records relationships
Note
For more details on the right table setup, check out our Structuring your Airtable bases article.
To learn more about the types of linked relationships available in Airtable, check out our Understanding linked record relationships article.
Before building relationships between records, it's worth mapping out what those relationships should look like.
What information is being tracked, and how it connects together, is completely dependent on the workflow. A base might have a list of projects, a list of action items, and a list of clients. Or maybe a list of events, a list of attendees, and a list of venues.
In Airtable, it's a best practice to capture each of these lists in a separate table, where each item and all of its details can be stored. But keeping lists in separate tables doesn't mean they have to live in isolation—and they don't have to. Projects have related action items, events have attendees, and so on. In the next step, I'll cover how to create these connections in an Airtable base.
For now, map out which information needs to connect together. Make sure each piece of information is stored in the right table before moving on.
Step 2: Creating a linked record field
Links can be created between records in two different tables or between records within the same table. The first step in creating those relationships in a workflow—projects to action items or attendees to events—is to create a linked record field.
Open your Airtable home screen.
Open the base and table where a linked record field needs to be added.
Click the + button at the far right end of the base's field names to add a new field.
Alternatively, click the dropdown arrow next to the name of an existing field, then click ← Insert left or → Insert right to add the new field.
Find and click Link to another record. Typing "Link" into the search bar will also reveal the Link to another record option.
Choose the same table or another table to link records together.
If the organization uses the data library (data sets) feature or HyperDB, a list of tables will appear under the "Tables from library" section of the table picker. Choosing one of these tables will create it as a synced table in the base.
Name the linked record field and configure the field settings as preferred:
Show display name instead of primary field — When toggled on, choose another field from the current table to use. This changes how linked records are named in the linked record picker.
Note that changing this setting won't adjust how linked record names function in automations, Airtable API, Airtable Sync, or other surfaces that rely on the primary field's name (primary key).
Allow linking to multiple records — When toggled off, only 1 record can be linked per linked record cell.
Limit record selection to a view — Toggle on to choose a view from the linked table containing the records to appear in the record picker. This option doesn't prevent records in other views from being linked—it only limits the records visible when manually linking from the record picker.
Filter record selection by a condition — (Paid plans only) Toggle on to configure record filtering settings for the record picker. This option doesn't prevent records outside the filter from being linked—it only limits the records visible when manually linking from the record picker.
Use AI to show top matches when selecting a record — For more details on this option, see the using AI in linked records section below.
Click Create field.
Once created, a corresponding linked record field is also created in either the same table (self-linking) or the linked table. Navigate to that field to configure its settings as well.
For self-linking fields, this corresponding field will have a default name beginning with "From field:"
Option 2: Convert an existing field into a new linked table
As a workflow grows in complexity, managing additional information often becomes necessary. Using linked records, it's straightforward to expand any dimension of a table into a separate, linked table to add more context.
For example, with only a few clients, it's easy to keep on top of client–project relationships with a single select or single-line text field. Doing so limits client information to just a name—the value captured in the single select.
As the client list grows, it may become useful to track additional information for each client: their address, logo, preferred payment method, or point of contact.
To expand any dimension of a workflow, create a linked record from an existing field. This will create a new table from the values in the existing field—1 record for each value. The new table will have linked records to the original table, maintaining the existing relationship.
With clients now tracked in a separate table, additional information can be added without losing the connection to projects.
Consider which elements of a workflow (venues, clients, products, or anything else) to expand beyond a single field. For any element identified, turn that field into a linked record and add additional details to the new linked table.
Step 3: Creating and leveraging linked record relationships
With a linked record field in place, it's time to start building relationships and putting them to work.
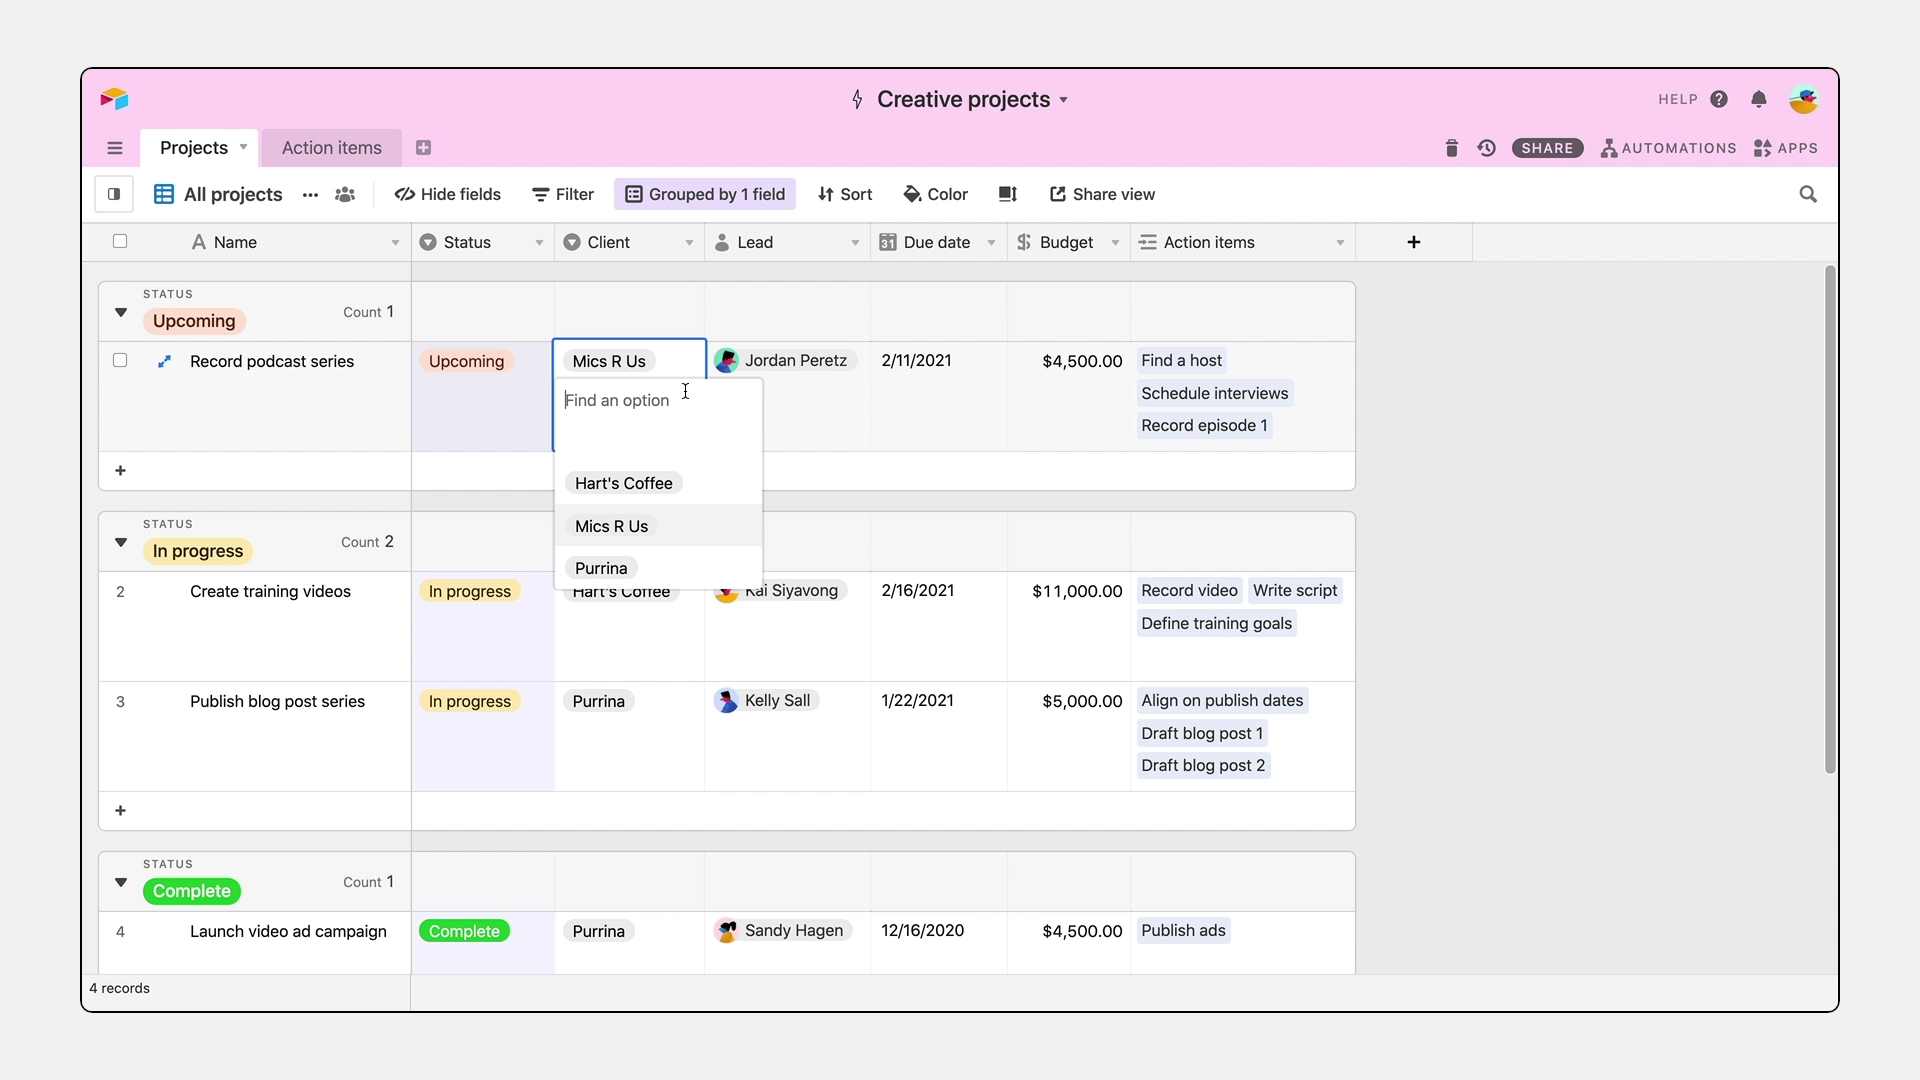
Click the + icon inside a linked record cell to open the linked record picker.
Select a record to link.
This creates a bi-directional relationship between those 2 specific records.
The association is automatically mirrored in the other table. In a project management base, for example, this lets end users see which action items relate to which project (Projects table) and which projects are associated with which action items (Action items table).
Click any linked record in the field to open its expanded record and view related details without leaving the current table.
To surface linked information directly in the table, add a lookup field to dynamically display values stored in linked records. Any updates to the original field will automatically persist in the lookup.
For example, to track project due dates from an action items table, create a lookup field that pulls in each linked project's due date. Any changes made to the project due date will automatically reflect across all action items tied to that project — keeping information consistent and eliminating duplicative data entry.
Using Airtable AI (Omni) in linked records
Note
In addition to enabling AI at the workspace level, organization’s who have admins that manage their Airtable instance in admin panel will need to have AI enabled and have OpenAI or Amazon models enabled for AI-powered linked record matching to function.
When AI is enabled in a workspace, it can help generate top matches when creating linked record fields — making it faster to find the closest matching linked record for review, approval, or decision-making. As more linked record relationships are built over time, match suggestions will continue to improve.
Owners or creators configure which fields on the origin table and linked record table are relevant for matching.
End users viewing the linked record picker will then see AI-powered "Top matches" in addition to all available linked records.
To turn on AI-powered linked record matching:
Open the Airtable home screen.
Create or open a base.
Add or edit a field.
Search for and select Link to another record.
Toggle on the Use AI to show top matches when selecting a record option.
Select 1 or more fields in each table to give the AI context about the records being worked with. This also helps the AI ignore fields that aren't relevant to the linked record field. For more details, see the best practices for Deep Match section below.
Click Create field for a new linked record field, or Save for an existing one.
AI-powered linked records (Deep Match)
Airtable offers an AI-powered option for linked record fields called Deep Match, which uses semantic understanding to automatically suggest matching records from a target table based on the content of your records.
How does Deep Match work?
When you enable AI matching for a linked record field, Airtable uses vector similarity search to find records in the target table that are semantically related to your source record. This is particularly useful when you want to automatically link records based on meaning rather than exact text matches.
Matching limits
Deep Match returns up to 20 matching record suggestions per source record. This limit exists for performance and cost optimization reasons:
Each match involves vector embedding calculations
Processing more matches would significantly slow down the AI field
The limit helps manage AI API consumption
The 20 records returned are the most semantically similar matches based on the AI's understanding of the content. If your target table contains more than 20 potential matches, only the top 20 most relevant records will appear as suggestions.
Best practices for Deep Match
Use when semantic matching matters: Deep Match works best when you want to link records based on meaning or context rather than exact text matches.
Consider the 20-record limit: If you expect more than 20 potential matches for a given record, be aware that only the most relevant matches will surface.
Combine with filters: Use view filters or other criteria to narrow down your target table if you need more precise control over which records are considered for matching.
The more links you make, the better the AI will be at matching.
AI will make suggestions based on previous selections made for similar records.
It’s best to use fields with text-based outputs, especially the one or ones that provide the most descriptive context about the record such as a category from a single or multiple select field, or text fields containing names and descriptions.
For example, if you want to have the AI suggest linked records that reveal a relationship between certain projects and tasks, then you would select “Project name” and “Project type” fields in the project table and “Task name” and “Descriptions” in the other.
We don’t recommend using number-based or date/time-based fields, because the AI is not calibrated to detect these types of relationships.
It’s also best to use fields that offer as concise of information as possible.
For example, a long text field with a lot of information may not utilize all of text in the cell as the AI would ignore any content over a couple hundred words for the purposes of matching.
Linking records within the same table
Note
Adding or changing links in either field automatically updates the corresponding records.
Links can be added or removed in both directions
Self-linked records are linked record fields that connect records within the same table, which can be used to show relationships like:
Team members and their managers
Tasks and their subtasks
Projects and their subprojects
Related items that reference each other
When creating a linked record field that references your current table, Airtable automatically creates a corresponding reciprocal linked record field. This reciprocal field will be named "From field: [Your Field Name]" and shows the inverse relationship. Self-linked records examples:
When creating a "Manager" field, Airtable automatically creates a "From field: Manager" field that can be renamed "Direct Reports."
When creating a "Parent Task" field, Airtable automatically creates a "From field: Parent Task" field that can be renamed "Subtasks."
To create self-linked record fields:
Open your Airtable home screen.
Open the base where you want to crate a self-linked field.
Click the + icon the right of the your base’s last field.
Alternatively, you can click the dropdown arrow next to the name of an existing field and then either click ← Insert left or → Insert right to add the new field.
Search for and select Link to another record.
When prompted to select a table to link to, choose your current table
Airtable will automatically create the reciprocal field named "From field: [Your Field Name]."
You can then rename reciprocal field.
Reordering record links in Airtable
There are times when you may want to reorder records within a linked record cell.
Note
The records linked most recently will appear at the end of the list of records.
If a record that was linked first is removed and then re-added, then that record will appear at the end of the list of records.
To manually reorder linked records:
To manually reorder a linked record:
Open your Airtable home screen.
Open the base > table > linked record field with the links you want to reorder.
Expand the cell with the link(s) you want to reorder. To do this:
Click on the cell containing the linked records that need to be reordered.
Either click the two arrow icon
 or press Shift + Space
Select a linked record, then drag and drop it somewhere else in the record link order.
To reorder linked records using the batch extension:
Note
Extensions are only available on paid Airtable plan workspaces.
To reorder linked records using the batch extension:
Open your Airtable home screen.
Open the base with the linked records that you want to reorder.
Click Tools in the upper-right portion of the base.
Click Extensions.
Click Add an extension.
Search for or scroll to the batch update extension.
Click Add next to “Batch update.”
Click Add extension.
Using the dropdown menus, select the “Table” and “View” that contains the linked record field that you want to reorder.
Only calendar, gallery, grid, and kanban view types are supported.
You’ll want to consider whether or not the view has filters configured since the batch extension will only update records that are filtered to show up in the view.
Click + Add action.
In the dropdown below “Field,” select the linked record field you want to reorder.
In the dropdown below “Action,” select the Sort links option.
Choose whether the links in that view will be sorted in Ascending or Descending order.
After configuring the extension, you will likely need to return to the batch extension and click Update records to periodically reorder the way the linked records are sorted.
Converting an existing field to be a linked record field
Note
Converting a field to be a linked record field will also automatically create a linked record field in the table you linked to. The name of this field will default to the name of the table you linked from. Also note that if any of the values in the field you're converting into a linked record field don't already have a corresponding record in the table you're linking to, new records with the names of those values will be created automatically in the table you're linking to.
Before making any field type conversions, make sure that separate values are separated by commas—that's how Airtable parses whether or not there are multiple values in a cell. If you have any values that have a comma in them, wrap those values in double quotation marks to prevent commas acting as separators.
For example, the value The Lion, the Witch, and the Wardrobe in a single line text field will create three separate links when converted into a linked record field: The Lion, the Witch, and and the Wardrobe. However, if you include double quotation marks around the value, like "The Lion, the Witch, and the Wardrobe", you'll get just one link: The Lion, the Witch, and the Wardrobe.
You’ll want to scrub through all the data in your field across all of the records held in the table before continuing. Sometimes, it can be helpful to try using a formula field to help with this, but needs will vary by use case and the way you have customized your base.
To convert the existing field to be a linked record field type:
Open your Airtable home screen.
Open the base with the field that you want to convert to a linked record field.
Click the dropdown next to the name of the field.
Click Edit field.
Click on the current field type, then click Link to another record.
Next choose an existing table to link to or click + Create a new table.
Configure the linked record field settings and click Save.
This will convert the values in the field to be linked record relationships.
FAQs
I can’t find a linked record field that links back to the same table or another table, what might be occurring?
When a linked record field is created, the “backlink” field created is usually:
At the end of the table for cross-table linked record fields
Directly after the newly created field for self-linked record fields
However, if the table the “backlink” field is being automatically created in has fields hidden in the current view, the automatically created field may be hidden as well. To remedy, create a new view that doesn’t have hidden fields or adjust which fields are hidden in the view you are using.
Is there a limit of the number of linked records that can be linked to a single cell?
Yes, there is a hard limit of 100000 linked records in a single cell of a linked record field. Note that in Team and Free plan workspaces, this limit will be lower and will reflect the table limits for each plan (Team = 50000, Free = 1000).
If you need to link additional records to the same record, then you would need to make additional linked record fields as needed and link the records not currently linked in the previous linked record field(s).
How does the linked record field’s "Show display name instead of primary field" setting behave with Airtable Sync?
When you sync a table into another base, the "Show display name instead of primary field" setting for linked record fields does not transfer to the destination base. The destination base will use the original (primary field) default display settings, and this option cannot be adjusted for synced tables. If you need the display name to appear in the destination, you may need to consider alternative approaches such as using a lookup field to pull in the desired display value.
Can I use AI-powered linked record matching in automations?
No, AI-powered linked record matching is a field-level feature designed to help users manually select appropriate linked records through the record picker interface. This AI matching capability is not available within Airtable automations.
When building automations that need to find or match records, the Find records action uses text-based conditions rather than AI semantic matching. In Find records, you can filter by linked record columns, but matching is by record reference only—not by AI semantic similarity. If you need to match records in automations based on linked record information, you'll need to use workarounds such as:
Finding records based on a view that has filters configured with your linked record criteria.
ex. Tasks within a certain date range will be linked to a higher-level sprint record in another table.
Linking records based on a separate condition that could be a single or multiple select field or an AI long text field that generates some kind of output that can help match and link records by record ID.
ex. When a record contains comma-separated record IDs from another table based on a prompt you’ve configured in a long text field, automatically link that list of records using the update record action. You would inut the output of linked record ids as a token in the linked record field you desire. Remember that you need the record ids of the records you want to link from the other table, not from the table you are currently in.
How many linked records can I create for each plan type?
Free: Up to 1,000 records per base.
You can link records between tables as much as you want, as long as you don’t exceed 1,000 total records in the base.
Team: Up to 50,000 records per base.
Business: Up to 125,000 records per base.
Enterprise Scale: Up to 500,000 records per base