- Getting started with Airtable
- Introduction to Airtable basics
- Contacting Airtable Support Updated
- Airtable home screen
- Glossary of Airtable terminology
- Airtable technical requirements
- Feature differences between Airtable on desktop and mobile
- Airtable keyboard shortcuts
- Using Markdown in Airtable
- Adding descriptions in Airtable
- Finding Airtable IDs
- Airtable Automations
- Automations Overview
- Automation feature walkthroughs
- Integrated automation walkthroughs
- Airtable automation walkthroughs
- Linking existing records using automations
- Conditional groups of automation actions
- Repeating groups of Airtable automation actions
- Creating recurring records using automations
- How to delay Airtable automation runs
- Prevent automations from triggering by mistake
- Use automations to timestamp status updates
- Automation Triggers
- Airtable Triggers
- Airtable automation trigger: When record matches conditions
- Airtable automation trigger: When a form is submitted
- Airtable automation trigger: When record created
- Airtable automation trigger: When record updated
- Airtable automation trigger: When record enters view
- Airtable automation trigger: At scheduled time
- Airtable automation trigger: When webhook received
- Airtable automation trigger: When a button is clicked
- Airtable automation trigger: When email received Updated
- Integrated Triggers
- Airtable Triggers
- Automation Actions
- Airtable Actions
- Airtable automation action: Send email Updated
- Airtable automation action: Create record
- Airtable automation action: Update record
- Airtable automation action: Find records
- Airtable automation action: Sort list
- Airtable automation action: Run a script Updated
- Airtable automation action: Generate with AI
- Integrated Actions
- Airtable automation actions: Slack
- Airtable automation actions: Google Workspace
- Airtable automation action: Send MS Teams message
- Airtable automation actions: Outlook
- Airtable automation actions: Jira Cloud
- Airtable automation actions: Jira Server / Data Center
- Airtable automation actions: Salesforce
- Airtable automation action: Create post in Facebook Pages
- Airtable automation actions: GitHub Issues
- Airtable automation action: Hootsuite post
- Airtable automation action: Send Twilio SMS
- Airtable Actions
- Airtable Bases
- Using Airtable Cobuilder
- Airtable bases overview
- Creating and managing Airtable bases
- Structuring bases in Airtable
- Moving bases between workspaces in Airtable
- Creating and managing tables in Airtable
- Creating Airtable base share links
- Importing third-party data into Airtable
- Using insights in Airtable
- Troubleshooting Airtable base performance
- Airtable Betas
- Collaborating in Airtable
- Airtable Enterprise Support
- General Enterprise information
- External badging in Airtable
- Using app library and components in Airtable Updated
- Ask an Expert beta overview
- European data residency at Airtable
- Airtable user groups overview
- Airtable Enterprise API
- Creating and managing data retention policies in Airtable
- eDiscovery APIs in Airtable
- Airtable and data loss prevention
- Accessing Enterprise audit logs in Airtable
- Set up Jira Server / Data Center to connect with Airtable
- Admin panel pages
- Airtable admin panel overview
- Users - Airtable enterprise admin panel
- Airtable admin panel user details
- Groups - Airtable admin panel
- Workspaces - Airtable Enterprise Admin Panel
- Bases - Airtable admin panel
- Interfaces - Airtable admin panel
- Data sets - Airtable admin panel
- Managed apps - Airtable admin panel
- Components - Airtable admin panel
- Reports - Airtable admin panel
- Settings - Airtable admin panel Updated
- Managing Enterprise organizations
- Managing Enterprise admins in admin panel
- Using Organizations
- Organization branding for apps in Airtable
- Enterprise Hub in Airtable
- Enterprise Hub: Org unit assignment with user groups Updated
- Deactivating, removing access, and reactivating users in the admin panel
- Managing user access to workspaces and bases
- Airtable Enterprise Key Management Updated
- Custom terms of use New
- Enterprise SSO
- General Enterprise information
- Airtable Extensions
- Airtable Fields
- Fields Overview
- Attachment
- Date-based fields
- Formula
- Getting Started with Formulas
- Formula Foundations
- The essentials of Airtable formulas
- Formula writing tips for beginners
- Troubleshooting formulas
- Basic calculations
- Conditional statements
- Logical arguments
- Working with dates
- Displaying DATETIME_FORMAT using the date field in Airtable
- Working with date functions in Airtable
- Calculating the difference between dates in Airtable
- Supported DATETIME_DIFF unit specifiers in Airtable
- Supported DATETIME_FORMAT format specifiers in Airtable
- Using the DATETIME_PARSE() formula in Airtable
- Working with timezones
- Record functions
- Text functions
- Numeric functions
- Common Solutions: Beginner
- Common Solutions: Intermediate
- Common Solutions: Advanced
- Long Text Field
- Linked Record Field
- Linking records in Airtable
- Limiting linked record selection to a view in Airtable
- Dynamic filtering in linked record fields
- Linking to one, many, or a subset of Airtable records
- Converting existing fields to Airtable linked records
- Reordering record links in Airtable
- Understanding linked record relationships in Airtable
- Number-Based Fields
- Other Fields
- Rollup, lookup, and count fields
- Select and user fields
- Integrating with Airtable
- API
- Getting started with Airtable's Web API
- Creating personal access tokens
- Airtable Webhooks API Overview
- Service accounts overview
- Airtable Web API - Using filterByFormula or sort parameters
- Airtable API Deprecation Guidelines
- Airtable API: Common troubleshooting
- Managing API call limits in Airtable
- URL length limitations for web API requests
- Integration services
- Third-party integrations via OAuth overview
- Troubleshooting disconnected OAuth integrations in Airtable
- Options for integrating with Airtable
- Third-party integrations - Common troubleshooting
- Low-code integrations - Common troubleshooting
- Integrating Airtable with external calendar applications
- Visualizing records from Airtable in Tableau
- Visualizing Airtable records in Microsoft Power BI & Power Query
- Integrating HubSpot with Airtable
- Using Zapier to integrate Airtable with other services
- Using Zapier's Multi-Step Zaps to find and update records
- Using IFTTT to integrate Airtable with other services
- Integrating with AWS Lambda & DynamoDB
- Developer tools
- API
- Airtable Interface Designer
- Interface Designer overview articles
- Interface layouts
- Interface elements
- Adding and removing elements in interfaces
- Adding layouts to interfaces
- Formatting elements in interfaces
- Interface element: Button
- Interface element: Calendar
- Interface element: Chart
- Interface element: Filter
- Interface element: Gallery
- Interface element: Grid
- Interface element: Kanban
- Interface element: Number
- Interface element: Record picker
- Interface element: Text
- Interface element: Timeline
- Learning and Resources
- Managing Airtable
- Airtable Policy
- Airtable Records
- Airtable Sync
- Airtable Views
- Airtable Workspaces
- Print
- Share
- DarkLight
- PDF
All paid plans | |
| |
Platform(s) | Web/Browser, Mac app, and Windows app |
Timeline views allow you to organize tasks, projects, or other trackable events in an easy-to-understand and visually pleasing way. Grouping records in the timeline view is similar to grouping records in grid or gantt views with some important differences explained below.
Understanding timeline view grouping
The Group option can be found near the middle of the view customization bar.
Once clicked, several configuration options will appear. These options are covered in the Guide to grouped records article. It’s important to remember that if you already have a view with groups set up the way you’d like them to appear in the Timeline view, then you can click “Copy from another view” to save yourself a bit of time.
If a timeline view is grouped by a field that allows multiple values, then the Utilization function will be unavailable.
Showing group overviews in timeline summaries
Choosing to summarize groups as an overview in timeline views allows end users to view high-level details about the records associated with one or more of the groups that you have set up in the timeline view. The group overview summary will show:
The name of the group being summarized
The date range of records within the group
The number of records in the group
Configuring and using group overviews in timeline summaries
Navigate to the base and table containing the view where you want to show a group overview summary. You’ll need to have already set up one or more groups within the view. Alternatively, set those up now before proceeding.
Next, click on the Summarize option in the view. Here, you will choose the Group overview summary option and then choose which groups will show the group overview summary.
Note that the location choices will be restricted to the groups that you’ve already configured.
If you aren’t seeing an expected group, then go back to the group settings and add or modify those settings so that the group appears in the view.
You can enable just one, a mix of, or all of the groups in the timeline view to show the group overview summary.
Now, users can expand and collapse groups to hide and reveal these group overview summaries.
![timeline_group_overview_summaries_2024(2).png](http://cdn.airtable.document360.io/d0ee2ee4-3f78-47c7-b388-85e40be9fb89/Images/Documentation/timeline_group_overview_summaries_2024(2).png)
Using drag-drop groupings
One of the main differences between grid/gantt views and the timeline view’s groupings is the ability to drag and drop timeline records into different groupings.
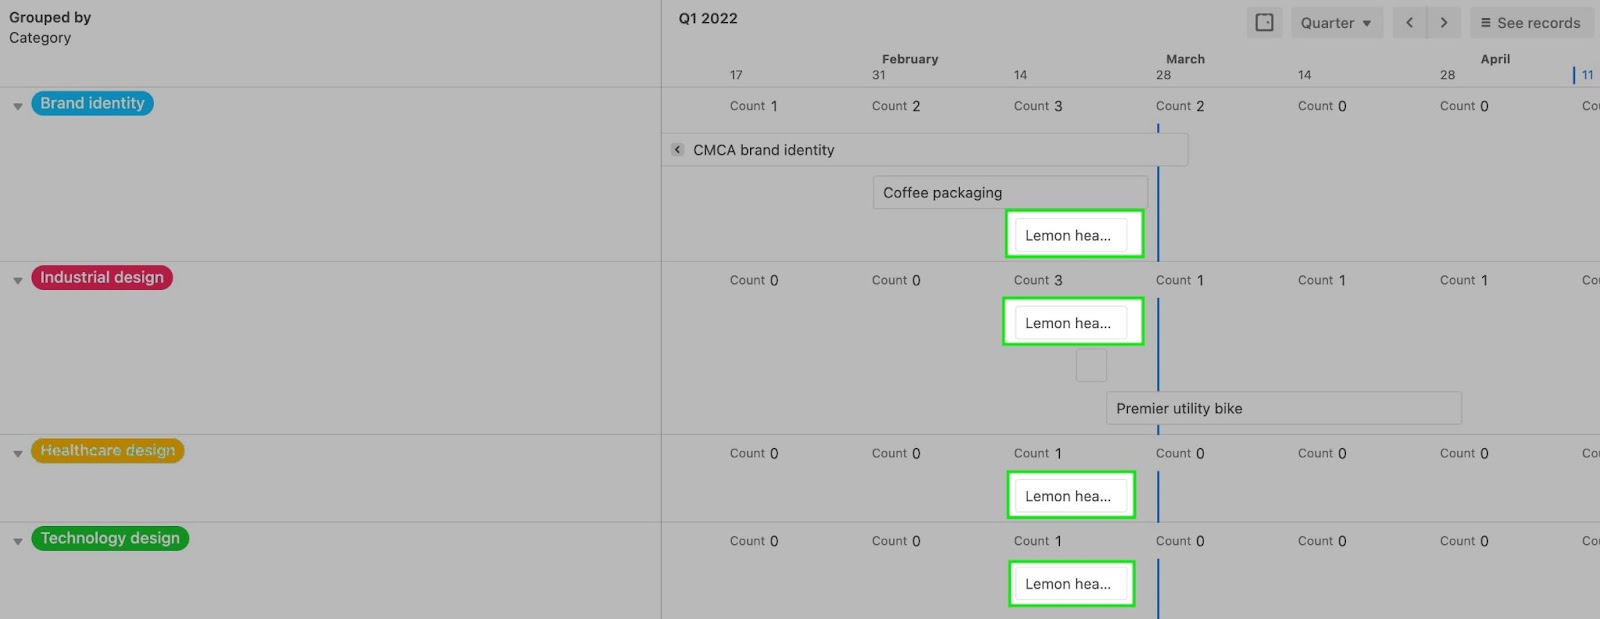
When the value that the record is being grouped by is connected to a single value field such as a Single select field or a Linked record field with “Allow linking to multiple records” turned off, dragging a record from one group to another will result in the removal of original value and the new group’s value will be added. Here’s an example of that process in action:
Notice that the green-colored “Technology Design” grouping is removed from the view once we move the record to another grouping. This is because no other records in our view currently meet the filter conditions.
Grouping behavior with multiple options
In grid and Gantt views, when a grouping has multiple values it creates a new “pseudo” grouping that is composed of those multiple values. In a Timeline view, you can decide whether the same records split into multiple groups or if it only appears as the single “pseudo” group.
If you toggle the “Split multiple values into individual groups” option on, then the same record will appear in each group that it is associated with.
However, if you choose to leave that option toggled off, then the record will appear in the “pseudo” grouping that is a combination of all of the groups it is a part of.
When you drag-drop an event into the multiple-valued grouping it will remove all of its current group attributes and have the multiple matching group values added instead. If you move a multi-grouped event to a single group it will remove all the group values and replace those with the single group value.
The important thing to be aware of here is that groups are not appended when you drag-drop events. Instead, they are removed and then made to match the attributes of the group where the event was dragged to.
Note
Even though records may appear multiple times when the “Split multiple values into individual groups” option is on, they will still only be counted once in Timeline view’s summary bar and other Airtable functions/formulas.
FAQs
I don't see the option to split multiple values into individual groups, what might the reason be for this?
In order to see this option, the field you are grouping records by will need to be a Multiple select field.
Where can I provide feedback on this feature?
Feedback for this feature can be provided in this form.