Plan availability | All paid plans |
Permissions |
|
Platform(s) | Web/Browser, Mac app, Windows app, and some basic functionality on iOS and Android mobile apps |
Timeline views allow you to organize tasks, projects, or other trackable events in an easy-to-understand and visually pleasing way. The Utilization function in Timeline view summaries allows you to track resource allocation across teams. Below we will walk you through a common use-case example of how to leverage this functionality.
Resource allocation overview
Take a moment and think of the various resources that go into project completion for your organization or team. Perhaps, you thought about:
Individual employee weekly working hours
Total team working hours per week
Holidays/Time-off
Average task completion durations
External contracting needs
Headcount planning
If any of the elements above revealed themselves, then the workflow we outline below that leverages the Utilization function in the summary bar will likely help you and your team to have a better understanding and control over task and project deadlines.
Base schema
To help demonstrate the setup process for the Utilization feature we will be using this base as an example.
Click the link above to make a copy of the base to your own workspace (click the Copy base button at the top right) and follow along.
You might also already have a base that is set up in a similar way, with different table and field names. In that case, try to identify concepts that match the workflow in your current base or ways in which your base could be adjusted to mirror the schema of our example base.
The base schema below is the structure of our example base. You can see there are 3 distinct tables (Projects, Assignee, and Days off). Also, there are some important date, linked record, and lookup fields that give us everything we need in order to configure our timeline view and Utilization summary function. The fields in the green box correspond to the Utilization setup. The pink arrow lines represent linked or looked-up information held in connected tables.
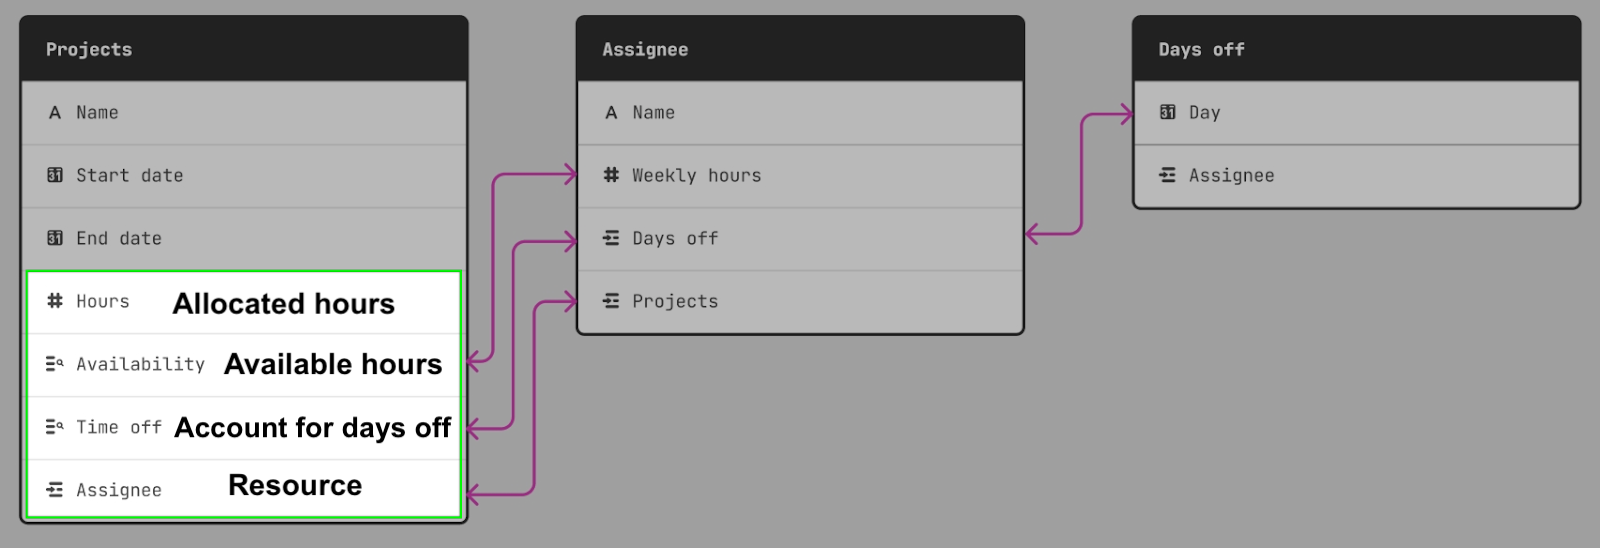
In general, there are three parts that are needed in order to fully leverage the Utilization function in the timeline view’s summary bar:
Allocated hours (Number value) - How much of “x” does this event require? Also, is that allocation a total for the whole event or does it repeat daily, weekly, or monthly? For a task it could be the number of hours needed each week to complete the task.
Resource (Linked record field preferred) - Which employees or teams are associated with the event? When this value is connected to a linked record, you are able to bring in dynamic information for availability.
Available hours (Number value) - This can be a static or dynamic number. As mentioned, when a linked record field is added you can reference dynamic Availability and Unavailability data via Lookup fields associated with that linked record.
Account for days off (Date value) - This option will only appear when a linked record is being used in the “Resources” portion of the configuration process.
Setting up resource allocation in a timeline view
Hopefully, the previous sections helped you to understand the idea of what we will be building out, but if not, don’t fear! Now you will get some hands-on practice setting the feature up. Open up the base you copied to follow along.
In the “Projects” table create a new timeline view. If you are unsure how to do this, consult the timeline overview article.
Add a Utilization summary - Click the Summarize option in the view menu.
Configure Allocated hours - Next, we want to configure the various fields that our Utilization function will use to output utilization percentages. The fields chosen map to the base schema shared above. In our example we will match Allocated hours to the “Hours” field from our “Project” table. Note that we set the rate to Per week since the project requires “x” hours each week.
Configure Available hours- Clicking this option will open another configuration window. In our example, we will:
Match Resource to the “Assignee” field. For our example, the project assignees are the resource we are using to work towards completion of the project.
Set the Working hours to be the "Availability" lookup field. In our example, the cadence should be set to Per week since this is a weekly amount set in the "Assignees" table.
(Optional) Account for time off - Toggling this on will reveal the option to Create table which will create a new table for tracking days off or Choose existing table that is already configured. In our case, we will Choose existing table and use the "Days off" table. Note that this label will only appear when there is a task scheduled for that day. Additionally, time off is unsupported in shared views.
Start date - Must be configured. In our example, we will use the "Day" field.
End date - Optional. Unless you are planning on more granularly tracking hourly time, this option is not needed. By default this option will say No end date.
Label for days off - Lastly, you can set a label for this time off. This will default to PTO (Paid time off).
Click the Back button to return to the main configuration window.
Choose a Label - Options include None, Function name, or Custom
Choose a Color- Next, it’s helpful to set up one or more color conditions to help identify when an assignee may be over-utilized. In our example, we set the following conditions:
Red color where the utilization Summary is more or equal to 100%
Add color - Color the utilization Summary orange when utilization is at or over 75%
Set default color - Otherwise, color the summary utilization green (Default color)
Show in - After setting up the utilization function, you’ll likely want to adjust where the summary bar shows. In our example, the bottom summary bar doesn’t make much sense to show, since we are looking at utilization on a per-assignee basis. In this case, the Assignee groups toggle is on by default and the Bottom summary bar option cannot be enabled.
Click anywhere outside of the configuration window to complete the setup.
You may want to adjust the timescale of your timeline view depending upon the rate values you set during the configuration process or just to “zoom in/out. If the utilization percentages seem off, it may be that you need to adjust the Date settings for your timeline view.
Note
It’s important to note that the “Resources” portion of the calculation relies on our grouping functionality. If the grouping attached to “Resources” is later removed, it will disable the summary bar Utilization function.
Resource allocation in linked records
Note
Using resource allocation in linked records requires your timeline's utilization to be previously enabled.
In timeline view, utilization is calculated based on your timescale (days, weeks, etc). Because we don’t use timescales for the linked record pickers, utilization is calculated over the timespan of the task itself.
Visit your Airtable homepage.
Open your preferred base and confirm timeline utilization is setup.
Click Interfaces at the top of your base.
Click Projects, then Projects & tasks.
Click the ⌄ icon next to your base’s name in the top-left corner.
Click Edit.
Click the name of the collaborator you want to allocate under the “Assignee” column.
A settings panel opens on the right side of your interface after clicking your collaborator's name.
Toggle on Edit records inline under the "User actions" section of the settings.

Click Assignee to open up your collaborator’s settings.
.png "Screenshot 2024-02-14 at 10.01.55%E2%80%AFAM(1).png")
Click the ⚙️ icon next to “Preview allocation.”
Click the ⌄ icon next to “Copy configuration from a view.”
Select your preferred configuration.
When copying a configuration, the “Date settings” and “Utilization” are included.
Configuration settings can also be manually updated by clicking ⚙️ icons next to “Date settings” and “Utilization.”
Click your collaborator name again under “Assignee” column to open up the resource allocation window.
The screenshot below shows “0%” time currently allocated to our collaborator.

Click the circle icon next to the collaborator you want to allocate.
FAQs
What does “Infinity%” mean in the summary bar?
Infinity means that the resource that you’ve allocated is unavailable for the time you are looking at. So the calculation is attempting to divide by zero which equals infinity.
Can I use resource allocation in shared views?
We do not recommend that you use resource allocation in shared views because the “Time off” lookup field is not supported in shared views. In this case, we recommend instead that you utilize the timeline visualization layout in an interface if you are looking to share those details with other users.