Plan availability | All plan types with varying limitations |
Permissions |
|
Platform(s) | Web/Browser, Mac app, and Windows app |
Note
Consider having Omni create an automation for you. With Omni's AI capabilities, you can use plain text requests to build, update, and query data in your Airtable base.
Determining which Slack action to use
When building an Automation, you may choose between the “Slack: Send a message” or “Slack: Send an actionable message” actions. When the automation runs successfully, a corresponding Slack message will be sent to the specified Slack channel, or user(s), containing the message you customized during the automation configuration process. This article will run you through the basic setup process of an automation containing either of these actions as well as some limitations, expectations, and other details that are helpful to know.
Choosing which Slack action to use in an automation will be very specific to your workflow. However, here are a few general ideas about each action that might help you determine the correct one to use. In some use cases, you might even use multiple actions or both action types.
Slack: Send a message - This action is great when the sole purpose of your automation is to communicate something to an individual or a team at your organization. Our Airtable messages can be really handy, but if your organization uses Slack you can create even more specific, customized notifications. If your workflow needs a particular action to happen after notifying a user or team, then this may not be the best action for your automation, you may want to use the actionable message action covered below instead. Here are some examples to think of where this automation action fits well:
Custom notifications triggered by very specific events that occur in your Airtable base
Weekly summaries of tasks being tracked in Airtable that were complete, in progress, or blocked
Automatically notifying individuals or groups of meeting notes and action items once a meeting has concluded
Slack: Send an actionable message - Actionable messages allow users to interact with Airtable data in Slack. This is a good fit for project management workflows where users need to approve, tag, or update data.
Approvals
Approve PTO request
Review a new creative asset version
Intake and triage
Categorize a new IT service desk ticket
Acknowledge an escalation
Updates
Remind someone to close an open ticket
Setting up a Slack action
After you have configured your base in the manner you choose, you can then begin configuring your automation.
For this example, we will be setting up an automation that sends a message to a channel in Slack when a project, in our Project Tracker template, needs to be reviewed.
Note that two new single select options in the "Status" field were added to the template base. One is named "Needs review" and another is "Approved."
We then added a new view also called "Needs review" that filters records to only show when the current status is "Needs review."
These new signle select options and new view are not present in the template, but you can add or modify something similar in your own base.
For this example, we want to use the When record enters view trigger. This is because we created a view that is filtered to only show records that have a status of "Needs review" based upon the single select status field that we modified.
Step 1: Create automation
Open your Airtable home screen.
Open the base where you want to create an automation.
Click Automations.
Click + Create new.
Click + Create automation.
Click + Add trigger.
Once clicked, the available triggers will display for you to choose from.
Now you'll see a window appear on the right side of the screen. Under the “Configuration” section, choose the table and view you want to use as the trigger.
Lastly, test the trigger by choosing a specific record (recommended) or allowing our system to determine a test record automatically.
Step 2: Choose a Slack action
After testing the trigger successfully, you can move on to configuring one or more action steps. The Slack action that you choose will be highly dependent upon your workflow's individual needs. We cover those considerations below.
For our example, we will be using the Slack: Send an actionable message option. This will allow us to configure a workflow where a recipient in Slack will receive a message that includes the option to click a button so that they can easily click an approval button in Slack for a project being tracked in Airtable.
Follow along with these steps:
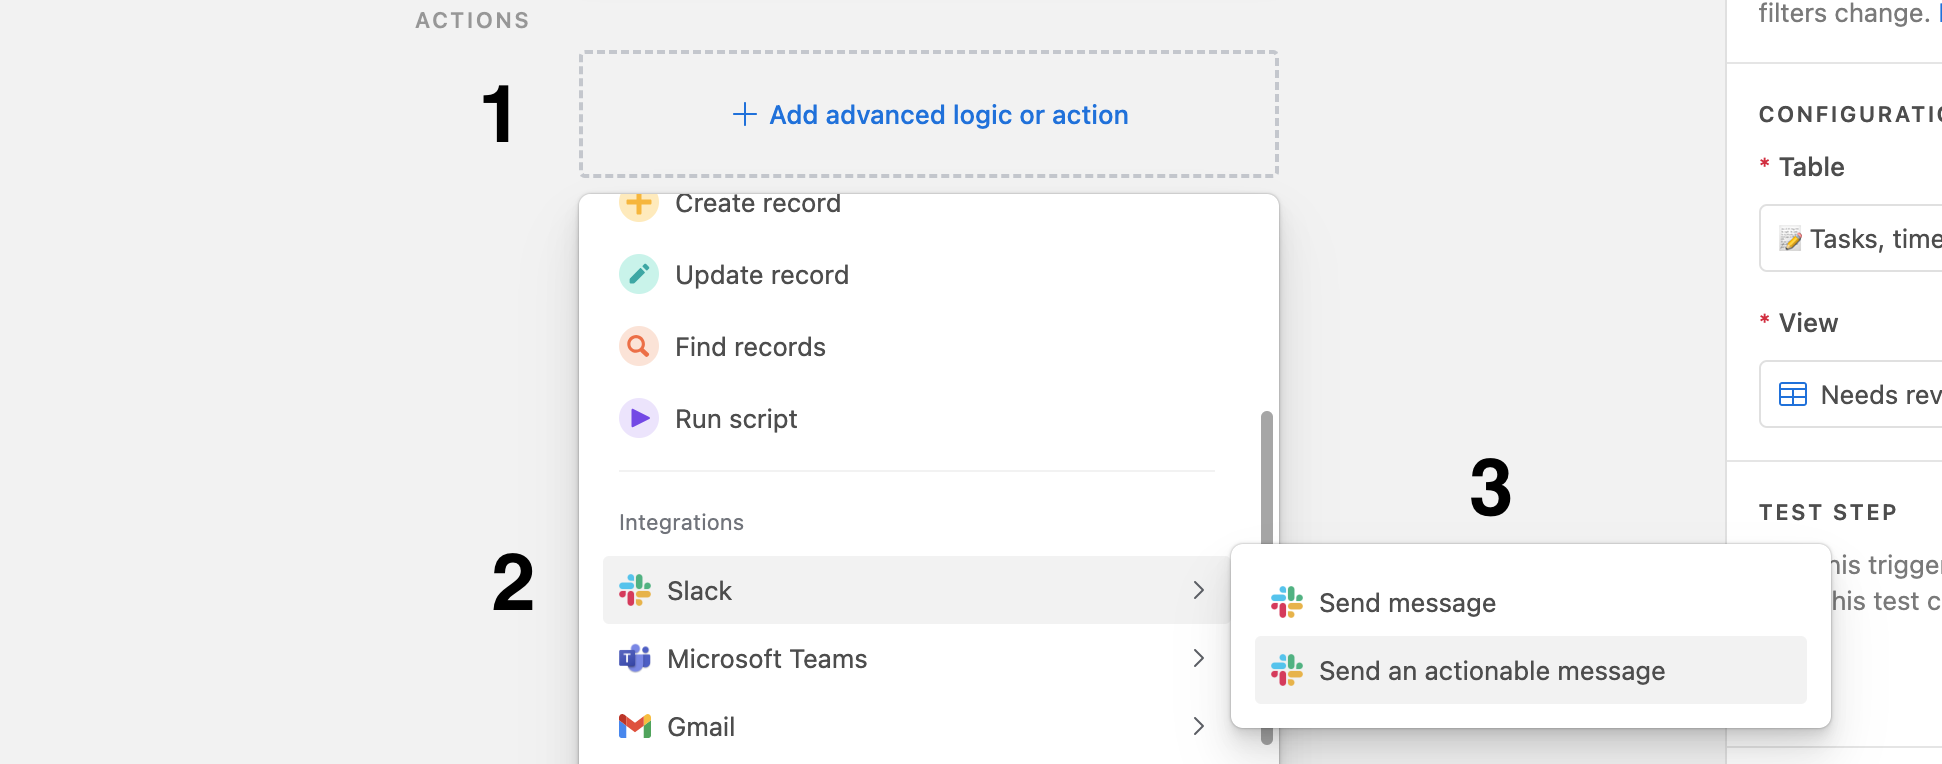
Click the + Add advanced logic or action option under the Actions section of the window.
Scroll down in the dropdown that appears. Under the Integrations section click Slack.
Next, choose the Slack trigger that is best for your workflow. In our case, we will use the Send: Send an actionable message option.
Step 3: Enter a description for this action step (Optional)
This step is optional but recommended - In the action step configuration sidebar on the right, the first option you'll see below the Action type is the Labels -> Description section. Here you can add a description of what this part of the automation is doing. This helps to let other collaborators who encounter this automation in the future better understand the underlying components and reasoning behind the automation's design. You can also choose to skip this part and write a full description of the automation in the
In our example, we might just write a simple description like this "Send the #product-management Slack channel a message when a particular project is marked 'Needs review' so that they can approve the project."
Step 4: Select a Slack account
Next, you'll need to select a Slack account from the dropdown menu used to integrate Airtable and Slack. If you haven't done this previously, or you want to connect to a different Slack account, then click + Connect new Slack account. We offer a deeper dive into authentication and the Slack API scopes we use in another section below.
Step 5: Choose a recipient
Now you will choose where the automated message will be sent in Slack. You can choose to either statically send a Slack message to the same channel or user(s) every time, or you can dynamically message different channels or users for each automation run. The options differ slightly depending on which of the Slack actions you are using in your automation:
Slack: Send a message
If you choose to use the static option, then you will only be able to input a single channel name or user.
Any users can be added that are associated with the Slack instance you logged in to in the previous step.
Slack: Send an actionable message
If you choose to use the static option, then you will only be able to input a single channel name, but you can choose multiple users to include from the dropdown.
Any user in Slack can be added as a recipient but only users with base/workspace access at the “Editor” permission level or higher can interact with buttons in the message.
You can find more information about dynamic messaging in another section below.
Step 6: Add a title (Actionable messages only)
Note
If you are using the “Slack: Send a message” action, then you can move on to step 7 below.
Configuring the “Title” of the message will allow you to give the message recipient(s) a good summary of the corresponding record in Airtable and what the general ask is. We recommend that you work to make this something brief, informative, and relevant to the person or people receiving the message. The “Title” can be either static, dynamic, or a mix of both. To add dynamic tokens to the title click the blue + icon in the “Title” field and choose the relevant pieces from records in previous steps of the automation you are building.
Step 7: Configure the message that will be sent
Depending upon the Slack action type that you chose in step 2, you might approach the messaging differently. The message portion of the action configuration is entirely up to you and your organization's needs related to the communication or workflow that you are automating. Regardless of your needs, it's important to know that the message can be:
Entirely static
Entirely dynamic (insert as tokens from information contained within fields present in previous automation steps)
A mixture of both
You'll likely find that mixing both static and dynamic information is the best for formatting your message in a succinct and informative way. Speaking of formatting, you can also utilize Markdown to format the way that the message will appear in Slack. More information about Markdown usage in Slack is available here.
In our example, we want to use a mix of static and dynamic information to format the message. We'll start the message with some text, add a record list token that will include only the most vital field information from Airtable, and then finish with some helper text about the button we will configure in a few steps. Here's what that could look like in Airtable from the automation's configuration window:

And here is how that would appear in Slack:
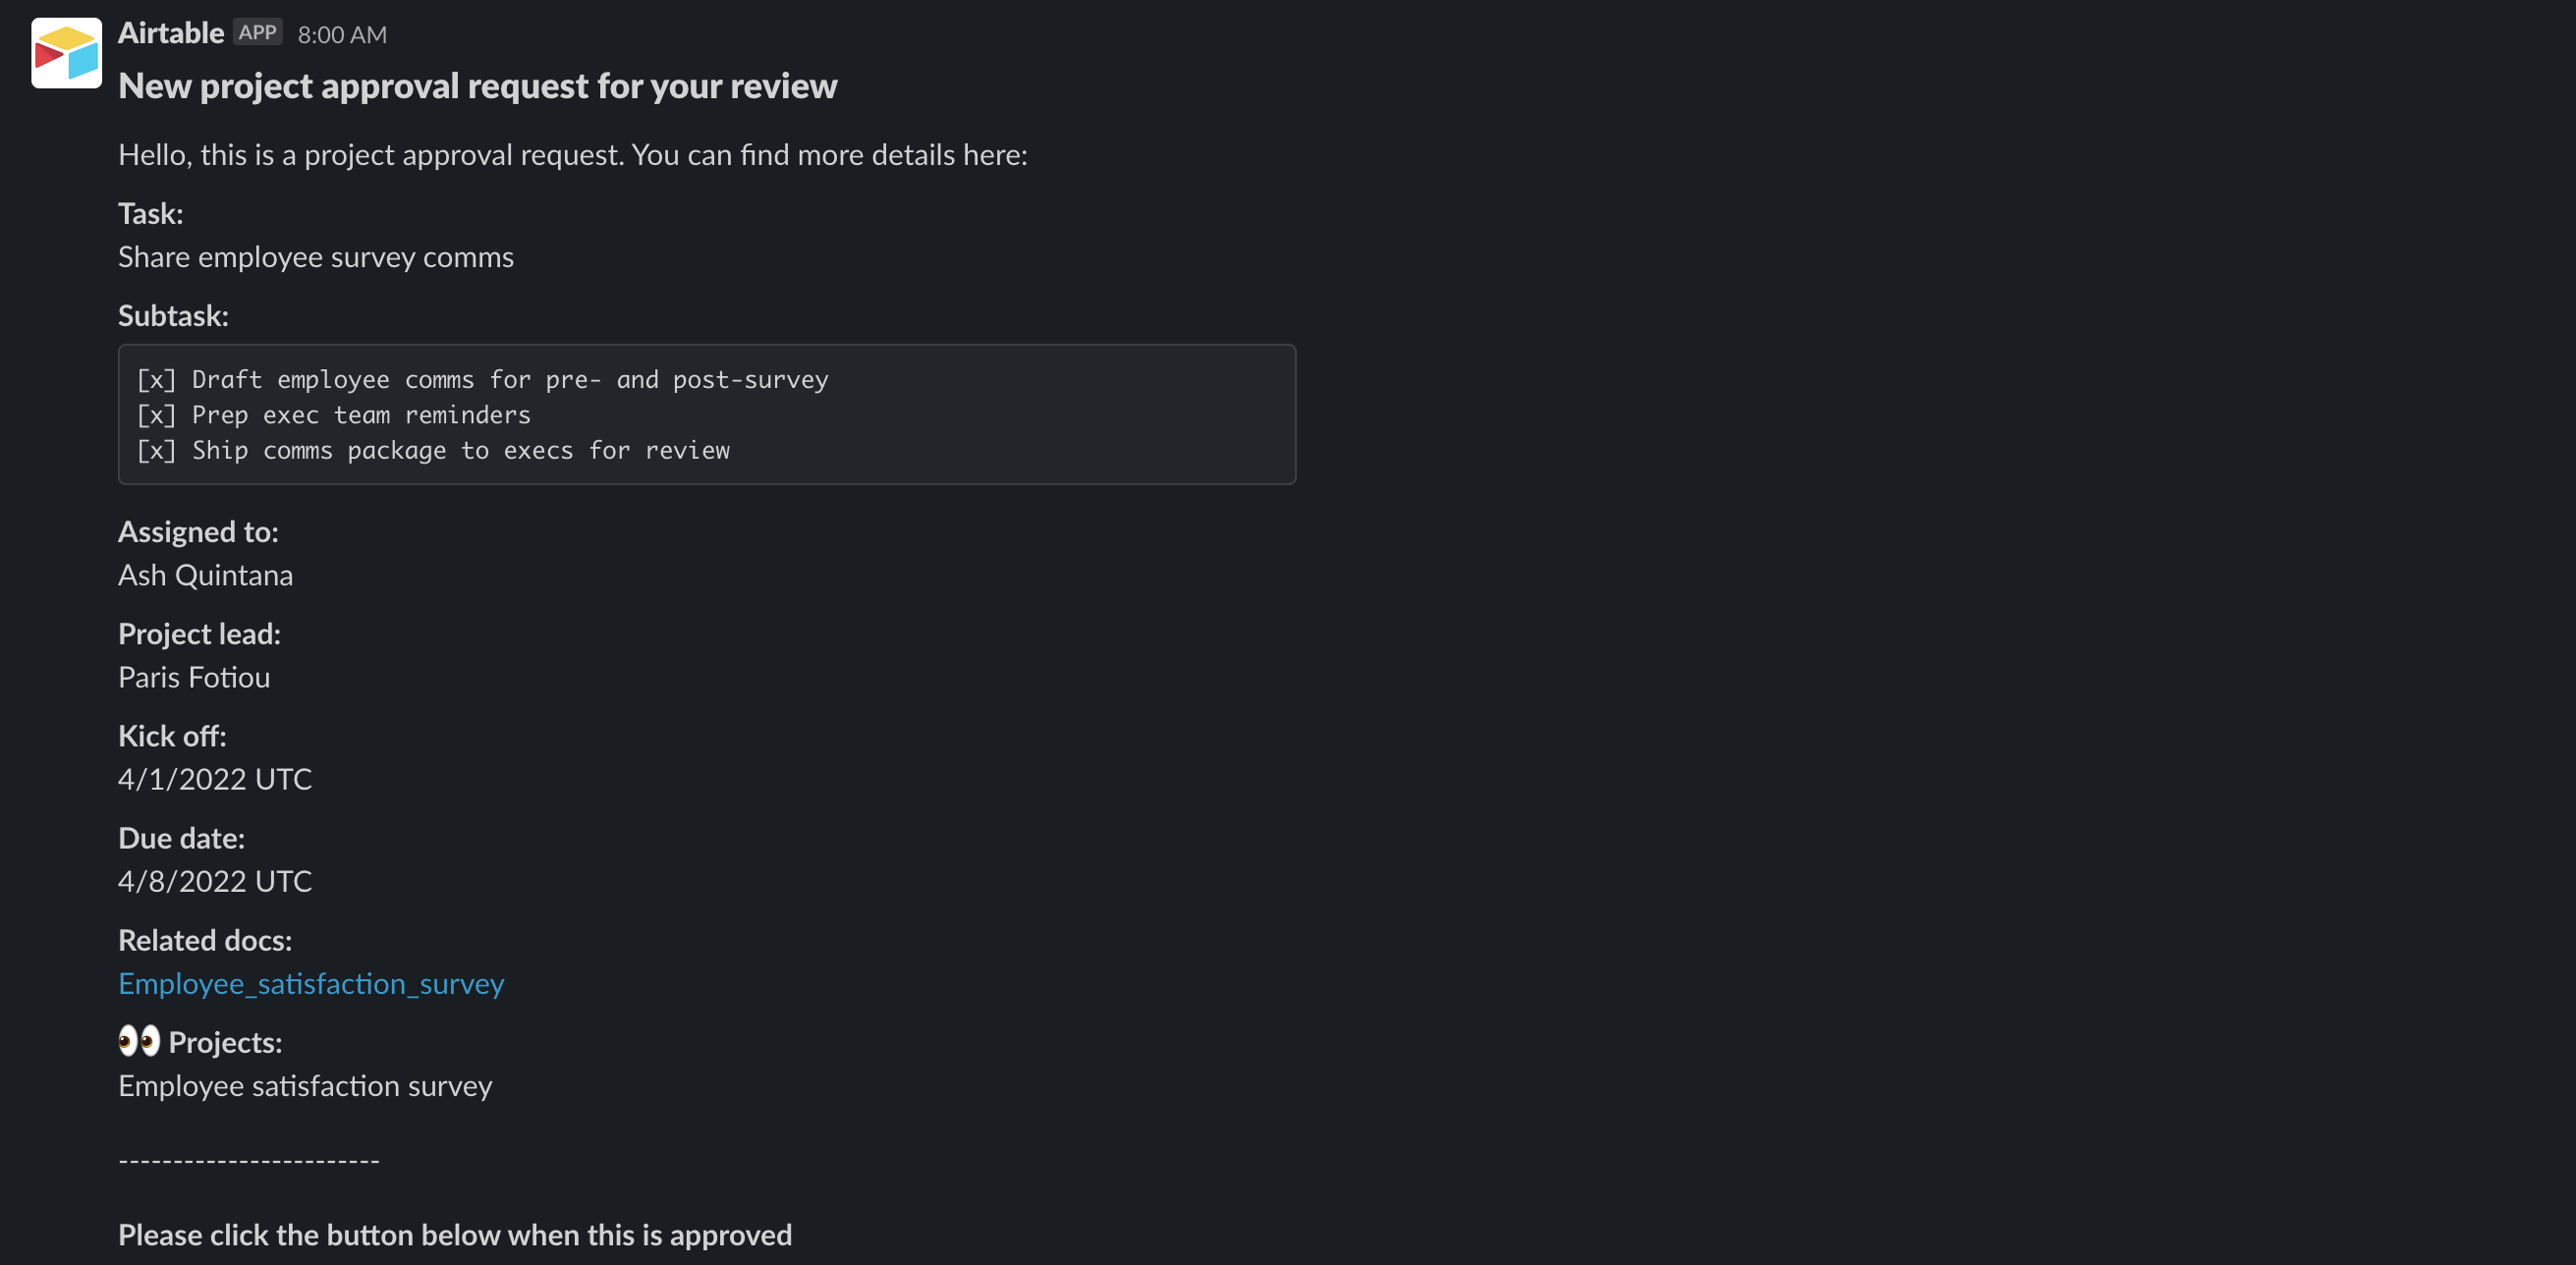
It's worth noting that you can also @mention Slack users or insert hyperlinks into the message. In fact, for our example, we might want to include a link to the specific Airtable record so that an approver can quickly navigate to the record to get more details before they approve the project.
Step 8: Choose a table and record (Actionable messages only)
Note
If you are using the “Slack: Send a message” action, then you can configure the way the bot will appear in Slack. By default, messages sent from an Airtable automation will appear as from Airtable with an Airtable logo, so this step is optional. Then, move on to step 10 below.
Next, you'll need to configure how the automation will define which record will be updated when a Slack user presses a button in the Slack message.
First, you'll choose a table in the base where the record resides. Click the dropdown menu under “Table” and choose a table from the base.
Then, you can either statically or dynamically configure which record to update.
Static record ID - A record ID string will be typed or copy/pasted into the field, so that the same corresponding record ID will be updated each time the button you configure in the next step is clicked in Slack. For more information on finding a record ID check out our support documentation here.
Dynamic record ID - A previous automation step's record ID token will be inserted in order to allow the automation to update that record when a message recipient in Slack clicks the button you will configure in the next step. In our example, we will use the record ID token from the trigger step, that way the same record that entered our "Needs review" view will be updated when the approval button we configure in the next step is clicked.
Step 9: Configure the button or buttons (Actionable messages only)
Now, you will want to configure the action and appearance of the button that will appear in Slack when a message is sent. You can configure one or more buttons that end-users in Slack with base/workspace access at Editor level and above can perform. Follow these general steps:
In the Buttons section, click + Add button. Then, click the pencil icon next to the button that appears to begin editing the button's settings. You can return to the automation later and edit a button further or remove it from this same menu.
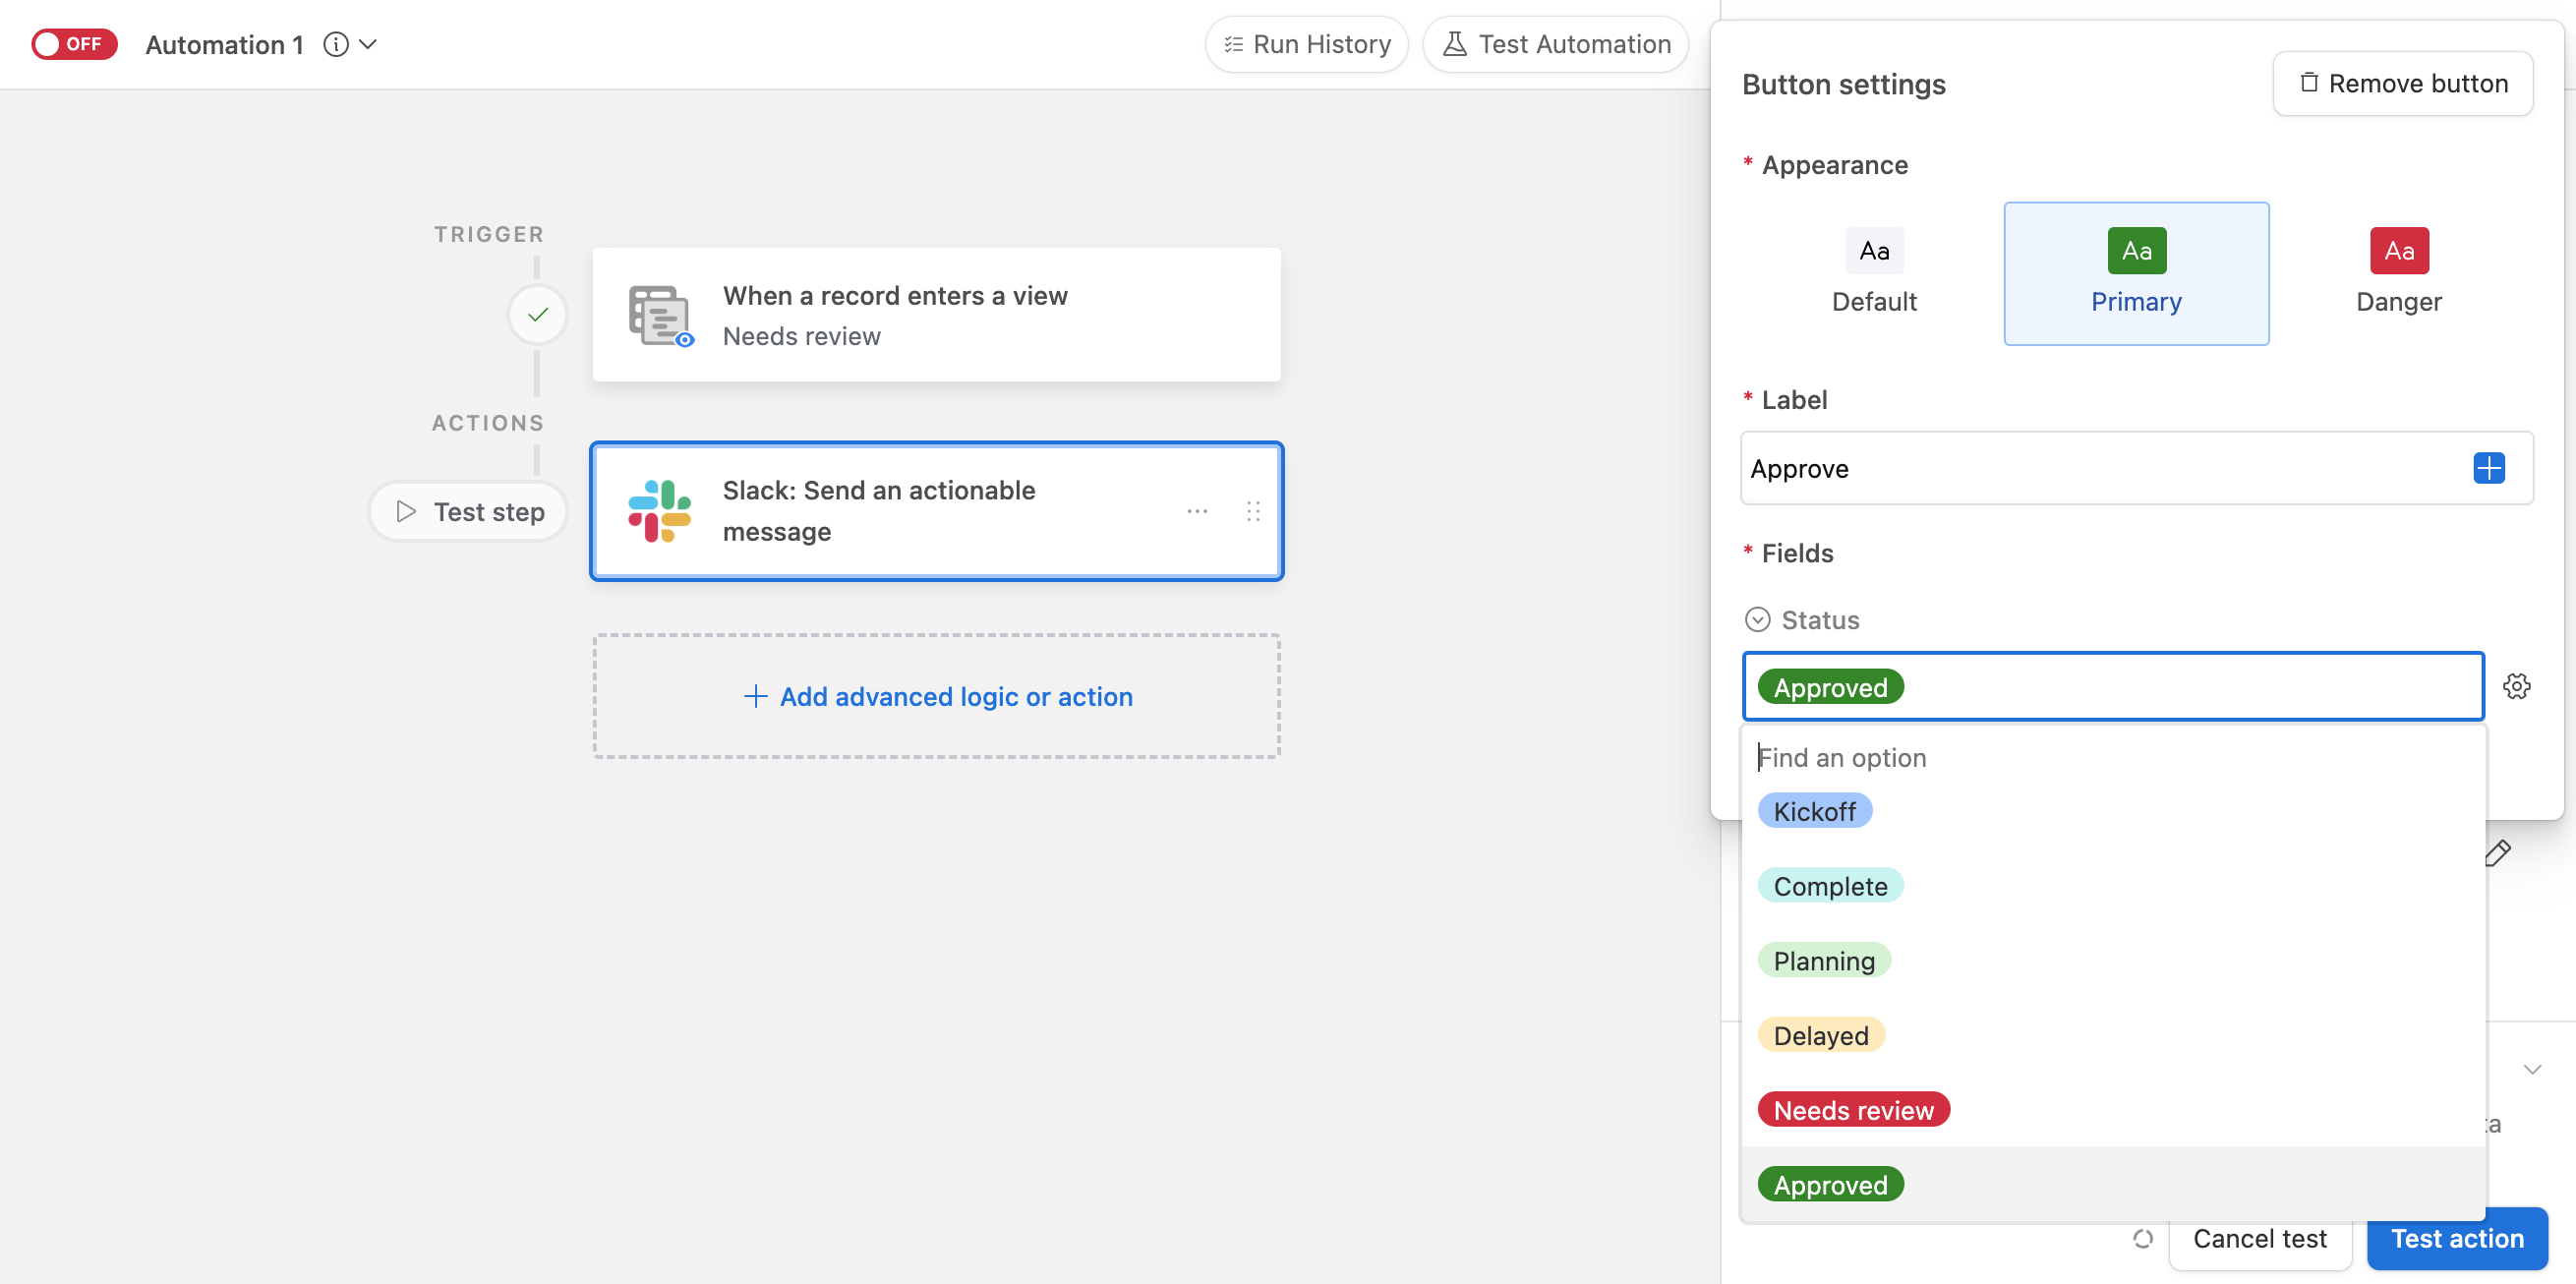
First, set the Appearance of the button. Choose between default (no coloring), Primary (green), or Danger (red).
Next, choose a Label for the button. By default the label will be "Click here," but in many use cases, you'll want to change the text.
Now, you'll want to configure a field or fields that will update when this button is clicked in Slack. Under the Fields section, you'll find the + Choose field option.
Similar to other configuration options mentioned above, you can choose between inputting Static values (same values every time the button is pushed) or using Dynamic values (different values using variables from previous steps). Fields will default to Static, but click the cog wheel icon next to the field to change it to Dynamic instead.
Again, which fields you will use and whether the values are static or dynamic will depend upon your specific use case. Using our example of project approval, we will set the appearance to the green Primary setting, change the label to "Approve," and choose the "Status" field with the static option "Approved" selected from the dropdown menu:
At this point, you might add another button to present the end-user in Slack with more options. For our example, we will keep it simple with just one option.
Note
Actionable messages will expire after 7 days of inactivity. Additionally, if an automation is turned off or the configuration is updated, any Slack messages In progress will be canceled.
Step 10: Test the action or full automation
After getting all of the necessary pieces of your Slack message set up, it's time to test the action. A successful test is necessary to turn the automation on. You'll have the option to Generate a preview or Run as configured.
Generating a preview allows you to see what the result will essentially look like in Slack. This will not result in the actual message being sent.
Choosing "Run as configured" will send the message out and allow you to run the test. It's good practice to warn the channel or individual that will receive the message to ignore the test message created.
Note
If the test does not run successfully, then check out our troubleshooting article for some tips.
Step 11: Turn the automation on
Now, it's time to turn the automation on. Good work! Next to the name of the automation, you'll see a toggle that says Off. Click this toggle to turn the automation On. It might also be a good time to click the name of the automation and rename it or edit the automation's description.
Dynamically messaging channels and users
There are some subtle differences between the way that dynamic channels work in the Slack: Send a message action versus the Slack: Send an actionable message action. Click below to open up more information about this related to the specific action that you are using in your automation.
Slack: Send a message action
You can dynamically configure where a message will be sent by clicking on the cogwheel next to the Channel input. You can input channel names by prepending the channel's name with a "#", (e.g. "
#general" instead of "general"). You'll likely need to build a specific field in your base containing the channel name(s) associated with the triggering record.
You can also dynamically input email address(es) to send individuals direct messages via Slackbot. This will be highly dependent upon your base's design, but the example below shows how to do this by inputting an email token from a user field in the base. You could also be storing email addresses in a field in the base and insert that text string as a token.
If you are inputting multiple inputs when using the dynamic option, ensure they are all separated with a comma. Note that Slack messages will be sent to each of the inputs individually via Slackbot. For example, if multiple email addresses are provided, we will send a Slackbot DM to each of those people, and will not create a group DM.
Slack: Send an actionable message action
To choose where an automated actionable message will be sent, there are two general options:
Send to a user
To send a dynamic message to a user depending upon record information from previous steps in your automation, click the cogwheel icon next to the Recipient field in the automation's configuration window on the right and select the Dynamic option if it isn't already selected.
Then click the blue + button
From here, you'll need to select a User field from a previous automation step and then select the ID value from that field. This will now dynamically message a user or group of users in Slack. Typically, this will be sourced from a trigger record's related user field, but your automation may differ in the way that you choose to dynamically message a user or users. Additionally, you can select a user’s email address as an input token, and we will match that email with the user's Slack account.
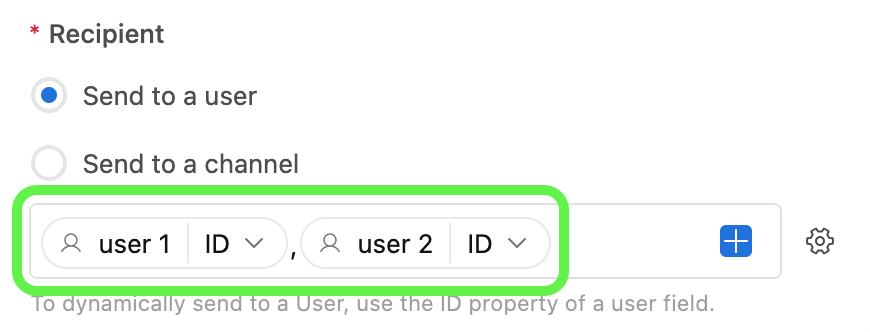
If your base contains a table with multiple user fields (ex. a project DRI user field, a Product manager user field, and an Engineering user field), then you can insert multiple user field ID tokens to dynamically notify multiple slack users. However, you need to separate each user field ID token with a comma like this:
When you choose a user field that is utilizing Airtable's user groups feature ( Enterprise only), when a user group has been added to that field, ALL users associated with the group will be individually notified in Slack.
Send to a channel
It's not possible to send a dynamic actionable message to a channel in Slack.
When choosing to use this option, you'll simply search or browse for the individual channel you want to use as the Recipient. This same channel will be messaged each time the automation runs.
@Mentioning Slack users
To @mention other Slack users in a message, you can either insert the user name associated with their Slack account or you can insert the individual Slack user's ID. Using either of the methods listed below, particular users can be mentioned statically (every slack message sent) or dynamically (only certain records that are associated with a certain individual or individuals). To dynamically be able to Directly message (DM) a user check out the section above.
@mention using Slack user's ID (Recommended)
As mentioned in Slack's API reference webpage, you can manually retrieve a specific user's ID by clicking on the overflow button (three vertical dots) in their Slack profile and choosing the "
Copy member ID"option.Now that you have the member ID (a unique combination of letters and numbers) you can add this to the body of your Slack message automation in the action step using this format:
<@U012345678>
@mention using a Slack username
To mention a Slack user in the body of a message you'll want to insert their name within brackets like the example below. Slack has its own documentation on this and it's worth pointing out that user names are different than display names. Additionally, we’ve found that only using lowercase characters (i.e. don’t capitalize the first letter of the first or last name) provides the most trustworthy results in Slack.
<@first.last>NOTE
If you are experiencing difficulties @mentioning a particular user via their user name, then we recommend using the user ID method discussed above.
Dynamic @mentioning
If you want a Slack message's body to dynamically @mention particular users based upon the record being referenced in Airtable, then you'll want to set up a formula to output the user's user name or member ID. In the example below, a particular collaborator's Slack member ID is being referenced via a lookup field. We then concatenate the member ID with the proper formatting in the formula.
CONCATENATE("<@", {Slack member id lookup}, ">")Next, you'll need to insert this formula field's value into your Slack message action. In this example, we insert the value from the trigger record ( Step 1 ) as a dynamic greeting so that the collaborator associated with the record in Airtable is appropriately tagged in Slack.
Inserting a hyperlink
Basic URL formatting - You can insert a clickable URL, or hyperlink, into your automation's Slack messages by wrapping the URL with brackets like this:
<https://www.airtable.com>
Hyperlinked text - If you'd prefer the link to show as hyperlinked text then use the following syntax:
<https://www.airtable.com|Airtable>The result would appear as Airtable rather than https://www.airtable.com.
Dynamic versus static URLs - There are two options to choose from in your automation:
Dynamic URLs - URLs inserted from an Airtable record in a previous step of the Automation using the blue plus sign. (Shown in green below. The arrow indicates the record where the URL is coming from.)
Static URLs - URLs that are typed into the "Message" box. These URLs will remain static/stay the same across every automated Slack message sent. (Shown in orange and matching the
<https://www.airtable.com|Airtable>example above.)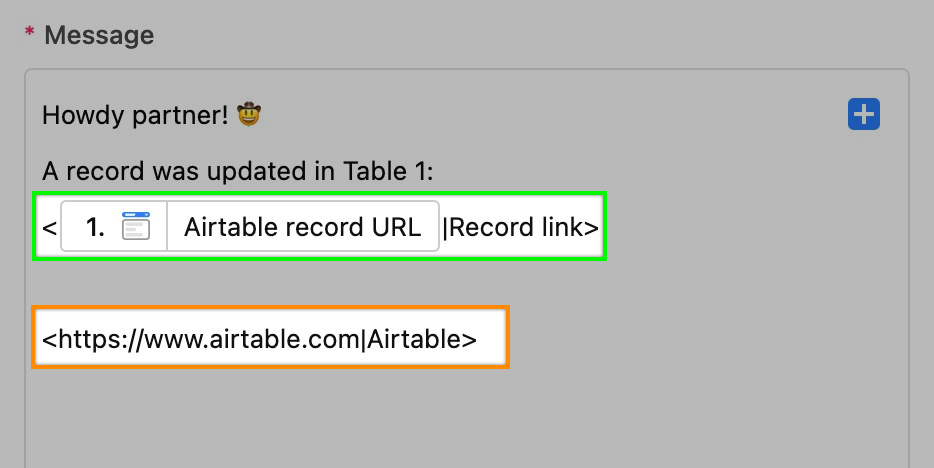
The result in Slack looks like this:
More options in the Slack: Send a message action
By clicking the Show more options dropdown you can customize the automation's Slack Bot name and Bot icon to give your messages a little more flair.
You can also choose to Unfurl links you may send in your Slack message by toggling the checkbox:

A few things to note about this Show more options section:
Messages will appear as being sent from Airtable unless you fill in the Bot name field under Show more options.
Bot icons added under the Show more options menu will not appear in test previews.
To render properly, URLs must begin with the "https://" or "http://" prefix. Not all links can be unfurled due to permissions and/or technical limitations of the underlying URL that is being included.
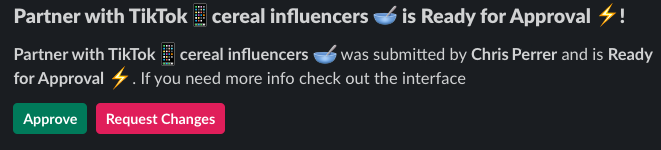
Receiving actionable messages
When using the Slack: Send an actionable message action, a user or users will receive actionable messages in Slack with the configured button(s). The first user who responds to the message, by clicking a button, will have their response recorded. Multiple users cannot respond to the same actionable message. Once the response is clicked, the field in Airtable will be updated.
Look at the image below. Whether the message is received by one or many users, once one of the buttons has been clicked ("Approve" or "Request changes"), these buttons will no longer be available and will be replaced with "Updated in Airtable."
Limitations and dependencies
Sometime the Slack API may return an error such as ratelimited. For instance, this rate-limiting error can appear while retrieving the channel ID for an actionable message.
The Slack API has certain rate-limit tiers that govern how quickly their API can be queried before certain requests are denied in order to protect their systems from the volume of requests that they are receiving.
According to Slack’s documentation, Slack's rate-limiting quota is on a per-API method, per-app, per-workspace basis. That means if the sum of Slack channel ID queries on your organization’s Slack workspace being issued from Airtable (either via automations or other integrations such as the Slack base notifications feature) exceed more than 20 per minute, Airtable is likely to be rate-limited.
OAuth scopes and security
Slack authentication
The setup process will bring you to a Connected Accounts configuration window within Airtable where users enter credentials via OAuth in order to connect Airtable and Slack together.
If you encounter an error during login, you may need to get in touch with your IT department or check your Slack account settings to enable this integration. After successfully connecting your Slack account to Airtable you can proceed with configuring the action.
There is no separate plugin or app that needs to be installed on the user's Slack instance. The data that we retrieve from Slack's API is transmitted securely via HTTPS and will not be used for any purpose other than performing the Slack automation action you are using in your automation.
Slack automation action scopes
For more information about Slack's scopes, we recommend checking out their support documentation here.
Airtable Automation's Slack actions rely on a few different pieces of their API in order to integrate the two services together. There are a few additional details in the FAQs section below that may be useful if you have additional concerns.
Airtable in AI Slack scopes
Approving
assistant:writedoesn't require your organization to enable Slack AI. That scope powers Airtable's assistant experience in Slack, it doesn't depend on Slack's own AI product.The
channels:history,groups:history, andim:historyscopes let Slack deliver message events to Airtable in the channels and direct messages where the Airtable app is present. Airtable doesn't proactively crawl your Slack history. If Airtable AI is disabled for your organization, message contents are dropped before they reach Omni. For details, see Using Airtable AI in Slack, in the "Enterprise admin controls" section.
Scope name | Scope purpose |
|---|---|
| Post messages as the Airtable app |
| Customize the sender name and icon on messages the app posts |
| Post to public channels the app hasn't been added to |
| Receive @-mentions of the Airtable app |
| Resolve public channel mentions |
| Receive messages in public channels the app is in |
| Resolve private channel mentions in channels the app is in |
| Receive messages in private channels the app is in |
| Read basic information about direct message channels the app is in |
| Receive messages in direct messages with the app |
| Resolve user mentions |
| Resolve user group mentions |
| Add and remove reactions on messages |
| Set loading and thinking status on assistant threads (Airtable AI in Slack) |
| Read |
| Show previews of |
FAQs
Can I format my Slack messages?
We recommend referencing this support article from Slack that lists the various ways that you can format your Slack message correctly.
Is Slack data stored on Airtable servers?
We fetch channel and people metadata from Slack to render a dropdown list of options in the Slack automation action. We don’t store this list anywhere. It’s fetched and displayed in the UI but does not persist in storage. However, when the user selects a channel/user, we do need to store the ID of the selected channel/user. We don’t store anything else.
Is there a limit to the number of recipients I can DM per action or automation run?
Yes. Slack's API limits the number of recipients to 10 users per DM. If you need to message more users, then consider creating a channel with each user and messaging that channel instead. Otherwise, you'll need to find a way to batch the message to 10 users at a time (per Slack message action or automation run). This can be accomplished in several ways and is highly dependent upon the way that your Airtable base is configured as well as the goals for your individual automation. Consider searching for answers or asking a question in the Community.
The automation I created accidentally sent a message. Can I cancel it?
No, after a message has been sent you are not able to cancel the message.
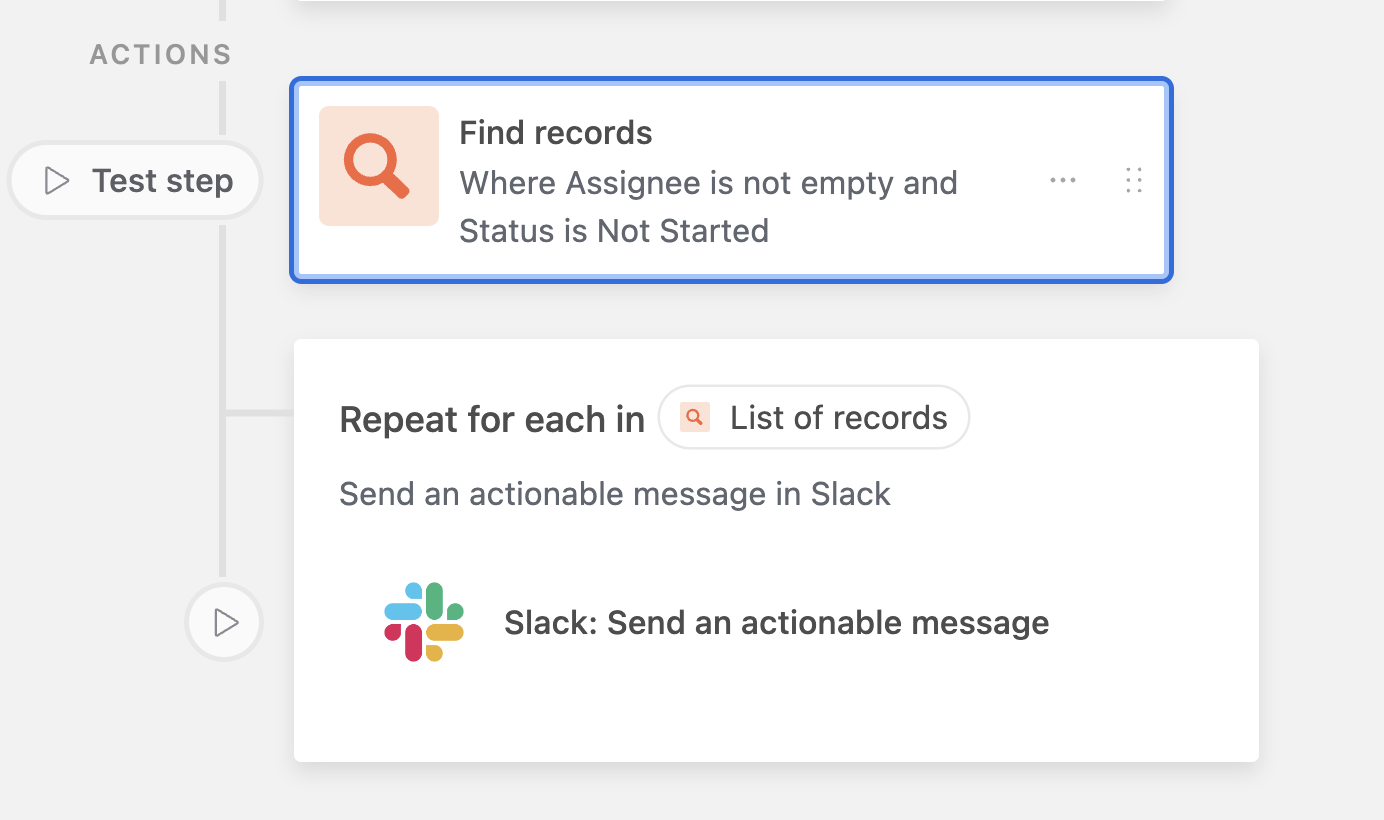
Can I use an actionable Slack message in a Repeating group?
If you incorporate an actionable Slack message into a repeating group, you can request action from each recipient in parallel. For example:
The input list for this group is “Where status is ‘Response Requested’
All messages are sent in parallel to any Assignee that hasn’t responded yet
Do actionable messages expire?
Actionable messages will expire after 7 days if they are not acted upon.
Can multiple users respond to an Actionable Message?
No, only the first user's response to the actionable message will be recorded.
Which Slack users can interact with actionable messages?
Any user in Slack can be added as a recipient but only users with base/workspace access at the Editor permission level or higher can interact with buttons in the message.
My messages aren’t showing up in Slack, what might be occurring?
Your organization’s Slack admins may have set a “Channel permission” that doesn’t currently allow our automation bot to post the message to Slack. To fix this, one of your admins will likely need to add the Airtable bot (APP) as a channel member in order to allow it access to post in the channel.
For more information, consult Slack’s documentation about managing bot access.
How do I send a Slack message at a specific time?
If the message needs to be sent at a specific static time, then consider using the “At scheduled time” automation trigger. You can even set up recurring automation runs at various time intervals.
If the message needs to be sent at a dynamic time determined by other events that may occur in your base, then the guidance will vary use case to use case.
One example would be to build a formula field that will output a phrase such as “Send Slack message” when the rules set in your formula function are met. You would then build a view that only shows a record when the formula output “Send Slack message” is present in the field. You would then use the “When record enters view” trigger to have the automation run and send the Slack message.
Note that using the NOW() function in formulas will have a delay that will not trigger an automation to run at the exact, specific time when that triggered the automation to run. It’s advised that you instead use a last modified time field to timestamp a particular event in your base. This way, even if the automation runs later than desired, there will at least be an accurate timestamp in the base and you can also add that value as a token in the Slack message for reference.