Plan availability | All plan types |
Permissions |
|
Platform(s) | Web/Browser, Mac app, and Windows app |
In Airtable, there are many different fields that you can add to a table; one of them is the formula field type. Formulas let you reference other fields in a table and create different functions based on the content of those fields. This article will cover how to write and format the formula field type.
Creating formula fields in Airtable
Open your Airtable home screen.
Create or open the base where you want to create a formula field.
Add or edit a field.
Search for and select Formula.
Enter your formula in the provided space below "Formula."
After adding a formula, you can optionally click Format to customize the formula's result.
Formula terminology
Formulas in Airtable utilize terms (e.g. "String") and symbols (e.g. "&") common to programming languages, however they are simplified to make formulas easier to write and understand. The table below lists the terms you'll encounter and some common examples of each one.
Formatting formula field outputs
Number formats
When the output of a formula is a number, you can format it by double clicking the field name, selecting customize field type, and then selecting formatting. Then, you can apply the following options to the output of your formula:
Decimal
Integer
Currency
Percent
Duration
Date formats
When the output of a formula is a date, you can apply the following options to the output of your formula:
Date format (local, friendly, US, European, ISO)
Include a time field
Use the same time zone (GMT) for all collaborators
Using single select outputs
When the output of a formula is text, it potentially contains a mix of dates, numbers, and/or plain text. You can format this output to match an option from a preset list similar to single select fields.
To enable single select style formatting:
Visit your Airtable home screen and navigate to the base of your choice.
Locate your preferred formula field and click the ˅ icon next to its name and click Edit field.
Next, click the Formatting tab.
Toggle on "Change formula output to single select options"
Define your preferred options, and select which options to match when the formula output does not match what you've predefined. If you do not set a fallback option, the cell value will be blank for any cells that do not match any of the predefined options.
Click Create field if you are creating a new field or Save if you are updating an existing field.

Using checkbox formatting in formulas with Boolean outputs
When the output of a formula is recognized by our system as a Boolean result, you can apply the Checkbox output type to have the formula format the result similarly to a checkbox field. It’s worth noting that not all formulas will allow for this kind of formatting. We recommend the following functions or operators when building out a formula that you want to format the output as a checkbox, however, other formulas might also yield Boolean outputs recognized by Airtable’s backend system:
TRUE()FALSE()AND()OR()XOR()NOT()REGEX_MATCH()=,!=,>,<,>=,<=
To enable checkbox style formatting:
Visit your Airtable home screen and navigate to the base of your choice.
Locate your preferred formula field and click the ˅ icon next to its name and click Edit field.
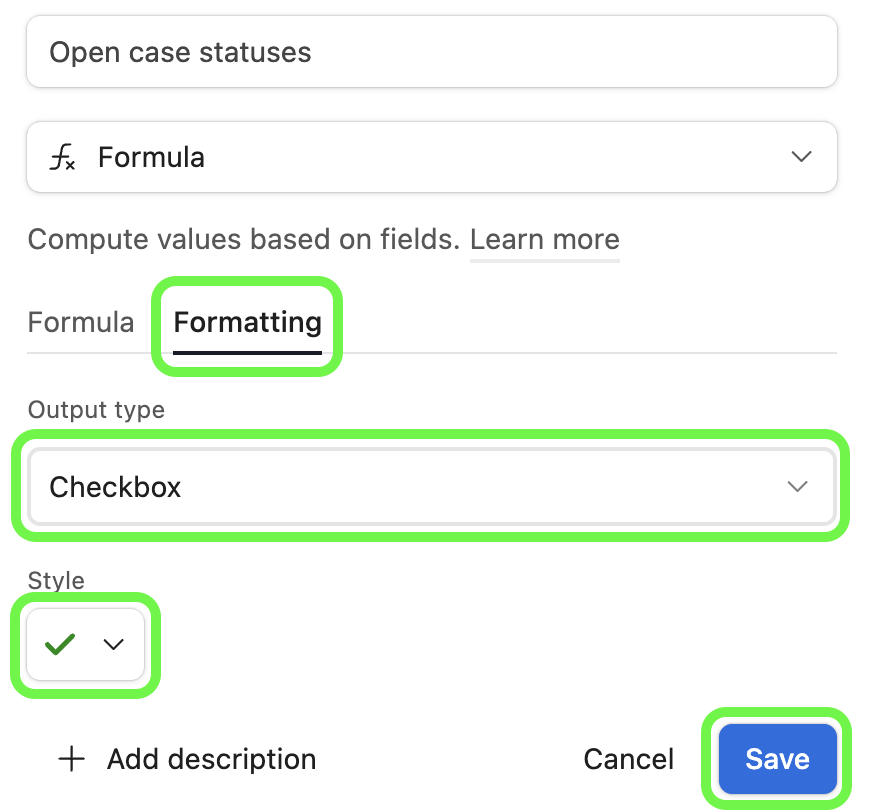
Next, click the Formatting tab.
Choose the Checkbox output type option.
Optionally, choose the style of the check icon. (Paid plans only)
Click Create field if you are creating a new field or Save if you are updating an existing field.
FAQs
How do I update the format of an existing formula field?
Open your Airtable home screen.
Open the base with the formula field you want to update.
Click the arrow ˅ icon next to the formula field you want to edit.
Click Edit field.
Click Formatting.
Click the arrow ˅ icon under the “Format” section and choose your preferred format.