Plan availability | All plan types |
Permissions | Owner or Creator permissions are required to perform the actions outlined in this article |
Platform(s) | Web/Browser, Mac app, and Windows app |
Note
If you are a developer looking to build an OAuth integration with Airtable and this is your first time testing OAuth functionality we recommend reading through the OAuth reference and utilizing the example setup repo.
Understanding third-party services and OAuth
OAuth integrations allow users to grant API access to their Airtable resources with third-party services. Third-party integration calls are initiated by the third-party requesting access to your Airtable resources. In addition, with OAuth Integrations, users can control what resources third parties can access or revoke access at any time.
.png)
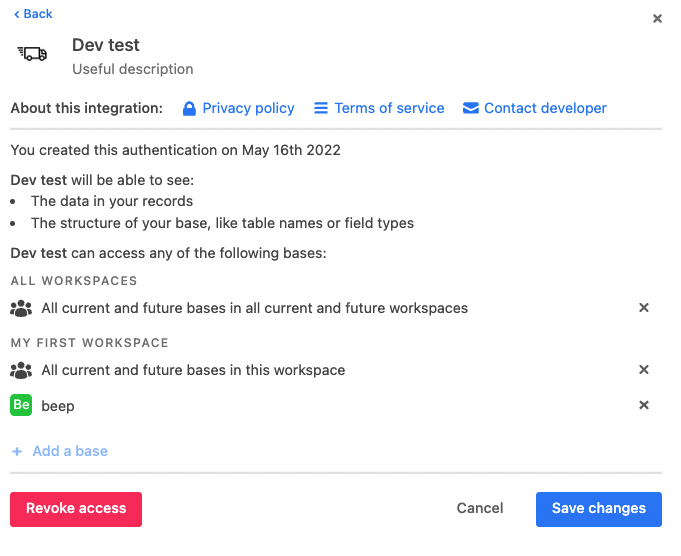
Granting access to Airtable workspaces & bases
When authorizing a third-party request, you can view the following:
The third-party requesting access to your data.
A list of actions the third party is requesting to perform.
A list of workspaces and bases that an integration can access if or when shared.
To grant access to a third party:
Click Add a base.
Select the base(s) or workspace(s)from the list of available options. Chose the level of access you're granting:
For one or more specific workspaces: All current and future bases in this workspace.
One or more individual bases.
All current and future bases in all current and future workspaces.
Enterprise admins can also grant access to all of their enterprise's bases and workspaces by selecting Add an enterprise.
Click Authorize.
After authorizing access, you will be redirected back to the third-party service’s website. Access to workspaces and bases can be updated at any time. See the Managing integrations section below for instructions on how to update access for an integration.
Managing integrations
Note
Users can have multiple authorization grants per third-party service.
Airtable offers users and admins access to a complete list of authorized OAuth integrations, with the ability to make changes and updates to past authorizations.
General user/owner access
Visit your Airtable homepage.
Click Account in the top right corner and select Integrations.
Choose Third-party integrations.
Click the > arrow under Third-party integrations.
After clicking the > arrow, users can manage, revoke access, and remove integrations. And from the same dialogue screen, users can also grant access by clicking Add a base and Save changes.
Access for admins
Admins can view and revoke OAuth authorization grants for users and service accounts from their enterprise Admin Panel. To manage access for users and service accounts:
Click a user’s name from the Users page to access the User Detail page.
Click the Third-party integrations tab.
Click … on the right side of an integration to manage that integration.
Revoke access is available for all users internal to your enterprise.
Edit permissions is available for service accounts only. By clicking Edit permissions, admins can access an account's integration details. Admins can also grant access by clicking Add a base and Save changes.
The Admin Panel offers the ability to manage access to third-party integrations across organizations using the API access for third-party integrations in the Enterprise Admin Panel. Check out this article for more information.
NOTE
User Detail pages are also accessible by clicking the Service Accounts tab.
Understanding authorization scope and impact
Each OAuth authorization you create represents a distinct connection between a third-party service and your Airtable resources. It's important to understand how these authorizations work:
Authorization tokens and base access - When you authorize a third-party integration, you're creating an authorization token that grants access to specific bases or workspaces. A single authorization token can provide access to:
One or more individual bases
All bases in one or more workspaces
All bases across all workspaces
Impact of revoking an authorization
When you revoke an authorization, it affects all bases and workspaces connected through that authorization token. The revocation doesn't apply to just one base—it removes the third-party's access to everything granted through that specific authorization.
If you need to remove access for only certain bases while keeping the integration active for others, modify the base access settings within the authorization details rather than revoking the entire authorization.
"No longer a collaborator" message
When reviewing your authorized integrations, you may see bases listed where you're "no longer a collaborator." This occurs when:
You originally authorized an integration and granted it access to specific bases
You were subsequently removed as a collaborator from those bases
If you’re removed as a collaborator from previously authorized bases, the token won’t have access to those bases while that access is missing.
If you’re re-added, token access can automatically resume for those resources (subject to token scope).
Revoking still removes access for everything tied to that token.
Managing multiple authorizations
Users can create multiple authorization grants for the same third-party service. This can be useful when you want to:
Separate access for different projects or teams
Grant different permission levels to the same service for different bases
Maintain distinct authorizations for organizational purposes
However, each authorization counts toward the 20-per-user-per-integration limit. To stay within this limit, regularly audit your authorizations and revoke any that are no longer needed.
Limitations
The OAuth limit is 20 for a single user. In other words, a single user can authorize the same integration no more than 20 times. In these instances, you may see this warning message:
You have reached the maximum access authorizations for this integration. You cannot authorize this integration again until you revoke at least one of the authorizations
If a user hits this error, they will need to revoke at least one authorization before being able to authorize a new one. You can do this by clicking your account avatar > Integrations > Third-party integrations > Clicking on one integration to revoke > Revoke access.
NOTE
After hitting your third-party limit of 20 authorizations (Zapier, etc.), you are notified your limit has been reached.
What Airtable counts are distinct authorizations from an integration for “active” users.
Conversely, there is no real limit on how many integrations you can authorize.
FAQs
Can I programmatically revoke an OAuth refresh token via the API?
No. Airtable does not expose a dedicated API endpoint for programmatically revoking OAuth refresh tokens. Token revocation is handled through these supported methods:
Manual user revocation — a user can revoke an integration's access from their account avatar → Integrations → Third-party integrations → select the integration → Revoke access.
Enterprise admin revocation — enterprise admins can revoke a user's or service account's third-party integration access from the admin panel.
Automatic invalidation — refresh tokens are automatically invalidated after 60 days of inactivity.
What automatically causes an OAuth refresh token to be revoked or invalidated?
Beyond manual and admin revocation, Airtable invalidates a refresh token after 60 days of inactivity, and its OAuth safety rules will revoke a token if it's reused after rotation, retried after the duplicate-refresh grace period, or sent with incorrect client credentials. Once revoked, the user must re-authorize the integration. For details, see Troubleshooting disconnected OAuth integrations.