Plan availability | All paid plans with varying limitations. |
Permissions |
|
Platform(s) | Web/Browser, Mac app, Windows app |
Note
Click here to try out a walkthrough of creating a sync in Airtable.
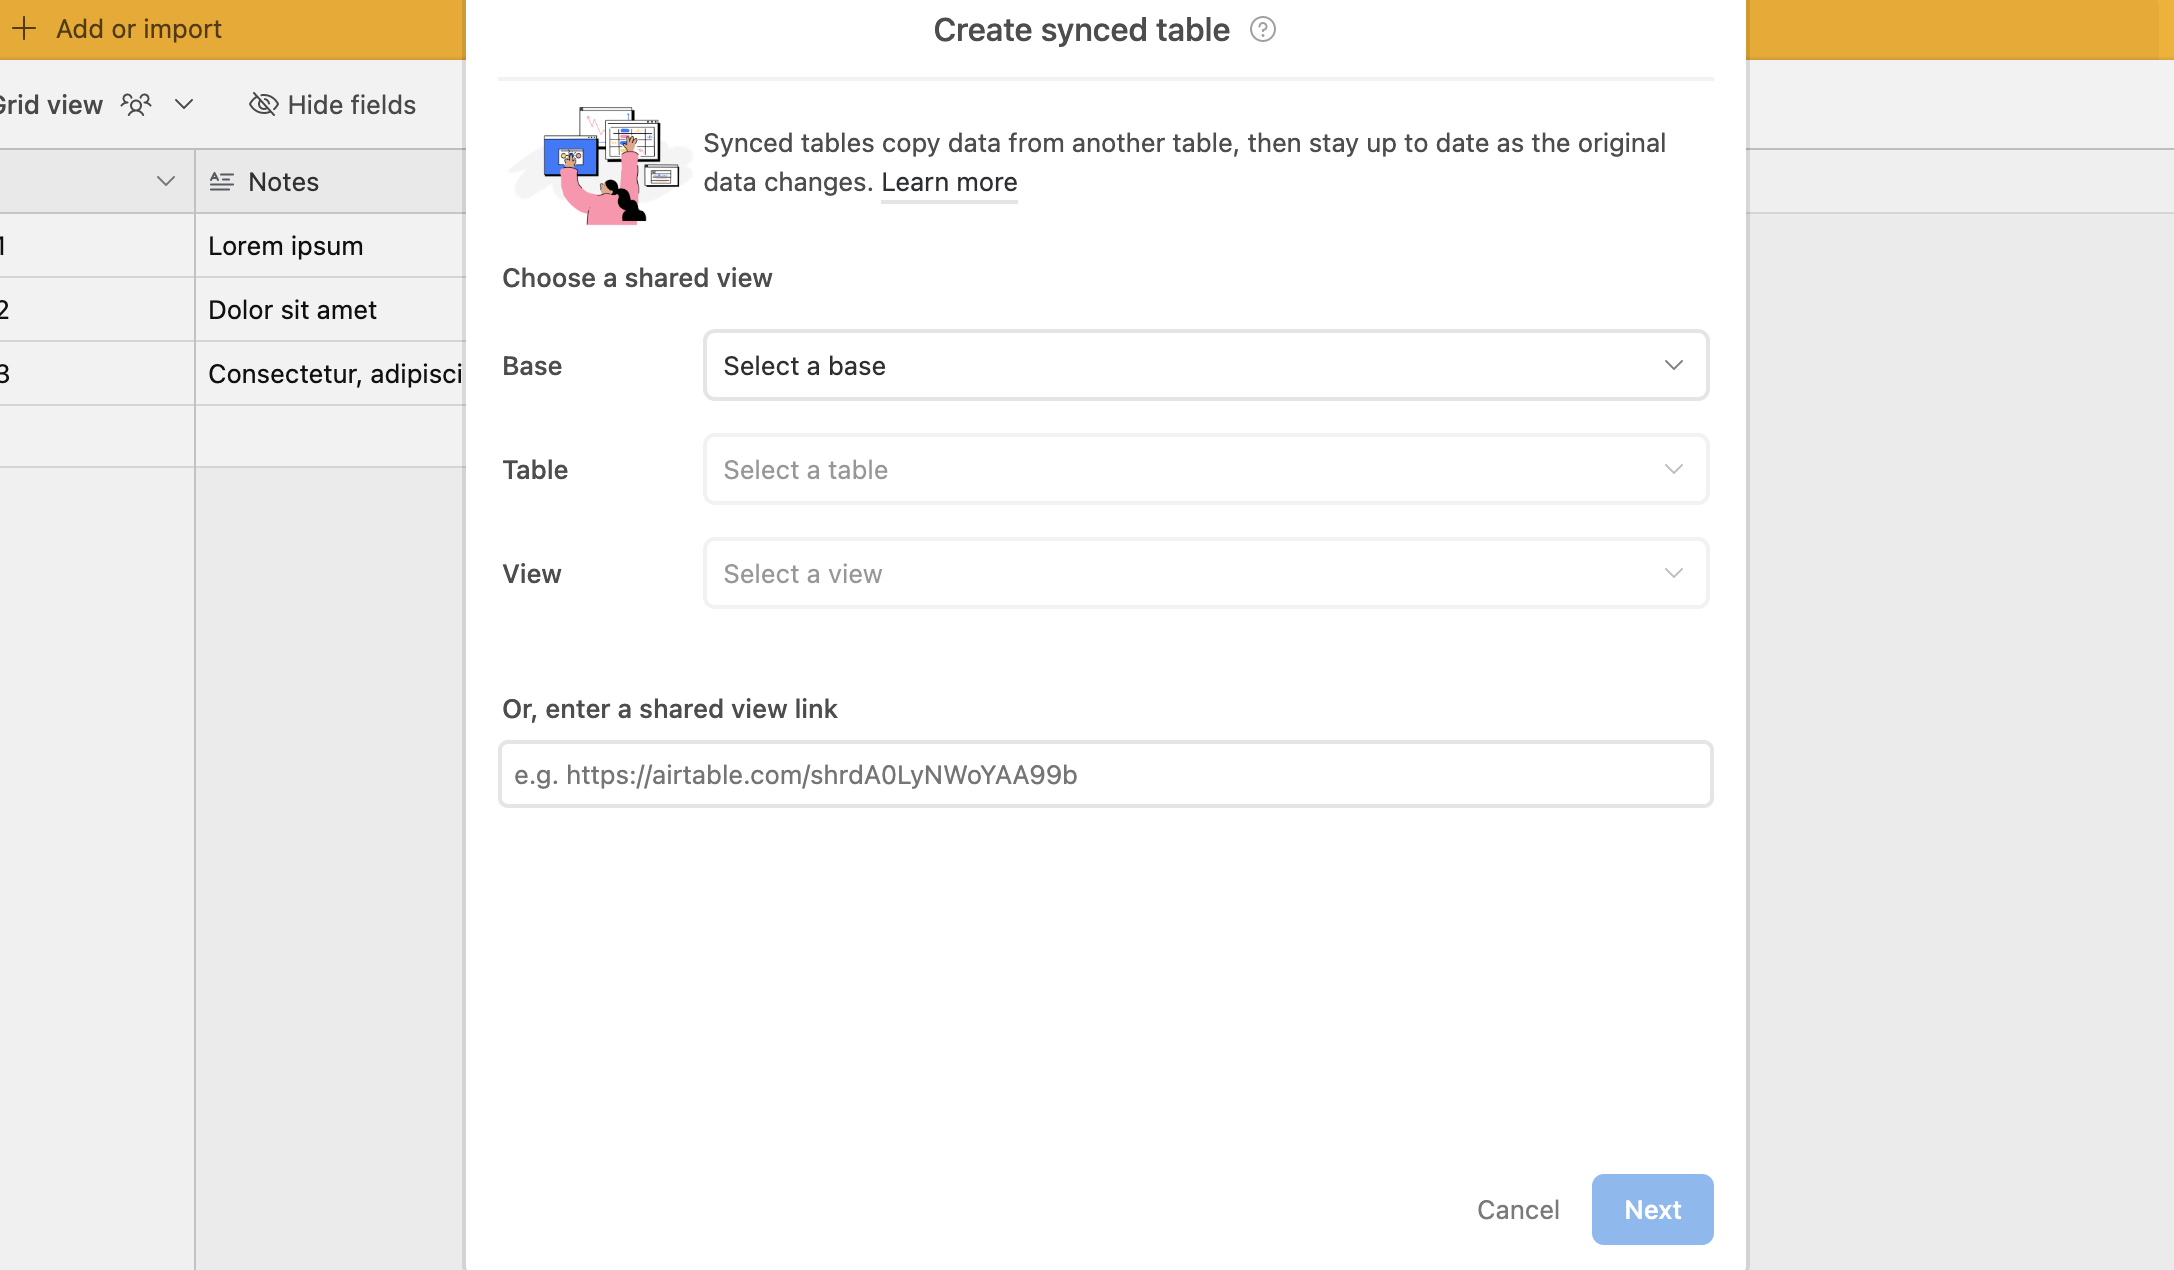
Configuring a sync in Airtable
The Airtable sync feature allows users to sync records from a source to one or more destination bases in Airtable. Setting up a sync requires a shared view that's enabled for syncing. Syncs can be configured to be only one-way, two-way, or to bring multiple sync source data into a single table via multi-source syncing. In this article, you will learn how to set up a basic one-way sync, the expected behavior of syncs, and some common limitations that are good to understand.
Two-way syncing, multi-source syncing, and Airtable sync integrations overview all involve more considerations and different configuration options. That information is covered more extensively in the articles linked above, but the process is more or less the same for the initial sync source setup.
Step 1: Navigate to the table you want to use as the source
You can either choose an existing grid view in a table or create a new grid view just for setting up the source for this sync. In most cases, we recommend creating a new view. You can duplicate a grid view that matches your needs if an existing one already exists.
In either case, remember that the source view may have filters, hidden fields, or field or table editing permissions. Each of these settings could impact the way that the sync can be configured in the destination base. Once you have created the new view or chosen an existing view you can move on to the next step.
Step 2: Configure the grid view’s share settings
After determining or creating a grid view to use as the sync source, find the Share and sync button and click it. We cover more about the view share menu in this article.
This will open a menu of options. Click Sync data to another base.
From here, you'll next toggle on the option to Allow data in this view to be synced to other bases.
This will cause additional configuration settings and sync options to appear. You can move on to the next step now.
Step 3: Preparing to sync in a destination table in another base
You should now see a screen similar to the one shown below:
.png "sync_share_settings_2024(1).png")
There are additional settings to consider:
Allow data in this view to be synced outside of your org unit (Enterprise Scale/Business plans only) - By default, this option is toggled off. Additionally, this setting may be overridden by “Synced view restrictions” set in your organization’s admin panel settings.
Allow edits from other bases (Enterprise Scale/Business plans only) - AKA enabling two-way sync. Learn more here.
Sync linked records - This feature enables you to sync linked data across multiple bases while maintaining the links between records in different tables. Learn more about this feature below.
Depending upon who will be setting up the destination(s) for the sync you might take a few different actions here:
You are ready to set up the destination sync in a base you have access to - Click Sync this view and choose the appropriate location to sync to. Then, move on to step 5 below.
Another user will set up the sync in a base where you don't have access - Click Copy shared view link and send the other user that link so that they can use it for setup purposes. Alternatively, other users (with access to this base) can choose a specific view with syncing enabled to set up a sync destination in another base when creating a new table.
You want to enable users across your organization to sync this data (Enterprise Scale/Business plans only) - Consult this support article about data sets for more information.
Step 4: Begin configuration in a destination table
If you clicked Sync this view in the last step you can skip to the next step, otherwise, navigate to the base where you want to set up the sync and follow these steps:
Click + Add or import to begin creating a new table.
Under Add from other sources choose the Airtable base option.
This will open a configuration window where you can either select the Base, Table, and View to use as the source or enter the shared view link from the previous step. Click Next when you are ready to move on.
Step 5: Configure sync settings
Whether you added the new destination sync from the source view or chose a source view from the sync destination base, you'll be brought to an additional configuration window. From here:
Choose to sync:
All fields in the source or
Specific fields in the source...

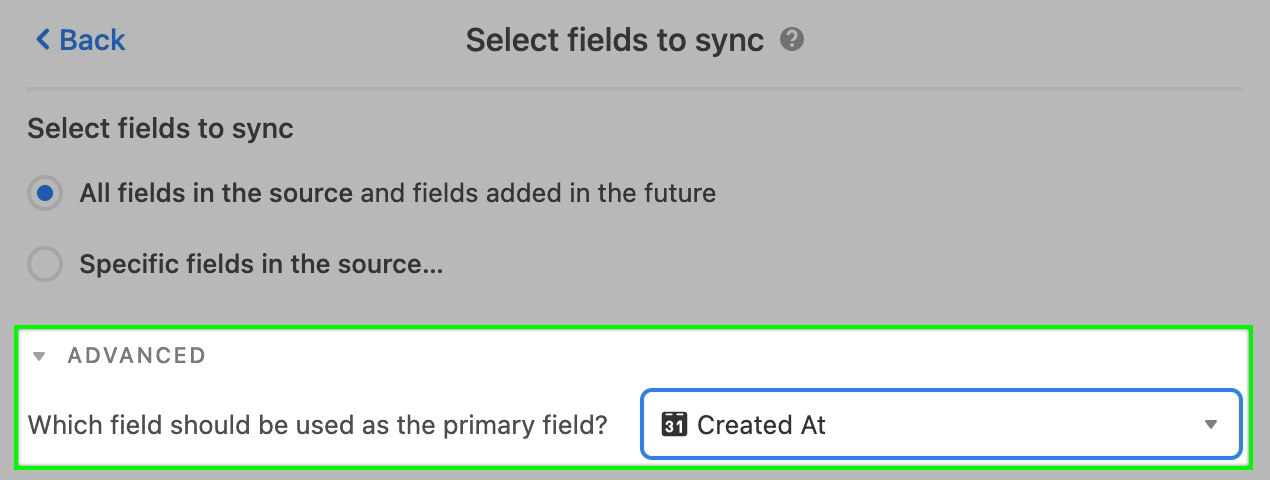
Note that the Advanced section includes the option to set a different primary field for the sync. This is covered in another section below.
Click Next. Additional options will appear that include:
Whether or not users can Edit source records. This option may not always be available, as two-way syncing will need to be enabled. We cover that option in more detail in this article.
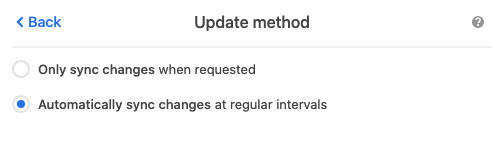
Sync frequency - Can be set to automatically update the sync or only sync manually. More information about these options is listed in the dependencies section below.
Record deletion behavior - Can be set to delete when records are deleted in the source or to be kept in the base even when they are deleted in the source. Again, more considerations are available in the dependencies section.
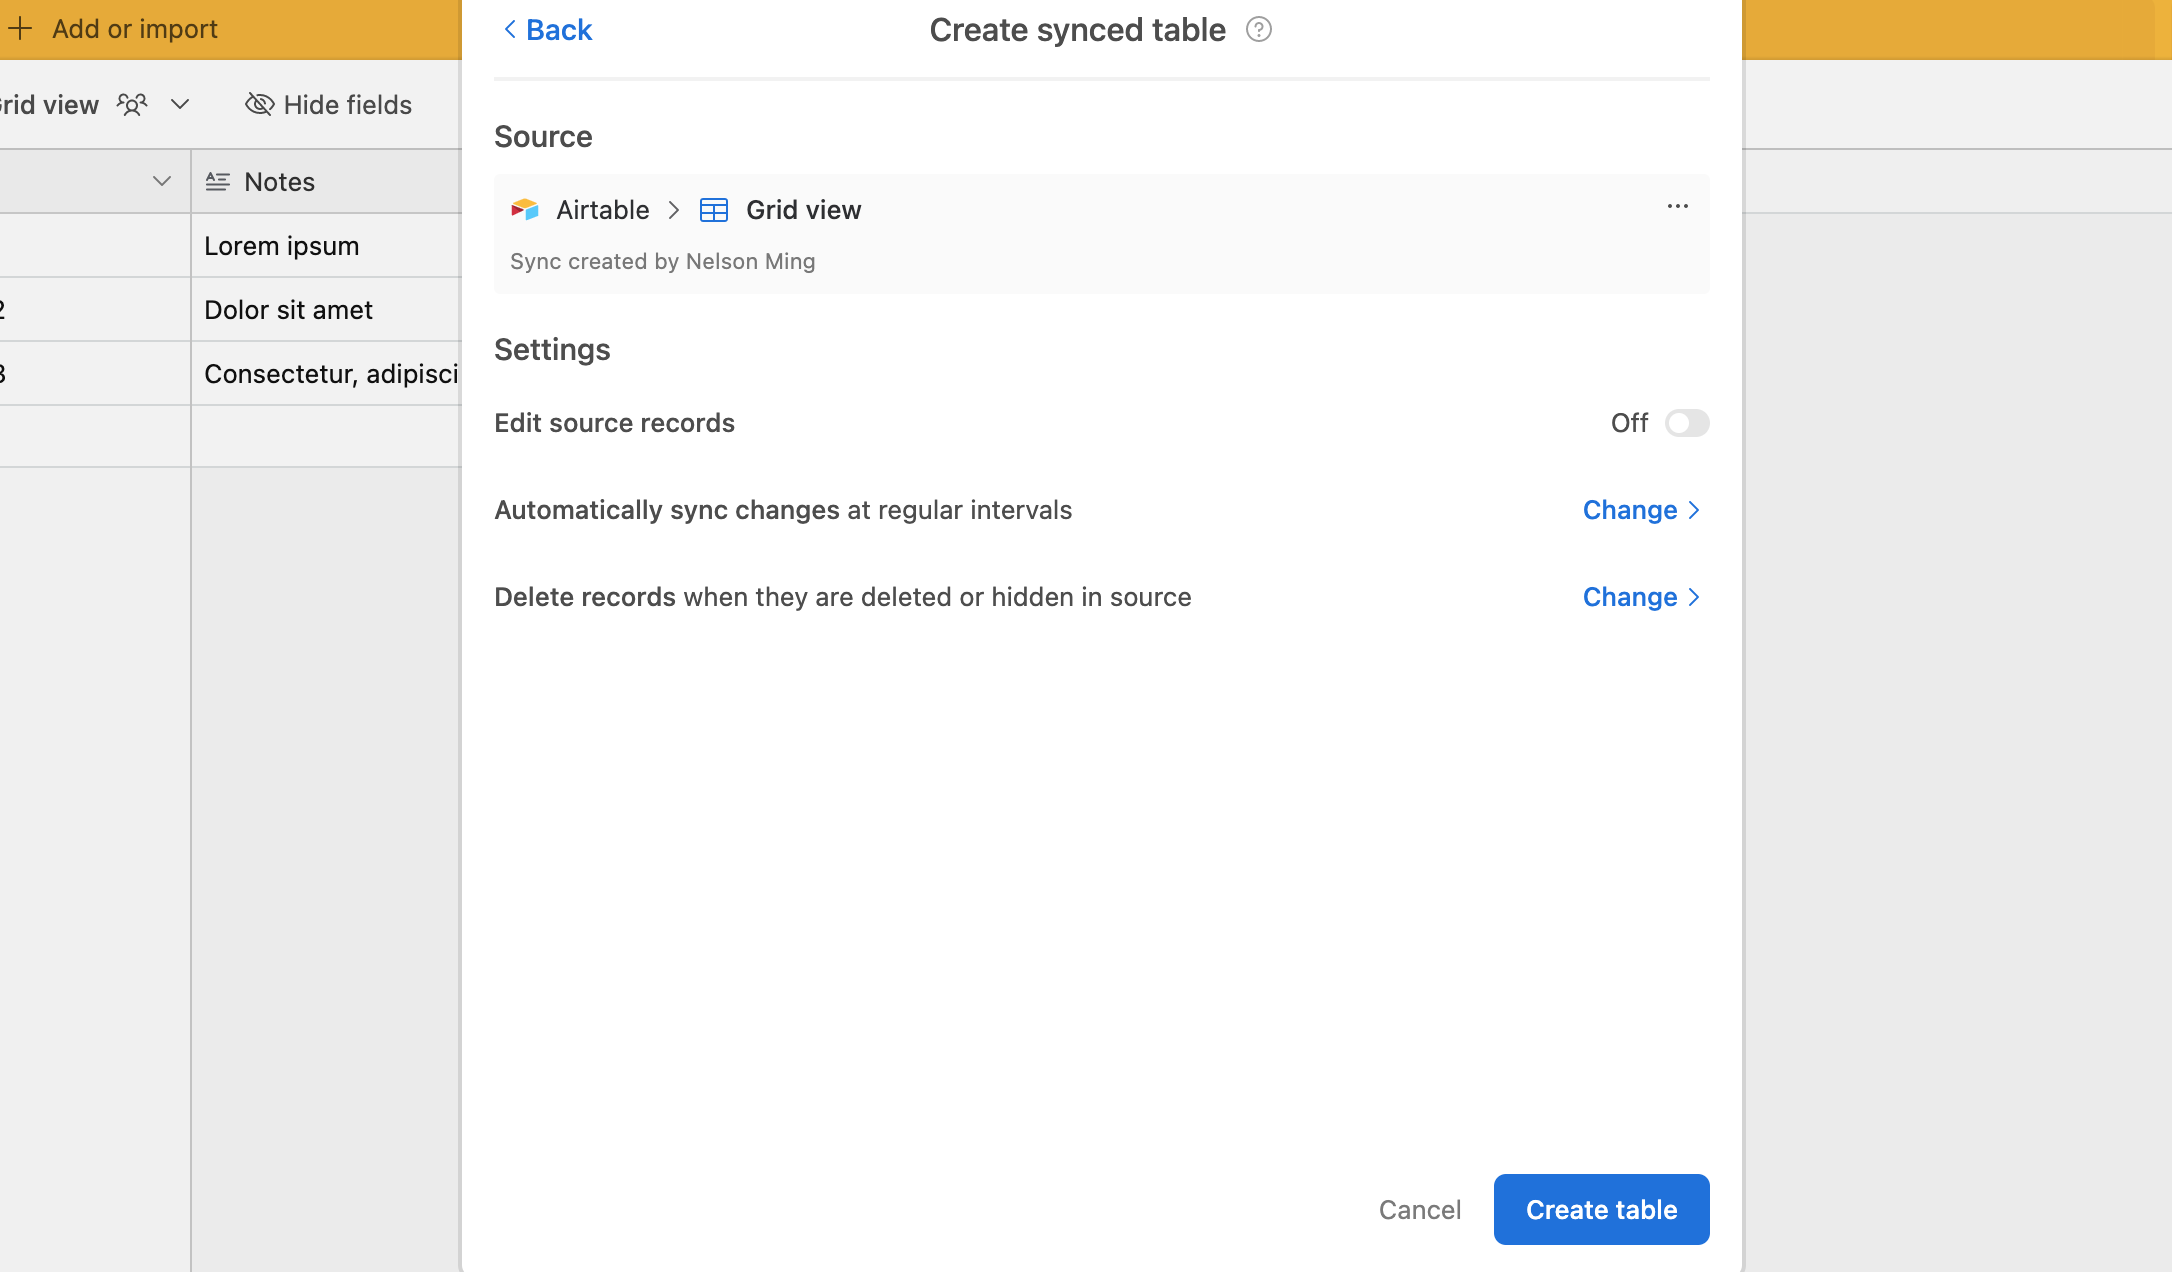
Once you have configured the sync the way you'd like click Create table.
Step 6: Post-sync considerations
After clicking Create table, it may be a moment before the table appears, especially when syncing over larger sets of data. A few considerations now that the sync has been set up:
The table's name in the destination will appear as the name of the synced view. In certain cases, you may want to change the table name to something else.
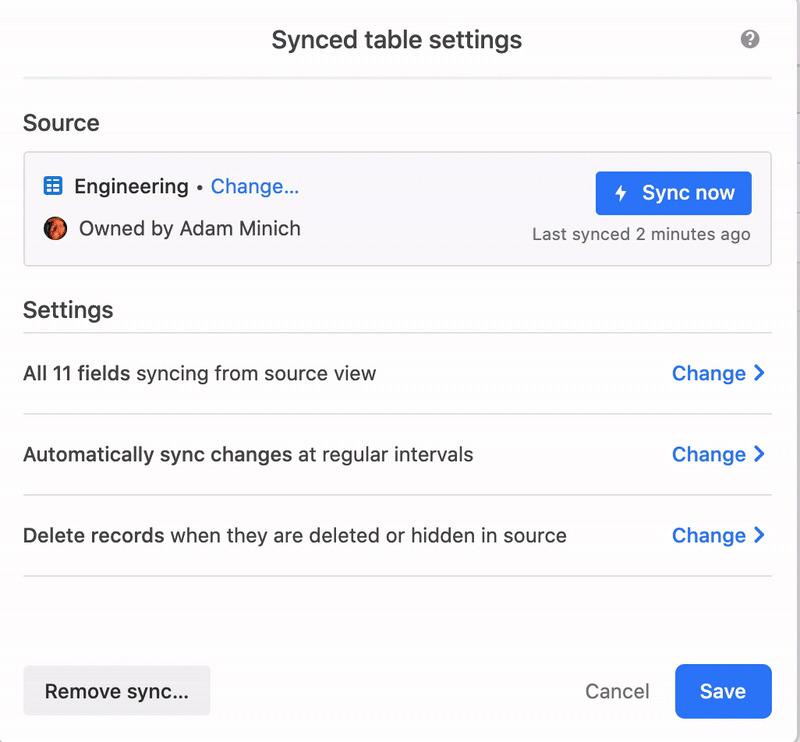
If you'd like to go back and adjust a sync's settings later, then navigate to the Update sync configuration option from the destination table's drop-down menu.
You may also want to set a table description so that other users know where the data is coming from and who to contact if the sync breaks.

Reactivating a sync in Airtable
Open your Airtable home screen.
Open the base with the broken sync.
Click the arrow icon to the right of the base’s name.
Click Update sync configuration.
Select the sync source.
Click Start sync.
Sync limitations
Note
Airtable Sync is unavailable on Free plan workspaces.
Limitations by plan type
Workspace plan | Sync sources per base | Synced tables per base | Automatic syncing 1 | Multi-source sync | Two-way sync | Sync integration type access |
|---|---|---|---|---|---|---|
Enterprise Scale | 50 | 20 | ✅ | ✅ | ✅ | Standard, Premium, and Enterprise Scale |
Business | 50 | 20 | ✅ | ✅ | ✅ | |
Team | 1 | 10 | ✅ | Standard integrations only |
1 Automatic syncs will eventually stop on bases that don't have any recent activity. To keep automatic syncs active make sure that some kind of action (i.e. create a record, update a record, create a new view, etc.) is being performed in the destination base on a regular basis.
General sync limitations
Sync reads per source base - 400 reads per minute
Reaching this limit is uncommon in most use cases.
Essentially, this is a limit on how many times synced tables can read from a source base for the purpose of syncing from it.
Maximum number of syncable source views per base - 100 share views with sync enabled per base
Each source view can have a large number of destinations (targets), however, a single base cannot exceed 100 views that have sync enabled on them.
Record limit per integrated sync source - 10,000 records maximum
This limit only applies to integrated syncs. This limit does not apply to syncs that occur from one Airtable base to another Airtable base. In those cases, the limit would relate to the number of records that a base can have according to plan type.
Sync dependencies
One-way versus two-way sync considerations
Syncing is one-way process to get information from a source table in a base to a destination table in a base, unless the option to edit records has been enabled in both the source and the destination sync. For one-way syncs, this means that in the destination base you cannot:
Add or delete records in the synced table
Edit information in the fields that are synced
However, you can do many of the same things you can do with any regular table, including:
Link existing tables to synced tables
Create multiple views of the synced records
Add additional fields to the synced records to enrich them
Add a last modified field to see when the record was last synced
Add a button field to open the original record to edit it
Refer to the synced records from other tables using linked records and lookups
Use a view of the synced table to trigger automations
Field type syncing behavior
Field types that will sync in the same format - Attachment, date, long text (Rich text), multi select, number, single line text, single select, and user 1
1 User field types in syncs created before March 14th, 2023 will sync as text fields. To have user fields sync in the same format, a user with creator permissions would need to recreate the sync in a new table. Note that this may not always be a feasible workaround in every scenario and it's important to think of the potential downstream effects of breaking the original sync.
Computed field type - Formulas, rollups, and other computed field types that produce text, numbers, or dates will sync as their result type
Field types that sync as text - Linked record (unless configured properly), lookup, buttons with the Open URL action, and created by
Actions that will sync from the source view
Adding a record (new rows may be added to the end of the view on the destination table)
Editing a record
Deleting a record
Adding a field (“sync all fields” must be turned on)
Changing a field’s configuration (supported fields)
Deleting or restoring a field
Changing the view’s filters or hidden fields
Actions that will not sync from the source view
Reordering, grouping, or sorting records.
Sync frequency options (Automatic or manual)
In the sync configuration process, there is an option to sync manually or automatically (Workspaces on the free plan will not see an option to sync automatically).
Turning on automatic syncing will cause the synced table to update in real-time. You can still manually sync a table, even if you have turned on automatic syncing. There are a few exceptions to real-time sync behavior:
Time-based formula fields (and all dependent fields) will not be instant – instead, they will periodically update.
Table syncs with Field Type Customized Linked Records will not be instant – instead, they will periodically update.
Note
Automatic syncs will eventually stop on bases that don't have any recent activity. To keep automatic syncs active make sure that some kind of action is being performed in the base on a regular basis. This can be accomplished via Airtable Automations or API. The idea is that by having either of these options periodically make an update to a base you will be able to trigger the automatic sync to run.
Manual sync can be accomplished on any plan at any time you choose. To manually sync your table click on the synced table's dropdown menu and click "Sync now". After you click the table will begin to update and save any changes. This process may take more time depending on the amount of information being synced. You will see an "All changes saved" message when the sync has finished successfully.
Field sync settings
From the sync configuration window, you can choose to sync all fields from the view or just some:
If you choose to sync all fields, then new fields added in the sync source will show up in the synced table when the next sync occurs.
If you choose to sync just some fields, then any new fields added in the source table will not sync until you have toggled them on as visible from the sync configuration window.
Note
If you do not see a table that you are expecting as an option, then you may need to check (or have a collaborator check) the settings in the source table/view.
Record retention
You can also choose how to handle records that are deleted or hidden in the source view. You can either delete or keep them in the destination table.
Note
If you choose the Delete the records in this table option, and records are deleted in the source table or filtered out of the synced view at any point in time, any additional information added to the synced destination table (e.g. linked records or other data in fields) will be removed.
Should you choose to Leave the records in this table you will be able to manually delete specific records that have been deleted in the sync source by clicking the Delete unavailable records... option.
Primary field customization
Note
We recommend carefully considering your primary field choice to ensure it meets your needs from the start. Once a primary field is selected for your destination table, it cannot be changed after the sync is created. To modify the primary field, a new destination table will need to be created.
While you are configuring a sync you'll arrive at the Advanced drop-down option on the Select fields to sync section. This option allows you to choose a specific field that will act as the primary field in Airtable. Primary fields should contain unique information in each cell to act as the primary key. Additionally, only certain field types are allowed to be used in the primary field.
Warning
If the field type in the sync source for this field is hidden or changed to an unsupported field type, then it will cause the sync to fail in the destination table. Consider locking the view being used as the sync source to prevent this from occurring.
Custom field types
After you've configured and created a synced table, you can customize each of the fields. To do this, click the drop-down next to the field's name, click Customize field type, and choose the field type that you want to change the field to.
There are some important things to note about this feature:
If a field has had its type changed in the target base, that will take precedence over the field type from the source base.
Multi-source syncs will have different options than single-source syncs. These are covered in a separate article on multi-source syncing.
Syncing linked records
When this setting is enabled and a view is synced to other bases, one or more views in tables connected by a linked record field can also be synced. If there are any linked records or fields that you don't want synced to other bases, configure the field and view settings in these views first.
Enabling linked record syncing in a source base
Navigate to the base where an existing sync source view has been configured or follow the steps covered here to create a new sync.
Click on the Share and sync button.
Click the Sync data to another base option.
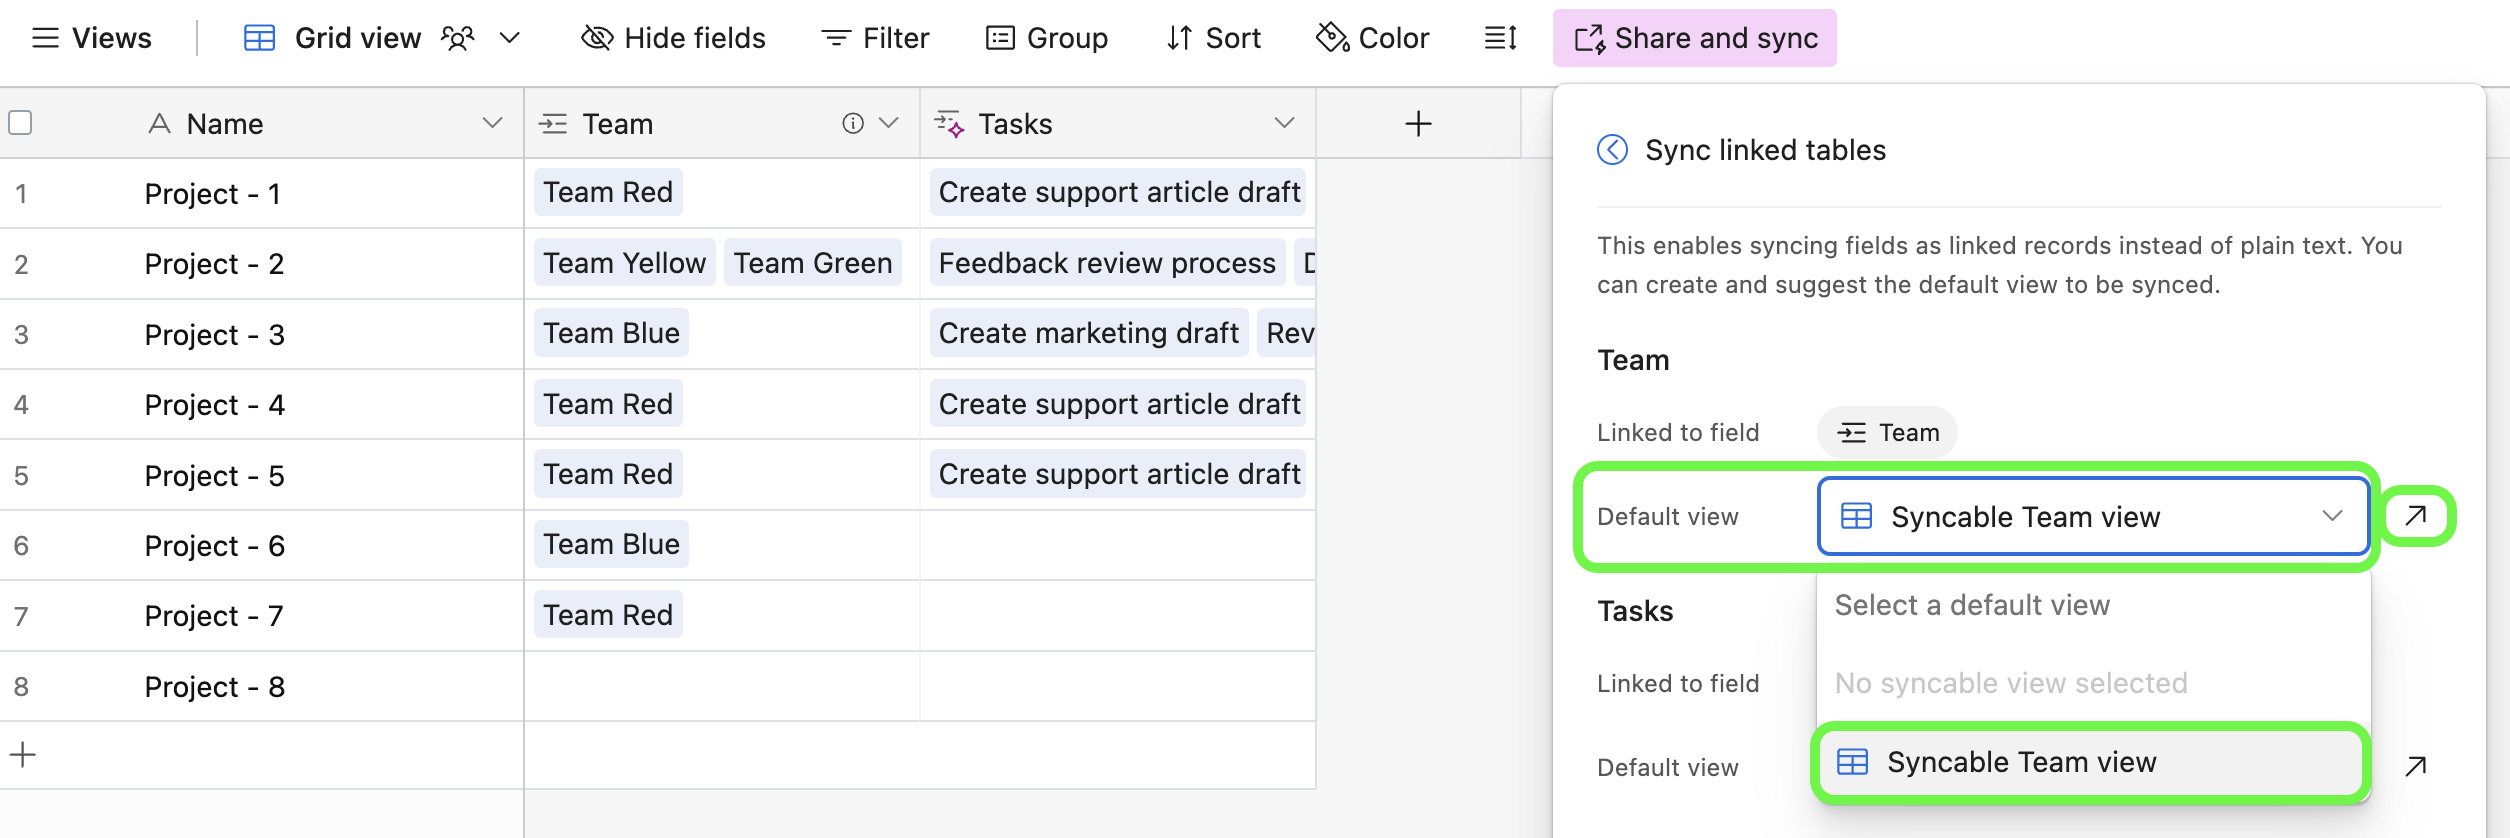
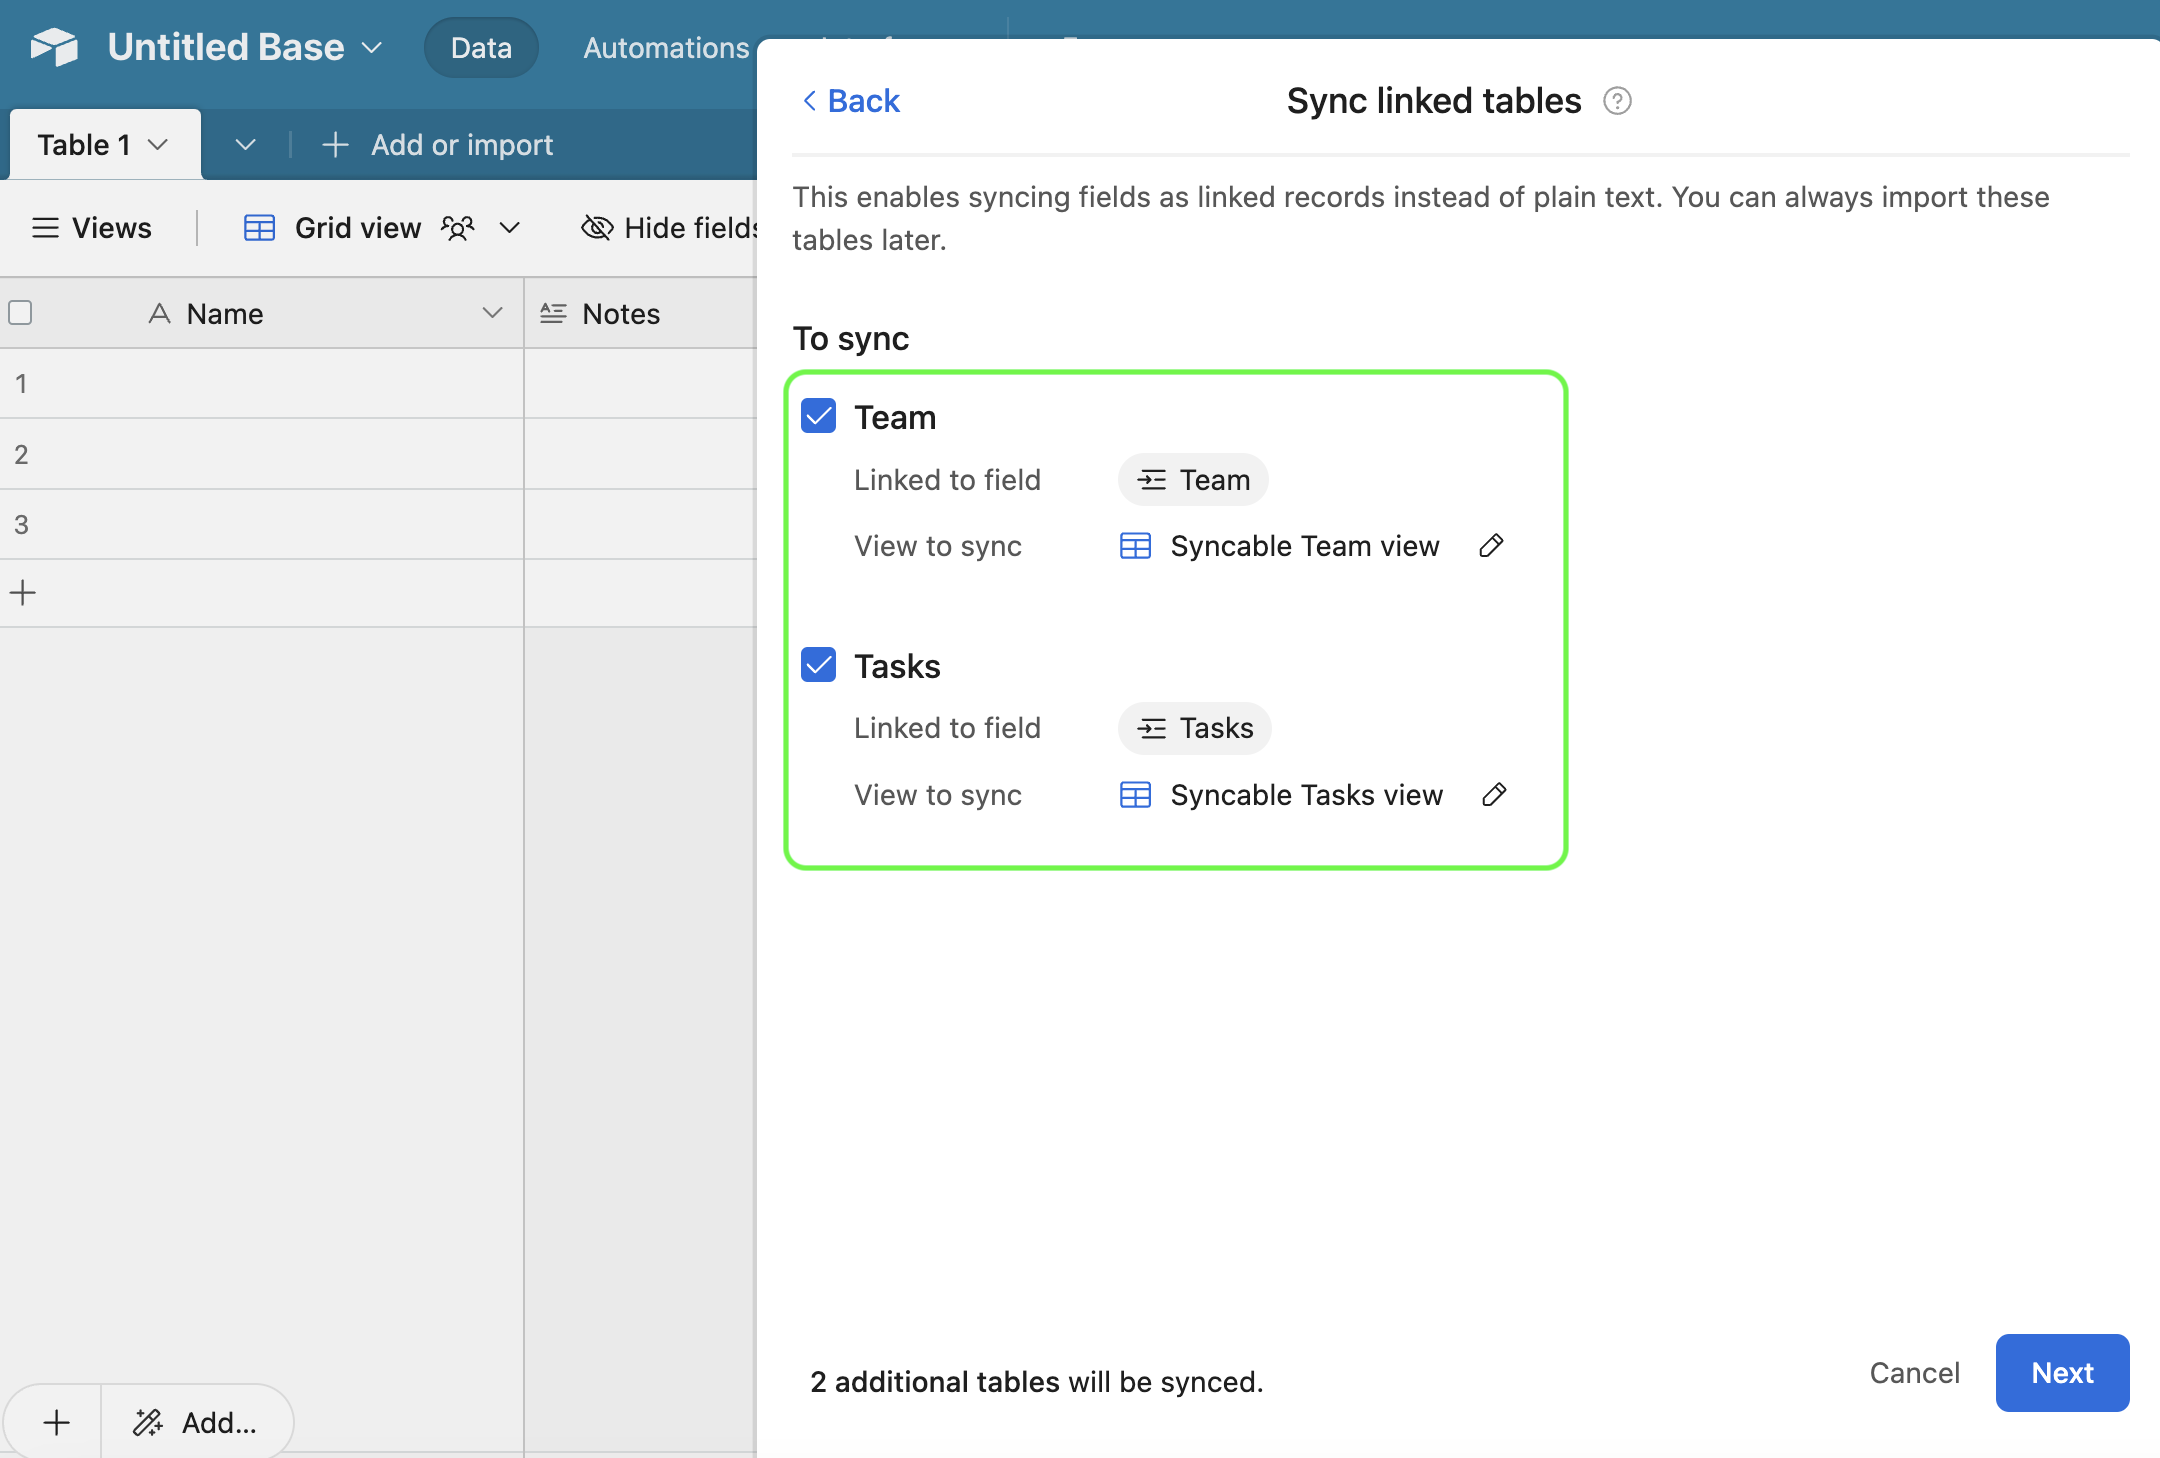
Click the Sync linked tables option. You’ll see the number of tables connected to the table/view via one or more linked record fields that you are configuring as a source sync. Additionally, there is a preview of how many of those tables contain an existing syncable share link that you can choose from in the next step.

The next step will depend on whether you are:
Choosing a syncable view already configured - Use this option when you already know of a view that contains the settings appropriate to your use case for syncing.
Next to the “Default view” section click the Select a default view drop down. If you are updating a previously configured source sync, then you might see the name of the current default view to click.
Choose which syncable view you would like to set as the default view. The number of syncable views will be determined by how many have already been set up in the linked table that you are connecting with.
Click the arrow symbol ↗ to open a new tab in your browser if you need to make any modifications to the syncable share view that you’ve selected.
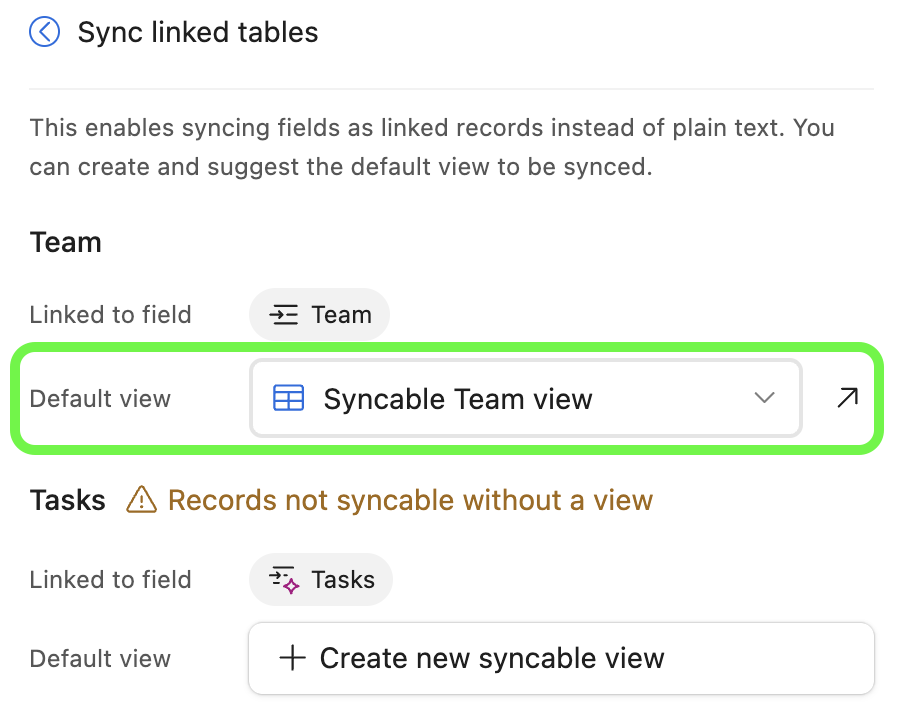
Creating a new syncable view - Use this option when you need to create a new syncable share view in the other table.
Click the + Create new syncable view option.

A view creation window will appear. Give the new view a name and toggle on the option to “Allow other bases to edit data in this created view” in order to allow two-way syncing.

Click Create view
The sync configuration window should update the “Default view” section with the view you created.
You can now share the view link with your colleagues to utilize are continue building by moving on to configure the sync in one or more destination bases.
Configuring linked record syncing in a destination base
When setting up syncs containing linked tables there will be an additional step to choose whether or not to include the additional tables required to allow for linked records to be preserved within the base where you are setting up the destination sync.
Note
You will need Editor permissions or higher in the sync source base in order to see and configure the steps outlined below.
For those without editor+ permission on the source base, you could obtain additional shared view links from another collaborator who does have access to the additional linked data that you want to add. Once the additional synced tables are present in target, you can link them via the synced linked records upconversion flow outlined in the “Upconverting previously synced linked record fields” section below.
Follow step 4 in the “Configuring a basic sync” section.
When you reach the “Sync linked tables” window during the configuration process, all available linked tables will be chosen by default.
Feel free to adjust this by clicking the check icon next to each linked table that you do not want to include in the sync.
Remember that not choosing to include a linked table will result in linked record fields that appear as single link text rather than linked record field types.
Once you’ve configured the sync-linked tables, click Next.
Configure the sync settings covered in step 5 of the “Configuring a basic sync” section. Then, click Create tables. This will create the main source table as well as any additional linked tables selected in the previous step.
Upconverting previously synced linked record fields
Prior to August 2024, linked record columns were synced as plain text. In order to use the newer synced linked records functionality, you will need to convert any of these older linked record fields. Converting these fields also involves syncing the additional tables necessary to use this feature.
To convert a linked record field:
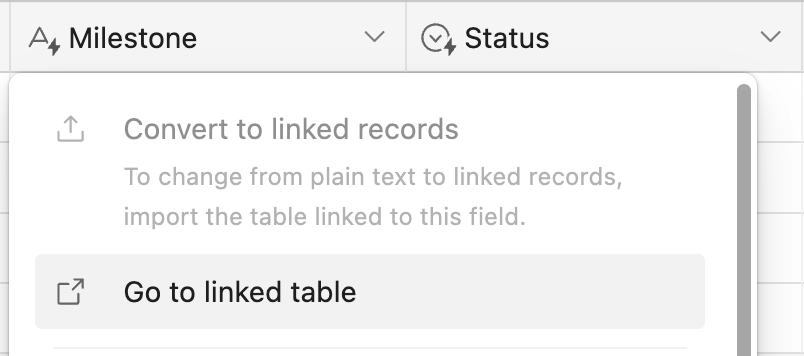
First, you’ll need follow the steps listed in the “Configuring a basic sync” section. The goal here is to sync in any extra source tables that contain linked record relationships not currently represented in the destination base. In some cases, you may be able to click the option Go to linked table in order to configure a new syncable shared view link.
Once you’ve synced in the additional necessary source tables, navigate to the destination table where a linked record field needs to be converted.
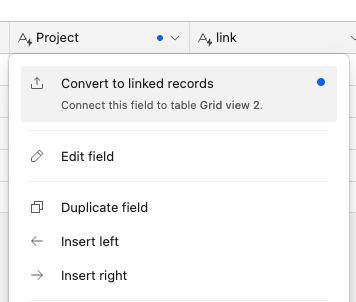
Click the dropdown next to the linked record field’s name.
Select the option Convert to linked records. If the option is not clickable, then the necessary synced table is still not synced into the destination base.
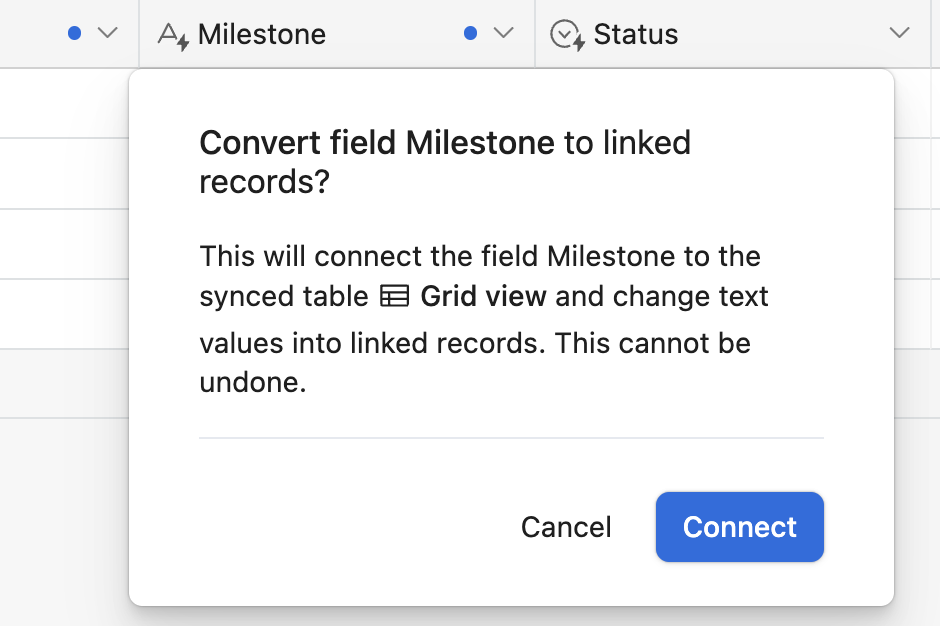
Finally, a confirmation modal with appear. Click Connect to finish the conversion process. Keep in mind that it may take a moment for Airtable to process the conversion on the backend before the linked records will appear in the synced linked record field.
Limitations of syncing linked records
Multi-source syncing is not supported.
Dynamic filtering is not inherited from the source base.
If a linked record is not displayed in the source view for the sync due to filtering conditions, we will not be able to reference all the information contained within that record. In these cases, we will only reveal a partial set of information about the linked record that is filtered out of the source view, but still present in the table where the source view resides.
FAQs
How often do tables sync?
When you configure a table sync, you can choose to manually or automatically sync changes to your base.
Automatic syncing between Airtable bases occurs in real-time 1
Automatic syncing between a sync integration and an Airtable base occurs as frequently as every 5 minutes, but may take longer at times.
Automatic syncs will eventually stop on bases that have not had any recent activity. To keep automatic syncs active, make sure that some kind of action (i.e. create a record, update a record, create a new view, etc.) is being performed in the base on a regular basis by automations, humans, or a combination of the two.
Automatic syncing is only available on paid Airtable plans.
1 Time-based formula fields (and all dependent columns) will not be instant; instead, they will periodically update. Table syncs with Customized Linked Records will not be instant; instead, they will be updated periodically.
Why can’t I see the option to turn on sync for my view?
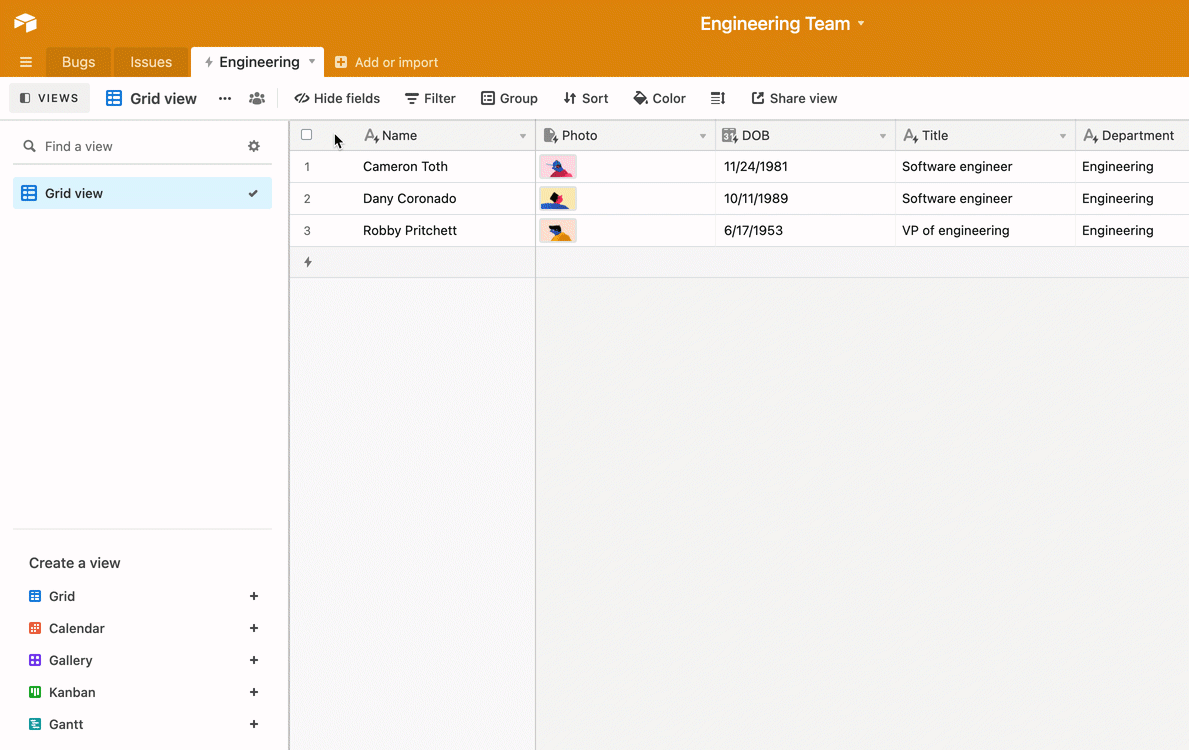
Airtable only supports syncing from grid views. It is not possible to set up a sync from calendar, gallery, kanban, timeline, list, or Gantt view types. However, those view types can be recreated in the destination table after the sync has been configured from the initial grid view.
What happens if I'm over the sync integration limits for my workspace?
Sync integrations can be managed from the workspace settings page as outlined in this support article.
What does it mean when the destination base says "an anonymous base" or "Unknown User"?
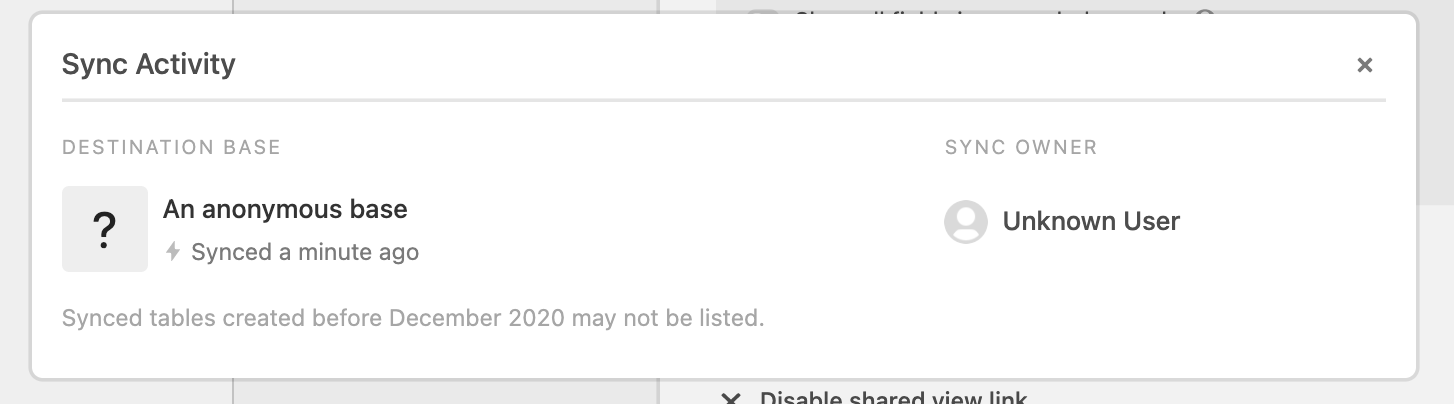
In the Sync Activity log, if you have access to the destination base, you'll see the name of the base and the user who configured the sync. If instead, you see "an anonymous base" or "unknown user", this is due to one of the reasons below:
You do not have access to the base
The destination base has been deleted
If you're concerned about who might have access to the shared view link to set up a synced table, you can:
Regenerate your shared view link - When you do so, the sync will pause on all destination bases until it is re-authenticated. The users on the destination bases will see an error icon, along with the time the table last synced. To re-authenticate, they'll need the new syncable view share link. To use that link, click the dropdown next to the destination table, click Update sync configuration, and insert the new link.
Enable a password and/or email domain restrictions on the shared view link - If the view share link is restricted to example.com, an example.com Airtable account will be required to sync that view to any base. You can learn more about sync permissions here. Note that these restrictions can break existing syncs or published data sets that depend upon this shared view link.
What if the view share link is password-protected or email domain-restricted?
We respect password and email domain restrictions. For example, if the view share link is restricted to dundermifflin.com, a dundermifflin.com Airtable account will be required to sync that view to any base. Learn more about sync permissions here.
What happens if the view share link is removed or regenerated at the source?
The sync will pause until it is re-authenticated. You’ll see an error icon ⚠️, along with the time the table last synced.
To re-authenticate, you’ll need a new syncable view share link. Then, click the dropdown next to the destination table, select Update sync configuration, and provide the new link.
I have a linked record field linking to a synced destination table. The record links are mysteriously unlinking. What is occurring?
It’s likely the case that someone is adjusting the filtering conditions (or hiding records) in the source view. If a record is filtered out of the source view, then, depending on your particular sync's settings, that record will in turn be removed from the destination table. If a record is removed from the destination table, that record will unlink from any linked record fields to that table.
You can address this issue is by locking the source view 🔐 (paid plans only), to prevent other collaborators from inadvertently changing the filtering conditions. You can also consider renaming the source view to warn people to not change the view’s filtering conditions
What happens if the Airtable account of the person who set up the sync is deactivated?
If the shared view is domain-restricted and the user that set up the sync loses access to the source base, the sync will pause. It may be worthwhile for an admin user to set up important syncs so that they are not interrupted.
If a field name is changed in the source how do I have that update in a sync destination?
By design, changing field names in a sync destination is meant to be difficult to change since formula fields, scripting, API calls, automations, and more may depend upon the current name of a field in the destination. For that reason, field names in the source and destination may not match if the name has been updated in the source. Use caution when using the workaround described and consider using the field manager to understand the dependencies in your base.
To update a destination table to match the name of the field in the sync source, first, navigate to the synced destination table and click the dropdown next to its name. Then, click Update sync configuration. This will open the sync configuration window. From here, click on the three-dot icon next to the source you would like the field's name to match and select Edit synced fields. If the Specific fields in the source option has not already been selected, choose that option. Then, toggle off the field that you'd like the name to match and hit Save. Next, you'll follow the same steps, this time toggling the option to sync that same field back on and then click Save once more. Optionally, you can repeat the process one more time by choosing the All fields in the source and fields added in the future option to return the sync configuration back to that functionality as well.
If the option to delete records when they are deleted or hidden in the source table is enabled, how can I determine if one of the synced records has been deleted or hidden?
You can add a button field with the ‘Open Source Record’ action. If the button is grayed out, the record has been deleted or hidden in the source view.
Will the synced table count toward the destination base’s record limits?
Yes. For example, if you sync a view with 1,000 records from a source base (where the records originate from), the destination base (where you want to sync the records) will count the 1,000 synced records towards that base's total record limit.
Will the attachments in a synced table count toward the destination base’s attachment limits?
Yes. Similar to record limits, attachments in a synced table will count against the attachment limit in that synced table's base.
Can I “daisy chain” syncs by syncing from the destination base to other bases?
Yes. However, daisy-chained syncs will not be reflected in sync sources/destinations enabled for two-way syncing.
Is there a way to filter for records that were deleted, or filtered out of, the source view in the source base?
Yes. If you choose to keep records in the destination base when they are deleted in the source base, then you can add a sync source record button field. If the button is not clickable, then the record was deleted, hidden, or filtered out of view in the source base.
Will record comments sync over to the destination base?
No. Record comments are scoped only to the base where the record resides. The records that reside in the destination table have a different record ID than the records in the source table, which means that even though there is a connection via the sync that you've set up, the records in each table are technically unique.
Can different bases be linked together?
While we don't support linking to individual records across multiple bases, you can add related tables into the same base. This case study demonstrates how a Airtable user interlinks dozens of tables into a single base.
How can I turn off a sync?
There are several options to consider when turning off a sync:
Turning off a sync from the source view - In some instances, you may want to disable a sync source. Keep in mind that this will break any connection to existing sync destinations, so they will be unable to continue to sync the data moving forward.
To disable a source view navigate to the base → table → view where you want to stop allowing syncs. Click the Share and sync button. Then, click the Sync data to another base option. Next, toggle off the “Allow data in this view to be synced to other bases” option.
Turning off a sync from a destination table - In other instances, you may want to disable a sync in a destination table. This is a good option to use when you want to “freeze” the data according to it’s most recent sync. The table will remain and the sync could be re-established in the future if needed. Keep in mind that you could also change the sync frequency to be “Only sync changes when requested” if you currently are automatically syncing the data.
To disable a destination sync, navigate to the base → destination table. Click the dropdown next to the name of the table. Click the Update sync configuration option. Next, you can either:
Change the sync interval to be unsynced by clicking the Change button under the “Settings” section next to the current interval setting. Then, choose the “Stop syncing changes and convert to unsynced table” option on the next page. A confirmation modal will appear where you will need to click Remove to break the sync.
Once you convert it to be unsynced, the table becomes a regular, fully editable table. All of the synced data stays in place, and the fields that were read-only while syncing are now editable.
Remove an individual source, which can be helpful in multi-source syncs. To accomplish this, click the … icon next to the source you want to remove. Then, click Remove source.
Deleting a source or destination table - This option should be used with caution, but there are time when you may need to delete a source or destination table. Keep in mind that deleting sync source tables can affect the data in downstream destination syncs depending on the destination sync’s settings. Reference this article if you want to learn more about deleting a table.
I don’t see the “+ Add elements” button on the interface editor, why might that be?
Elements are an aspect of an older version of Interface Designer. Currently, elements are only available in blank layouts or legacy record review and record summary layouts. If you are looking for the best and most well supported interface features, then we recommend using newer interface layout types covered here.
I'm trying to unsync a completed project, but the view appears to be locked. How do I remove the sync?
A locked view and an unsynced table are two separate things. You don't need to unlock the view to remove the sync.
To remove a sync from a destination table:
Open the destination base and click the dropdown arrow next to the synced table's name.
Click Update sync configuration.
Under the "Settings" section, click Change next to the current sync interval.
Click Stop syncing changes and convert to unsynced table, then confirm by clicking Remove.
If you're seeing a "locked view" message, that's a separate view-level setting and is unrelated to removing the sync. Locked views restrict edits to the view configuration itself and can be toggled off by someone with Creator-level permissions on the base.
Why am I receiving the "Your enterprise admin hasn't yet configured a Databricks connection." error when trying to set up a Databricks sync?
Integration sync sources such as Databricks, Snowflake, and Salesforce require a one-time configuration by an enterprise/organization admin before individual users can connect. The admin sets this up in the Airtable admin panel under Settings → Integrations & development → Configure integrations, after creating the corresponding app connection on the provider side (for Databricks: an app connection with Airtable's redirect URL and the SQL scope, which produces a client ID and secret). Until that configuration exists, users will see the "admin hasn't configured..." message. Once it's in place, you can connect your own account and create the sync. See Airtable Sync integration: Databricks for the full admin steps.
Why am I getting the "Unable to sync this source. This table exceeds the synced tables per base limit." error and how do I fix it?
The "Unable to sync this source. This table exceeds the synced tables per base limit." error is releated to a plan or limit constraint. Confirm the following:
Is the base's workspace on a Free plan? Airtable Sync isn't available on Free plan workspaces, so attempting to sync there can surface this error. The fix is to move the base into, or upgrade the workspace to, a paid plan that includes sync. On enterprise accounts, an admin can upgrade the workspace from the admin panel (Workspaces → locate the workspace → Manage workspace).
Have you hit the per-base synced-table count? On paid plans there's a maximum number of synced tables per base (Team allows 10; Business and Enterprise Scale allow 20). If the base already has that many synced tables, you'll need to remove an existing synced table or distribute syncs across additional bases before adding another.
Can I move or copy a table with attachment fields into another base while preserving the attachments?
Yes. Youou can copy a table across bases and keep attachments using the sync-then-unsync method:
In the source base, create a shared view with syncing enabled and sync that table into the destination base.
Once the synced table appears in the destination with its data, open its sync configuration and convert it to an unsynced table. The data stays put as a regular, fully editable table.
This preserves attachment fields in their original format (attachments sync in the same format), which CSV export/import does not — CSV brings everything in as text. Plan note: Airtable Sync requires a paid plan (Team and above). If you're on a Free plan, your options are copy-paste (select the table, copy, paste into a new table in the target base) or CSV import, both of which work on any plan but lose field-type configuration and require you to set up field types first.
Can I choose which synced table a synced linked record field connects to?
No. Synced linked record fields connect to only one foreign table, and when a source table's links are synced into your target base across multiple synced tables (for example, several views of the same source table were each synced in), the field has to pick one of them — and Airtable selects it automatically.
To get the link pointing where you want, use one of these workarounds:
Remove the unwanted synced table. If one of the synced tables is stale or being retired, deleting it cascade-removes its linked field on the connected table, clearing the way for the field to re-establish a clean link to the table you actually want. (Deleting the table you no longer need is often the simplest fix.)
Clear and rebuild the link. Delete the existing linked field that's pointing at the wrong table, then either let the remaining synced table's connection re-establish the reverse link, or manually create a new linked record field to the intended table.
How do I update the primary field in my synced (destination) table after changing the primary field in my source table?
The primary field of a synced destination table is set when the sync is first created and can't be reassigned afterward — so designating a different field as the primary in your source won't change the destination's primary field on an existing sync. You have two paths:
Recreate the sync with the primary field you want. Create a new synced table from the same source, and on the "Select fields to sync" step expand the Advanced section to choose which field acts as the primary field, then click Create table. Once the new synced table is working, delete the old one (it isn't removed automatically). Note: rebuilding the sync means any lookups, rollups, links, or automations pointing at the old synced table will need to be repointed to the new one.
Edit the original source primary field instead of promoting a new field. If your goal is to change the content/type of the primary value (e.g., make the existing primary field a formula that includes more detail), modifying the existing source primary field flows through to the destination — whereas making a separate field the primary in the source does not.
You can choose your primary field during sync configuration, on the "Select fields to sync" step, expand the Advanced section to choose a specific field to act as the destination table's primary field; by default it matches the source table's primary field. Primary fields must contain unique values and be a supported field type. Because this choice is only available at creation, decide on the primary field before creating the sync; to change it later you'll need to recreate the synced table as described above. (If you don't see the Advanced option, note its availability can depend on your plan.)