Plan availability | Business and Enterprise Scale access only |
Permissions | Owners/Creators - In order to create or update synced tables, you'll need to have creator permissions in the base where you are setting up the sync. |
Platform(s) | Web/Browser, Mac app, and Windows app |
Related reading |
|
Learn how to use the Airtable Sync integration feature to bring information from an external application into Airtable as a new table in your base. Sync integrations are always a one way sync from the external application into an Airtable base, so changes made in Airtable cannot be synced back to the external application that you are syncing with.
This article covers how to sync Jira issues found in specific filters to an Airtable base. Customers utilizing Jira Server / Data Center should consult this support article instead.
Setting up a Jira Cloud sync in Airtable
Note
Please ensure that the Jira user connecting the Jira Cloud integration has the "Create Issues" permission in the Jira project you are syncing to Airtable. Without this permission, some field data from Jira will not sync.
Navigate to a base where you want to sync data into Airtable.
Add a new synced table by clicking the + Add or import button.
Scroll down to the bottom of the list and click the XX more sources… option.
Browse or search for “Jira Cloud” and then click Jira Cloud.
Click the dropdown below “Jira Cloud Account” and select an existing Jira account (if you’ve already connected to Jira), or link to a new Jira account.
Once you link to the account, select the “Site” that you want to use to create the synced table - all of your existing sites will be available as options to select. Select a site before moving on.
You’ll then be able to choose which issue “Filter’ to use for creating Airtable records. Then, click Next.
It’s important to choose a filter with conditions that won’t change. Whenever a filter’s conditions are changed in Jira, records that no longer match are deleted, along with any additions made in Airtable.
For example, if you’ve synced a filter that only has open bugs, and a bug is closed, the Airtable record will be deleted along with any record comments and activity, and other field data that may have been added. If that same bug is reopened, a new Airtable record will be created. As a result, we recommend choosing a filter that is unlikely to change.
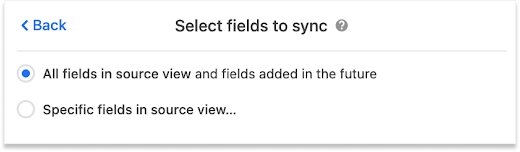
After clicking Next, you’ll be presented with two sync options; you can sync:
All fields from the source view (Jira), including any fields added by Jira in the future.
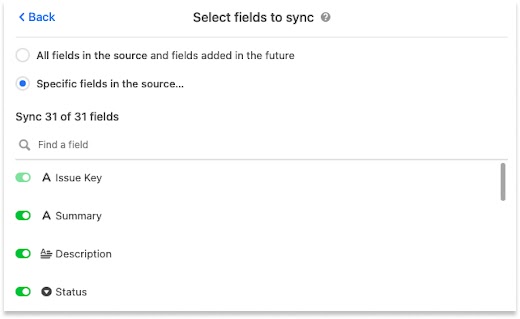
Specific fields from the source view (Jira).
If you choose to sync specific fields you’ll be shown a menu where you can toggle each individual field that you want to sync from Jira.
Note
Only certain fields from Jira are supported in Jira Cloud syncs. Consult the information here as needed.
Before creating your synced table, there are Settings options that will allow you to choose how often you want to sync, and how to handle records that are deleted or hidden from the source (Jira). These options are:
The frequency of syncing. Right now, the options are manual syncing and automatic syncing which happens as often as every 5 minutes, but can, at times, take longer.
Whether or not deleted records (issues in the selected Jira filter) should be removed from the Airtable table. By default, deleted events will be removed.
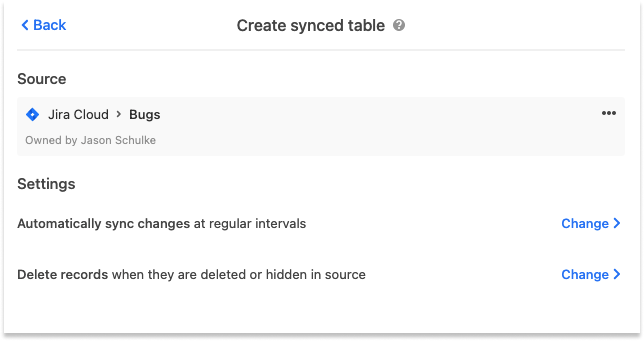
Once you’ve selected your desired settings, click Create table. The sync operation will retrieve all issues in the selected Jira filter and generate Airtable records.
Which Jira fields can be used in Jira Cloud syncs?
Below is a list of all of the field data that is provided by Jira that can be synced to Airtable:
Issue Key | Priority | Parent |
Summary | Labels | Environment |
Description | Time Spent | Affects Versions |
Status | Aggregate | Epic Name |
Project | Time Spent | Sprint |
Issue Type | Time Remaining | Reporter |
Created | Aggregate Time Remaining | Flagged |
Updated | Original Estimate | Story Point Estimate |
Components | Due Date | Start Date |
Story Points | Linked Issues | Issue Color |
Fix Versions | Assignee |
Security and OAuth scopes
Authentication
Airtable only interacts with a single Jira external account type, so the scopes listed here are also used for the Jira automations actions. This is why the scopes include write permissions. The OAuth consent screen will look like this:
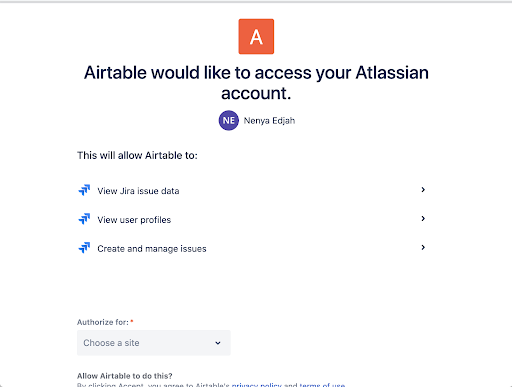
Airtable will only have access to the issues and filters that the user who connected the Jira sync has access to. If the user who connected a Jira sync leaves the company and their Jira account gets deactivated, the sync will stop working.
Note
There is no separate plugin or app that needs to be installed on the user’s Jira instance. The data that we retrieve from Jira’s API is transmitted securely via HTTPS and will not be used for any purpose other than the synced table.
Jira Cloud scopes
Scope name | Scope purpose |
| To get a refresh token |
| Get user information (e.g. might want to "mention" someone in a post) |
| e.g. reading issues |
| e.g. posting issues |
The tokens are transmitted between Airtable and Jira’s servers securely via HTTPS. On Airtable’s side, the tokens are stored in databases that are encrypted at-rest.
For more information on Jira scopes, check out Jira's documentation here.
FAQs
What type of access will Airtable have to Jira?
Airtable will only have access to the issues and filters that the user who connected the Jira sync has access to.
What happens to the sync if the Jira account used becomes deactivated?
The sync will stop working if the connected Jira account is deactivated.
How is data transmitted from Jira?
The data that we retrieve from Jira’s API is transmitted securely via HTTPS and is not used for any purpose other than syncing data to the table.
Can custom fields in Jira be used in the Sync?
Custom fields that are based on Jira's built-in field types are supported, but other types of custom fields may not be supported.
Are there any limitations to be aware of?
Yes, there are a few limitations to be aware of when using this sync integration type:
The maximum number of issues synced is 10,000. This is a limit that we impose to ensure reasonable performance.
This Jira sync integration only fetches fields from issues if the field is present in the 'Create Issue Screen' screen. Fields present in the 'View Screen' or 'Edit Screen' are not supported at this time.
Jira’s API limits how much data can be transferred with each request, so sync performance in the range of 1 second per 100 issues is to be expected. We recommend that you choose filters that narrow your request wherever possible.
Is there a cap on how many fields can be synced from Jira to Airtable?
There isn't a fixed numeric limit on the number of fields, but what's syncable is governed by two rules rather than a count: a field must be on Jira's "Create Issue Screen" for that issue type, and it must be a supported field type (Airtable's Jira sync supports a defined list of Jira field data; custom fields are supported only when they're based on Jira's built-in field types). Fields that appear only on the View or Edit screens, or custom fields built on unsupported types, won't sync regardless of how many fields you have. Note the documented hard cap is on issues (rows): a maximum of 10,000 synced issues — that's separate from fields.
When one field won't come across while others do, check these, in order:
Is the field on the Jira "Create Issue Screen"? The sync only fetches fields present on the Create Issue Screen for that issue type. A field that exists and is populated but lives only on the View or Edit screen won't be picked up. Adding the field to the Create Issue Screen in Jira typically makes it available to sync.
Is it a supported field type? Custom fields sync only when they're based on Jira's built-in field types; custom fields from plugins or non-standard types may not be supported. Confirm the field's type against the supported-field list in the Jira sync documentation.
Does the connecting Jira user have the "Create Issues" permission? Without it, some field data won't sync. Make sure the account that set up the sync has Create Issues permission in the project being synced.
Is the field included in your sync configuration? If you chose "specific fields" rather than "all fields" when setting up the sync, confirm the field is toggled on.
For Employee-ID-style custom text fields specifically, the usual cause is that the field isn't on the Create Issue Screen, or it's a custom field type that isn't one of Jira's built-in types.