- Getting started with Airtable
- Introduction to Airtable basics
- Contacting Airtable Support Updated
- Airtable home screen
- Glossary of Airtable terminology
- Airtable technical requirements
- Feature differences between Airtable on desktop and mobile
- Airtable keyboard shortcuts
- Using Markdown in Airtable
- Adding descriptions in Airtable
- Finding Airtable IDs
- Airtable Automations
- Automations Overview
- Automation feature walkthroughs
- Integrated automation walkthroughs
- Airtable automation walkthroughs
- Linking existing records using automations
- Conditional groups of automation actions
- Repeating groups of Airtable automation actions
- Creating recurring records using automations
- How to delay Airtable automation runs
- Prevent automations from triggering by mistake
- Use automations to timestamp status updates
- Automation Triggers
- Airtable Triggers
- Airtable automation trigger: When record matches conditions
- Airtable automation trigger: When a form is submitted
- Airtable automation trigger: When record created
- Airtable automation trigger: When record updated
- Airtable automation trigger: When record enters view
- Airtable automation trigger: At scheduled time
- Airtable automation trigger: When webhook received
- Airtable automation trigger: When a button is clicked
- Airtable automation trigger: When email received Updated
- Integrated Triggers
- Airtable Triggers
- Automation Actions
- Airtable Actions
- Airtable automation action: Send email Updated
- Airtable automation action: Create record
- Airtable automation action: Update record
- Airtable automation action: Find records
- Airtable automation action: Sort list
- Airtable automation action: Run a script Updated
- Airtable automation action: Generate with AI
- Integrated Actions
- Airtable automation actions: Slack
- Airtable automation actions: Google Workspace
- Airtable automation action: Send MS Teams message
- Airtable automation actions: Outlook
- Airtable automation actions: Jira Cloud
- Airtable automation actions: Jira Server / Data Center
- Airtable automation actions: Salesforce
- Airtable automation action: Create post in Facebook Pages
- Airtable automation actions: GitHub Issues
- Airtable automation action: Hootsuite post
- Airtable automation action: Send Twilio SMS
- Airtable Actions
- Airtable Bases
- Using Airtable Cobuilder
- Airtable bases overview
- Creating and managing Airtable bases
- Structuring bases in Airtable
- Moving bases between workspaces in Airtable
- Creating and managing tables in Airtable
- Creating Airtable base share links
- Importing third-party data into Airtable
- Using insights in Airtable
- Troubleshooting Airtable base performance
- Airtable Betas
- Collaborating in Airtable
- Airtable Enterprise Support
- General Enterprise information
- External badging in Airtable
- Using app library and components in Airtable Updated
- Ask an Expert beta overview
- European data residency at Airtable
- Airtable user groups overview
- Airtable Enterprise API
- Creating and managing data retention policies in Airtable
- eDiscovery APIs in Airtable
- Airtable and data loss prevention
- Accessing Enterprise audit logs in Airtable
- Set up Jira Server / Data Center to connect with Airtable
- Admin panel pages
- Airtable admin panel overview
- Users - Airtable enterprise admin panel
- Airtable admin panel user details
- Groups - Airtable admin panel
- Workspaces - Airtable Enterprise Admin Panel
- Bases - Airtable admin panel
- Interfaces - Airtable admin panel
- Data sets - Airtable admin panel
- Managed apps - Airtable admin panel
- Components - Airtable admin panel
- Reports - Airtable admin panel
- Settings - Airtable admin panel Updated
- Managing Enterprise organizations
- Managing Enterprise admins in admin panel
- Using Organizations
- Organization branding for apps in Airtable
- Enterprise Hub in Airtable
- Enterprise Hub: Org unit assignment with user groups Updated
- Deactivating, removing access, and reactivating users in the admin panel
- Managing user access to workspaces and bases
- Airtable Enterprise Key Management Updated
- Custom terms of use New
- Enterprise SSO
- General Enterprise information
- Airtable Extensions
- Airtable Fields
- Fields Overview
- Attachment
- Date-based fields
- Formula
- Getting Started with Formulas
- Formula Foundations
- The essentials of Airtable formulas
- Formula writing tips for beginners
- Troubleshooting formulas
- Basic calculations
- Conditional statements
- Logical arguments
- Working with dates
- Displaying DATETIME_FORMAT using the date field in Airtable
- Working with date functions in Airtable
- Calculating the difference between dates in Airtable
- Supported DATETIME_DIFF unit specifiers in Airtable
- Supported DATETIME_FORMAT format specifiers in Airtable
- Using the DATETIME_PARSE() formula in Airtable
- Working with timezones
- Record functions
- Text functions
- Numeric functions
- Common Solutions: Beginner
- Common Solutions: Intermediate
- Common Solutions: Advanced
- Long Text Field
- Linked Record Field
- Linking records in Airtable
- Limiting linked record selection to a view in Airtable
- Dynamic filtering in linked record fields
- Linking to one, many, or a subset of Airtable records
- Converting existing fields to Airtable linked records
- Reordering record links in Airtable
- Understanding linked record relationships in Airtable
- Number-Based Fields
- Other Fields
- Rollup, lookup, and count fields
- Select and user fields
- Integrating with Airtable
- API
- Getting started with Airtable's Web API
- Creating personal access tokens
- Airtable Webhooks API Overview
- Service accounts overview
- Airtable Web API - Using filterByFormula or sort parameters
- Airtable API Deprecation Guidelines
- Airtable API: Common troubleshooting
- Managing API call limits in Airtable
- URL length limitations for web API requests
- Integration services
- Third-party integrations via OAuth overview
- Troubleshooting disconnected OAuth integrations in Airtable
- Options for integrating with Airtable
- Third-party integrations - Common troubleshooting
- Low-code integrations - Common troubleshooting
- Integrating Airtable with external calendar applications
- Visualizing records from Airtable in Tableau
- Visualizing Airtable records in Microsoft Power BI & Power Query
- Integrating HubSpot with Airtable
- Using Zapier to integrate Airtable with other services
- Using Zapier's Multi-Step Zaps to find and update records
- Using IFTTT to integrate Airtable with other services
- Integrating with AWS Lambda & DynamoDB
- Developer tools
- API
- Airtable Interface Designer
- Interface Designer overview articles
- Interface layouts
- Interface elements
- Adding and removing elements in interfaces
- Adding layouts to interfaces
- Formatting elements in interfaces
- Interface element: Button
- Interface element: Calendar
- Interface element: Chart
- Interface element: Filter
- Interface element: Gallery
- Interface element: Grid
- Interface element: Kanban
- Interface element: Number
- Interface element: Record picker
- Interface element: Text
- Interface element: Timeline
- Learning and Resources
- Managing Airtable
- Airtable Policy
- Airtable Records
- Airtable Sync
- Airtable Views
- Airtable Workspaces
- 03 Jan 2025
- 2 Minutes to read
- Print
- Share
- DarkLight
- PDF
Applying conditions to count, lookup, or rollup fields in Airtable
- Updated on 03 Jan 2025
- 2 Minutes to read
- Print
- Share
- DarkLight
- PDF
All plan types | |
Platform(s) | Web/Browser, Mac app, and Windows app |
Related reading |
Lookup, rollup, and count fields in a table use linked record fields to pull in values from one table to another. By default, these fields will pull in all the linked records from the other table, but you can choose to apply conditions to filter on these fields to limit what is included. This is ideal for when you only want to show a subset of related records such as showing only pending tasks for a project or only employees with birthdays this month.
Note
If you are looking for information related to applying dynamic/conditional filters to linked record selection, then consult this support article.
Applying conditions to fields in Airtable
Applying conditions to existing lookup, rollup, or count fields means that you already have two tables connected by a linked record field. If you do not already have one of these fields created, see the following to first connect the tables and then to create a field that pulls in or calculates additional values from one table to another.
Once you have a lookup, count, or rollup in your table, you can configure it to only show a subset of related information. For example, a “Bugs & Issues” table may be linked to a “Features” table to show all the bugs related to each feature. If you wanted to only see the number of high priority bugs for a feature, you could configure a count field to be filtered to just the “Critical” and “High” priority bugs.
To configure, check the “Only include records which match certain conditions” toggle.
The conditions you can apply here work the same as view filtering where you select a field , an operator , and a comparison value . In our example, you could set the filter to only count bugs with priorities of either “Critical” and “High” from the other table (Bugs & Issues).
The number of high priority bugs here can help determine which features need the most attention.
You can also add multiple conditions for each rollup, lookup, and count field by creating a conditional group. In the example below, a rollup includes a condition to calculate the average days old for all bugs with critical priority and a status of being blocked.
To learn more about creating more complex conditions, and using conditional groups, we recommend consulting this support article.
Invalid conditions in Airtable
When a rollup, lookup, or count field has an invalid condition, a notification will appear in the field configuration with an error symbol (⚠).
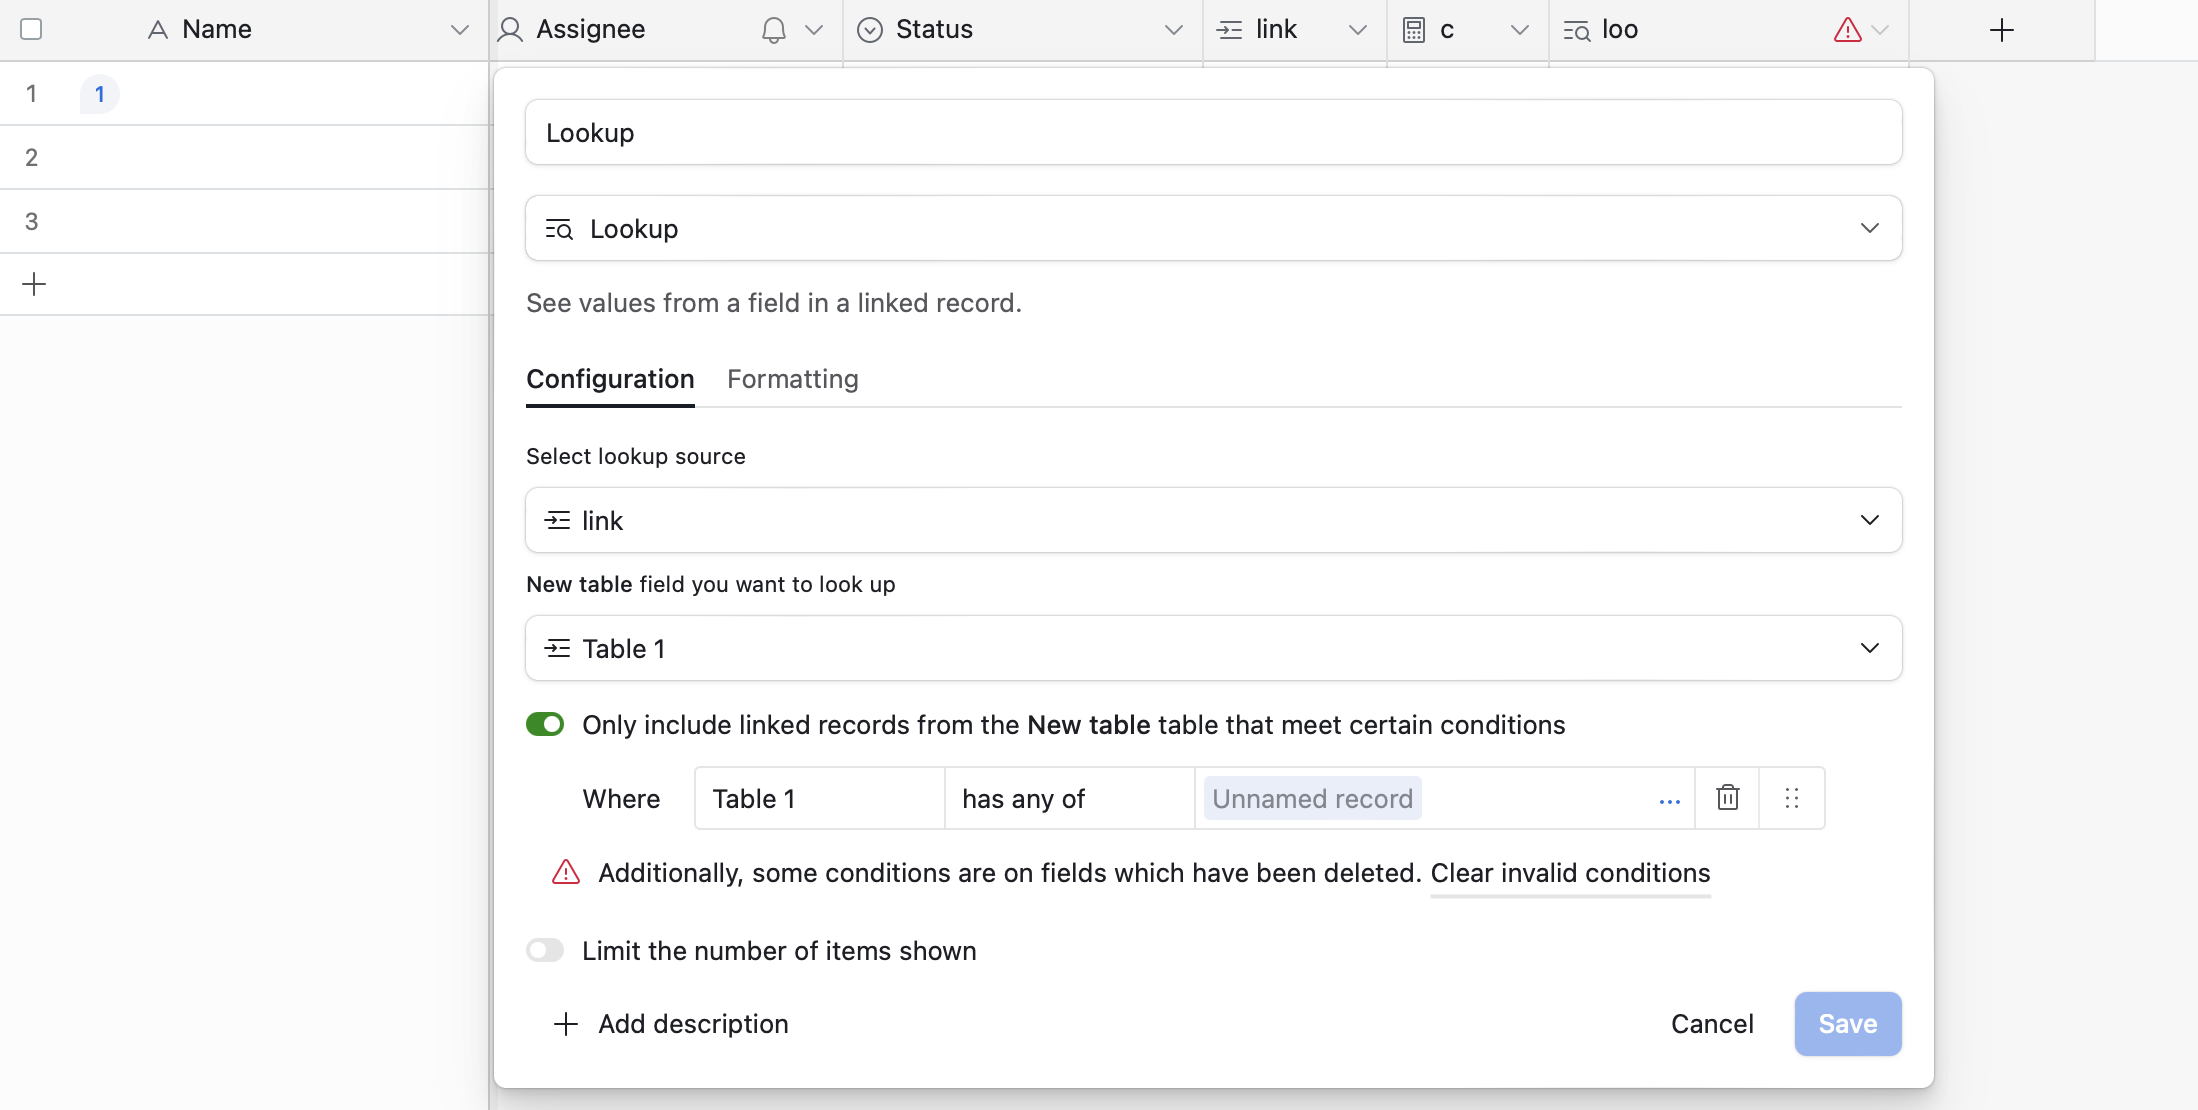
Invalid conditions may be caused by the following:
A field referenced in the condition was deleted.
A field referenced in the condition was changed to another field type that does not support the operator and comparison value of the original field type. For example, if a date field was changed to a text field, a condition that checks for all dates within the next month would become invalid.
It’s also worth noting:
If the field has an invalid condition while you are in the field configuration dialog, you will not be able to add any new conditions until the issue is resolved and you will not be able to save the configuration.
If the field becomes invalid after you created it (e.g., a referenced field was deleted), all the cell values for that field will appear blank.