Plan Availability | All plan types |
Permissions |
|
Platform(s) | Web/Browser, Mac app, and Windows app (with some additional limited support on mobile) |
Note
To parse a datetime from a string, use the
DATETIME_PARSE()function. Learn more here.For more information on
DATETIME_FORMATand other formulas, check out the formula field reference article.
How DATETIME_FORMAT works in Airtable
There are times when a date field in an Airtable base needs to be formatted beyond what's available in the field's configuration. In those cases, referencing the date field in a formula field using DATETIME_FORMAT gives full control over the output format.
DATETIME_FORMAT reformats data from a date-type field into a string. It follows this structure:
DATETIME_FORMAT({yourDateTimeField}, 'format specifier(s)')The format specifier controls how the date is returned—something like 'DD-MM-YYYY', 'YYYY/MM/DD', or 'MM.DD'. For the full list of supported specifiers, see the Supported DATETIME_FORMAT specifiers section below.
Here's a quick example of how DATETIME_FORMAT transforms a date field from one format to another.
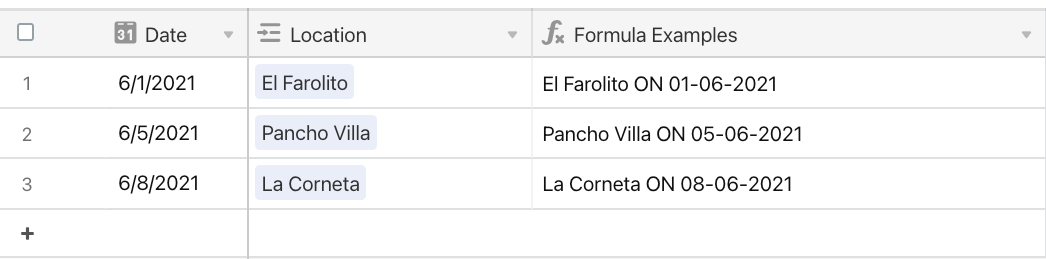
{Location} & " ON " & DATETIME_FORMAT({Date}, "DD-MM-YYYY")
Notice how the date's format changes from MM/DD/YYYY in the Date field to DD-MM-YYYY in the Formula Examples field.
Reformatting a date for use in a primary field
Since a table's primary field should contain a unique value for each record, formula fields are often used to ensure this. The example below shows how to combine static text with a formatted date field to create unique record names.
Here's a table with this formula currently in the primary field: CONCATENATE("Experiment #", {Test ID})

Using the autonumber creates a unique name for each record, but a more dynamic approach ties the experiment name to the test date instead. The table has these fields:
"Experiment Name"—the primary field, which uses a formula, concatenating "Experiment #" with the Autonumber field (Test ID).
Test ID—an autonumber field tracking unique experiments.
Test Date—a date field tracking when each experiment took place.
To update Experiment Name to include the date, adding the date field directly to a formula without DATETIME_FORMAT outputs it in simplified ISO format—not easy to read. Here's what CONCATENATE("Experiment #", {Test Date}) produces:

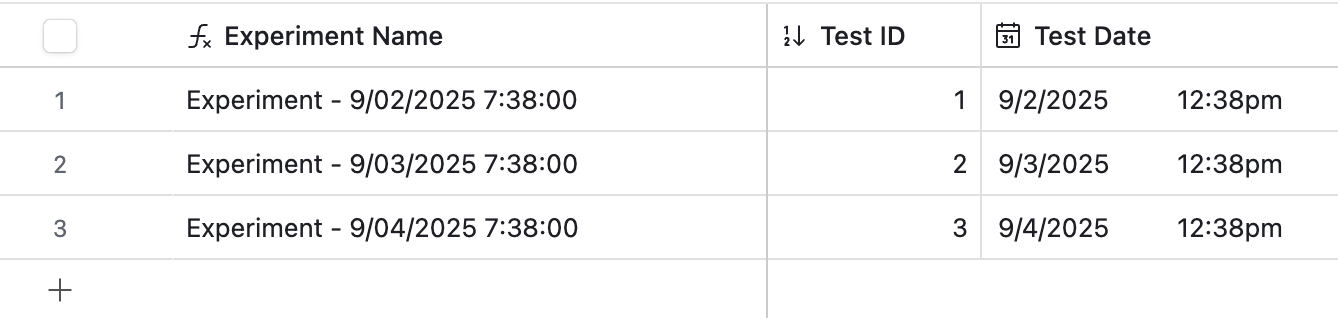
Updating the formula with DATETIME_FORMAT and a specifier makes the output readable:
CONCATENATE("Experiment - ", DATETIME_FORMAT({Test Date},'M/DD/YYYY h:mm'))
This produces a more readable, unique experiment name for each record:
Fixing a timezone difference in a formula's output
Occasionally, timestamps in DATETIME_FORMAT appear offset to GMT or another timezone. There are 2 ways to fix this:
The easiest way is to check "Use the same time zone (GMT) for all collaborators" in the date field's configuration menu. This can sometimes have downstream effects—use option 2 in those cases.

A more flexible approach is to use the
SET_TIMEZONEfunction insideDATETIME_FORMAT. For the full list of supported timezone identifiers, see Supported SET_TIMEZONE timezones. Here's an example for a team in the PST timezone:CONCATENATE("Experiment - ", DATETIME_FORMAT(SET_TIMEZONE({Test Date}, 'America/Los_Angeles'), 'M/DD/YYYY h:mm'))This produces the same consistent results:

Supported DATETIME_FORMAT specifiers
Note
The specifiers "w" and "W" behave differently. "W" is the ISO week of year, while "w" is the locale week of year (Gregorian calendar in GMT). 2/11/21 falls on the 6th ISO week and on the 7th Gregorian week. Airtable uses Moment.js for date parsing.
The following DATETIME_FORMAT specifiers are supported:
Format specifier | Description | Example(s) |
|---|---|---|
| Month of the year, cardinal nos. 1–12 | 1 2 ... 11 12 |
| Month of the year, ordinal nos. 1st–12th | 1st 2nd ... 11th 12th |
| Month of the year, cardinal nos. 01–12 | 01 02 ... 11 12 |
| Month name, 3-letter abbreviation | Jan Feb ... Nov Dec |
| Full month name | January ... December |
| Quarter of the year, cardinal nos. 1–4 | 1 2 3 4 |
| Quarter of the year, ordinal nos. 1st–4th | 1st 2nd 3rd 4th |
| Day of the month, cardinal nos. 1–31 | 1 2 ... 30 31 |
| Day of the month, ordinal nos. 1st–31st | 1st 2nd ... 30th 31st |
| Day of the month, cardinal nos. 01–31 | 01 02 ... 30 31 |
| Day of the year, cardinal nos. 1–365 | 1 2 ... 364 365 |
| Day of the year, ordinal nos. 1st–365th | 1st 2nd ... 364th 365th |
| Day of the year, cardinal nos. 001–365 | 001 002 ... 364 365 |
| Day of the week, cardinal nos. 0–6 | 0 1 ... 5 6 |
| Day of the week, ordinal nos. 0th–6th | 0th 1st ... 5th 6th |
| Day of the week, 2-letter abbreviation | Su Mo ... Fr Sa |
| Day of the week, 3-letter abbreviation | Sun Mon ... Fri Sat |
| Full day of the week | Sunday ... Saturday |
| Day of the week (locale) | 0 1 ... 5 6 |
| Day of the week (ISO) | 1 2 ... 6 7 |
| Week of the year, cardinal nos. 1–53 | 1 2 ... 52 53 |
| Week of the year, ordinal nos. 1st–53rd | 1st 2nd ... 52nd 53rd |
| Week of the year, cardinal nos. 01–53 | 01 02 ... 52 53 |
| Week of the year (ISO), cardinal nos. 1–53 | 1 2 ... 52 53 |
| Week of the year (ISO), ordinal nos. 1st–53rd | 1st 2nd ... 52nd 53rd |
| Week of the year (ISO), cardinal nos. 01–53 | 01 02 ... 52 53 |
| Year, last 2 digits | 00 01 ... 98 99 |
| Full year | 2000 2001 ... 2098 2099 |
| Week year, last 2 digits | 00 01 ... 98 99 |
| Full week year | 00 01 ... 98 99 |
| Week year (ISO), last 2 digits | 00 01 ... 98 99 |
| Full week year (ISO) | 2000 2001 ... 2098 2099 |
| AM/PM (uppercase) | AM PM |
| am/pm (lowercase) | am pm |
| Hour, 24-hour clock, 0–23 | 0 1 ... 22 23 |
| Hour, 24-hour clock, 00–23 | 00 01 ... 22 23 |
| Hour, 12-hour clock, 1–12 | 1 2 ... 11 12 |
| Hour, 12-hour clock, 01–12 | 01 02 ... 11 12 |
| Minute | 0 1 ... 58 59 |
| Minute (zero-padded) | 00 01 ... 58 59 |
| Second | 0 1 ... 58 59 |
| Second (zero-padded) | 00 01 ... 58 59 |
| Fractional second (1 digit) | 0 1 ... 8 9 |
| Fractional second (2 digits) | 00 01 ... 98 99 |
| Fractional second (3 digits) | 000 001 ... 998 999 |
| Fractional second (4–9 digits) | 000[0..] ... 999[0..] |
| Timezone offset from GMT, with colons | -07:00 -06:00 ... +06:00 +07:00 |
| Timezone offset from GMT, without colons | -0700 -0600 ... +0600 +0700 |
| Unix timestamp | 1360013296 |
| Unix millisecond timestamp | 1360013296123 |
| Preset time format: h:mm A | 6:30 PM |
| Preset time format: h:mm:ss A | 6:30:45 PM |
| Preset date format: MM/DD/YYYY | 06/08/2016 |
| Preset date format: M/D/YYYY | 6/8/2016 |
| Preset date format: MMMM D, YYYY | June 8, 2016 |
| Preset date format: MMM D, YYYY | Jun 8, 2016 |
| Preset datetime format: MMMM D, YYYY h:mm A | June 8, 2016 6:30 PM |
| Preset datetime format: MMM D, YYYY h:mm A | Jun 8, 2016 6:30 PM |
| Preset datetime format: dddd, MMMM D, YYYY h:mm A | Wednesday, June 8, 2016 6:30 PM |
| Preset datetime format: ddd, MMM D, YYYY h:mm A | Wed, Jun 8, 2016 6:30 PM |
DATETIME_FORMAT formatting examples
ISO 8601—represents date and time in year-month-day-hour-minutes-seconds-milliseconds format.
For example, 2025-12-31 15:00:00.000 represents December 31, 2025 at 3:00pm. There's no timezone offset specified—the time is assumed to be in UTC.
DATETIME_FORMAT({Insert Date Field Name}, "YYYY-MM-DD HH:mm:ss.SSS")
American datetimes—formats the date in month–day–year order:
December 31 2025
DATETIME_FORMAT({Insert Date Field Name}, "MMMM D YYYY")
12/31/25
DATETIME_FORMAT({Insert Date Field Name}, "M/D/YY")
12/31/2025
DATETIME_FORMAT({Insert Date Field Name}, "M/D/YYYY")
UK datetimes—formats the date in day–month–year order:
31 December 2025
DATETIME_FORMAT({Insert Date Field Name}, "D MMMM YYYY")
31/12/25
DATETIME_FORMAT({Insert Date Field Name}, "D/M/YY")
31/12/2025
DATETIME_FORMAT({Insert Date Field Name}, "D/M/YYYY")
Determining date starts, ends, or ranges
There are times when a date field needs to be represented as a range—like the start and end of a specific week. Combining DATETIME_FORMAT with DATEADD can pinpoint the start (Monday) and end (Friday) of the week based on any date. For more on DATEADD, see Working with date functions in Airtable.
Beginning of the week (Monday):
"Week of " & DATETIME_FORMAT(DATEADD({Date},1-DATETIME_FORMAT({Date},'E'),'day'),'ll')End of the week (Friday):
"Week of " & DATETIME_FORMAT(DATEADD({Date}, 7 - DATETIME_FORMAT({Date}, 'E'), 'days'), 'll')Full week range (Monday–Friday):
"Week of " & DATETIME_FORMAT(DATEADD({Date},1-DATETIME_FORMAT({Date},'E'),'day'),'ll') & " - " & DATETIME_FORMAT(DATEADD({Date}, 7 - DATETIME_FORMAT({Date}, 'E'), 'days'), 'll')