Plan Availability | Business and Enterprise Scale plans only |
Required permissions |
|
Platform(s) | Web/Browser, Mac app, and Windows app |
Admin panel users page overview
The Users page of the admin panel lets Airtable admins manage and view information about Airtable usage focusing on users within their organization.
The admin panel allows you to view the total number of active users associated with the organization’s Enterprise plan including external users:
A breakdown of users by license type
This header will not be shown for organizations that have not renewed their Airtable contract as of November 2021.
Pending user invites
A list of all of the users in their organization
The name and email address of each user
Additional user details in a separate window
Identify the user as Internal/Provisioned (no tag displayed), External, Admin, or Deactivated
The last date of activity for a particular user
Last activity is updated when a user takes a qualifying action in a workspace owned by the enterprise.
When the user joined
The seat type for each user
Organizations who have not yet signed a new contract with us will only be able to see whether the user is billable or not.
A cost center column for accounting purposes
Total # of users
The number displayed under the "Name" column shows the number of users that match the current filter or search query.
When “Status” is set to Active, the total number of users that can currently access your organization’s content in some way is shown.
When “Status” is set to Deactivated, the total number of users who, at some point in time, had access to your organization’s content in some way is shown.
Apply additional filters as needed.

Active user overview
Active users can log in and access Airtable, while deactivated users can't log in.
Admins can deactivate active users managed by their enterprise account and reactivate de-provisioned users.
Admin panel users page actions
Invite new user actions:
Search, sort, and filter results in various ways
Download a CSV of the list of users being displayed
Edit the email of a user
Sign the user out of all sessions they are currently logged in to
Revoke a user’s admin access
An admin cannot revoke their own admin permissions.
Deactivate a user
An admin cannot deactivate their own user account.
Understanding the last activity time of a user
The "Last activity time" data is updated once users take a qualifying workspace action in a base or interface owned by the enterprise.
Examples of qualifying actions:
Workspaces
Upgrading/downgrading/deleting workspaces
Adding/removing collaborators
Renaming workspaces
Bases
Opening bases
Adding and removing collaborators
Creating, deleting, and modifying share links
Exporting CSV data
Uploading and downloading attachments
Modifying automations
Commenting
Viewing share links while logged in
Interfaces
Loading interfaces
Viewing records through interfaces
Updating records through interfaces
Examples of non-qualifying actions:
Loading the home screen
Logging in / logging out
Updating user preferences (eg. Notification preferences)
Submitting a form
Trying to load a base to which they do not have access
Inviting users through the admin panel
To invite users via admin panel:
Open your admin panel.
Click Users.
Click Invite users.
Enter the email address of the user you want to invite.
Search for or select the workspace, base, or interface, or group you want them join.
Click the ⌄ icon next to the workspace, base, or interface you selected and choose a permission.
You can optionally choose to include a personalized message.
Click Send invitations.
Note
Admins on Enterprise plans can simultaneously send up to 1000 workspace, base, or interface collaboration requests. The limit for admins on Business plans is 50.
Users already collaborating on other workspaces or bases in your organization's Enterprise ecosystem will auto-accept invitations to new bases or workspaces. Users already managed by your organization will auto-accept invitations to groups.
If domain restrictions are enabled for your organization's Enterprise plan, you will see a warning for any email addresses outside those restrictions. Additionally, internal domains will appear slightly greyed, while external domains will show white with a light grey border.
Reviewing pending user invitations
To review pending user invitations:
Open your admin panel.
Click Users.
Click Pending invites.
Note
The pending invites tab does not show pending invites for users who are already collaborating in your organization's enterprise ecosystem.
Admins can use this to tab to search for invited users by email, review when invited, and resend or cancel all pending invitations.
Searching, filtering, and sorting
Searching for users in the admin panel
You can search for users by name, email, or user ID, allowing admins to pinpoint a specific user or query multiple users more broadly. For example, an admin could search for all users with a particular domain name attached to their email address. The number of search results will appear in the search bar as you type.
Open your admin panel.
Click Users.
Click the “Find by email” search box.
Filtering users in the admin panel
There are multiple filtering options to the right of the search bar allowing you to filter your list of users. Filtering options include:
Status - Choose between All, Active, or Deactivated.
Account
All - This default filter option shows all users who have ever been associated with your organization’s Airtable Enterprise plan.
Member - These are active Airtable users whose accounts have not been deactivated.
External - This group of users have an email domain that does not match the domain(s) of your company that we have on record.
Admin - This option will only show those users with admin privileges.
Deactivated - This filter will list out users who have been deactivated.
Guest - Users who are not claimed (not managed), but have an email domain matching an enterprise domain. This can happen with:
Non-domain-capturing organizations.
Enterprise hub, when the admin is looking at a specific org unit and the “guest” user is part of the hub but not part of the org unit.
Super - (Enterprise Hub only) The users who have admin access at the top-level of your organization. More on super admins here.
Last active - Choose between Anytime, More than 3 months ago, More than 6 months ago, More than 1 year ago.
Joined - Choose between Anytime, In the last month, In the last 3 months, In the last 6 months, In the last year.
Seat - Seat represents the highest access that a user has across the organization (or org units if using Enterprise Hub). Check one, all, or a combination of the following options:
All
Editor - Members within an organization whose highest access level causes them to be considered billable.
Portal Editor - “External” users who have access through a portal.
Viewer - Members within an organization whose highest access level does not cause them to be considered billable.
Viewer (Restricted) - A non-billable user who can only be upgraded via an admin user / service account.
Org unit - (Enterprise Hub only) Check All org units, a combination of org units, or a single org unit.
Sorting users in the admin panel
Admins can sort users by clicking on any of the column names in the header. Sorting options include:
Name (user) - Alphabetically (↑) or reverse alphabetically (↓).
Last active - Most recent (↑) or oldest active session (↓).
Users with blank information in this column were either last active before Airtable started keeping track of this information (November 2019) or have never had an active session in Airtable.
Joined on - Most recently joined (↑) or oldest joined date (↓).
Users with blank information in this column joined before Airtable started keeping track of this information (November 2019) or are external users.
Seat type - Show Editors first (↑) or show deactivated users first (↓).
Enterprise customers on legacy plans will see this as a “Billable” column. Show billable users first (↑) or show non-billable users first (↓).
Individual user details and actions
To learn more about the individual user details page, please check out our admin panel user details article. Admins have access to a suite of tools allowing them to managing user access, permissions, and more. These options allow admins to:
Edit user email addresses. Note that there are some restrictions when updating email addresses:
Admins can’t modify external user emails since they are not considered part of the enterprise account.
Admins can’t update their own emails, however, this action can be performed by a different admin.
Updated emails must be part of a domain owned by the enterprise account.
The email can’t be in use already.
The email can’t be changed when the user has two-factor authentication enabled
Sign out users from all sessions.
Grant or revoke admin access privileges.
Deactivate (remove) or provision (reactivate) user affiliations with your organization’s enterprise license.
To access these options:
Visit your admin panel.
Click Users.
Click on your preferred user’s name.
Click the … icon at the end of row.
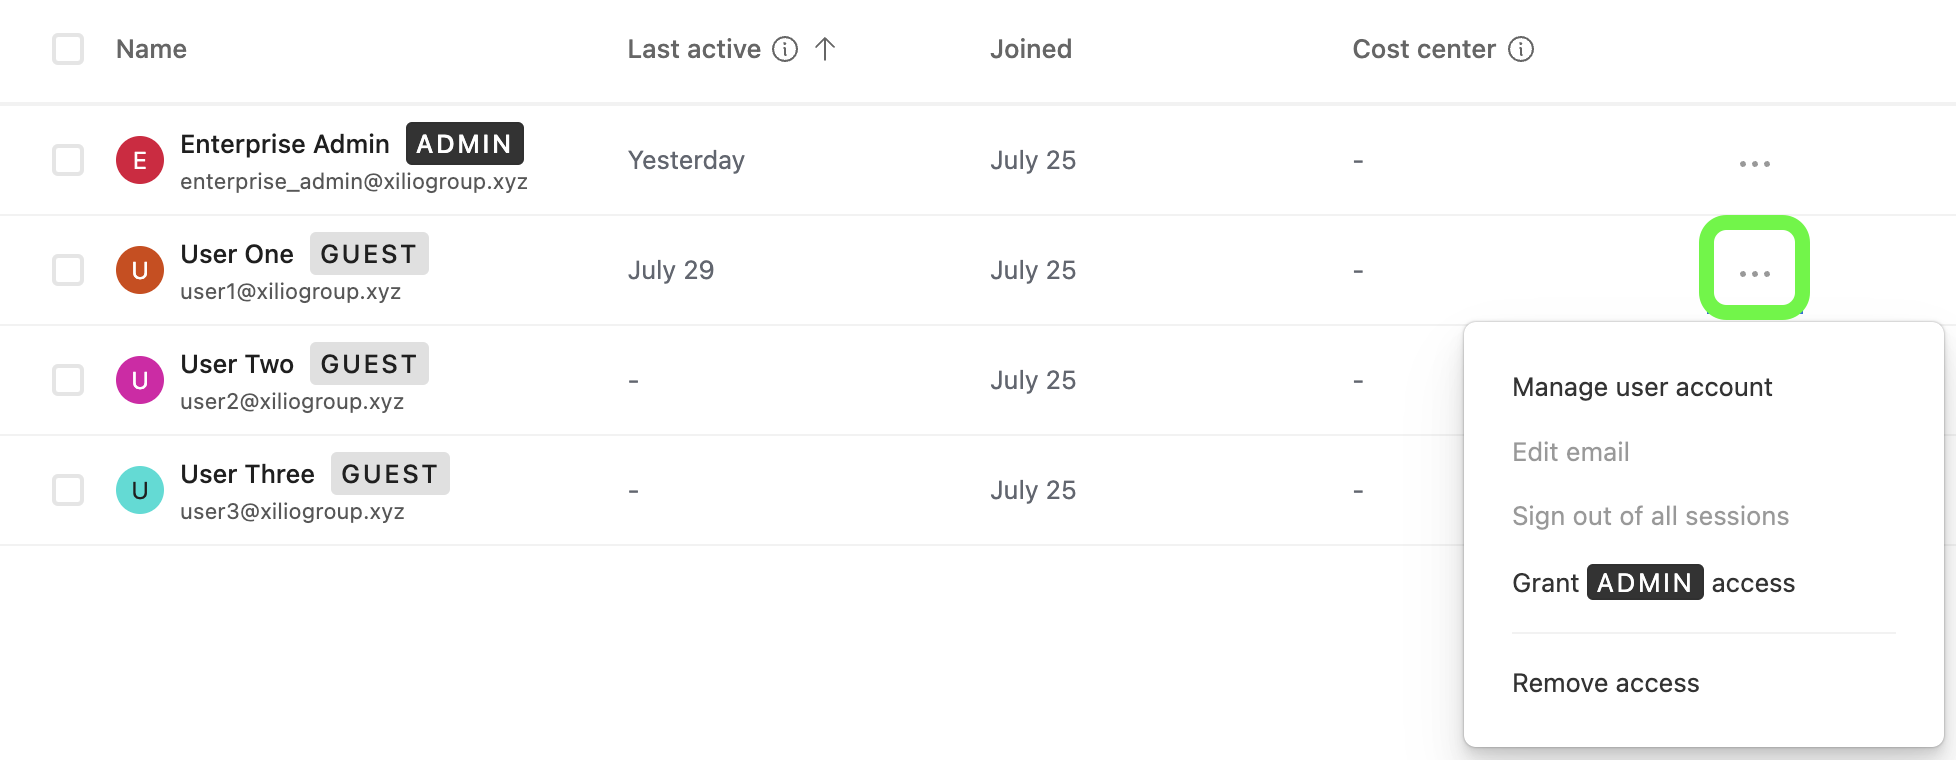
Select the necessary action.
Click Save (when applicable).
Bulk user actions
Admins can also select up to 1000 users and perform actions for the selected group.
Open your admin panel.
Click Users.
Select the checkbox next to your preferred users’ name(s).
Options will appear in the right corner of the header, allowing admins to:
Sign out users from all sessions.
Grant admin access.
Deactivate users.
Note
Admins are not able to perform actions on their own account in order to prevent being locked out.
Downloading user detail CSVs
Admins can download user detail CSVs offering user context and relevant information for decision making.
Open your admin panel.
Click Users.
Click CSV.
CSVs in the admin panel include the following information:
User ID
User first name
User last name
Account type (If blank, user is internal)
Two-factor auth enabled
Email verified
Invited by ID
Invited by email
Last active date and time (UTC)
Joined on date and time (UTC)
Seat type
Granting admin access to users
To grant admin permissions to another user at your organization:
Open your admin panel.
Click Users.
Click on your preferred user’s name.
Note that you will need to invite the user if they do not already belong to your organization.
Click the … icon at the end of row.
Click Grant ADMIN access.
FAQs
Can I programmatically change multiple email addresses?
Yes, this section of our Enterprise Airtable API documentation will help. This can be especially useful if your company is migrating to a different domain.
What admin panel pages can I access based on my role type?
Note
Super admins and org unit admins can access all of the category pages listed below.
All other roles’ access is individually noted below.
Page | Permissions (Enterprise Scale plans only) |
|---|---|
Super admin (Enterprise Hub only) | |
Super admin, Org unit admin, User admin | |
Super admin, Org unit admin | |
Super admin, Org unit admin, User admin | |
Super admin, Org unit admin | |
Super admin, Org unit admin, User admin | |
Super admin, Org unit admin, User admin | |
Super admin, Org unit admin, User admin | |
Super admin, Org unit admin | |
Super admin, Org unit admin, Integration admin | |
Super admin, Org unit admin | |
Super admin, Org unit admin | |
Super admin, Org unit admin | |
|