Note
While these articles are meant to serve as helpful guides for our customers, 1:1 support for integrations with 3rd party tools is limited in support interactions.
If you are experiencing setup issues or need help troubleshooting this integration, we recommend you search threads in the Community first.
If your question doesn't appear to be asked in the Community, then post a new message on the Development & APIs board (Requires signing into the community).
Plan availability | All plan types |
Permissions | Owner or Creator permissions are required to perform the actions outlined in this article |
Platform(s) | Web/Browser, Mac app, and Windows app |
Overview of integrating Airtable and AWS Lambda & DynamoDB
Airtable's developer platform gives you plenty of options to create, read, update and delete records in a given base. Whether you choose the scripting extension or develop a custom extension of your own, Airtable's developer platform can help you send data to other services, where you can centralize your data, and make it available to other teams throughout your organization.
This guide covers how to send information from Airtable to AWS DynamoDB. For many teams, AWS is their preferred development environment and is the backbone of many of their internal and customer-facing systems. By integrating Airtable with your AWS environment, you can make your Airtable data available to these other services. This guide focuses on pushing data into DynamoDB via an AWS Lambda. By changing the Lambda code, you could also use this setup to move data into other AWS services, such as RDS, Redshift or S3.
By following the steps in this guide, you will create:
An AWS Dynamo Database where you can send Airtable data
An AWS Gateway REST API to access your database
An AWS Lambda Function to process inputs from Airtable
An Airtable base from this example
Two Airtable Scripting extensions that allow you to create, update, and delete information in your AWS Dynamo Database
What you will need to integrate Airtable and AWS
Access to an AWS account and environment
Access to an Airtable account and a Personal Access Token with at least the
data.records:readscope enabledAn Airtable base (we recommend following along with this example base)
Basic software development/programming skills. The code in this guide will be in JavaScript but it is possible to replicate this setup in any language
Steps to integrate Airtable and AWS
To complete this integration we'll need to do some setup in both Airtable and AWS. We'll first need to create the base where we want our data to live. Then we'll create the DynamoDB instance where our data will live. After that, we can build the AWS Lambda and API Gateway environments which will then host the bulk of our code. Finally, we can configure our Airtable base to make API requests to this API to push data and actions into Dynamo.
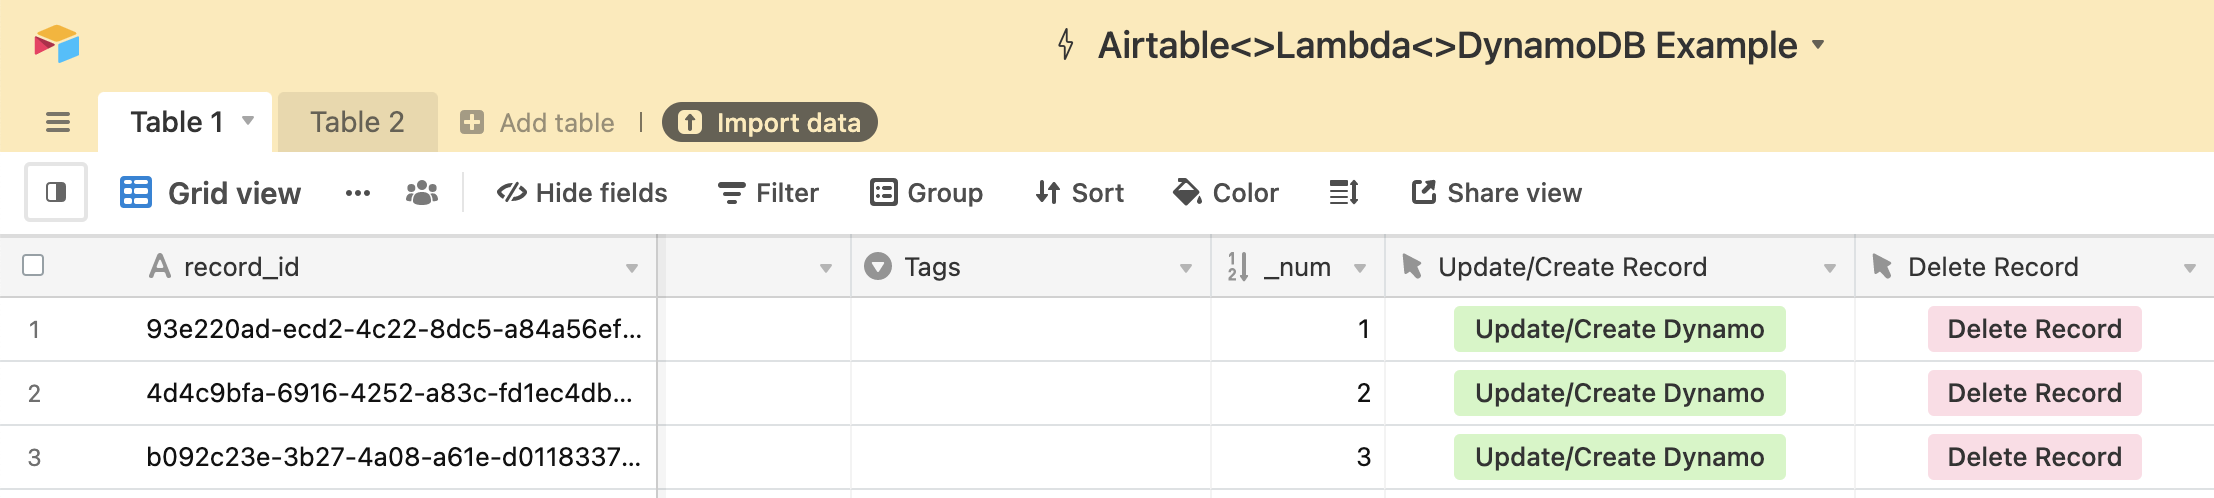
Step 1: Create an Airtable base
Create your Airtable base and configure your tables and fields to reflect the information you want to capture, we recommend starting with this example base.
Step 2: Create an AWS Dynamo database
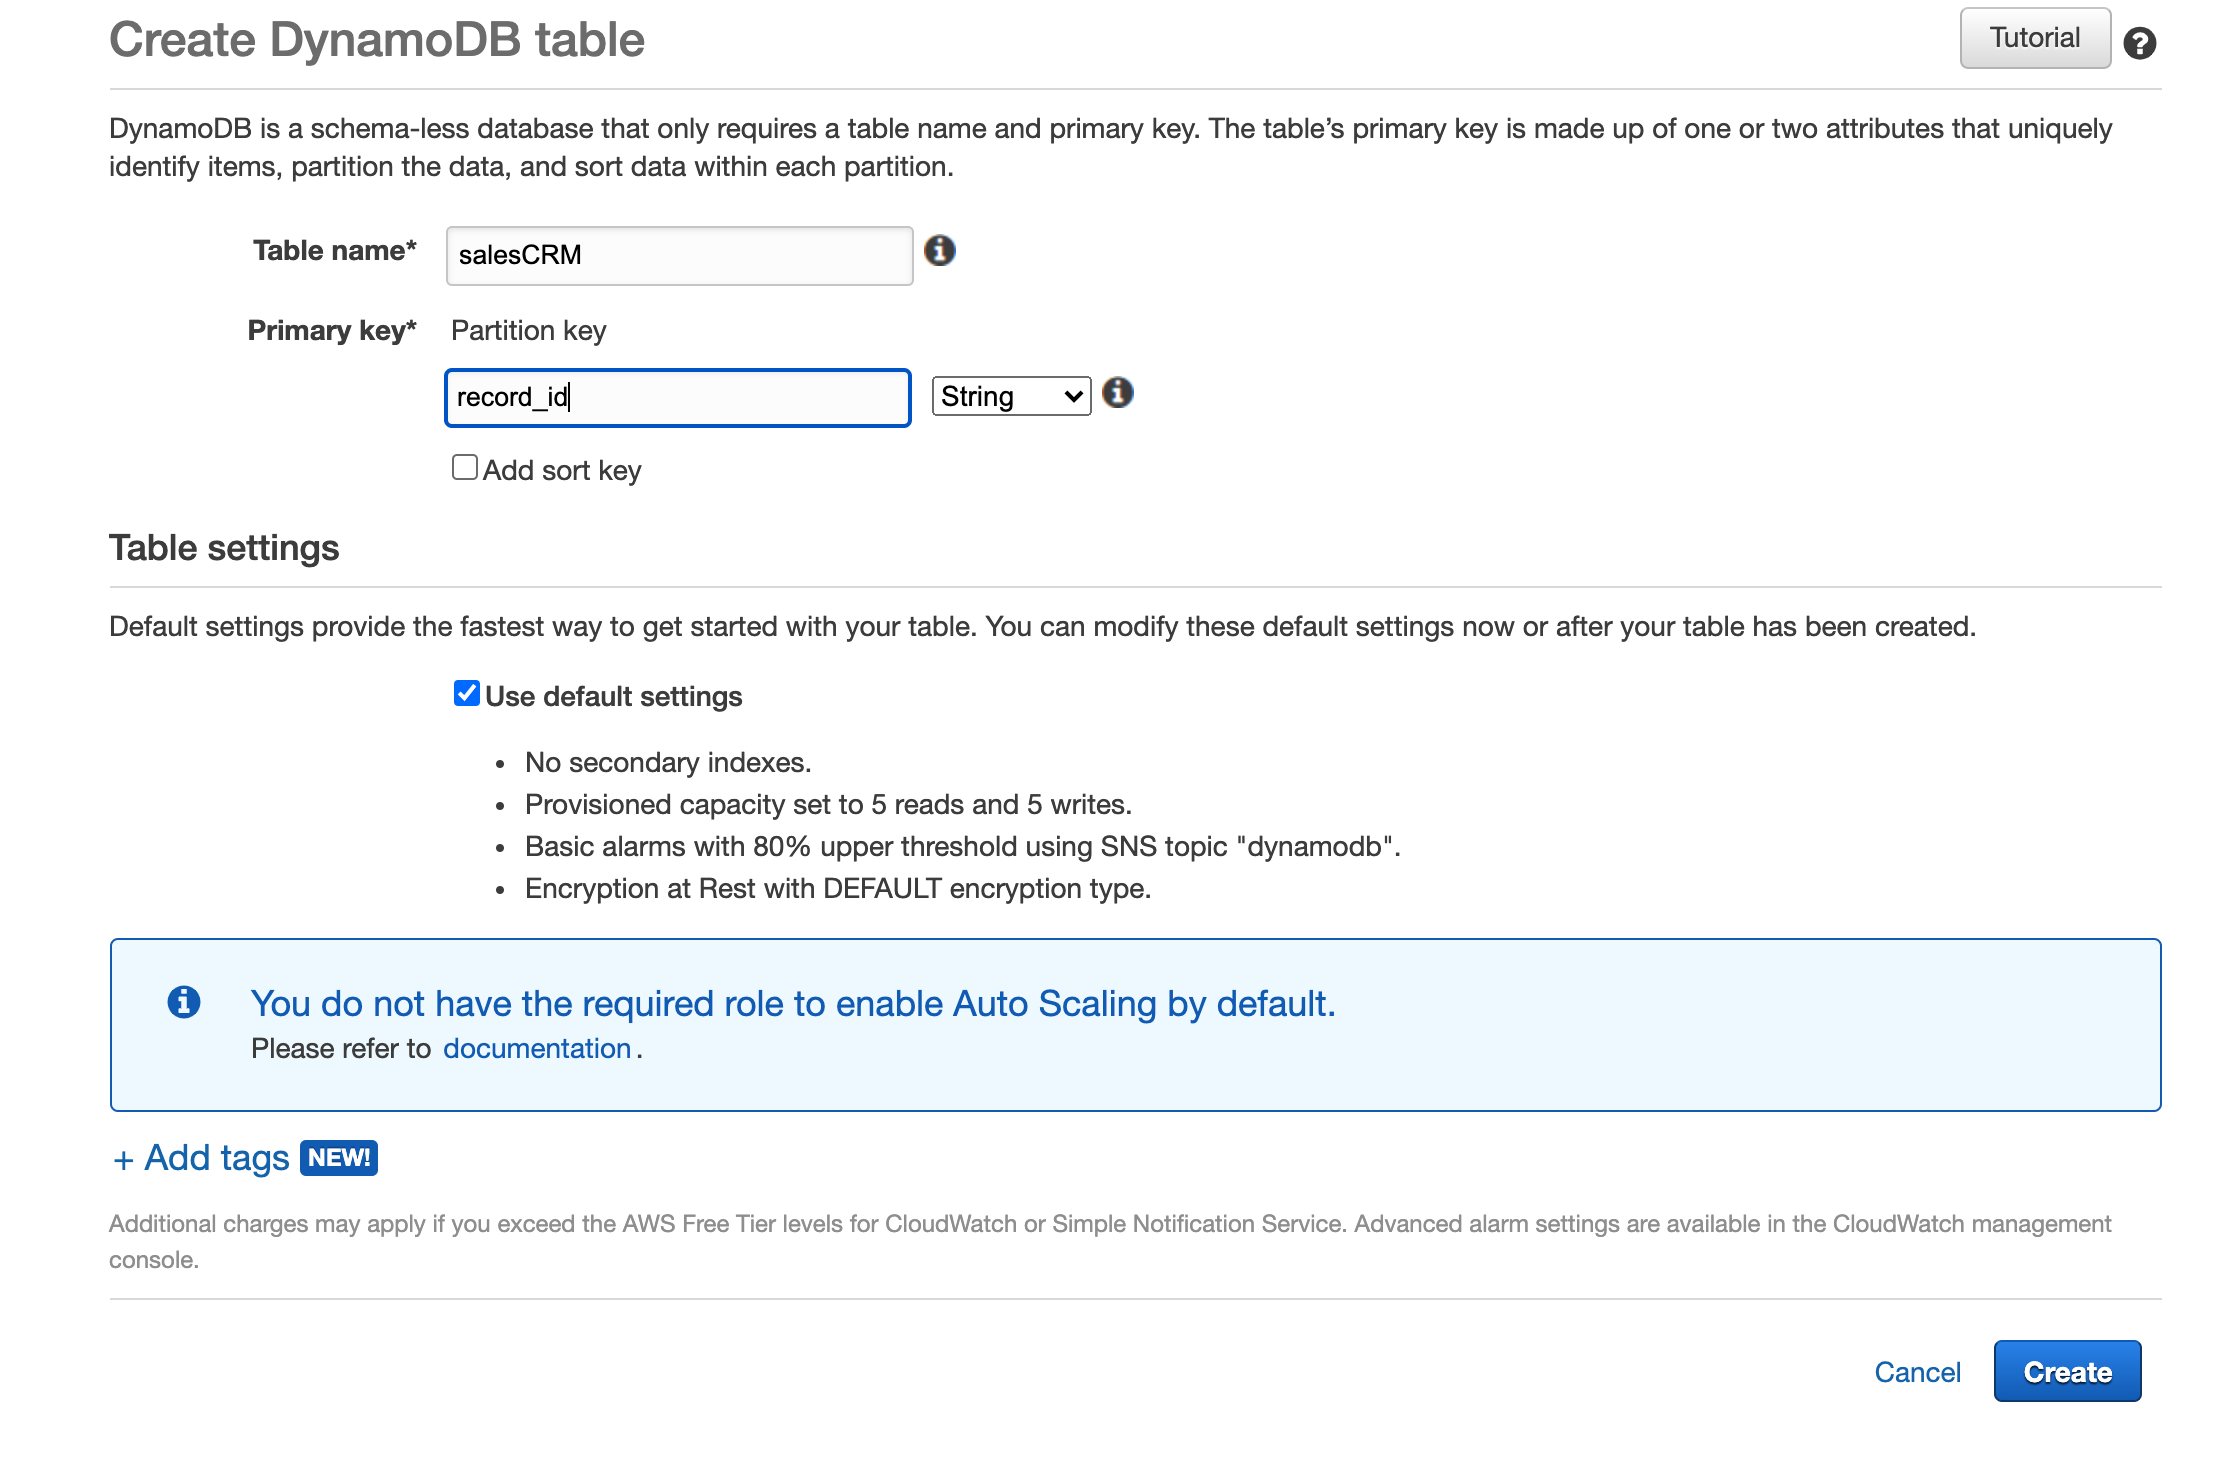
Login to your AWS account and navigate to DynamoDB
Select Create table, then name your table and your primary key.
Your primary key will define what makes a given record unique. You should use the same value here as you do in your Airtable base to define unique records. We generally call our primary key “record_id”
Press Create
Step 3: Create a Lambda and REST API to handle requests
In this step, we'll create a Lambda Function and build a REST API using AWS API Gateway so that our Lambda Function can send information to our DynamoDB. For a more in-depth explanation into how REST APIs work, and why we're building components like Resources and Methods, watch this quick video.
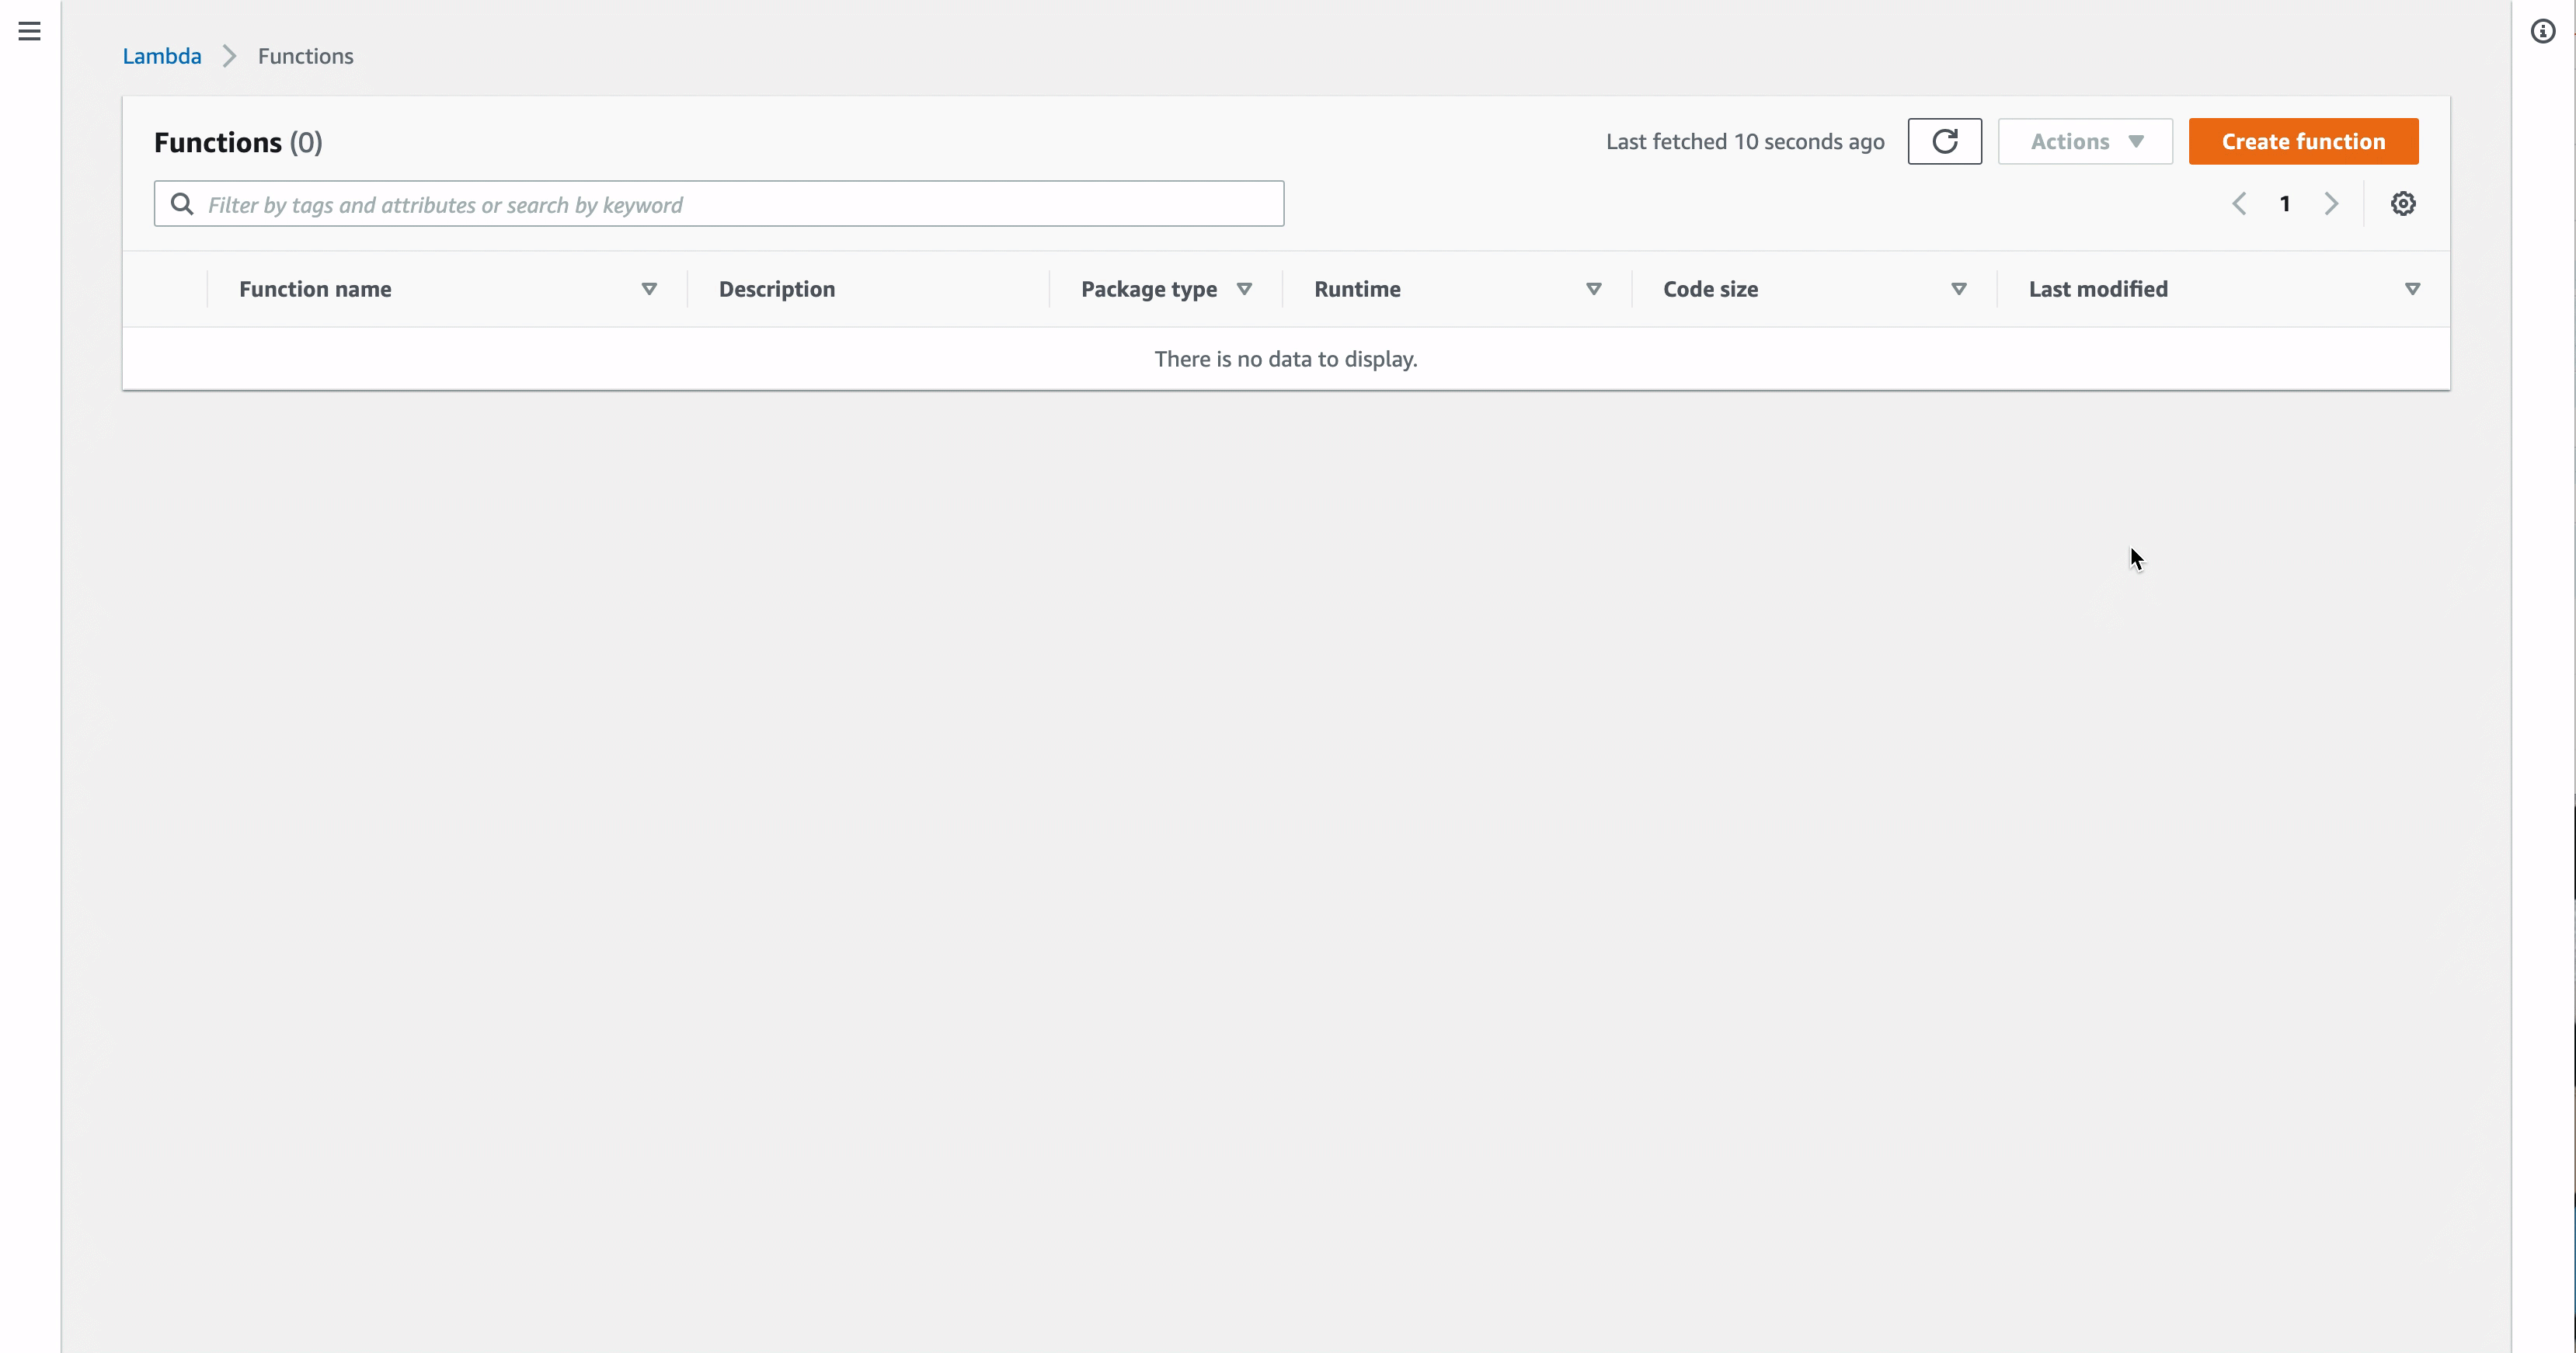
Create a Lambda function
Within your AWS account, navigate to Lambda
Select Create Function
Select Author from scratch, add your basic information, and select Create function. We'll revisit this later.
Create a REST API via AWS API Gateway
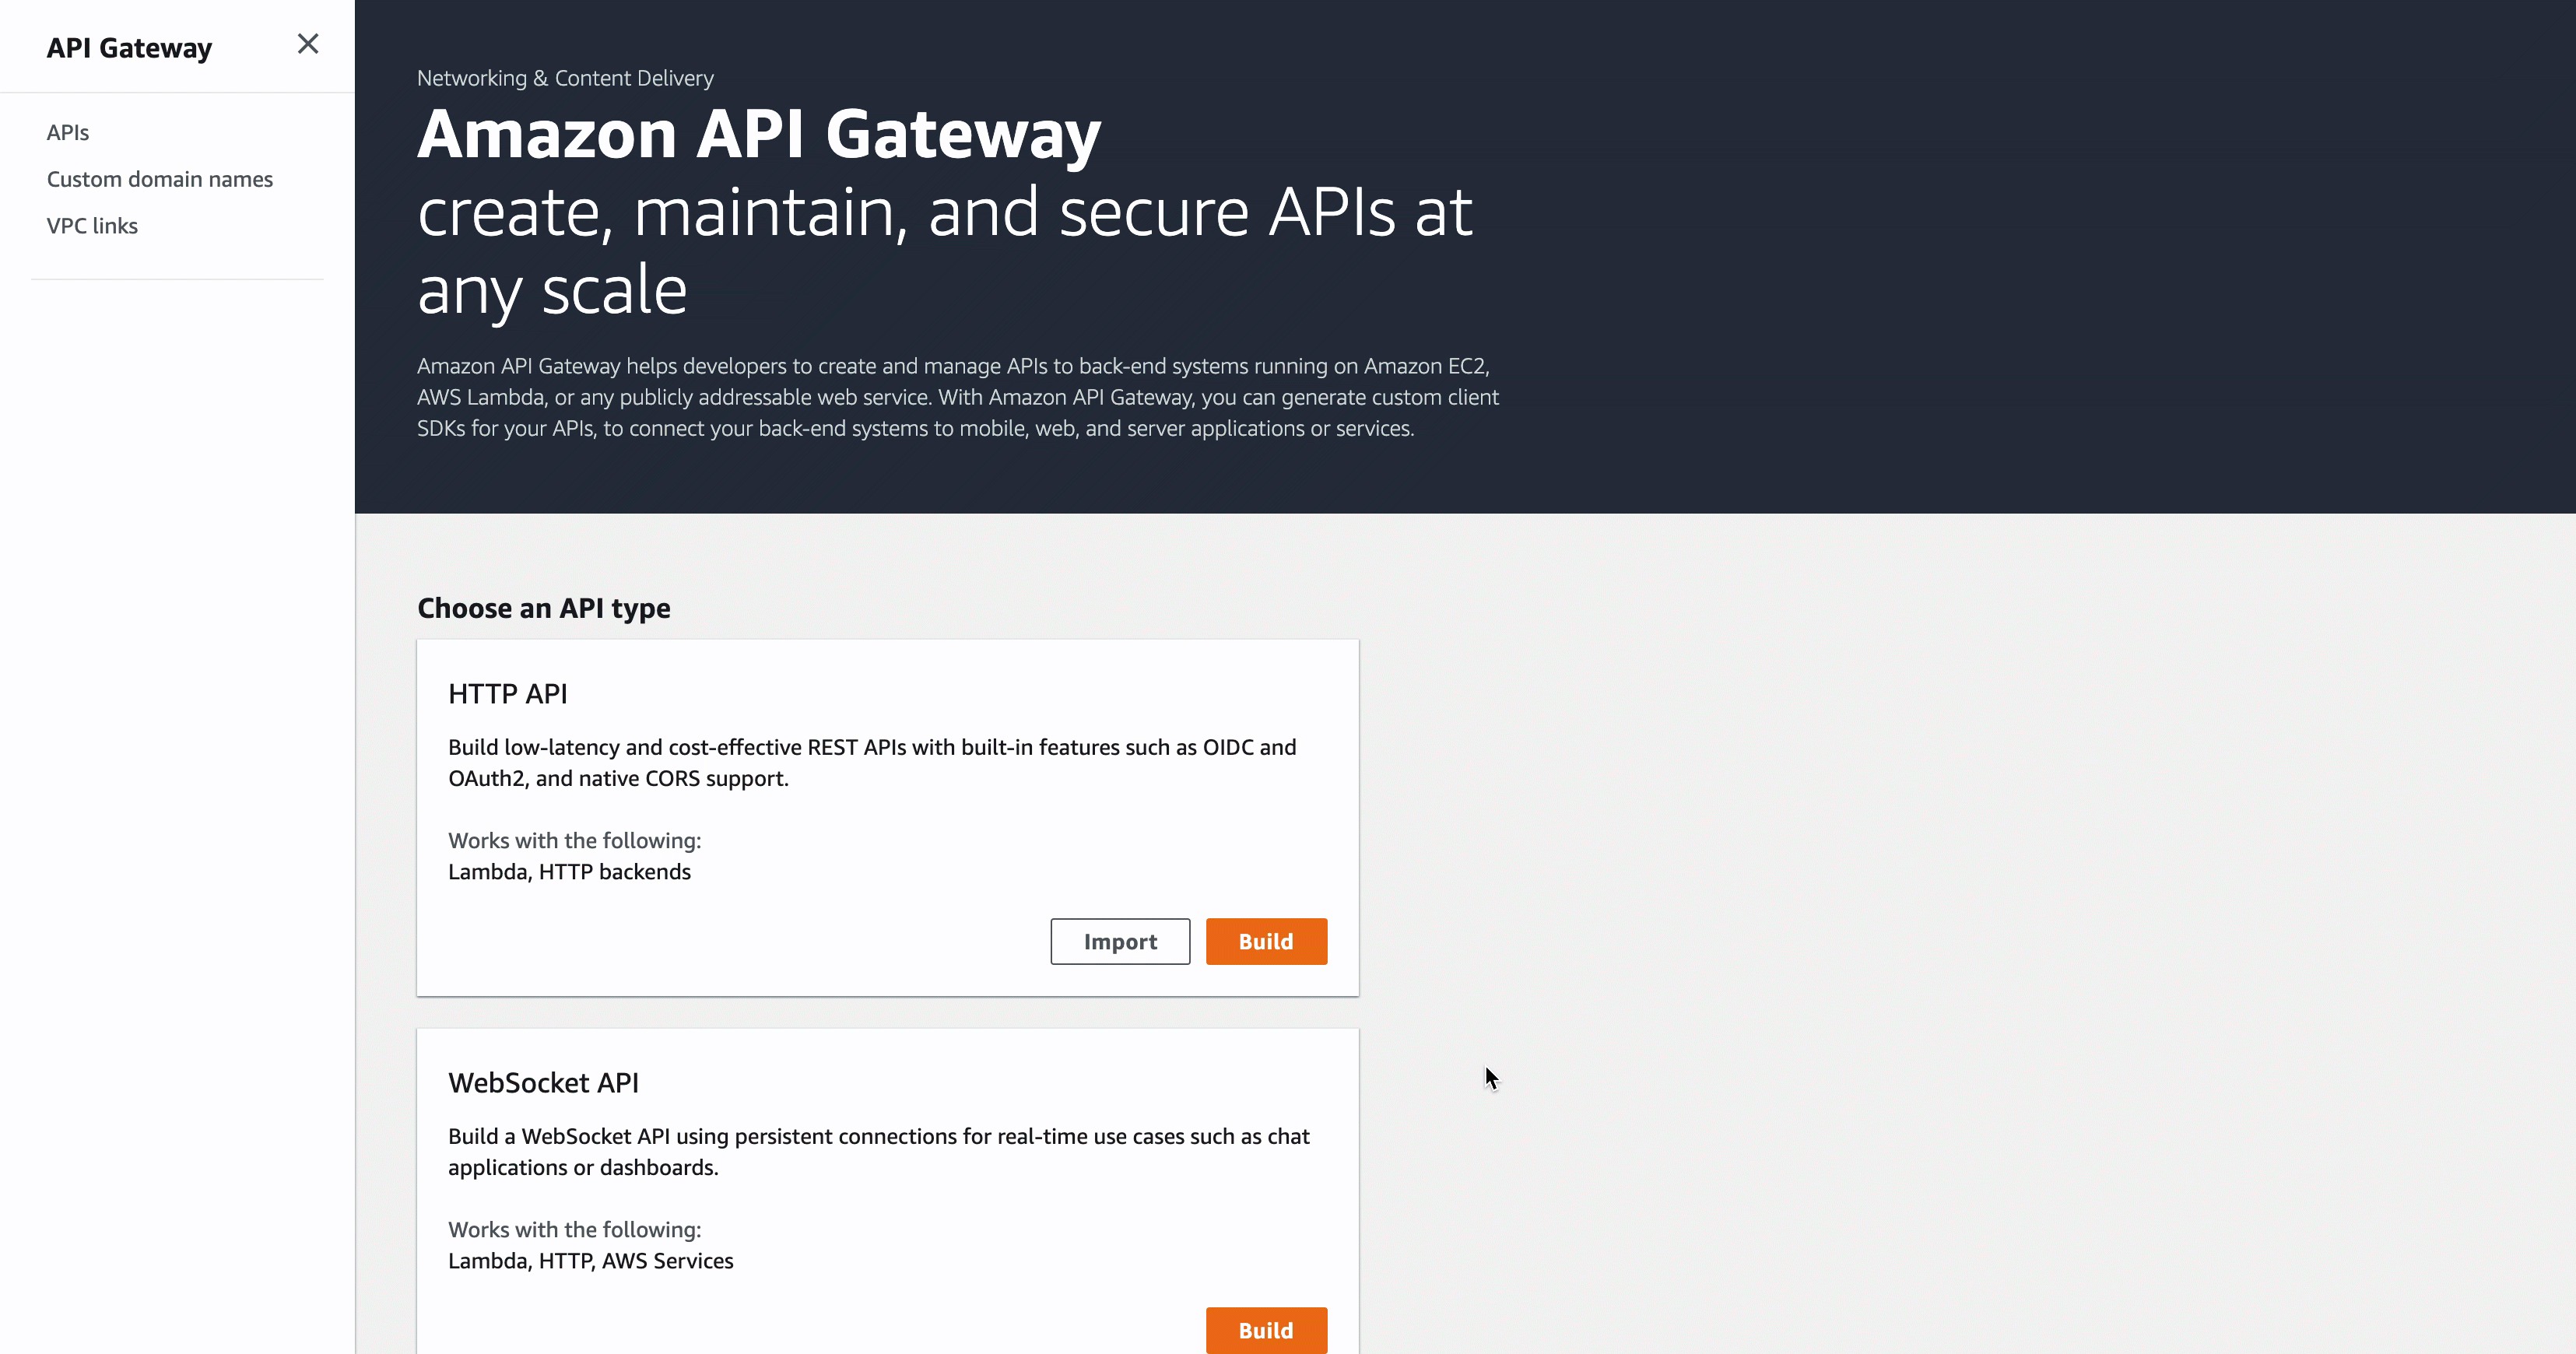
Within your AWS account, navigate to API Gateway
Under "Choose an API type" find REST API and select Build
Select New API and give your API a name
Create Resources - Now we can create the resources for our API. For this project, we'll create two resources.
In the tool bar, click Actions to open the dropdown menu. In the menu, click Create Resource
Create your first resource with the following details:
Resource Name: table
Resource Path: table_name
Within /{table_name} we want a resource for ID so that a user can update/delete an existing item by making a request to /{table_name}/{id}. Within /{table_name}, create your second resource with the following details:
Resource Name: id
Resource Path: {id}
Create Methods - Now that we've added our resources, we can create methods under each resource. Our Lambda code will handle most of the routing logic based on HTTP method. For each resource complete the following steps.
Select the resource name in the “Resources” sidebar
In the "Actions" menu select Create Method
Select ANY and click the checkmark to confirm
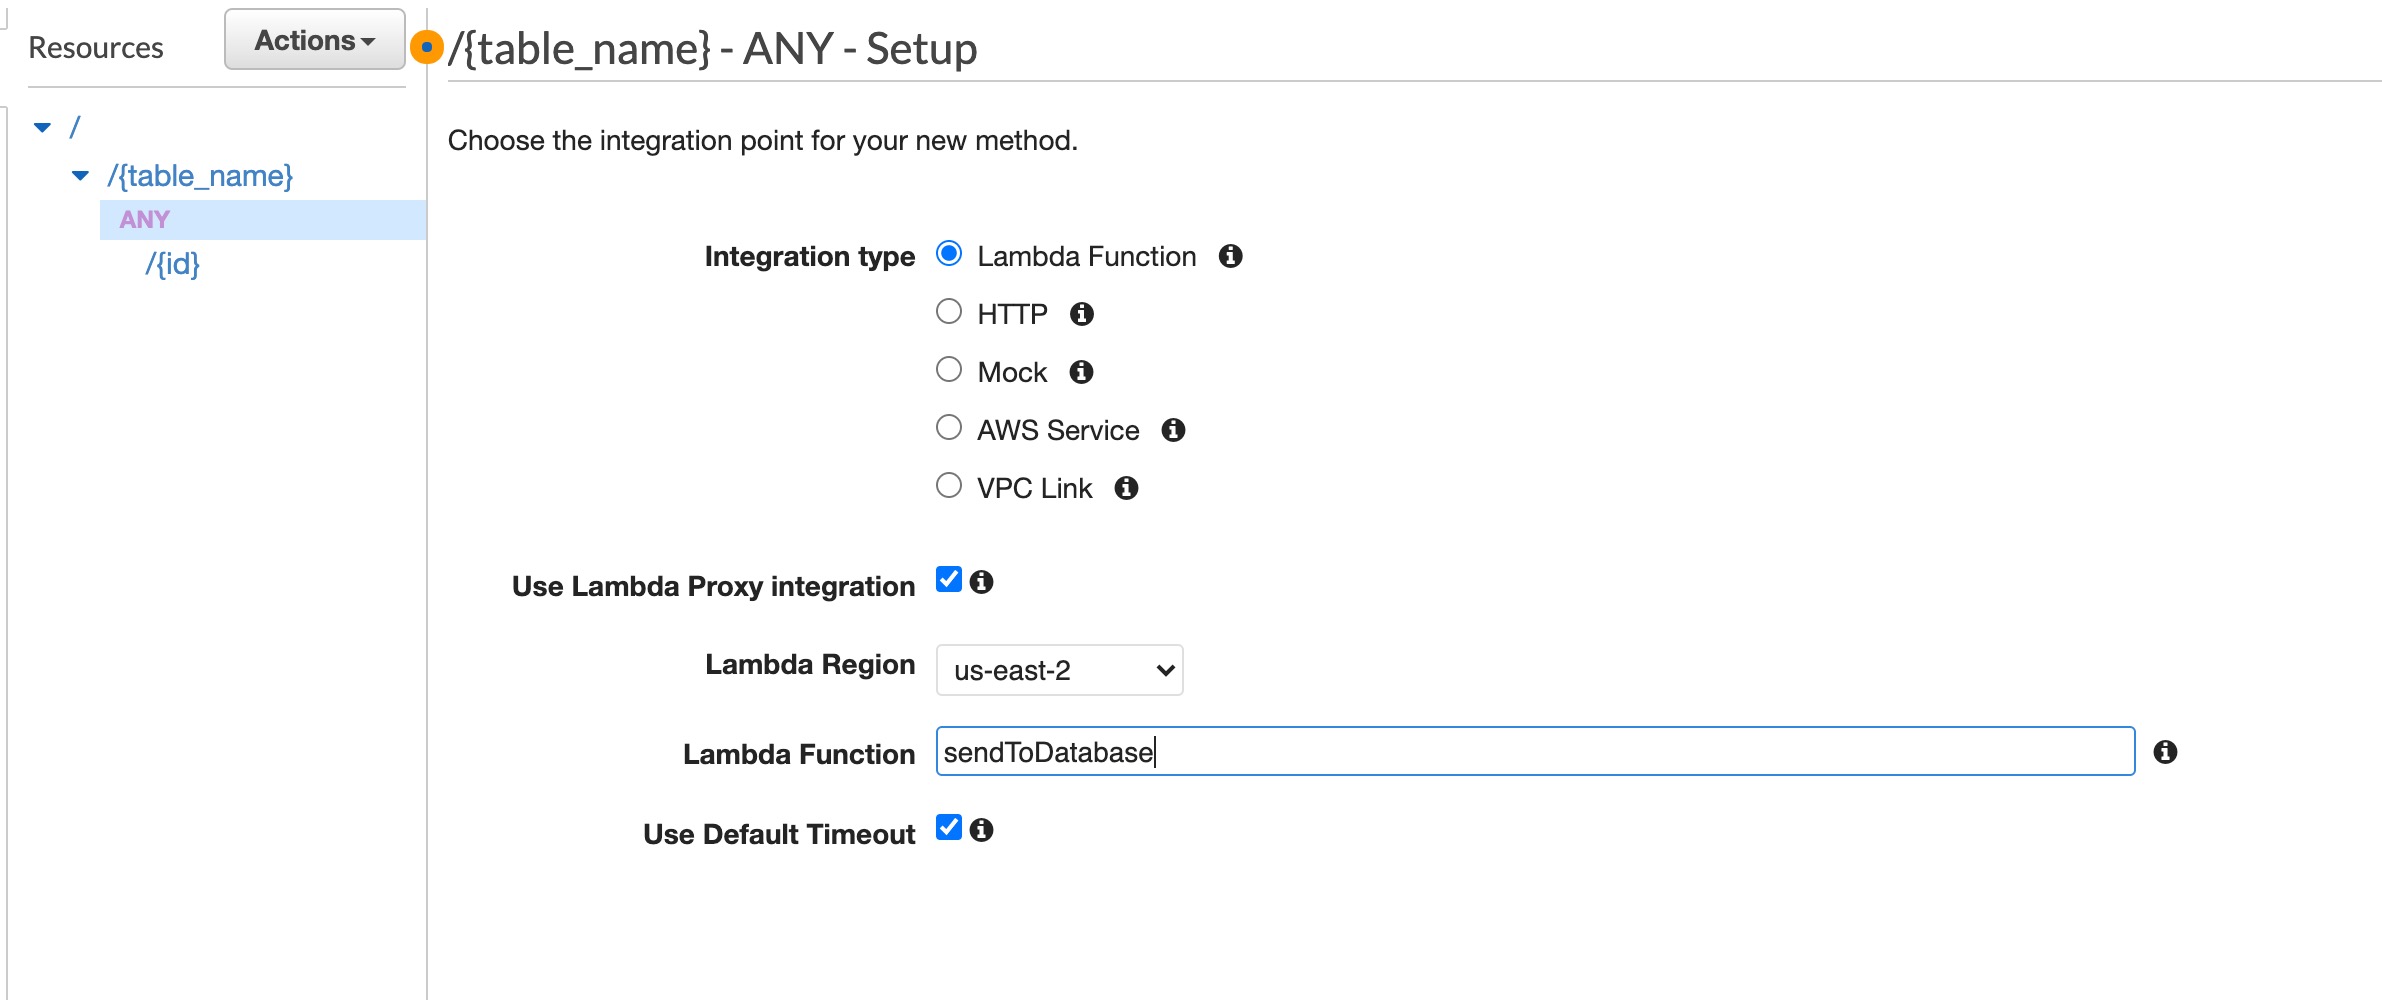
Select Lambda Function as your integration type
Select Use Lambda Proxy Integration
Name your Lambda Function
Select Save
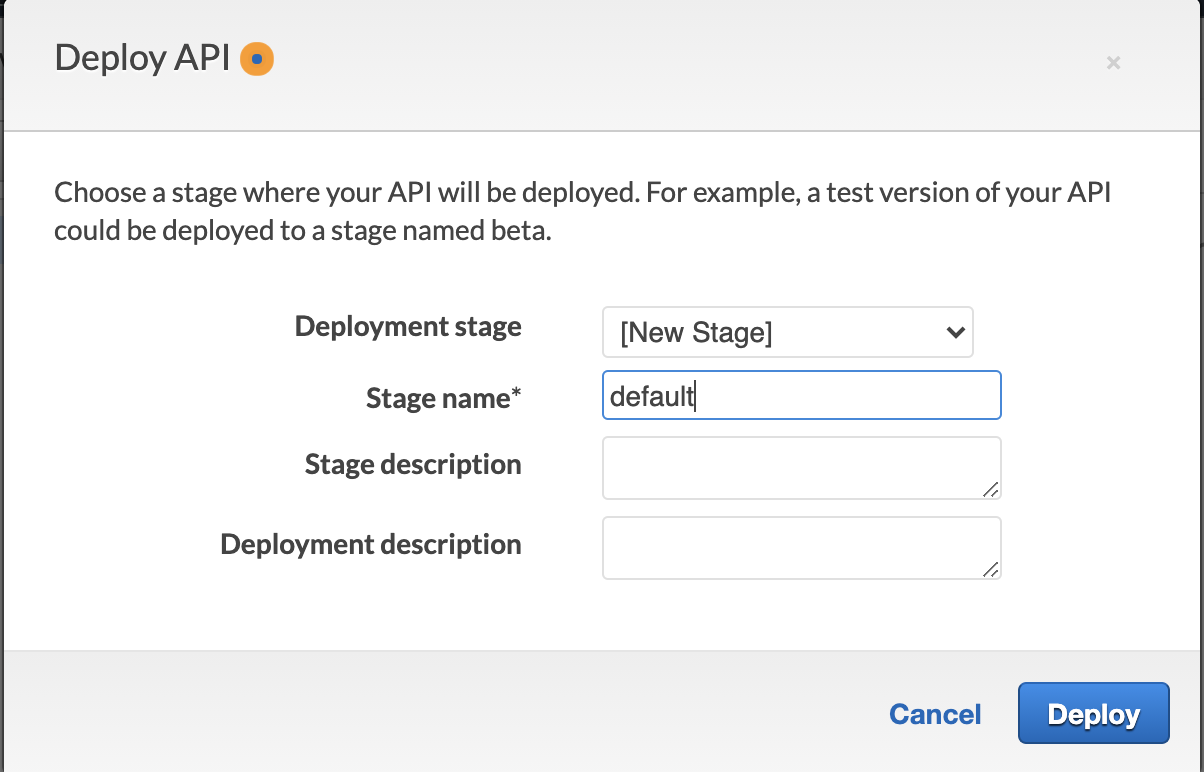
Deploy your API Gateway
After you've created methods for both resources, select Deploy API from the “Actions” menu. On first set up, AWS will ask you to set up a Deployment stage. We've called ours “default.”
Next, you must:
Re-deploy your API Gateway any time you make changes
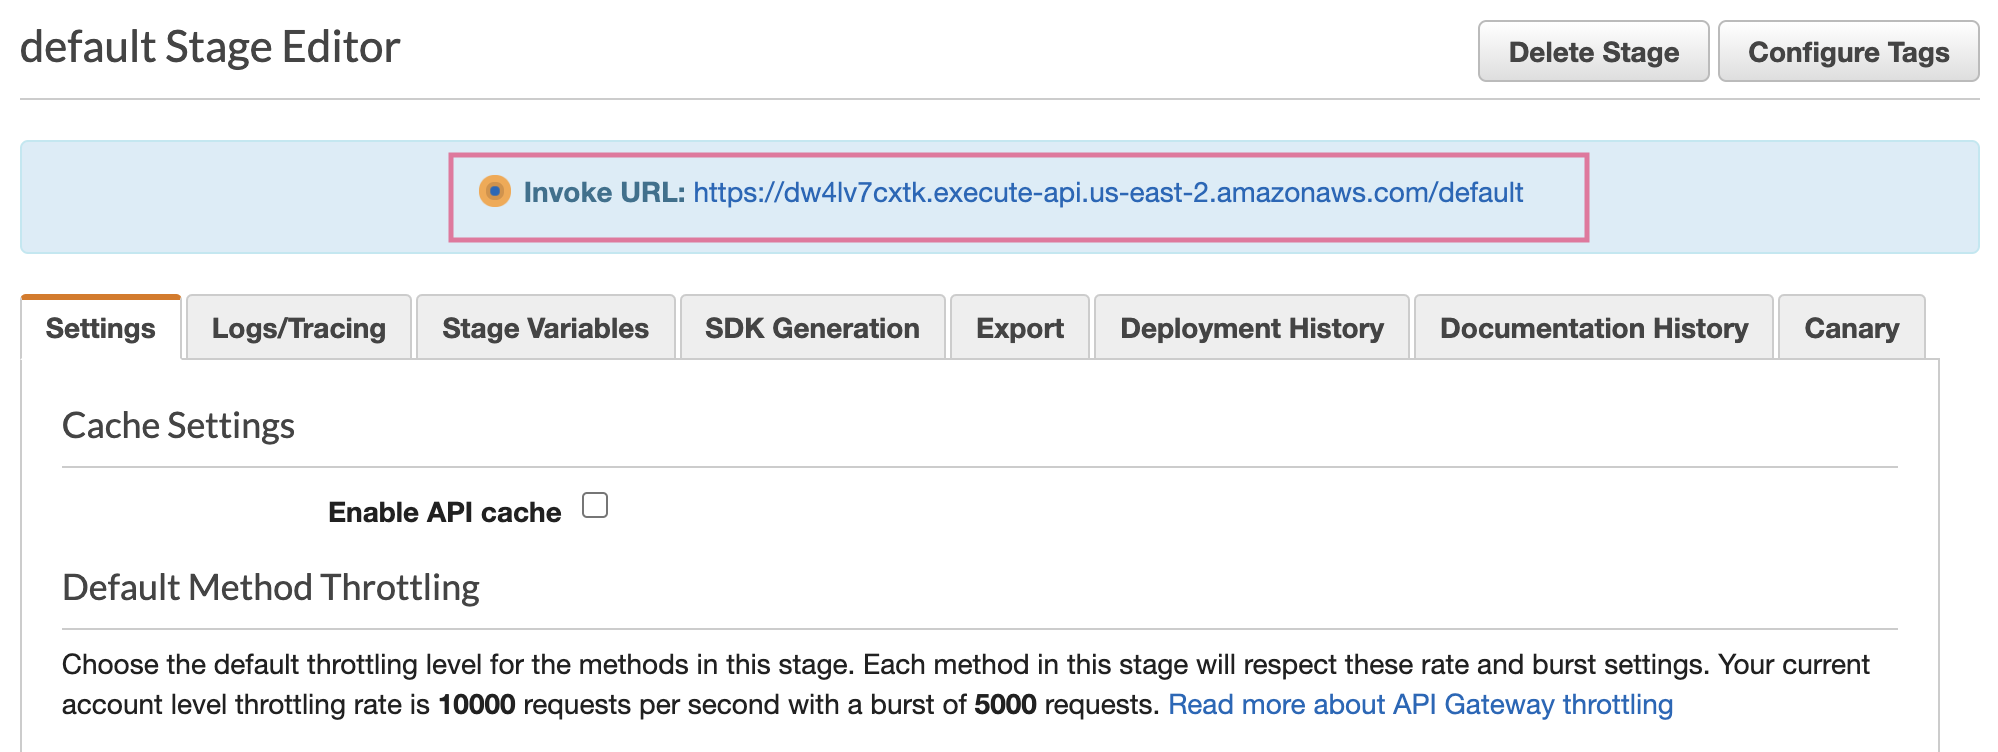
Keep a record of the Invoke URL as that’s what we actually use to make API requests
After you've deployed your API, you'll be taken to the Stage Editor where you can find your Invoke URL. This will be our endpoint for our API calls. Test your API by making a request via cURL or Postman.
Step 4: Add Lambda to an Identity Access and Management (IAM) Role
Before the Lambda Function can write data to your Dynamo DB, it will need permission. This can be done in the Identity Access and Management Service (IAM) by assigning the Lambda to a role that has the ability to issue CRUD operations to your Dynamo DB instance.
Within your AWS account, navigate to Identity Access and Management (IAM)
In the sidebar, select Roles and select the Create New Roles button
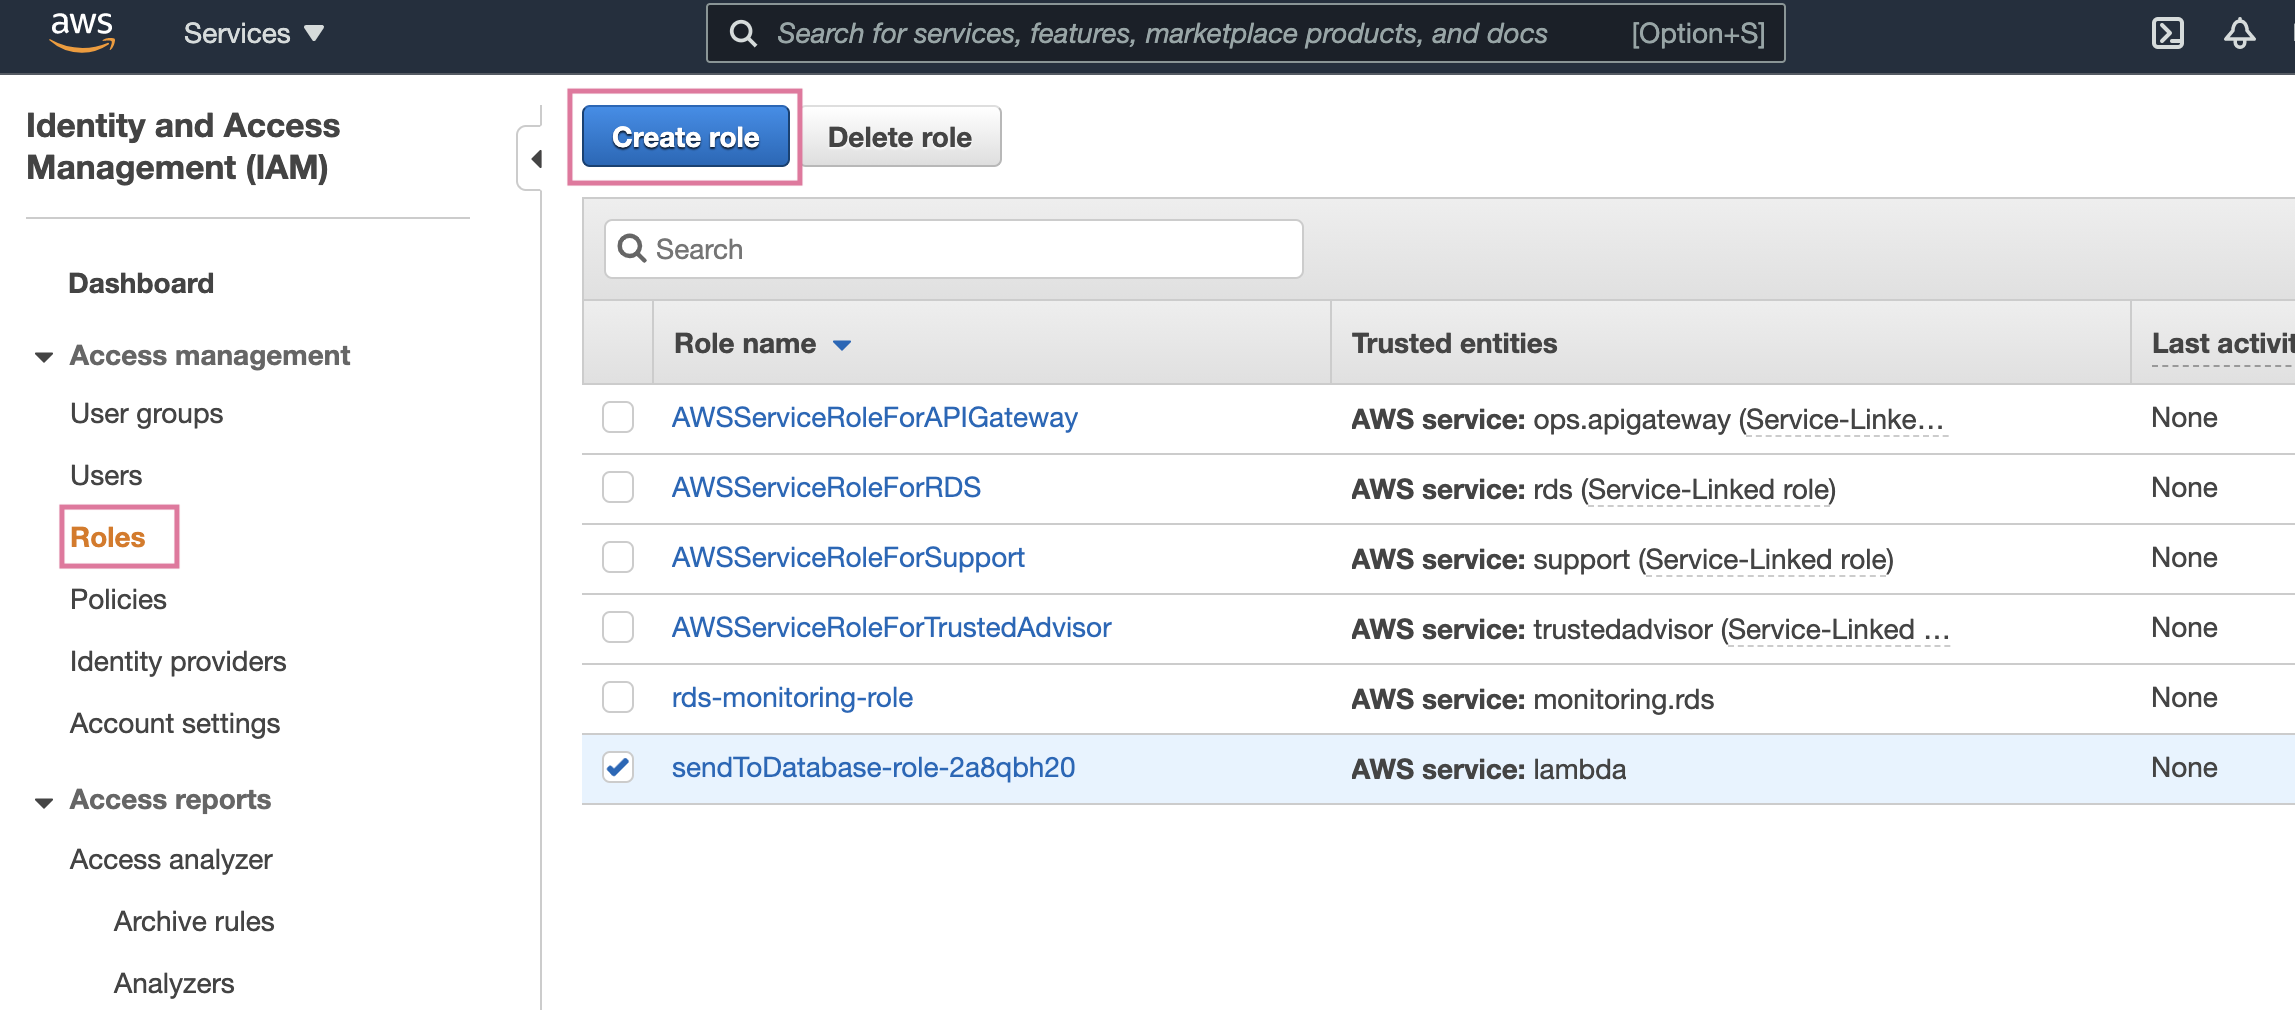
Select AWS service and Lambda
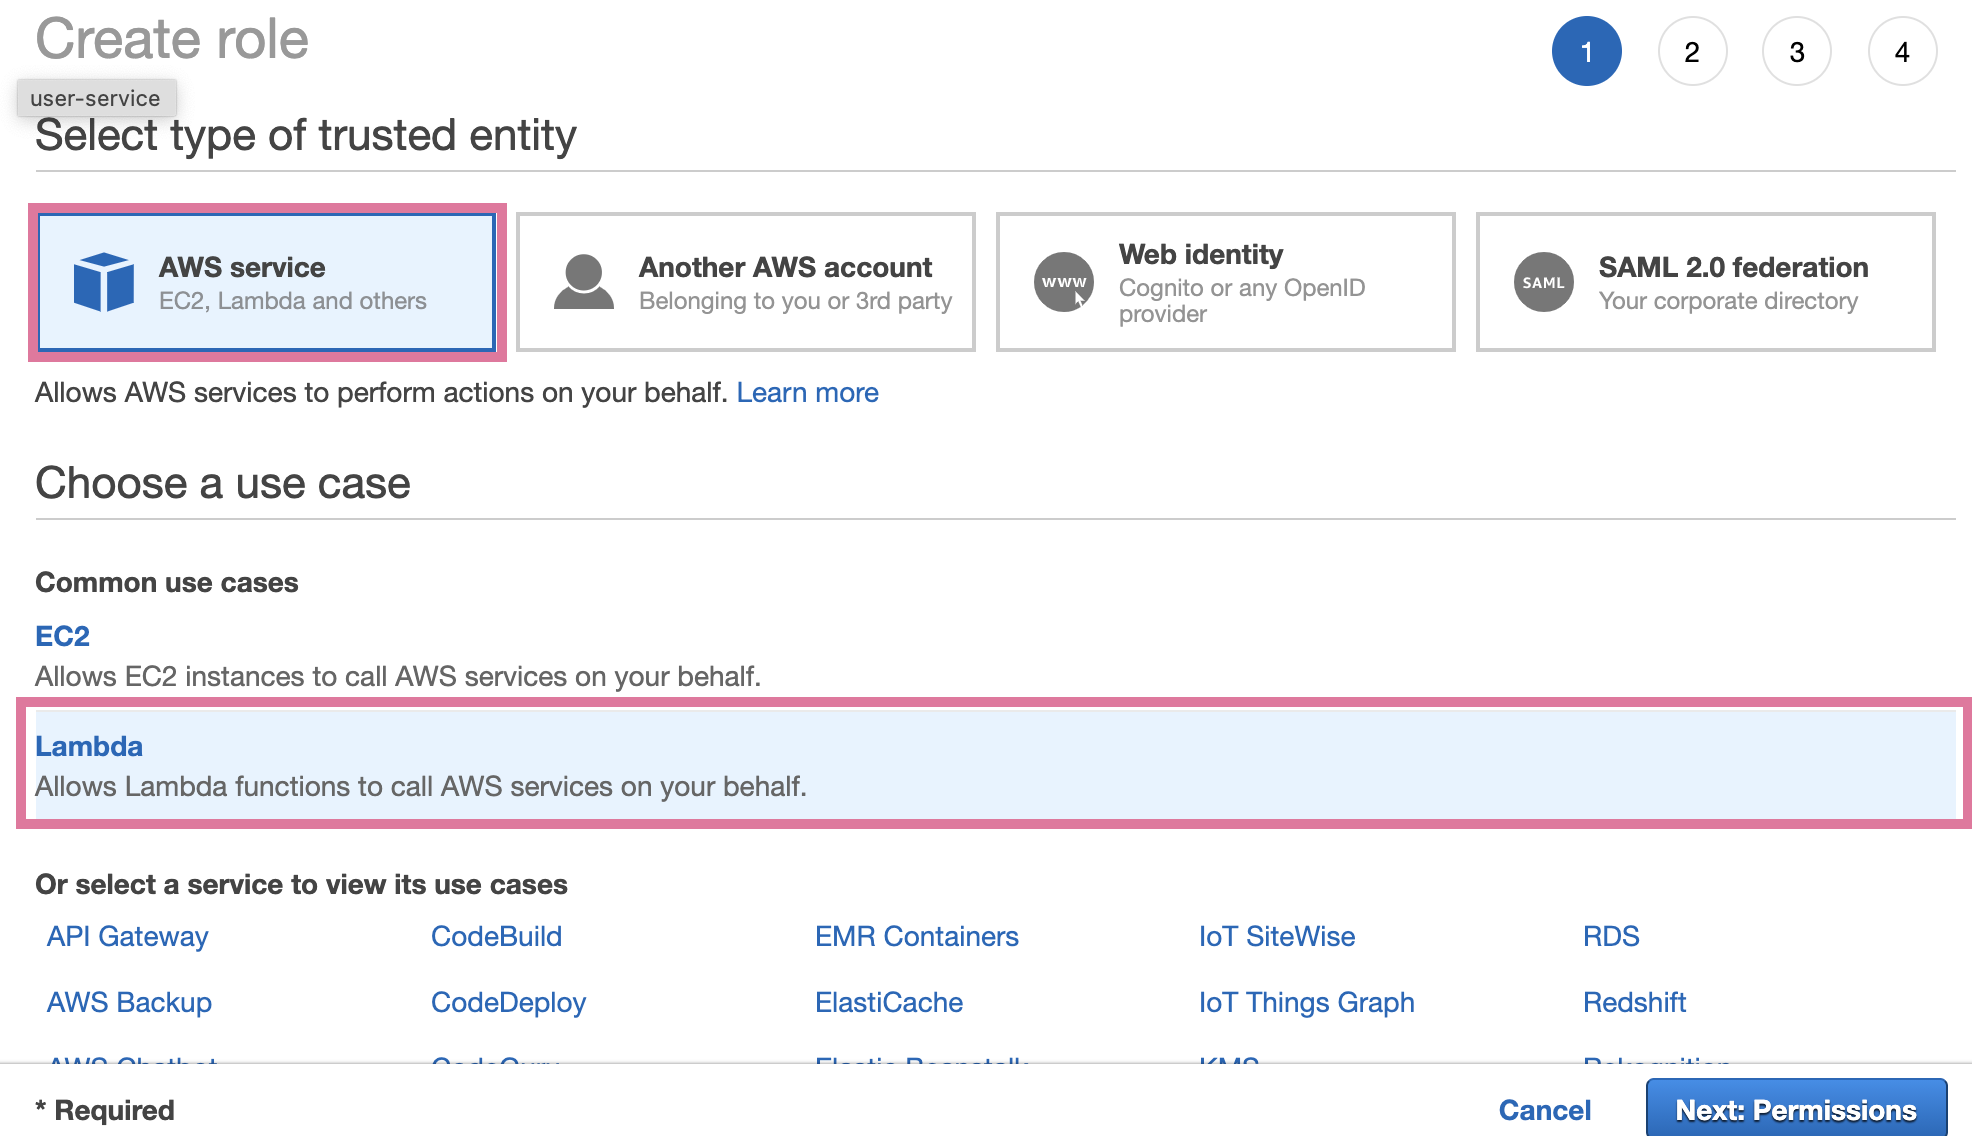
Search for AmazonDynamoDBFullAccess and select the policy.
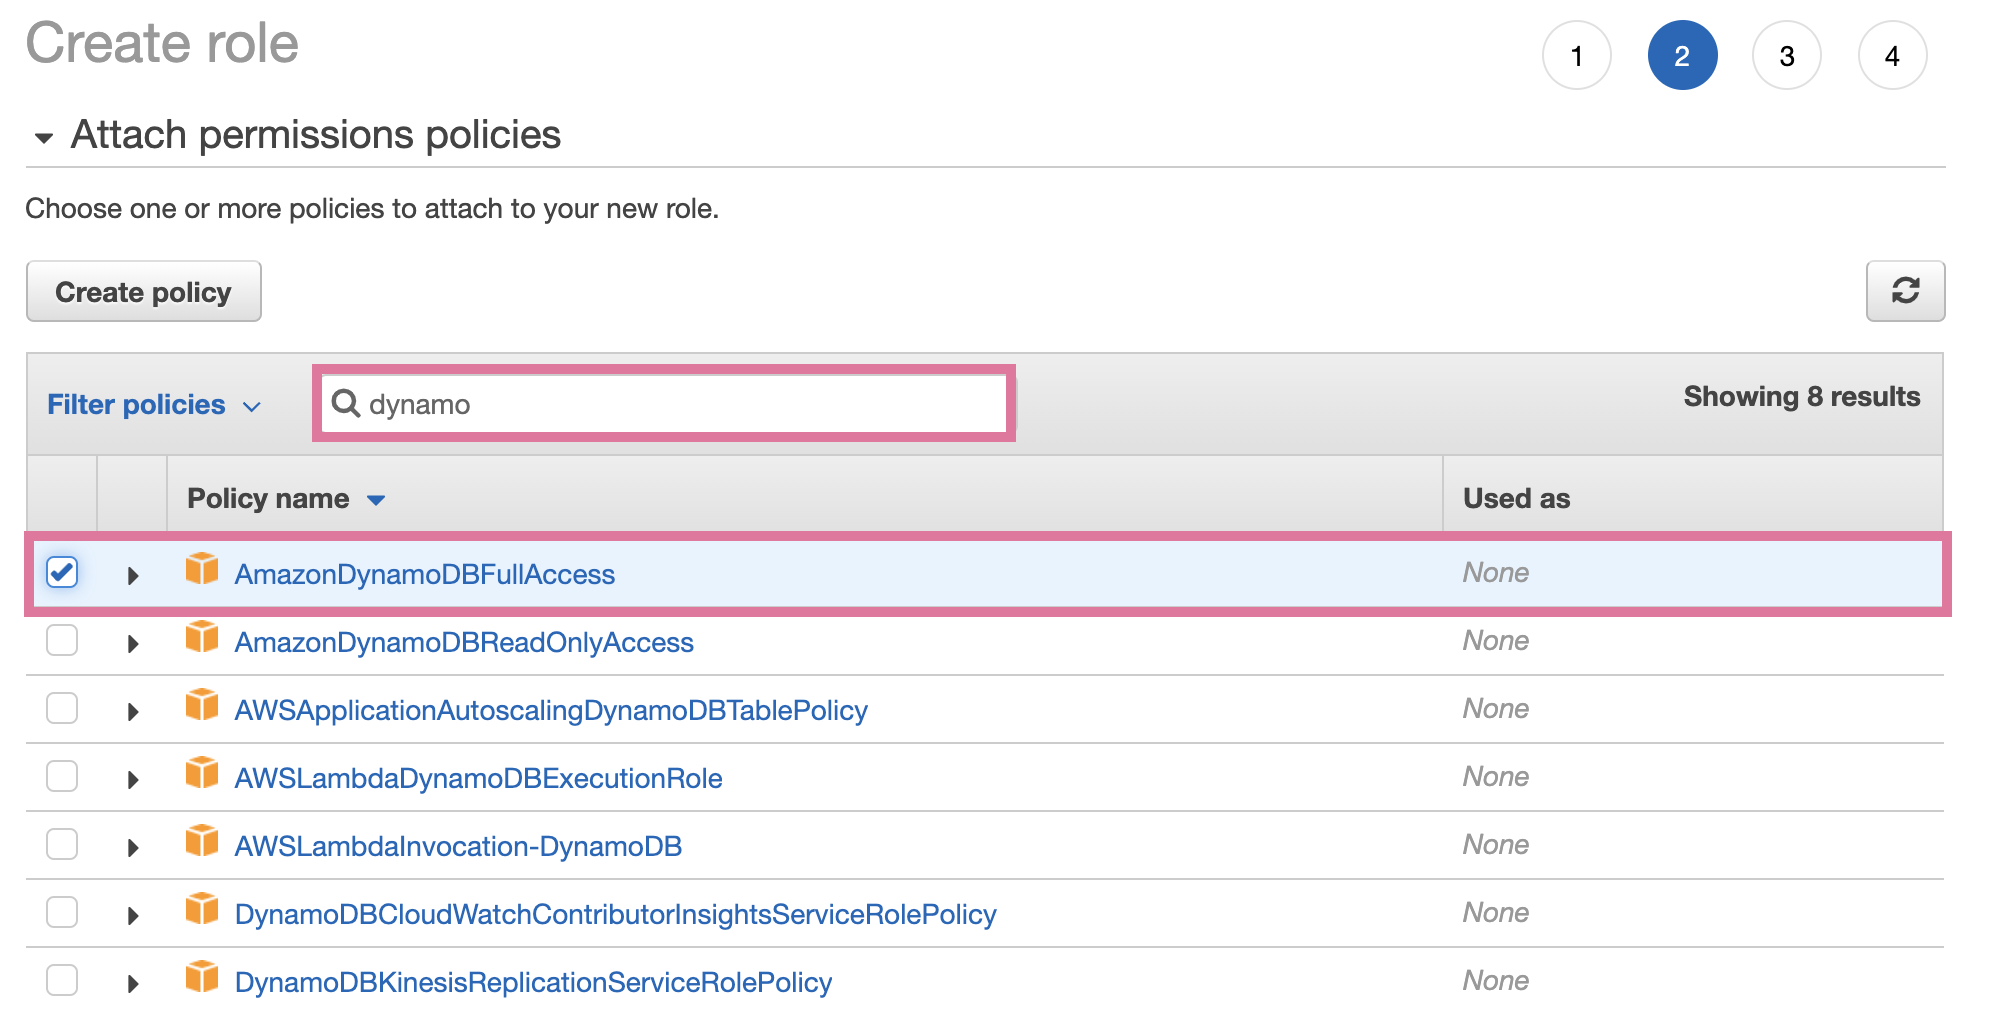
Walk through the rest of the creation process and apply additional data as necessary.
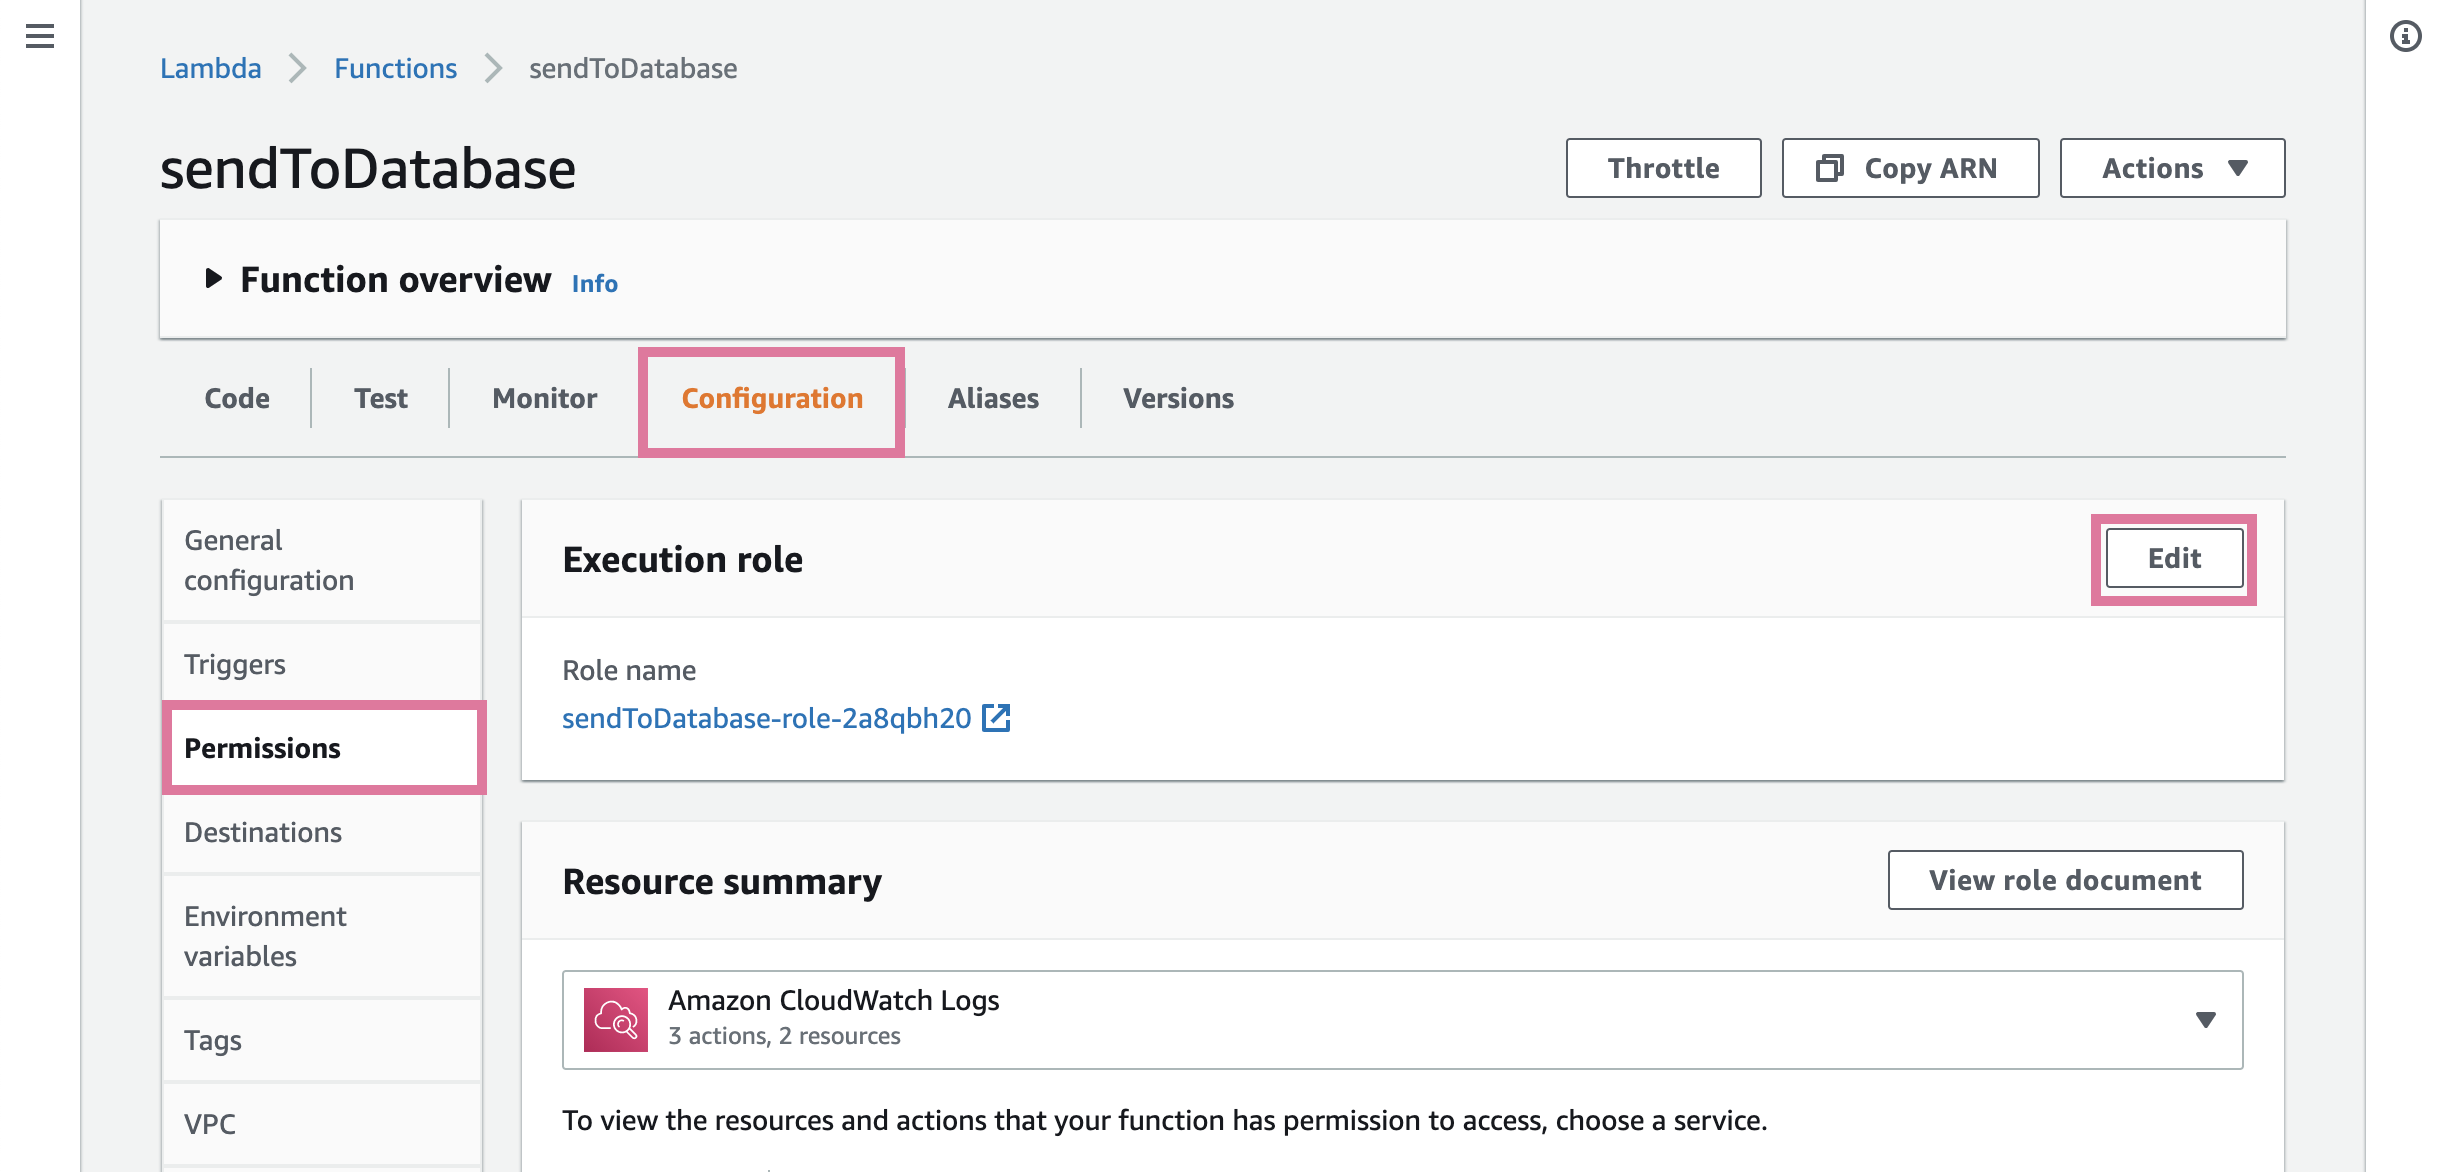
Go back to the Lambda Function you created and select Permissions. Next to Execution role click Edit.
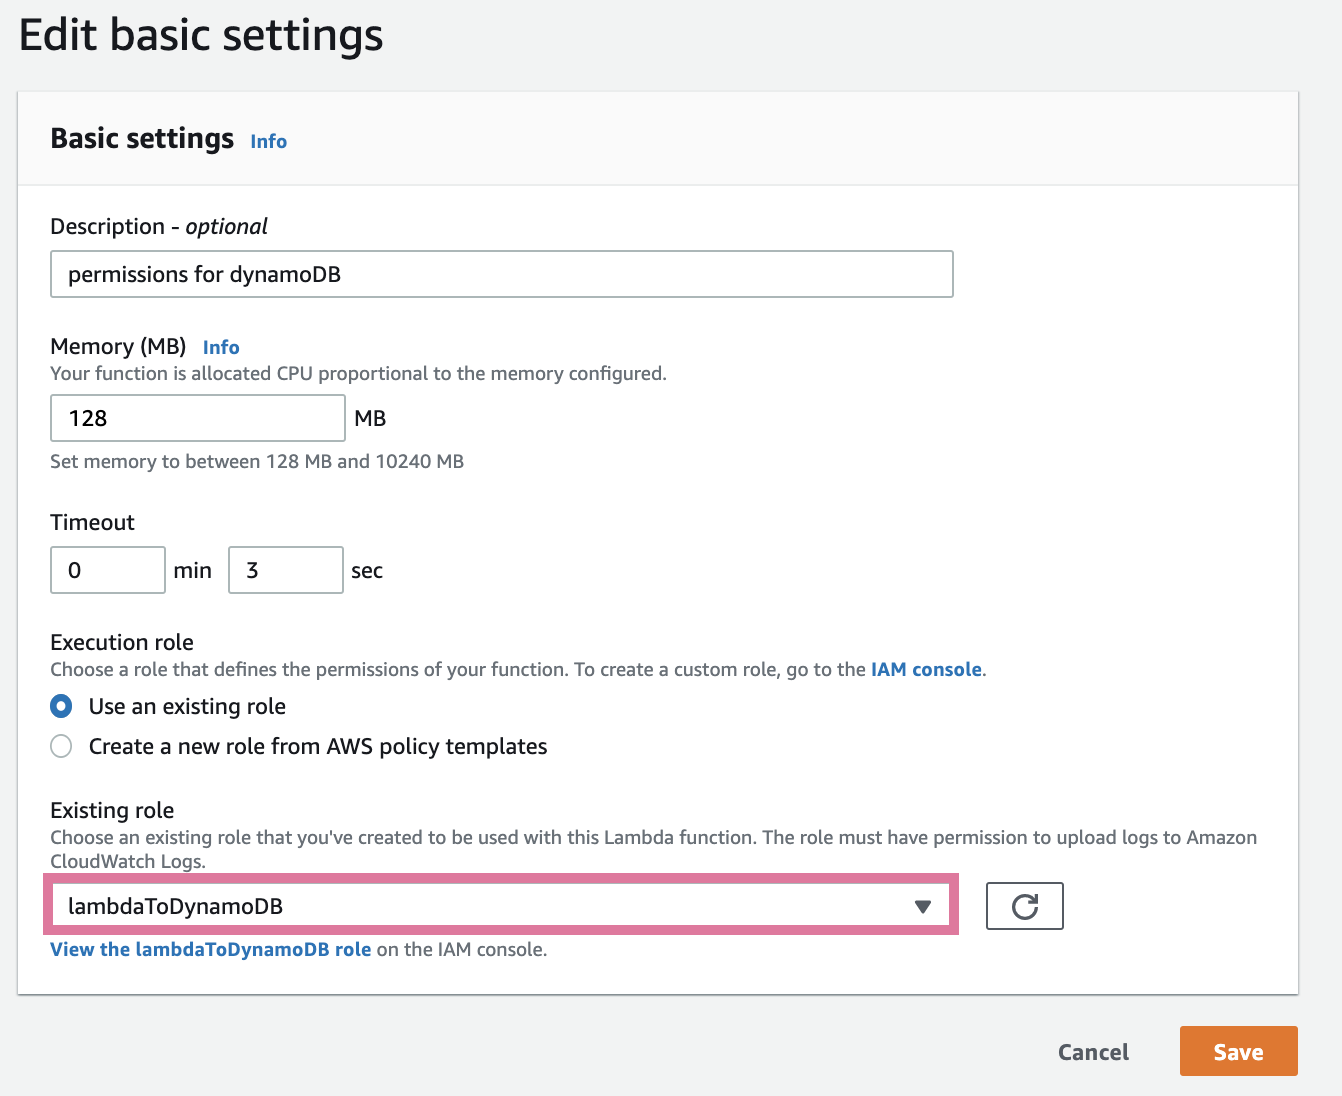
In the settings panel, select the policy you just created, and click Save.
Step 5: Write your Lambda Code
Note
Allowing cross-origin requests is necessary for this solution to work, but you should familiarize yourself with the risks before doing so.
We can now go back to our Lambda and update its code to actually manage these incoming operations. We will configure:
Create new record
Update existing record
Delete existing record
We've provided some sample code in this GitHub repository. Feel free to copy and configure it to your needs. You can download the repository as a ZIP and then upload the ZIP directly into Lambda.
Create will use the /{table_name} endpoint and take a JSON body payload.
Update and Delete will use the /{table_name}/{id} endpoint to perform an action on a specific record.
Our example code also assumes you have the following environment variables configured which you can set in the “Environment Variables” section underneath the Lambda code editor.
CORS_ORIGIN = example.com
- The domains that you will allow cross-origin requests from
- If you know the subset of domains, you can put them here to decrease exposure

IS_CORS = true
- Can set to false if you do not want to allow cross-origin requests

PRIMARY_KEY = record_id
- This should be the DynamoDB key name that you set when creating or DynamoDB instance.
Step 6: Add a scripting extension to your Airtable base
Airtable’s scripting extension allows you to write JavaScript or TypeScript code and deploy it from your base. This enables you to further optimize your workflows by including custom logic in your base. The scripting extension supports the ability to make web-requests to other services via a fetch request. Allowing us to make API calls out to our new AWS API Gateway and Lambda application, which will create and delete data within our DynamoDB database.
Airtable also supports a button field, which can be configured to take a number of different actions after the user clicks on it. One of those actions is the ability to pass a record’s details to a scripting extension and then execute the script with those details.
For our example use case, we want users to consciously make the decision to push updates into DynamoDB via a button in the Airtable base. In our example, Airtable users plan, draft and collaborate on content in a base. Once it’s ready to publish into our DyanmoDB instance, the user can push a button to send that record into DynamoDB. If the user needs to pull the information from DynamoDB because it’s no longer relevant, users can trigger a deletion by pushing another button in the base.
To configure this workflow you’ll first need to create your scripts and then create the button fields which can be used to trigger those scripts.
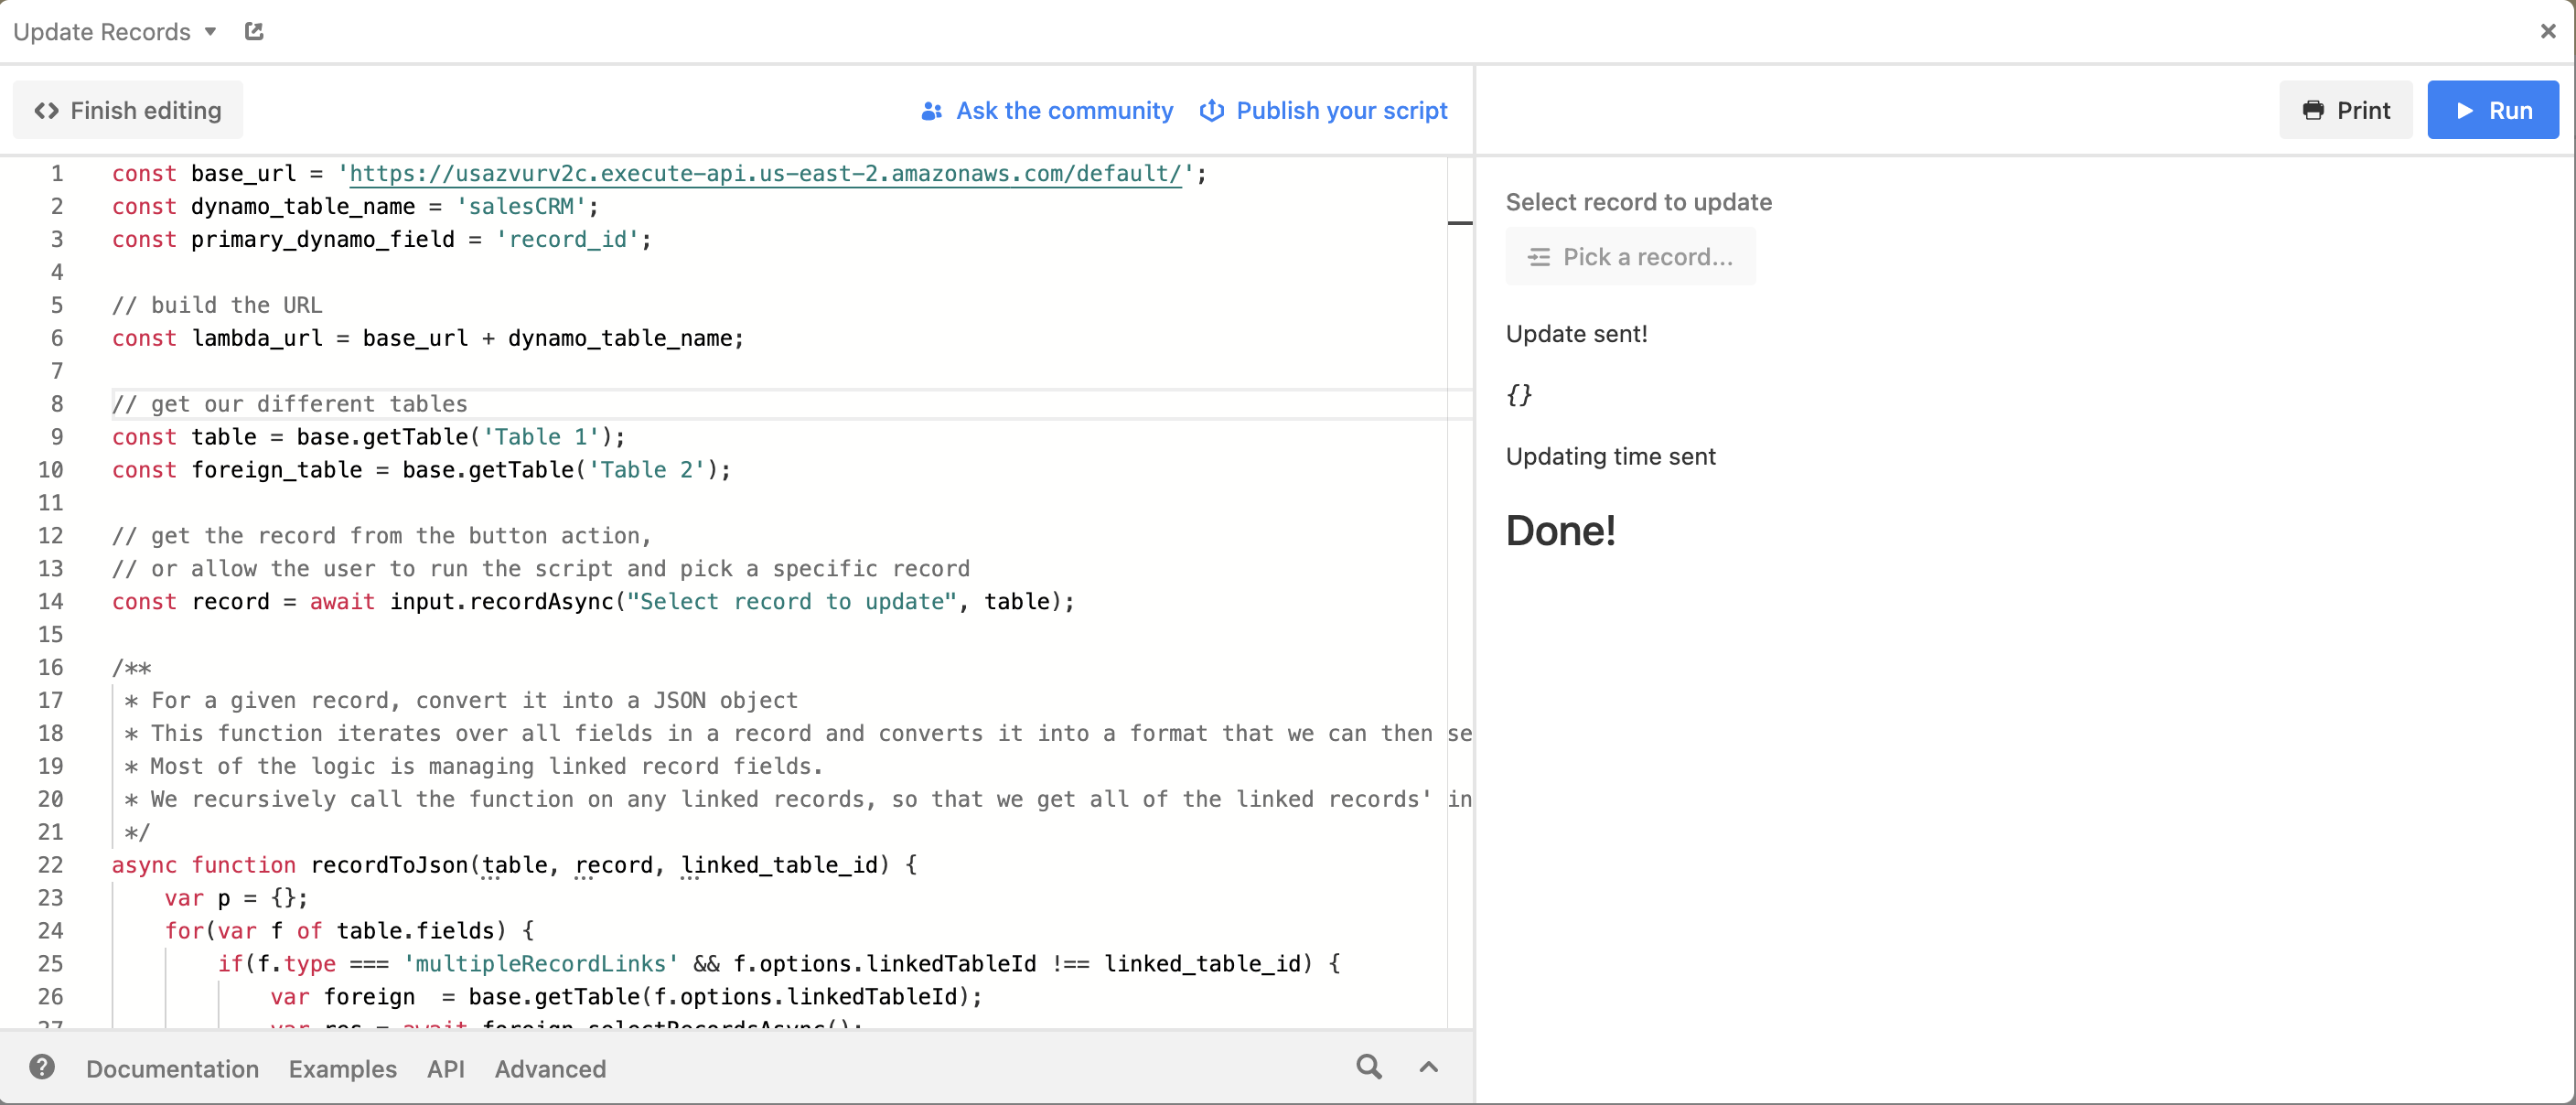
Create a new scripting extension in your base to Update or Create in DynamoDB. You can copy the following code and paste it in the code editor of the scripting extension you are creating:
const base_url =  '{{YOUR AWS API GATEWAY URL}}' ;
const dynamo_table_name =  '{{YOUR DYNAMODB TABLE NAME}}' ;
const primary_dynamo_field =  '{{YOUR DYNAMODB PRIMARY FIELD/KEY NAME}}' ;

// build the URL

const lambda_url = base_url + dynamo_table_name;

// get our different tables

const table = base.getTable( 'Table 1' );
const foreign_table = base.getTable( 'Table 2' );

// get the record from the button action,
// or allow the user to run the script and pick a specific record

const record =  await input.recordAsync( "Select record to update" , table);

/**

* For a given record, convert it into a JSON object

* This function iterates over all fields in a record and converts it into a format that we can then send to Dynamo

* Most of the logic is managing linked record fields.

* We recursively call the function on any linked records, so that we get all of the linked records' information as well
*/

async function recordToJson(table, record, linked_table_id) {
 var p = {};
 for ( var f  of table.fields) {
 if (f. type ===  'multipleRecordLinks' && f.options.linkedTableId !== linked_table_id) {
 var foreign   = base.getTable(f.options.linkedTableId);
 var res =  await foreign.selectRecordsAsync();
 var foreign_recs = record.getCellValue(f.id);

foreign_recs = foreign_recs ===  null ? [] : foreign_recs
p[f.name] = [];

 for ( var r  of foreign_recs){

p[f.name].push( await recordToJson(foreign, res.getRecord(r.id), table.id));
}

p[f.name] =  JSON .stringify(p[f.name]);
}
else if (f. type !==  'button' && f. type !==  'multipleRecordLinks' ) {
p[f.name] = record.getCellValueAsString(f);
}
}

 return p;
}

// build the payload to send and then send to our Lambda

var payload =  await recordToJson(table, record);
var p =  await fetch(

lambda_url,

{
method: 'POST' ,
body:  JSON .stringify(payload),
headers: {
 'Content-Type' :  'application/json'
}
}
);

var resp =  await p.json();

output.markdown( 'Update sent!' );
output.inspect(resp);

// then write the last updated time for this record back to the table

output.markdown( 'Updating time sent' );

await table.updateRecordAsync(
record.id,
{
 'Last Pushed to Dynamo' : ( new Date ()).toISOString()
}
);
output.markdown( '## Done!' );
Create another scripting extension in your base to Delete in DynamoDB. You can copy the following code and paste it in the code editor of the scripting extension you are creating:
const base_url =  '{{YOUR AWS API GATEWAY URL}}' ;
const dynamo_table_name =  '{{YOUR DYNAMODB TABLE NAME}}' ;
const primary_dynamo_field =  '{{YOUR DYNAMODB PRIMARY FIELD/KEY NAME}}' ;
const table = base.getTable( 'Table 1' );
const record =  await input.recordAsync( "Select record to update" , table);
const url =    ${base_url} / ${dynamo_table_name} / ${record.getCellValueAsString(primary_dynamo_field)}   ;

var p =  await fetch(
url,

{
method: 'DELETE' ,
headers: {
 'Content-Type' :  'application/json'
}
}
);

var resp =  await p.json();
output.markdown( 'Record deleted!' );
output.inspect(resp);

await table.deleteRecordAsync(record.id);

output.markdown( 'Deleted record from base' );
Lastly, create the button fields to trigger the scripts to run. Create two button fields:
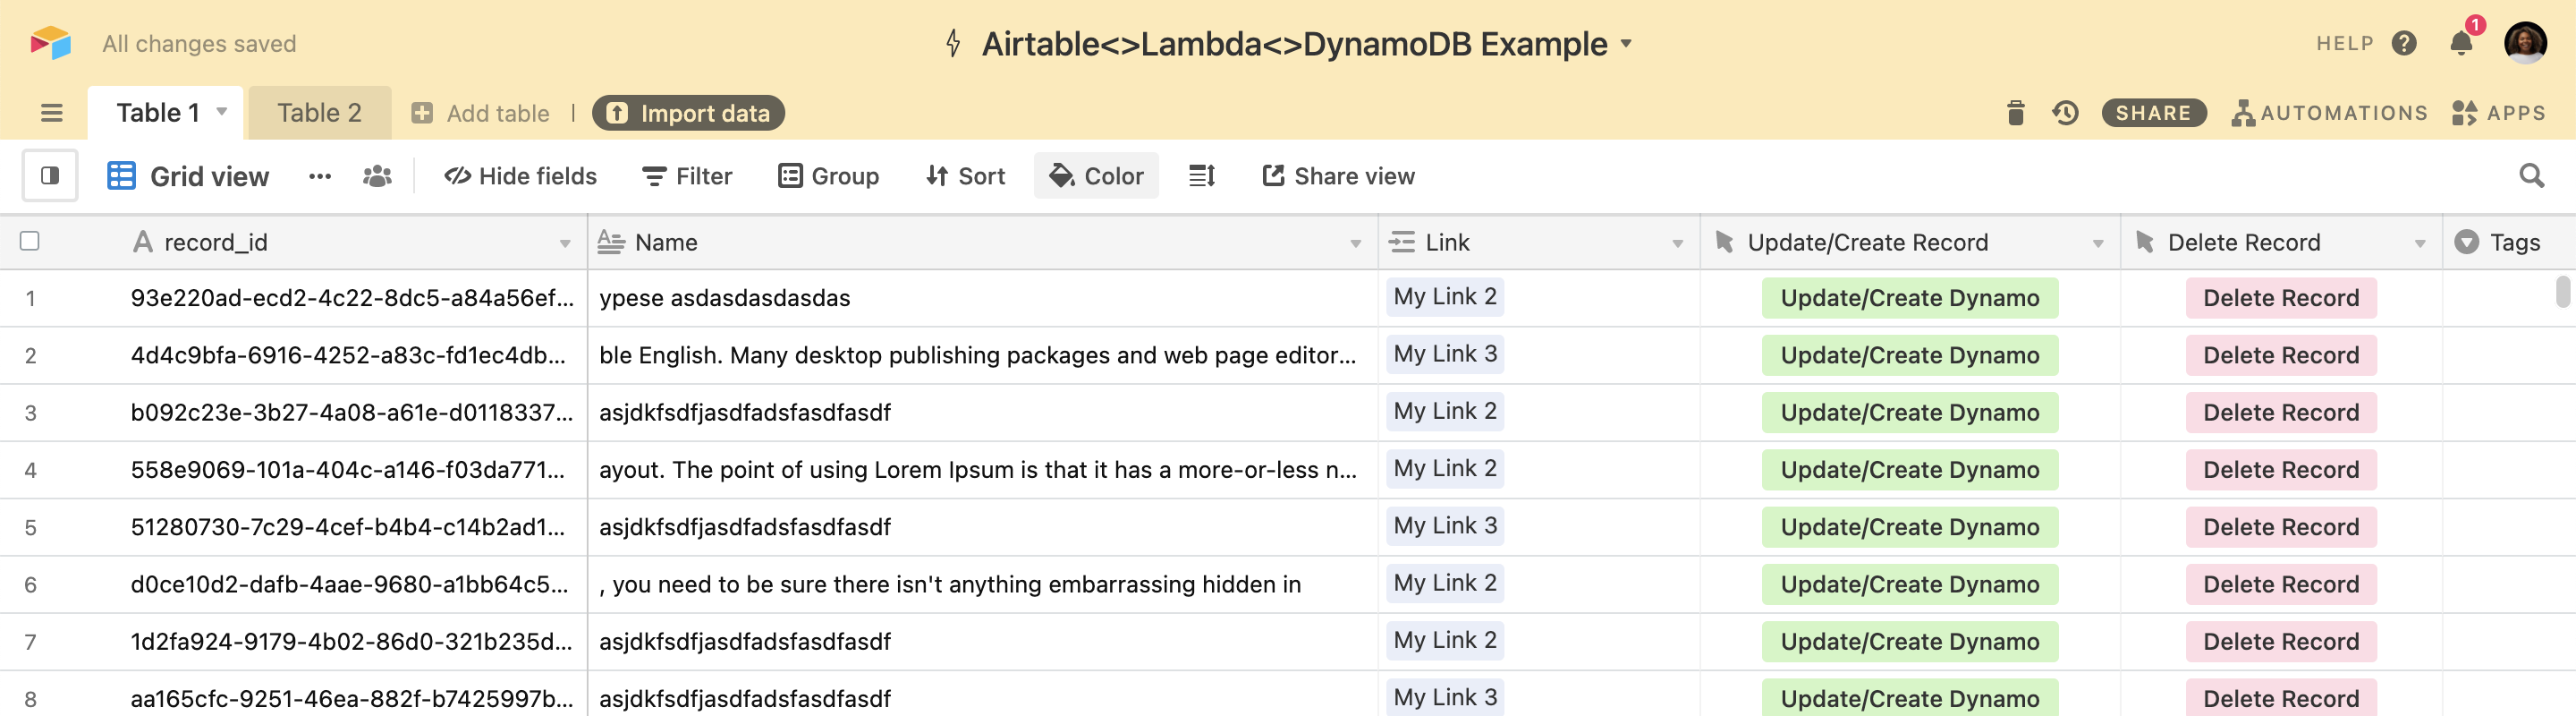
Create/Update Record
Delete Record
When creating each button field:
Action : Run Script
Dashboard : the dashboard you installed the scripting extension in
Extension : the corresponding update/delete script
You should now be able to trigger these scripts by clicking on the buttons and see the corresponding action take place in your AWS DynamoDB instance.