Plan availability | All plan types |
Permissions |
|
Platform(s) | Web/Browser, Mac app, and Windows app |
Autonumber fields
Autonumber fields automatically generate unique and incremented numbers for each record. Autonumbers can be helpful when you need a unique identifier for each record or when using a formula in the primary field.
Note
Autonumber fields are not designed to count the number of records in a table. When a record is deleted, the remaining records are not re-numbered—leaving gaps in the numbering. To re-number an autonumber field, either delete and re-create an autonumber field or convert it to a different field type and then revert it to an autonumber field.
Check out our Airtable Community for more info and suggestions for conditional auto-numbering.
Open your Airtable home screen.
Open the base where you want to create an autonumber field.
Add or edit a field.
Search for and select Autonumber, then click Create field.
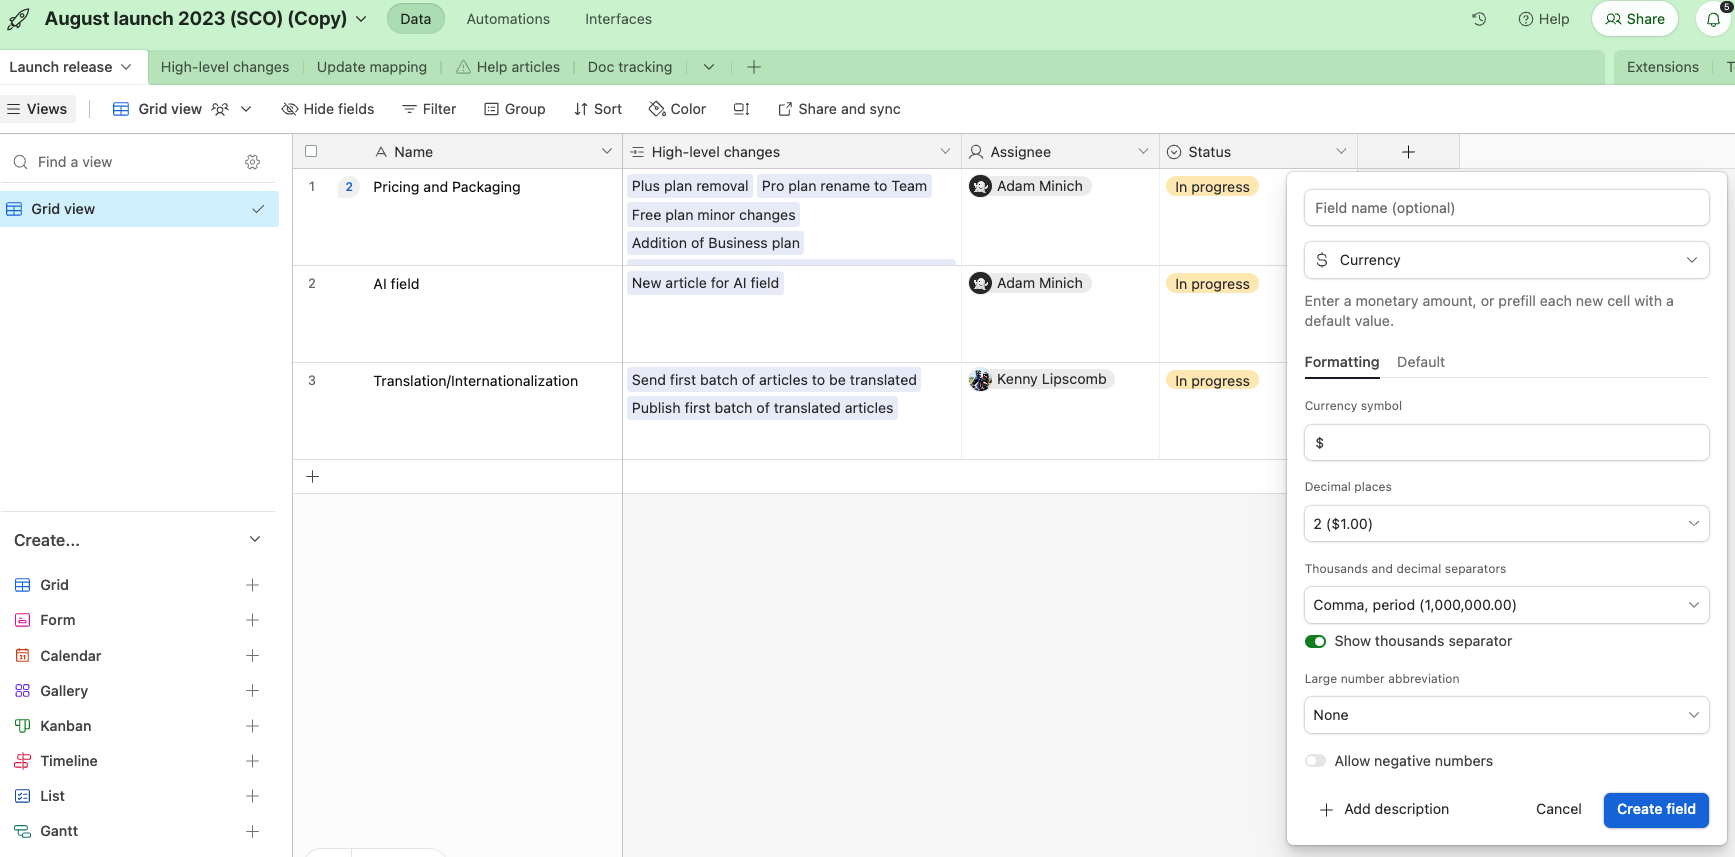
Currency fields
A currency field is a specific type of number field that formats the number as a currency amount. You can specify a currency symbol (the default symbol is $), the number of significant digits, and whether or not to allow negative currency amounts.
Note
Airtable doesn't support using multiple currencies within the same currency field.
Open your Airtable home screen.
Open the base where you want to create a currency field.
Add or edit a field.
Search for and select Currency, then create Create field.
You can optionally update the default settings by clicking Formatting.
Lastly, you can set a default field value for every new record created within the table by clicking Default and entering your preferred number.
Percent fields
The percentage field type hosts numerical values formatted as percentages. The values in a percent field are shown as fractions of 100 with the percent symbol. For example, .75 in a percent field is represented as 75%.
For a more general-purpose numeric field type, try a number field to represent integers or decimals.
Note
Percent fields created before May 2019 were stored using a format are now converted to number fields. Read more about this change in the number legacy section of the Number field type article.
Open your Airtable home screen.
Open the base where you want to create a percent field.
Add or edit a field.
Search for and select Percent, then click Create field.
Number fields
The number field type is a field type designed to hold numbers. The number field type is a general-purpose field type for most numerical values, like the number of chairs of a particular type your furniture business has in stock, or the distance from one city to another.
Open your Airtable home screen.
Open the base where you want to create number field.
Add or edit a field.
Search for and select Number, then click Create field.
You can optionally update the default settings by clicking Formatting.
Legacy default values in fields
Note
Single line text, number, currency, and percent fields in bases created before January 31, 2024, offer the option to toggle on/off "Apply default value for all actions."
To toggle on the "Apply default value for all actions" setting:
Open your Airtable home screen.
Open the base with the field where you want to enable the “Apply default value for all actions" setting.
Click the dropdown arrow next to the field you want to edit.
Click Edit field.
Toggle on the “Apply default value for all actions" setting.
.png)
Any fields displaying "Apply default value for all actions" rely on a legacy default value used inconsistently. You can toggle "Upgrade to consistent default value behavior" on to address the previous inconsistencies.
The following scenarios did not use the default value for legacy fields but will after enabling "Upgrade to consistent default value behavior:"
Using the Airtable automation action: Create record without specifying a field value.
Using public APIs to create a record without specifying a field value.
Submitting a form without a legacy field.
Importing a CSV without specifying field mapping for the related field.
Rating fields
The rating field allows you to rate your records for ranking or quality assessment.
Note
Users on paid Airtable plans can update the style of the field's rating symbol from the default yellow star.
Open your Airtable home screen.
Open the base where you want to add a rating field.
Add or edit a field.
Search for and select Rating, then click Create field.
Formatting number-based fields
To access formatting options in number-based fields:
Click the ⌄ icon next to the name of the number-based field you want to format.
Then, click Edit field.
Next, click on the Formatting tab.
From the formatting tab, you have a variety of options to choose from: Format, Presets, Decimal places, Thousands and decimal separators, the option to toggle whether to Show thousands separators, and Large number abbreviation.
After configuring the format of the field, you'll see the option to "Preview" the output at the bottom of the field configuration window.
FAQs
What is the max date that can be stored in a date field?
The max date for a date field is 12/31/9999.
Can I store numbers that are larger than 15 digits?
Numbers with 15+ digits are not recommended for storing in Airtable records because they are automatically rounded up.
We recommend using a text field in these cases, as it is not possible to use the ROUNDDOWN or other formula functions to return the initially entered number.
Does the Auto Number field help serial numbers stay continuous as I add rows to my base?
Auto Number assigns a unique, ever-increasing number to each new record in the order records are created. However, it guarantees uniqueness, not contiguity: if you delete a record, the numbers are not re-flowed, so you'll see gaps (e.g., 1, 2, 4, 5). It also won't renumber based on sorting or filtering. If you need a truly gap-free, always-continuous sequence (1, 2, 3… with no holes after deletions), Auto Number alone won't do it — you'd use a formula or an automation that recalculates position, with the trade-off that such "position" numbers can shift when records are added or removed. Decide based on what matters more: a permanent unique ID per record (Auto Number) or a contiguous running count (formula/automation).
To re-number from 1, either delete and recreate the Auto Number field, or convert it to another field type (like Single line text or Number) and then convert it back to Auto Number. Note that re-numbering re-assigns values in the order records were created (and, when a new Auto Number field is created, by the view's current sort order at that moment, with hidden records numbered last) — so on a table where records were deleted or reordered, the new values may not match the old ones. Make a base snapshot first if other fields, formulas, automations, or integrations depend on the existing numbers.