Note
While these articles are meant to serve as helpful guides for our customers, 1:1 support for integrations with 3rd party tools is limited in support interactions.
If you are experiencing setup issues or need help troubleshooting this integration, we recommend you search threads in the Community first.
If your question doesn't appear to be asked in the Community, then post a new message on the Development & APIs board (Requires signing into the community).
Plan availability | All plan types |
Permissions | Owner or Creator permissions are required to perform the actions outlined in this article |
Platform(s) | Web/Browser, Mac app, and Windows app |
This article outlines a solution to efficiently and automatically bring information from your Airtable base into Microsoft Power BI and Microsoft Power Query in Excel.
What is Power BI & Power Query and how can I use it in Airtable?
Power Query is Microsoft’s data connection tool that enables users to connect, combine, and refine data sources. These connections can come from self-hosted and/or static files like XLSX, CSVs, XML files, as well as cloud-based sources such as Azure SQL Databases and Salesforce.
Using Power Query, you can pull records from Airtable into Excel or Power BI so that teams can create complex dashboards, and enrich Airtable data with other data sources available in Power BI and Microsoft Excel.
What do I need to use Power BI & Power Query in Airtable?
A computer running Windows
Power BI Desktop or Microsoft Excel 2016 (or later)
An Airtable base ID, table ID, and a Personal Access Token with the
data.records:readscope enabledThe below query in Microsoft's M formula language
Connecting Airtable to Power BI & Power Query
Note
Add a space after 'Bearer' in the Power BI script every time, between it and the access token. Otherwise, pagination will not work.
Step 1: Copy Template M Query
Note
The first record in the table or view that is being integrated from Airtable should have a populated value in each field that you would like to visualize in Power BI. If this is not the case, then that field will not appear in PowerBI. Leveraging a specific view with filters and/or sorts can help to ensure that records missing data in certain fields are not the first record called by the API. As an alternative to the table-based query shown below, the query for a specific view can be found here.
We've developed the following template M Query that should help you get started bringing data from a table in an Airtable base to a Power BI Query. This query uses Query Parameters to define your Airtable BASE_ID, TABLE_ID, and PERSONAL_ACCESS_TOKEN as variables. After we set the parameters in the next steps, you should not need to modify the query directly.
let Pagination = List.Skip( List.Generate( () => [Page_Key = "init", Counter=0], // Start Value
  each [Page_Key] <> null, // Condition under which the next execution will happen
  each [
    Page_Key = try if [Counter]<1 then ""
    else
      [WebCall][Value][offset] otherwise null, // determine the LastKey for the next execution
    WebCall = try if [Counter]<1
    then
      Json.Document(Web.Contents("https://api.airtable.com",[RelativePath="v0/"&BASE_ID&"/"&TABLE_ID,Headers=[Authorization="Bearer"&PERSONAL_ACCESS_TOKEN]]))
    else
      Json.Document(Web.Contents("https://api.airtable.com",[RelativePath="v0/"&BASE_ID&"/"&TABLE_ID&"?offset="&[WebCall][Value][offset], Headers=[Authorization="Bearer"&PERSONAL_ACCESS_TOKEN]])),// retrieve results per call
    Counter = [Counter]+1// internal counter
  ],
  each [WebCall]
),1),
   #"Converted to Table" = Table.FromList(
     Pagination, Splitter.SplitByNothing(), null, null, ExtraValues.Error),
   #"Expanded Column1" = Table.ExpandRecordColumn(
     #"Converted to Table", "Column1", {"Value"}, {"Column1.Value"}),
   #"Expanded Column1.Value" = Table.ExpandRecordColumn(
     #"Expanded Column1", "Column1.Value", {"records"}, {"Column1.Value.records"}),
   #"Expanded Column1.Value.records" = Table.ExpandListColumn(
     #"Expanded Column1.Value", "Column1.Value.records"),
   #"Expanded Column1.Value.records1" = Table.ExpandRecordColumn(
     #"Expanded Column1.Value.records", "Column1.Value.records",
     {"id", "fields", "createdTime"},
     {"Column1.Value.records.id", "Column1.Value.records.fields", "Column1.Value.records.createdTime"}),
   #"Renamed Columns" = Table.RenameColumns(
     #"Expanded Column1.Value.records1",{{"Column1.Value.records.id", "_airtableRecordId"},
     {"Column1.Value.records.createdTime", "_airtableRecordCreatedAt"},
     {"Column1.Value.records.fields", "_airtableRecordFields"}}),
   #"Reordered Columns" = Table.ReorderColumns(
     #"Renamed Columns",
     {"_airtableRecordId", "_airtableRecordCreatedAt", "_airtableRecordFields"}),
   #"Expanded Record Fields" = Table.ExpandRecordColumn(
     #"Reordered Columns", "_airtableRecordFields",
     Record.FieldNames(#"Reordered Columns"{0}[_airtableRecordFields]),
     Record.FieldNames(#"Reordered Columns"{0}[_airtableRecordFields]))
in
    #"Expanded Record Fields"
Note
If the above script seems to be causing an error, then please refer to this GitHub resource, as the code may have changed.
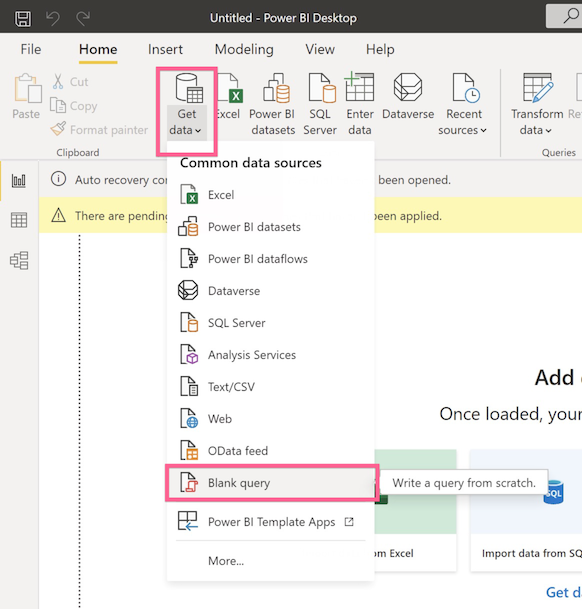
Step 2: Create a Query
Create a new Power BI document and select Get Data from the Home toolbar. In the dropdown menu, select Blank Query to open the Power Query Editor.
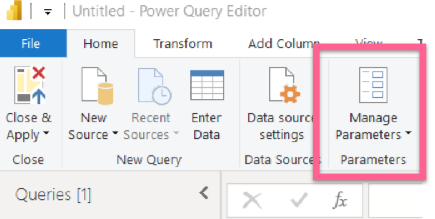
Step 3: Create Parameters
In the toolbar of the Power Query Editor, select Manage Parameters. This will open the window where you can create and edit Power Query Parameters.
This is where you will create and define the parameters referenced in the template M Query. Power BI's Query Parameters allow users to define variables to be used in a query. For each parameter, we're going to set a Name, Type, and Current Value. All of the parameter types will be set as text, and we'll set the Name and Current Value using the PAT/IDs identified below.
PERSONAL_ACCESS_TOKEN | BASE_ID | TABLE_ID |
|---|---|---|
Your personal access token. | The ID of the base you want to query. | The ID of the table you want to query |
You can learn how to create, update, and delete PATs here. | You can find your Base ID by navigating to the API documentation for your base. | You can find your table ID by navigating to a view of your table, and looking in your URL/address bar. |
Your PAT will start with the letters pat | Your Base ID will start with the letters app | Your Table ID will start with the letters tbl |
Step 4: Paste in Query
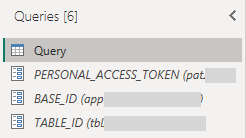
After creating your three parameters and selecting OK from the Manage Parameters window, the sidebar of your Power Query Editor should list the three variables you just set.
Once you have your parameters, select Query 1 from your sidebar, and then select Advanced Editor in the toolbar. Remove any existing query and paste the M Query into the editor. Press Done.

You should now see a list of records from your Airtable base’s table. From here you can transform and shape the data in your table. Once you've finished manipulating your data, select Close & Apply in the top left corner of the Query Editor. Now you can try making changes in Airtable and refreshing the query in Excel, you should see your updates reflected.

Note
PowerBI will only load a field if the first record coming from Airtable has data in that field. So if the field is empty, then it won’t show up in Power BI.
Authenticating Airtable to Power BI & Power Query
You may be asked to provide Authentication for https://api.airtable.com. In this menu, you should select Anonymous for the Authentication mechanism. You can select the Privacy Level that’s best for your use case and then click Sign In. We are already including the Personal Access Token in the actual query using the Authorization header in the request, so there is no extra information to provide here.
The expression error The 'Authorization' header is only supported when connecting anonymously may appear in an M Query. This error can be fixed by updating the authentication to be “Anonymous” globally in “Data Source Settings” → “Global Permissions.” This must be done for all Airtable endpoints being used to resolve the issue. To open “Data Source Settings”:
Power BI Desktop - File tab → Options and settings → Data source settings
Excel - Data tab → Get Data → Data Source Settings. This can also be accessed from the Power Query Editor.
FAQs
How do I connect Airtable to Microsoft Excel Power Query?
The process here is very similar to the process in Power BI. To get started, open a new workbook, and then click on Data, Get Data, From Other Source, and Blank Query. The rest of the steps are the same as above.
How do I automate refreshes of my Power BI report?
To keep your data up to date, Power BI allows you to schedule a refresh of a report once it's been published in your organization’s workspace. Microsoft outlines how to set up a scheduled refresh in their support documentation.
Certain field types in Airtable seem to return unexpected values, is there anything I can modify to change this?
Some field types including single selects, multiple selects, linked records, and collaborator fields will show “List” or “Record” instead of the values you may be used to seeing in the Airtable grid view. This is consistent with how the Airtable Web API returns information. Depending on your use case and needs, you may want to use Power BI’s “Expand to New Rows” or “Extract Values…” functionality that Power BI outlines in their support documentation.
What do I do if I run into the expression error: We cannot convert the value null type to type Record when using a PAT (personal access token)?
We cannot convert the value null type to type Record when using a PAT (personal access token)?First, ensure you have followed step 3 above, Create Parameters. Then, in PowerBI, navigate to Options and Settings -> Data source settings -> Edit Permissions -> then change Credentials Type to "To Anonymous from Windows." This change must be TO ANONYMOUS, FROM WINDOWS. If the error persists, we recommend reaching out to PowerBI support for further assistance.