Plan Availability | All paid plans |
Permissions |
|
Platform(s) | Web/Browser, Mac app, and Windows app |
Note
The CSV import extension row limit is limited to 25,000, and CSV imports are limited to 5MB. Suppose your data set grows beyond the limitations. In that case, we recommend splitting your information into multiple bases and then syncing it into one base as needed. Read more about Airtable sync and multi-source sync for additional information.
With the CSV import extension, you can add new records to an existing table in your base - or merge data with existing records - directly from a CSV file. The CSV import extension has a 25,000-row limit.
Adding a CSV import extension
Open your Airtable home screen.
Create or open the base where you want to install the CSV import extension.
Click Tools in the upper-right corner.
Click the Extensions option.
Click Add an extension.
Search for and locate the CSV import extension.
Click Add, then Add extension.
Uploading a CSV file to the CSV import extension
After adding a CSV import extension to your base, you can drag and drop a CSV file into the extension. After your file gets uploaded, you'll be brought to a screen where you can map exactly how the information from the CSV gets put into your table.
Note
Before importing data into your base, we recommend taking a base snapshot. This will let you restore a version of your base from a point in time.
Configure settings and field mappings
After you've uploaded your CSV file into the extension and selected which table you want to import into, you'll need to configure a few settings.
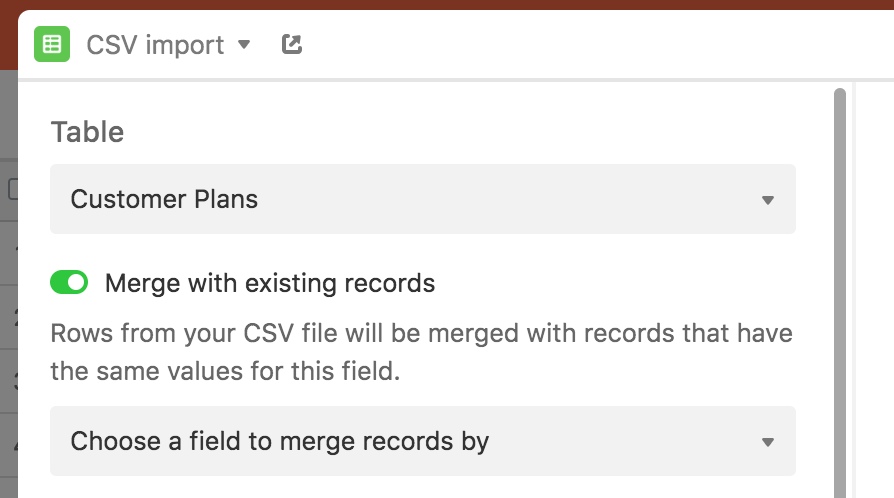
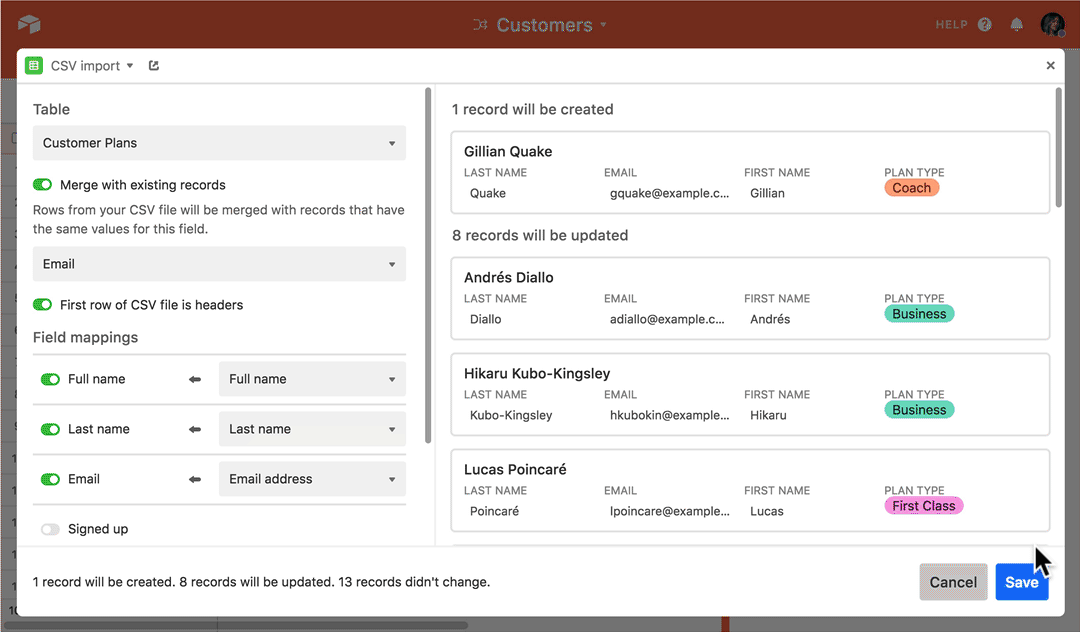
Merge with existing records
If you want to create new records with your CSV data, keep this option toggled off. If you want to merge your CSV data with your existing records, toggle the option on and continue reading below.
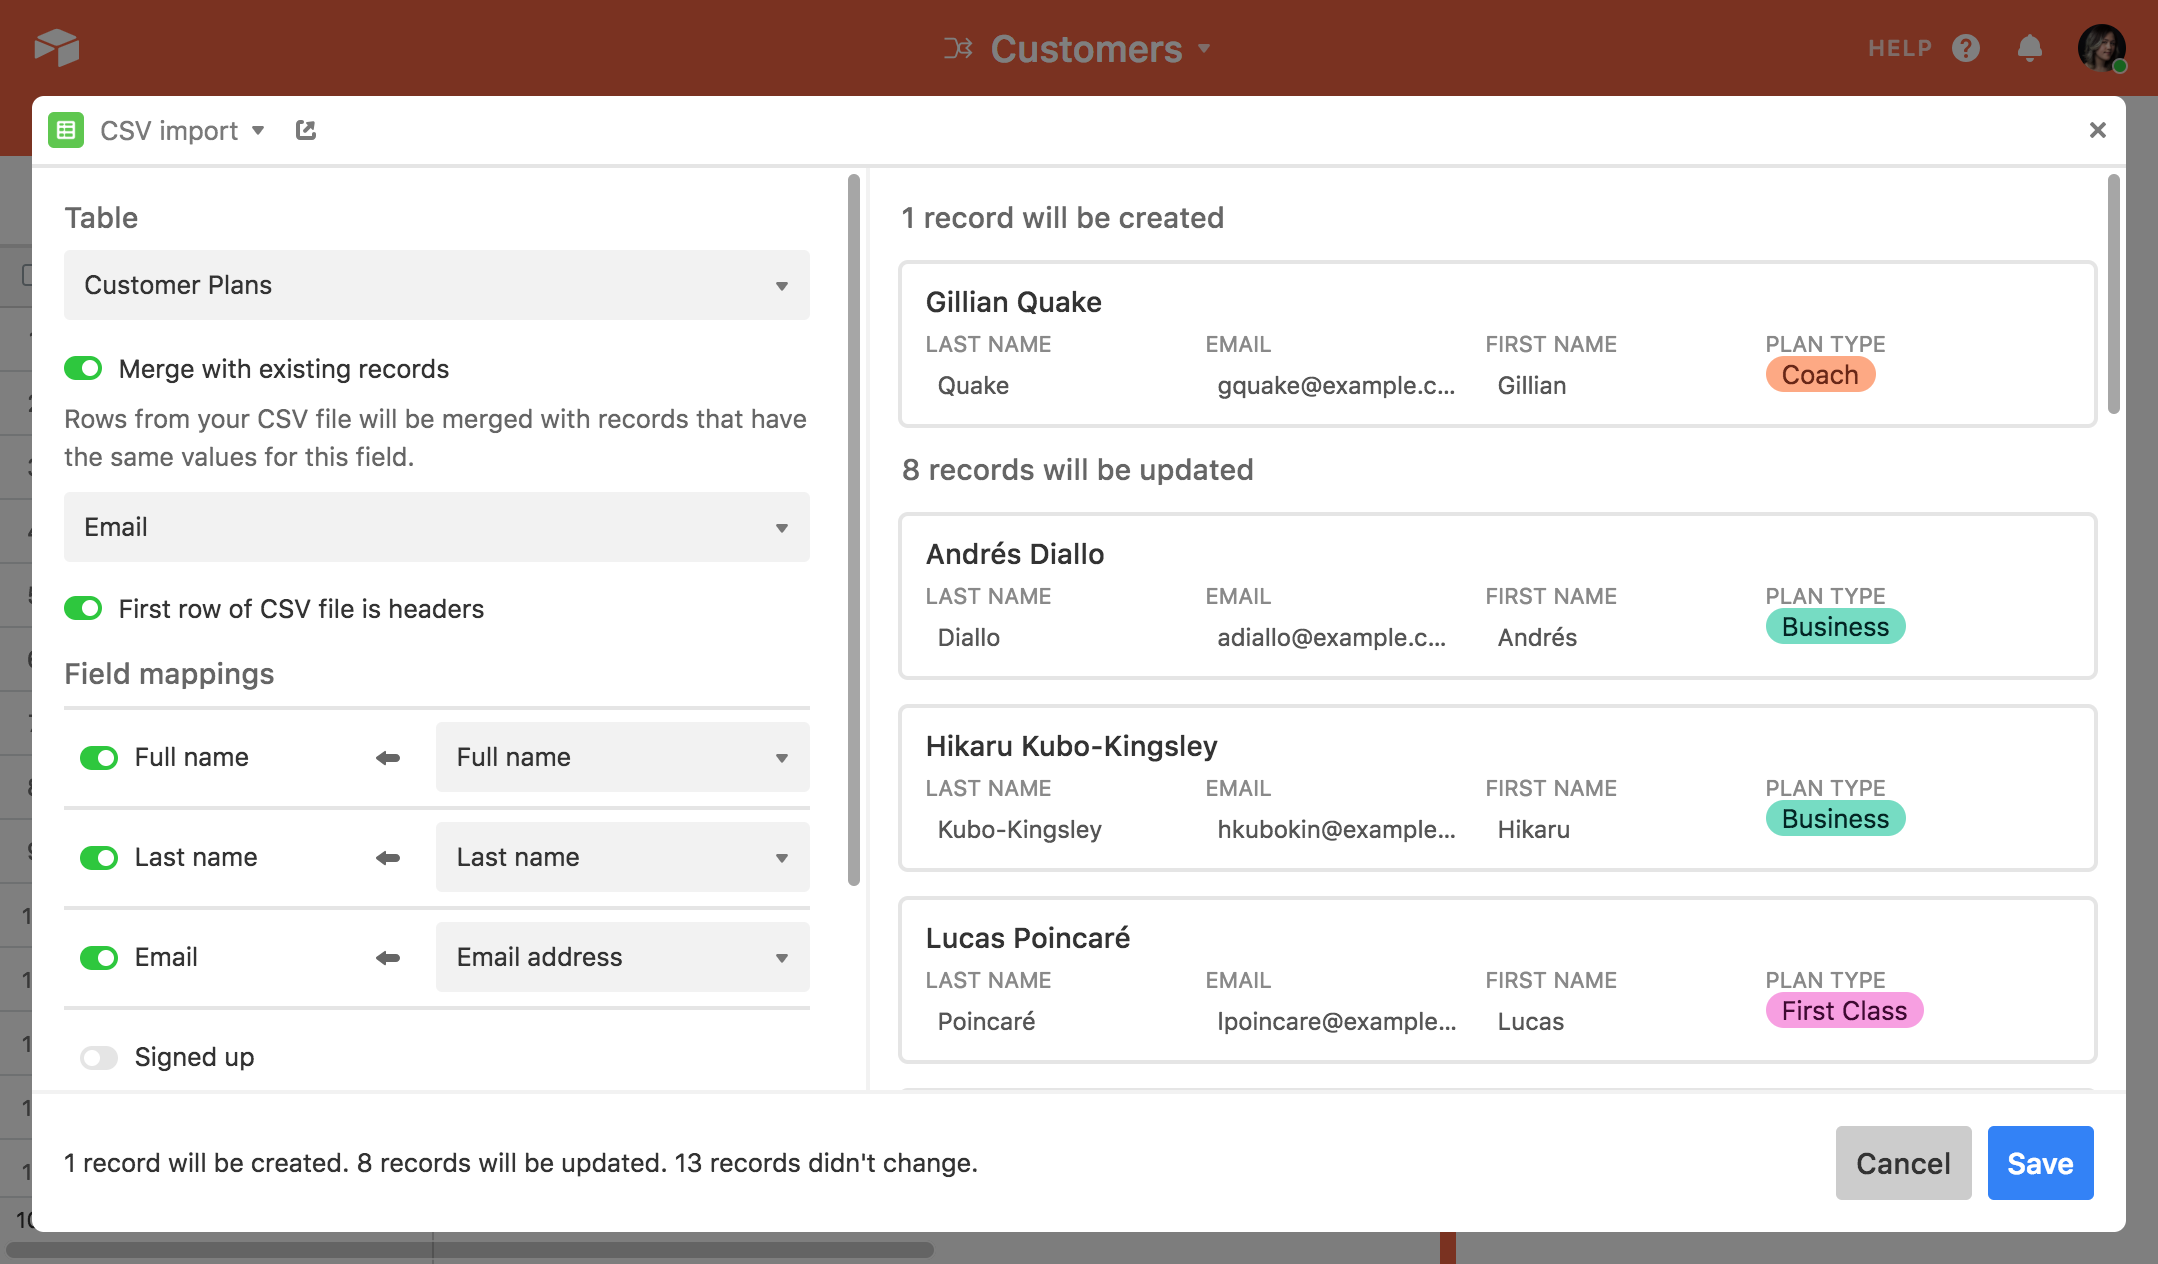
To merge CSV data with existing records you'll need to pick a field on which to merge records (ideally containing a unique value like an ID number or email address, for example). The extension will then compare the records in your table with the rows in your CSV, find matches using the field you selected, and update the values in the table according to the contents of the CSV file.
Matching for the field you select will be case-sensitive; for example, the extension will consider "[email protected]" and "[email protected]" to be two different values. However, leading and trailing whitespace will be ignored when finding matches.
Once you pick a field, the extension will display previews for the records to be updated. If the CSV being imported contains rows which have no matches in the table, the extension will create new records. The bottom of the extension window will show the number of records that will be updated, the number of records that won't change, and the number of new records that will be created (if any).
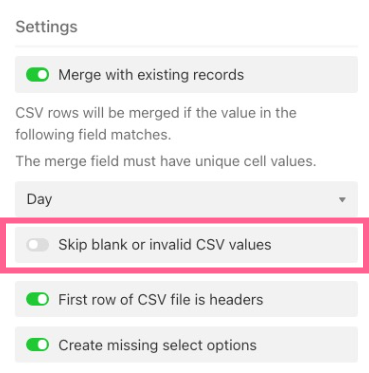
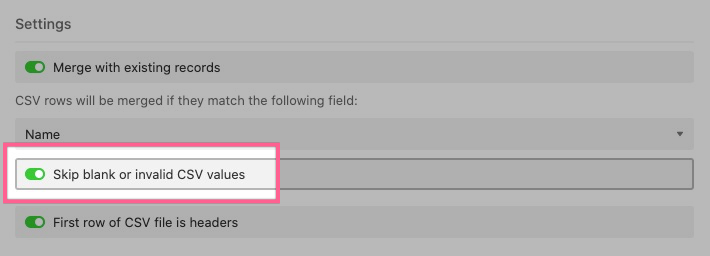
If your CSV contains blank or inconsistent values, you can choose to ignore those fields when importing by toggling the option to "Skip blank or invalid CSV values":
A few other notes on the updating process:
If the CSV file contains multiple rows which contain the same value for the merge field, the extension will only use the first of those rows, and subsequent rows will be ignored.
If the table has multiple records, all of which contain the same value for the merge field, all of those records will be updated if there's a matching row in the CSV file.
If the CSV contains any rows where the value in the merge field is blank, a new record will be created.
Note
If you merged your data incorrectly, you can revert your base to a previous version by restoring a base snapshot. Learn more about this feature in this article.
Skip blank or invalid CSV values
If you toggle on the "Merge with existing records" option (more details on that option below ), another option will appear to "Skip blank or invalid CSV values". This option is helpful if your CSV file might have any blank rows - instead of overwriting existing Airtable records with blank rows, it will skip these rows in the CSV import.
First row of the CSV file is headers
The extension will automatically try to detect if the first row of your CSV is comprised of headers or not, and check the "First row of CSV file is headers" option accordingly. If this option is checked, the columns in the field mappings section of the extension will be named after the CSV's column headers.
If this option is not checked, the columns in the field mappings section of the extension will be given generic names like Column, 1, 2, 3, and so on.
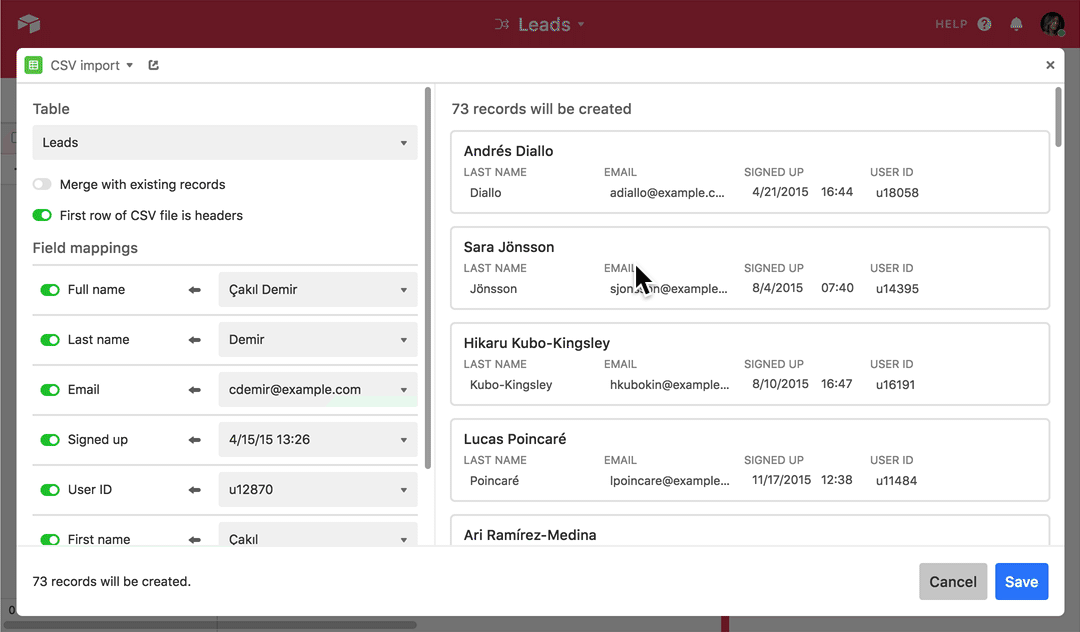
Field mappings
The left side of the Field mappings section (with the toggles) shows the fields in your table, and the right side (with the dropdowns) shows the columns of the CSV. If the columns of your CSV and names of the fields in your table have matching names, the extension will automatically try and match them. Otherwise, you can map the columns of the CSV to whichever fields you prefer.
To map a value, select the field toggle, then choose a CSV column from the dropdown menu. Repeat this process for as many fields as you want.
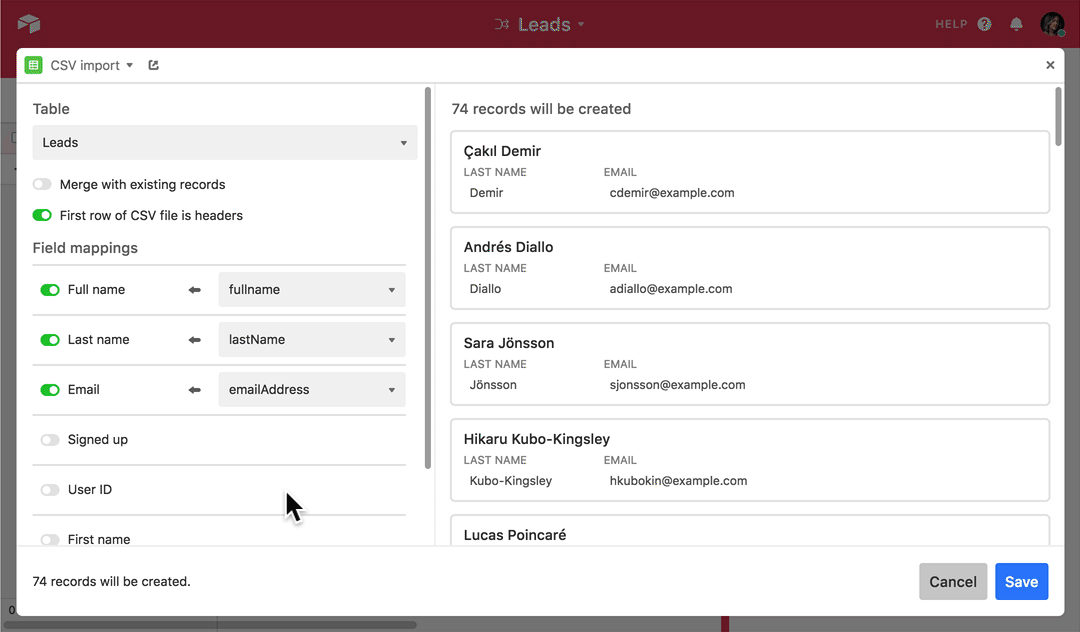
Note that you don't have to import any fields you don't need to, and the order and names of the fields in your CSV don't necessarily have to match the order and names of the fields in your Airtable base.
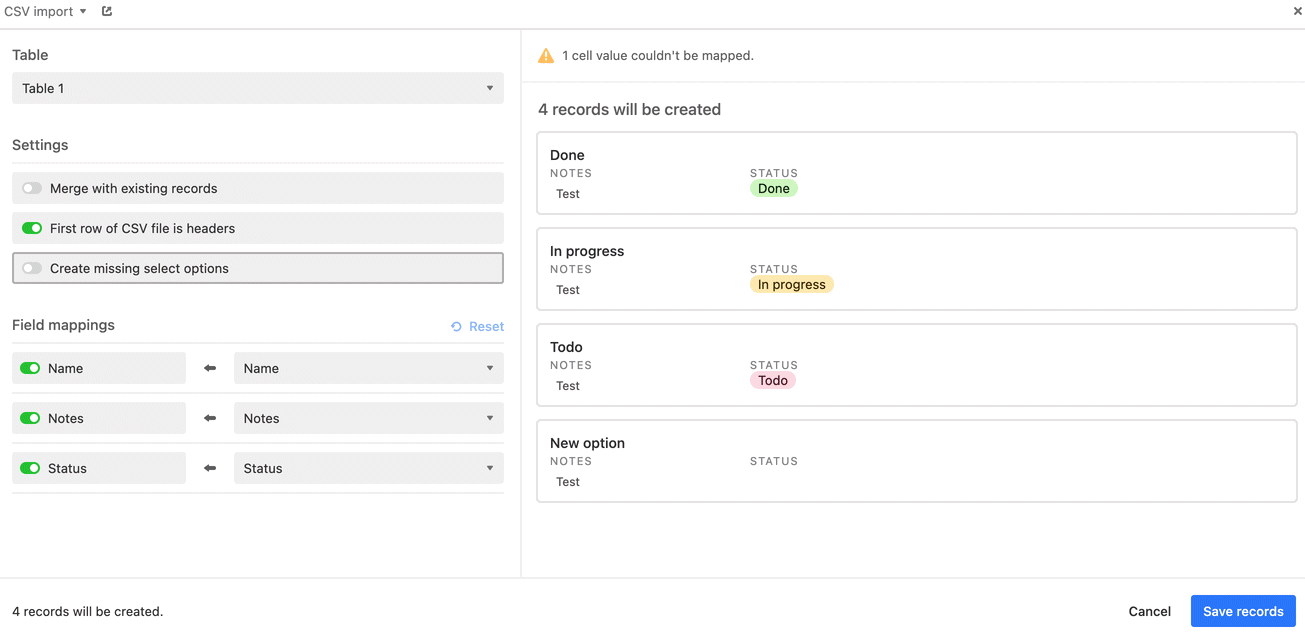
Create missing select options
Note
Turning on Create missing select options requires Owner or Creator permissions on the base. If you have Editor or lower permissions, the toggle reverts to off when you click it and no new options are added to your single or multiple select fields. Ask a base Owner or Creator to grant you Creator permissions, or have a collaborator with Creator permissions run the import.
There is also a setting to create missing select options. Toggling this option on means that if there is a single or multiple select field in your table, then the new option will be created. Leaving this toggle off means that new options will not be created. Pay close attention to field mappings as well as how this setting may be affected by the " Merge with existing records " option mentioned above.
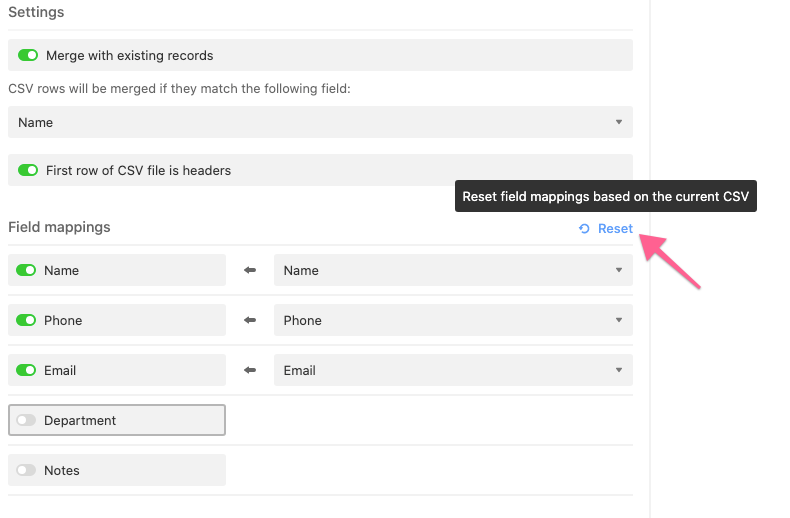
Resetting field mappings
The extension will remember your field mappings the next time you import another CSV, speeding up the process if you plan on importing CSVs again and again as part of your workflow.
However, if you are importing a new CSV file, or if the table where you intend to import has changed, you may want to reset the field mappings using the current CSV and table.
To do so, click the "Reset" button - this performs the field name to CSV header name matching that occurs the first time you use the CSV Import extension , however this time it uses the current CSV and table.
Preview sample records
As you alter the field mappings, you can look at the right side of the extension, which shows samples of the records that will be created according to the specified mappings.
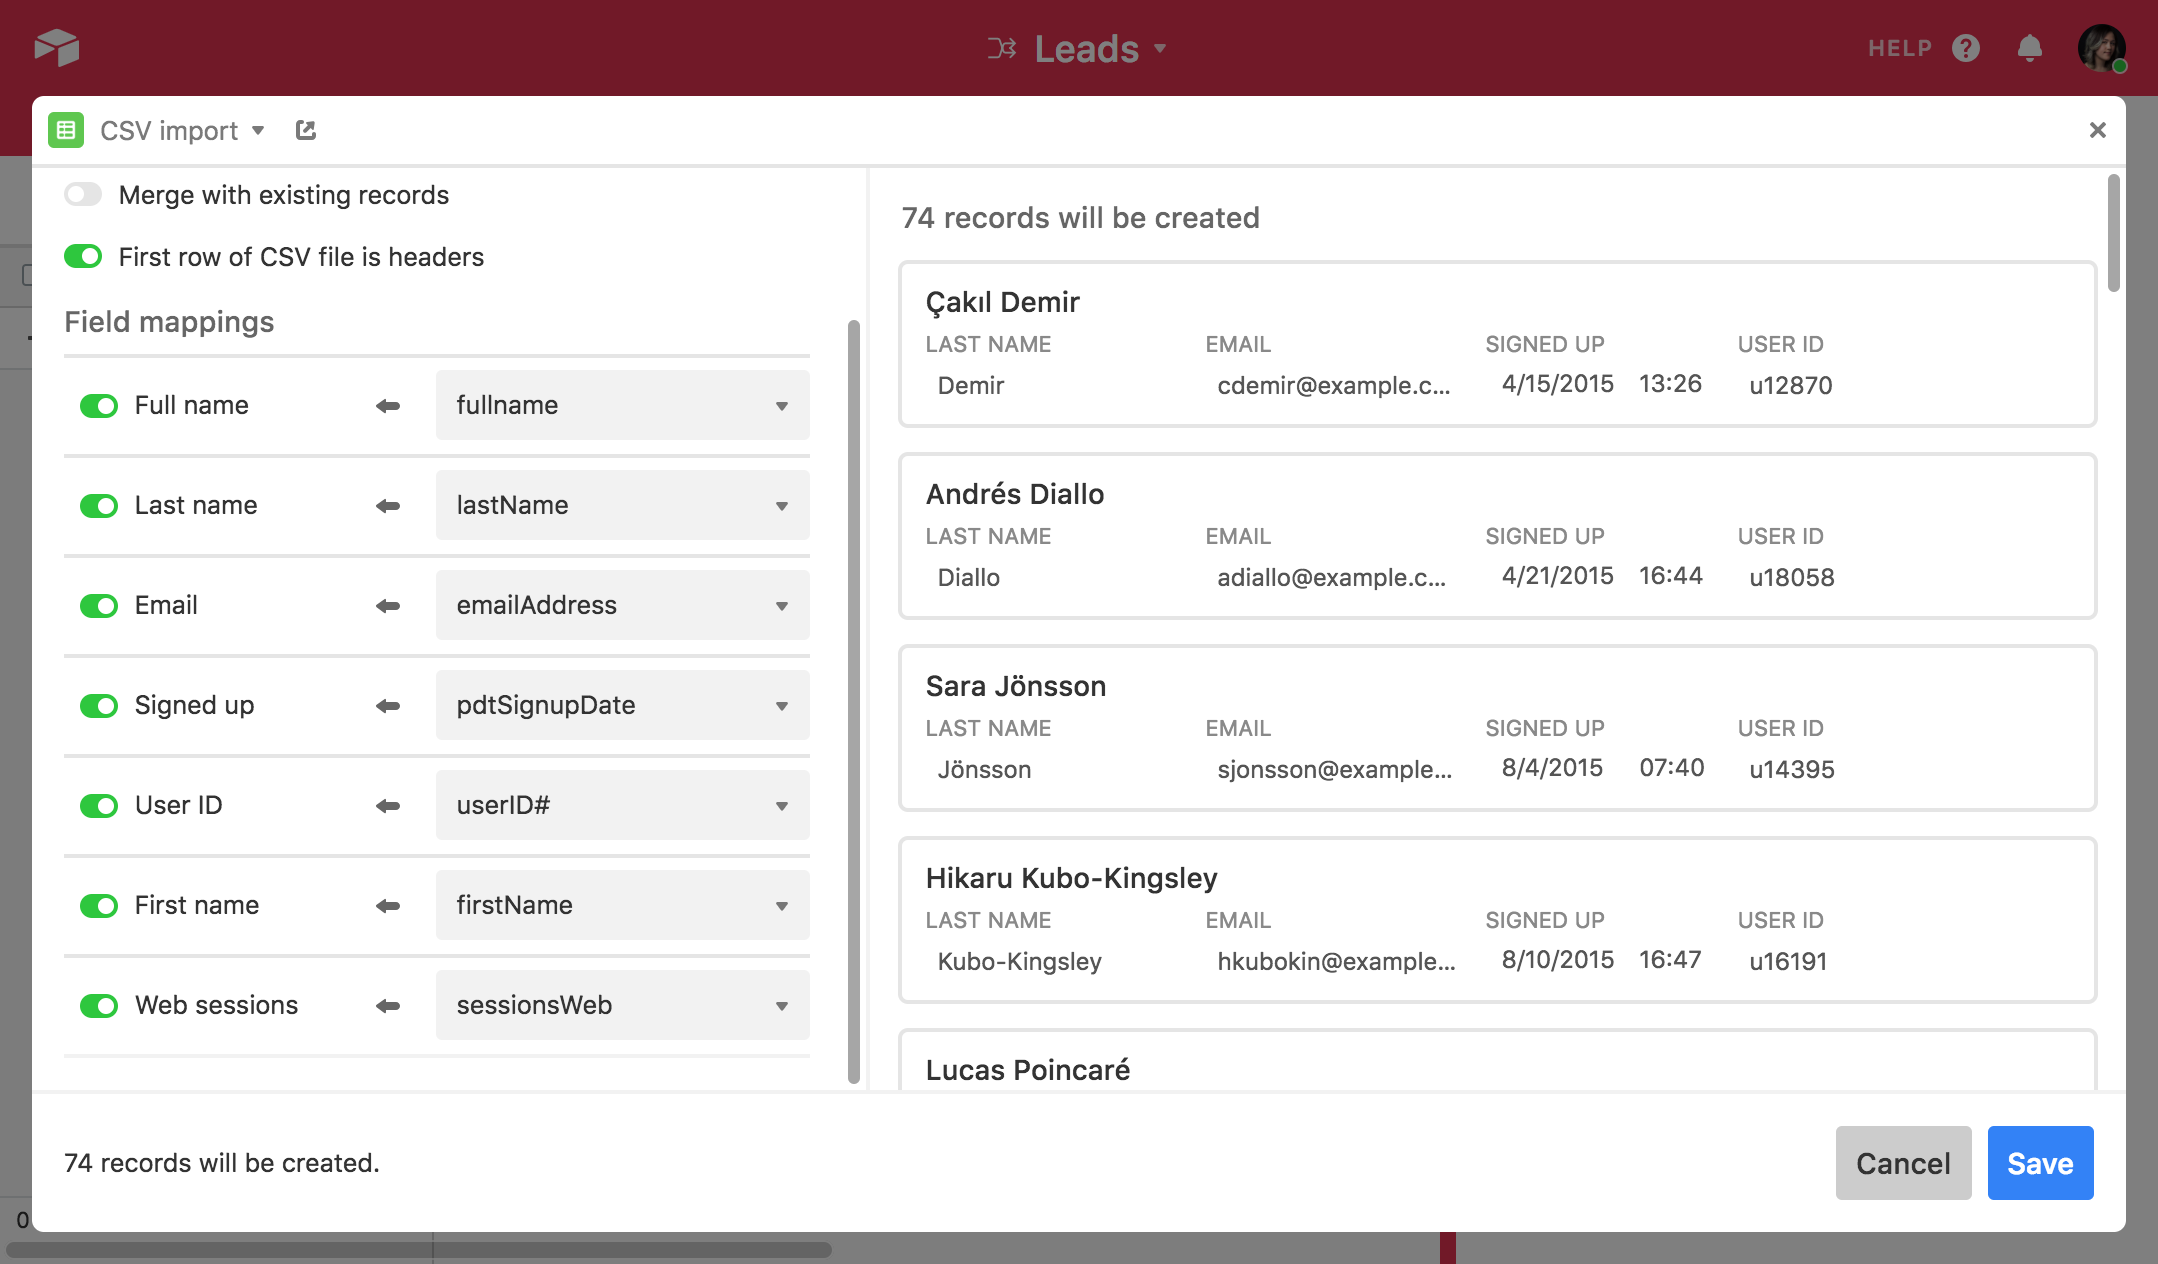
Previewing the records that will be created will likely be your last step before you import your CSV data.
Import CSV data
Once you've configured your settings and field mappings, you're ready to import your CSV data. Click the "Create records" button to start importing data into your table. This may take a few seconds to a few minutes depending on the amount of information you're importing.
Importing inconsistent or "dirty" CSV files
Real-world CSV exports are often inconsistent—missing values, mismatched column headers between exports, or duplicate rows. Before importing a dirty CSV, a few extension settings and habits can help you avoid creating messy or duplicate records:
Standardize your CSV export first, when possible. If the CSV comes from another tool, export it the same way each time so column headers and order stay consistent. This also prevents your field mappings from resetting between imports.
Use "Skip blank or invalid CSV values" to avoid overwriting good data with blanks. When merging with existing records, toggle this setting on so blank or invalid cells in the CSV don't overwrite existing values in your table.
Deduplicate before you import, or merge on a unique field. The extension doesn't deduplicate rows within the CSV itself—if your CSV file contains multiple rows with the same value in your chosen merge field, only the first of those rows is used and the rest are ignored. If you need every duplicate row reconciled (not just the first), clean up duplicates in the CSV before importing, or use the Dedupe extension on your table after the import completes.
Preview before you commit. Use the record preview and the update/no-change/new-record counts shown at the bottom of the extension window to catch mapping or matching problems before clicking Create records.
FAQs
How many rows of data can I import?
The CSV import extension has a 25,000 row limit.
Should I do anything before importing CSV data?
Yes - we recommend taking a base snapshot before importing any data into your base.
Are any field types incompatible with CSV or XLS file importing?
Yes, generally computed field types are unsupported. The following field types are unsupported:
Attachment
Autonumber
Barcode
Button
Count
Created by
Created time
Formula
Last modified by
Last modified time
Long text (unsupported when the “Enable rich text formatting” setting is toggled on)
Rollup
Why aren't all fields from my import appearing in the table?
If fields from the imported file aren't appearing after import, check these common causes:
Fields are hidden in the current view
Click the Hide fields button in the toolbar.
Review the list of hidden fields.
Toggle on any fields that should be visible.
Field types aren't supported - Certain computed field types can't receive imported data. Typically, these are converted to be compatible field types during the import process, but you may want to convert them to be compatible before uploading the csv. (i.e. attachments could be converted to a URL path instead of the original file when possible). The following field types are incompatible for CSV imports:
Attachment
Autonumber
Barcode
Button
Count
Created by
Created time
Formula
Last modified by
Last modified time
Long text (when "Enable rich text formatting" is toggled on)
Rollup
You don't have Creator permissions
Only collaborators with Owner or Creator permissions can add new fields during import or turn on Create missing select options. If you have Editor or lower permissions, unmatched columns are skipped and the Create missing select options toggle reverts to off.
If the user importing the CSV file does not have Creator or Owner permissions and they import a file containing columns that don't match existing fields, then those columns won't be imported.
Why don’t my CSV Import extension field mappings stay when I export data?
The extension does remember mappings, but only under specific conditions — and a few common workflow patterns break them:
The CSV column headers must be identical each time. Mappings are tied to your CSV's column headers. If the file is exported differently between imports (different download options, extra/renamed columns, or a different column order), the extension re-runs its automatic field-to-header matching, which looks like the mapping "reset." Make sure everyone exports the CSV the exact same way so the headers match every time. Using a header row (rather than generic "Column 1/2") also makes matching more reliable.
Mappings are saved per extension instance, locally — not per user or across browsers. The remembered mapping lives with that specific extension instance in your session/browser, and isn't shared between collaborators or across different browsers/devices. If several people import (each in their own browser, e.g., Chrome vs. Brave), they don't share a saved mapping, and one person's import won't carry over to another's.
Reusing one extension for different import jobs overwrites its saved mapping. The CSV Import extension remembers one mapping. If you use the same extension instance for two different imports (e.g., a daily import to one table and a weekly import to a different part of the base), each job overwrites the other's mapping. Add a separate CSV Import extension for each import type (you can rename each and place them on different dashboards); each instance remembers its own settings.
Keep in mind that clicking “Reset” intentionally clears the saved mapping and re-matches against the current CSV/table — so an accidental reset will require re-mapping.
Can a large destination table cause my CSV import to fail, even if my CSV file is small?
Yes. The CSV import extension loads your entire destination table before importing new data, not just the rows in your CSV file. If your destination table is very large, the import can fail or time out due to the size of the existing table—independent of your CSV file's own size or row count (which is limited to 25,000 rows and 5MB, as noted in the article above).
If you run into failures importing into a large table, try importing into a new, smaller table first, or splitting your data into multiple bases synced together as recommended for datasets that exceed the extension's limits.