- Getting started with Airtable
- Introduction to Airtable basics
- Contacting Airtable Support Updated
- Airtable home screen
- Glossary of Airtable terminology
- Airtable technical requirements
- Feature differences between Airtable on desktop and mobile
- Airtable keyboard shortcuts
- Using Markdown in Airtable
- Adding descriptions in Airtable
- Finding Airtable IDs
- Airtable Automations
- Automations Overview
- Automation feature walkthroughs
- Integrated automation walkthroughs
- Airtable automation walkthroughs
- Linking existing records using automations
- Conditional groups of automation actions
- Repeating groups of Airtable automation actions
- Creating recurring records using automations
- How to delay Airtable automation runs
- Prevent automations from triggering by mistake
- Use automations to timestamp status updates
- Automation Triggers
- Airtable Triggers
- Airtable automation trigger: When record matches conditions
- Airtable automation trigger: When a form is submitted
- Airtable automation trigger: When record created
- Airtable automation trigger: When record updated
- Airtable automation trigger: When record enters view
- Airtable automation trigger: At scheduled time
- Airtable automation trigger: When webhook received
- Airtable automation trigger: When a button is clicked
- Airtable automation trigger: When email received Updated
- Integrated Triggers
- Airtable Triggers
- Automation Actions
- Airtable Actions
- Airtable automation action: Send email Updated
- Airtable automation action: Create record
- Airtable automation action: Update record
- Airtable automation action: Find records
- Airtable automation action: Sort list
- Airtable automation action: Run a script Updated
- Airtable automation action: Generate with AI
- Integrated Actions
- Airtable automation actions: Slack
- Airtable automation actions: Google Workspace
- Airtable automation action: Send MS Teams message
- Airtable automation actions: Outlook
- Airtable automation actions: Jira Cloud
- Airtable automation actions: Jira Server / Data Center
- Airtable automation actions: Salesforce
- Airtable automation action: Create post in Facebook Pages
- Airtable automation actions: GitHub Issues
- Airtable automation action: Hootsuite post
- Airtable automation action: Send Twilio SMS
- Airtable Actions
- Airtable Bases
- Using Airtable Cobuilder
- Airtable bases overview
- Creating and managing Airtable bases
- Structuring bases in Airtable
- Moving bases between workspaces in Airtable
- Creating and managing tables in Airtable
- Creating Airtable base share links
- Importing third-party data into Airtable
- Using insights in Airtable
- Troubleshooting Airtable base performance
- Airtable Betas
- Collaborating in Airtable
- Airtable Enterprise Support
- General Enterprise information
- External badging in Airtable
- Using app library and components in Airtable Updated
- Ask an Expert beta overview
- European data residency at Airtable
- Airtable user groups overview
- Airtable Enterprise API
- Creating and managing data retention policies in Airtable
- eDiscovery APIs in Airtable
- Airtable and data loss prevention
- Accessing Enterprise audit logs in Airtable
- Set up Jira Server / Data Center to connect with Airtable
- Admin panel pages
- Airtable admin panel overview
- Users - Airtable enterprise admin panel
- Airtable admin panel user details
- Groups - Airtable admin panel
- Workspaces - Airtable Enterprise Admin Panel
- Bases - Airtable admin panel
- Interfaces - Airtable admin panel
- Data sets - Airtable admin panel
- Managed apps - Airtable admin panel
- Components - Airtable admin panel
- Reports - Airtable admin panel
- Settings - Airtable admin panel Updated
- Managing Enterprise organizations
- Managing Enterprise admins in admin panel
- Using Organizations
- Organization branding for apps in Airtable
- Enterprise Hub in Airtable
- Enterprise Hub: Org unit assignment with user groups Updated
- Deactivating, removing access, and reactivating users in the admin panel
- Managing user access to workspaces and bases
- Airtable Enterprise Key Management Updated
- Custom terms of use New
- Enterprise SSO
- General Enterprise information
- Airtable Extensions
- Airtable Fields
- Fields Overview
- Attachment
- Date-based fields
- Formula
- Getting Started with Formulas
- Formula Foundations
- The essentials of Airtable formulas
- Formula writing tips for beginners
- Troubleshooting formulas
- Basic calculations
- Conditional statements
- Logical arguments
- Working with dates
- Displaying DATETIME_FORMAT using the date field in Airtable
- Working with date functions in Airtable
- Calculating the difference between dates in Airtable
- Supported DATETIME_DIFF unit specifiers in Airtable
- Supported DATETIME_FORMAT format specifiers in Airtable
- Using the DATETIME_PARSE() formula in Airtable
- Working with timezones
- Record functions
- Text functions
- Numeric functions
- Common Solutions: Beginner
- Common Solutions: Intermediate
- Common Solutions: Advanced
- Long Text Field
- Linked Record Field
- Linking records in Airtable
- Limiting linked record selection to a view in Airtable
- Dynamic filtering in linked record fields
- Linking to one, many, or a subset of Airtable records
- Converting existing fields to Airtable linked records
- Reordering record links in Airtable
- Understanding linked record relationships in Airtable
- Number-Based Fields
- Other Fields
- Rollup, lookup, and count fields
- Select and user fields
- Integrating with Airtable
- API
- Getting started with Airtable's Web API
- Creating personal access tokens
- Airtable Webhooks API Overview
- Service accounts overview
- Airtable Web API - Using filterByFormula or sort parameters
- Airtable API Deprecation Guidelines
- Airtable API: Common troubleshooting
- Managing API call limits in Airtable
- URL length limitations for web API requests
- Integration services
- Third-party integrations via OAuth overview
- Troubleshooting disconnected OAuth integrations in Airtable
- Options for integrating with Airtable
- Third-party integrations - Common troubleshooting
- Low-code integrations - Common troubleshooting
- Integrating Airtable with external calendar applications
- Visualizing records from Airtable in Tableau
- Visualizing Airtable records in Microsoft Power BI & Power Query
- Integrating HubSpot with Airtable
- Using Zapier to integrate Airtable with other services
- Using Zapier's Multi-Step Zaps to find and update records
- Using IFTTT to integrate Airtable with other services
- Integrating with AWS Lambda & DynamoDB
- Developer tools
- API
- Airtable Interface Designer
- Interface Designer overview articles
- Interface layouts
- Interface elements
- Adding and removing elements in interfaces
- Adding layouts to interfaces
- Formatting elements in interfaces
- Interface element: Button
- Interface element: Calendar
- Interface element: Chart
- Interface element: Filter
- Interface element: Gallery
- Interface element: Grid
- Interface element: Kanban
- Interface element: Number
- Interface element: Record picker
- Interface element: Text
- Interface element: Timeline
- Learning and Resources
- Managing Airtable
- Airtable Policy
- Airtable Records
- Airtable Sync
- Airtable Views
- Airtable Workspaces
- Print
- Share
- DarkLight
- PDF
All paid plans | |
| |
Platform(s) | Web/Browser, Mac app, and Windows app |
Related reading | |
Extension - Extensions are modular components that add visuals or functionality to a base, and were shown in the base's dashboard. Users can create custom extensions, or they can use extensions created by Airtable or other open-source extensions. |
Getting started with the Flowchart extension
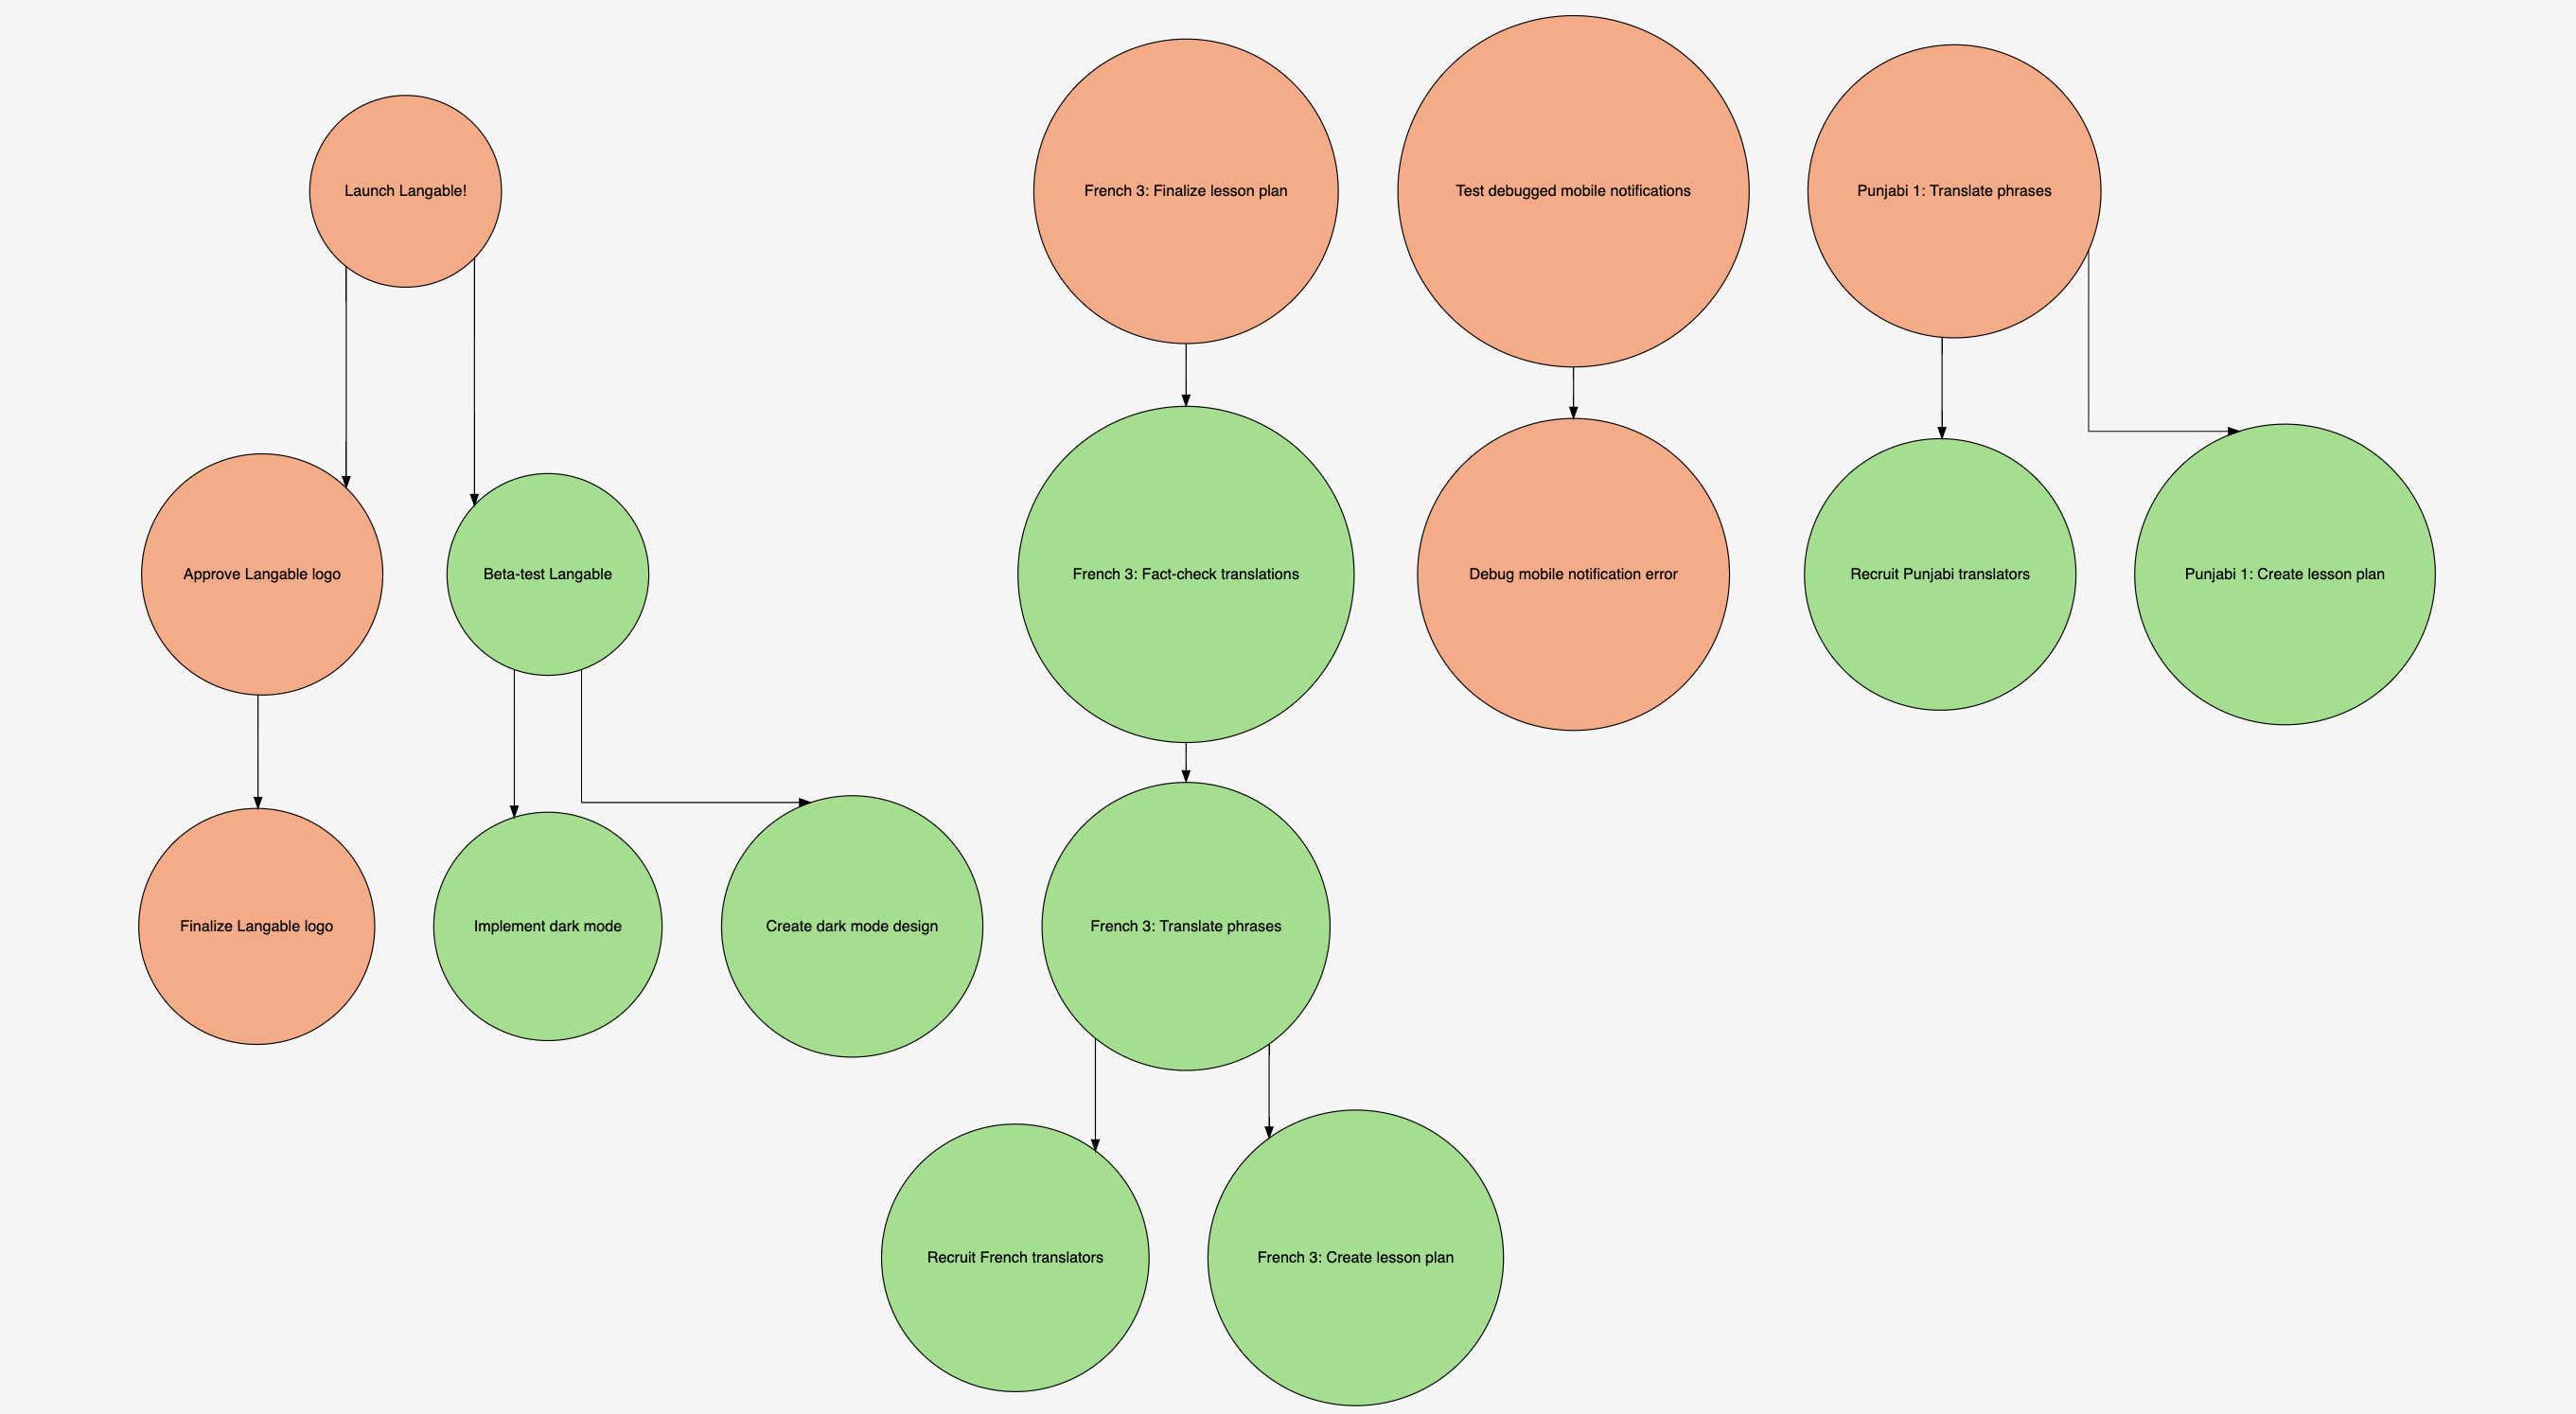
The flowchart extension creates flowcharts from records in a chosen table. By setting up record dependencies—records that link to other records in the same table—the extension will automatically build a flowchart based on your choices. You can even save your flowcharts as PNG and SVG files for printing, sharing, or further editing.
The flowchart extension requires a base with the following:
A table with a linked record field that links to records in that same table. If you're not yet familiar with this process, you can learn how to set up record dependencies in this support article.
Only collaborators with editor access and above can configure the flowchart settings. Collaborators with commenter or read-only permissions can still view and export the chart.
Optional: color-coded records (if you want the flowchart to mirror the colors of your records).
The flowchart extension has three primary settings you'll need to adjust to get started:
Table: Choose the table you want to work with to build the flowchart. Make sure the table you choose has the linked record field that links to other records in this same table.
View: Choose any view in the table you selected in the previous setting. You can choose all records or a filtered view you've created that only displays a selection of records.
Linked-record field: Choose the linked record field in this table that links to other records in the same table. The flowchart extension will automatically build your flowchart from the contents of this field.
The flowchart extension also has a few optional settings that can adjust the appearance of your flowchart:
Chart orientation: This setting allows you to set the orientation of your chart. When you have a wide chart, the horizontal setting works best. Conversely, you'll want to use the vertical setting for taller charts to maximize their size in the extension's display area. Naturally, most flow charts will look best in full screen with the optimal orientation selected. You can always adjust this setting on the fly if your needs change.
Link style: Choose "Right angles" if you want flow chart lines that only flow in orthogonal directions and turn at perfect right angles. Alternatively, choose "Straight lines" if you want the flowchart's lines to flow the shortest distance between records in the chart, resulting in both orthogonal and diagonal paths.
Record shape: You can choose the shape that displays the contents of the primary field of each record with this setting. By default, records appear as rounded rectangles but you can also choose (non-rounded) rectangles, ellipses, circles, and diamonds.
How it works
Watch this demonstration of a simple setup for the flowchart extension to get an idea of how it works and read on for additional information.
Once you've satisfied the settings for the flowchart extension, you can begin adding records and links in your chosen table.
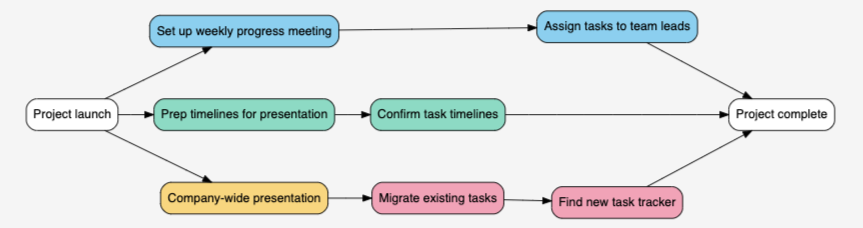
As demonstrated in the example above, the flowchart extension forms its flowchart automatically when one record links to another in the same table. If a record called "A" links to two other records called "B" and "C" (respectively), you'll see the flowchart draw an arrow from the "A" record to the "B" and "C" records.
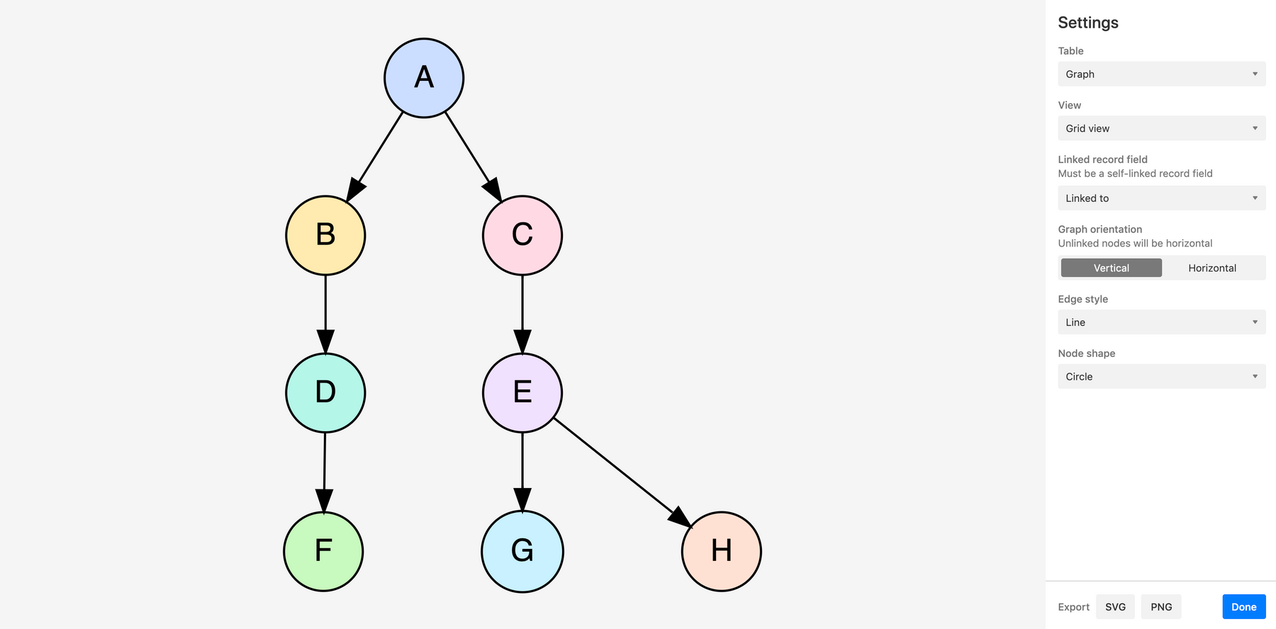
Whenever you choose a record and link other records to it, the flowchart extension draws an arrow from the original to the linked record (or records).
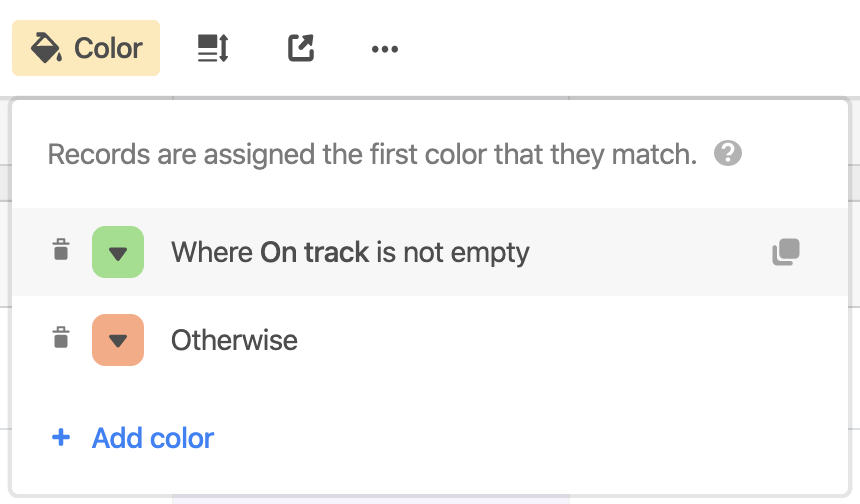
By default, the flowchart displays all records in white but you can change this by color-coding your records.
Once you make your selections, the flowchart extension immediately updates to reflect that selection.
You can export your flowcharts as PNG and SVG files whenever you wish by clicking the corresponding export button at the bottom of the extension.
PNG files are great for digitally sharing your flowchart or embedding it in presentations. SVG files work best when you want to make additional edits to the flowchart in another application like Adobe Illustrator and/or print your flowchart at any resolution without a loss of image quality.
FAQs
Is there a limitation to the number of records that the flowchart extension can display?
Yes. For display compatibility, only 100 records can be displayed per flowchart extension.
Can I use multiple shapes in my flowchart?
You can choose from multiple shapes in the settings of your flowchart but you cannot use more than one shape at a time.
How do I make changes to the flowchart?
You cannot make changes to the corresponding records directly from the flowchart extension. Changes and additions must take place in the table you chose when setting it up.
How can I adjust the layout of the flowchart?
You can change your flowchart's orientation, link style, and record shape by adjusting the optional settings described in this support article. The flowchart extension automatically calculates all other aspects of the layout.
How do I change the size of the flowchart?
The flowchart extension always fills up the maximum amount of space possible based on the orientation of the chart. Charts with several records will often look small when docked in an extensions dashboard so make sure to select the fullscreen option when you want to display them in the largest size possible.
Also, ensure you've set the flowchart's optimal orientation. Wider charts will fill more space in the horizontal orientation while taller charts will fill more space in the vertical orientation. You can find detailed descriptions of these settings earlier in this support article.
If you export your flowchart as an SVG file (described earlier in this support article) you can make adjustments in any application with SVG support (e.g. Adobe Illustrator) which, of course, includes resizing the chart to any resolution you need.